GlobalProtect
Enable Two-Factor Authentication Using One-Time Passwords (OTPs)
Table of Contents
End-of-Life (EoL)
Enable Two-Factor Authentication Using One-Time Passwords (OTPs)
Use this workflow to configure two-factor
authentication using one-time passwords (OTPs) on the portal and
gateways. When a user requests access, the portal or gateway prompts
the user to enter an OTP. The authentication service sends the OTP
as a token to the user’s RSA device.
Setting up a two-factor
authentication scheme is similar to setting up other types of authentication.
The two-factor authentication scheme requires you to configure:
- A server profile (usually for a RADIUS service for two-factor authentication) assigned to an authentication profile.
- A client authentication profile that includes the authentication profile for the service that these components use.
By
default, the app supplies the same credentials used to log in to
the portal and gateway. In the case of OTP authentication, this
behavior causes the authentication to initially fail on the gateway
and, because of the delay this causes in prompting the user for
a login, the user’s OTP may expire. To prevent this, you must configure
the portals and gateways that prompt for the OTP instead of using
the same credentials on a per-app configuration basis.
You
can also reduce the frequency in which users are prompted for OTPs
by configuring an authentication override. This enables the portals
and gateways to generate and accept a secure encrypted cookie to
authenticate the user for a specified amount of time. The portals
and/or gateways do not require a new OTP until the cookie expires,
thus reducing the number of times users must provide an OTP.
- After you have configured the back-end RADIUS
service to generate tokens for the OTPs and ensured users have any
necessary devices (such as a hardware token), set up a RADIUS server
to interact with the firewall.For specific instructions, refer to the documentation for your RADIUS server. In most cases, you need to set up an authentication agent and a client configuration on the RADIUS server to enable communication between the firewall and the RADIUS server. You must also define the shared secret to use for encrypting sessions between the firewall and the RADIUS server.
- On each firewall that hosts the gateways and/or portal,
create a RADIUS server profile. (For a small deployment, one firewall
can host the portal and gateways.)
- Select DeviceServer ProfilesRADIUS.
- Add a new profile.
- Enter a Profile Name for this RADIUS profile.
- In the Servers area, Add a
RADIUS instance, and then enter the following:
- A descriptive Name to identify this RADIUS server.
- The IP address of the RADIUS Server.
- The shared Secret for encrypting sessions between the firewall and the RADIUS server.
- The Port number on which the RADIUS server listens for authentication requests (default 1812).
- Click OK to save the profile.
- Create
an authentication profile.
- Select DeviceAuthentication Profile and Add a new profile.
- Enter a Name for the profile. The name cannot contain spaces.
- Select RADIUS as the authentication service Type.
- Select the Server Profile you created for accessing your RADIUS server.
- Enter the User Domain name. The firewall uses this value for matching authenticating users against Allow List entries and for User-ID group mapping.
- Select a Username Modifier to modify the username/domain format expected by the RADIUS server.
- Click OK to save the authentication profile.
- Assign the authentication profile to the GlobalProtect
portal and/or gateway.You can configure multiple client authentication configurations for the portal and gateways. For each client authentication configuration, you can specify the authentication profile to apply to endpoints of a specific OS.This step describes how to add the authentication profile to the portal or gateway configuration. For additional details on setting up these components, see GlobalProtect Portals and GlobalProtect Gateways.
- Select NetworkGlobalProtectPortals or Gateways.
- Select an existing portal or gateway configuration, or Add a new one. If you are adding a new portal or gateway, specify its name, location, and network parameters.
- On the Authentication tab, select an SSL/TLS service Profile or Add a new profile.
- Add a
new Client Authentication configuration,
and then configure the following settings:
- The Name of the client authentication configuration.
- The endpoint OS to which this configuration applies.
- The Authentication Profile you created in Create an authentication profile.
- (Optional) A custom Username Label.
- (Optional) A custom Password Label.
- (Optional) A custom Authentication Message.
- Click OK to save the configuration.
- (Optional) Configure the portal or gateway to
prompt for a username and password or only a password each time
the user logs in. Saved passwords are not supported with two-factor
authentication using OTPs because the user must enter a dynamic
password each time they log in.This step describes how to configure the password setting in a portal agent configuration. For additional details, see Customize the GlobalProtect App.
- Select NetworkGlobalProtectPortals, and then select an existing portal configuration.
- On the GlobalProtect Portal Configuration dialog, select Agent.
- Select an existing agent configuration or Add a new one.
- On the Authentication tab, set Save User Credentials to Save Username Only or No. This setting enables GlobalProtect to prompt users for dynamic passwords on each component that you select in the following step.
- Click OK twice to save the configuration.
- Select the GlobalProtect components—portal and types
of gateways—that prompt for dynamic passwords, such as OTPs.
- Select NetworkGlobalProtectPortals, and then select an existing portal configuration.
- On the GlobalProtect Portal Configuration dialog, select Agent.
- Select an existing agent configuration or Add a new one.
- On the Authentication tab,
select the Components that Require Dynamic Passwords
(Two-Factor Authentication). When selected, the portal
and/or types of gateways prompt for OTPs.Do not select the Components that Require Dynamic Passwords (Two-Factor Authentication) option for any components that use SAML authentication.
- Click OK twice to save the configuration.
- If single sign-on (SSO) is enabled, disable it. Because
the agent configuration specifies RADIUS as the authentication service,
Kerberos SSO is not supported.This step describes how to disable SSO. For more details, see Define the GlobalProtect Agent Configurations.
- Select NetworkGlobalProtectPortals, and then select an existing portal configuration.
- On the GlobalProtect Portal Configuration dialog, select Agent.
- Select an existing agent configuration or Add a new one.
- On the App tab, set Use Single Sign-on (Windows Only) to No.
- Click OK twice to save the configuration.
- (Optional) To minimize the number of times a
user must provide credentials, configure an authentication override.By default, the portal or gateways authenticate the user with an authentication profile and optional certificate profile. With authentication override, the portal or gateway authenticates the user with an encrypted cookie that it has deployed to the endpoint. While the cookie is valid, the user can log in without entering regular credentials or an OTP. For more information, see Cookie Authentication on the Portal or Gateway.If you must immediately block access to an endpoint whose cookie has not yet expired (for example, if the endpoint is lost or stolen), you can Block Endpoint Access by adding the device to a block list.For more details, see GlobalProtect Portals and GlobalProtect Gateways.
- Select NetworkGlobalProtectPortals or Gateways.
- Select an existing portal or gateway configuration, or Add a new one.
- Depending on whether you are configuring a portal
or gateway, select one of the following:
- GlobalProtect Portal Configuration—On the GlobalProtect Portal Configuration dialog, select Agent<agent-config>Authentication.
- GlobalProtect Gateway Configuration—On the GlobalProtect Gateway Configuration dialog, select AgentClient Settings<client-setting>Authentication Override.
- Configure the following Authentication
Override settings:
- Name of the authentication override.
- Generate cookie for authentication override—Enables the portal or gateway to generate encrypted, endpoint-specific cookies. After users successfully authenticate, the portal or gateway issue the authentication cookie to the endpoint.The authentication cookie includes the following fields:
- user—Username that is used to authenticate the user.
- domain—Domain name of the user.
- os—Application name that is used on the device.
- hostID—Unique ID that is assigned by GlobalProtect to identify the host.
- gen time—Date and time that the authentication cookie was generated.
- ip—IP address of the device that is used to successfully authenticate to GlobalProtect and to obtain the cookie.
- Accept cookie for authentication override—Instructs the portal or gateway to authenticate the user through a valid, encrypted cookie. When the endpoint presents a valid cookie, the portal or gateway verifies that the cookie was encrypted by the portal or gateway, decrypts the cookie, and then authenticates the user.The GlobalProtect app must know the username of the connecting user in order to match and retrieve the associated authentication cookies from the user’s endpoint. After the app retrieves the cookies, it sends them to the portal or gateway for user authentication.(Windows only) If you set the Use Single Sign-On option to Yes (SSO is enabled) in the portal agent configuration (NetworkGlobalProtectPortals<portal-config>Agent<agent-config>.App), the GlobalProtect app uses the Windows username to retrieve the local authentication cookie for the user. If you set the Use Single Sign-On option to No (SSO is disabled), you must enable the GlobalProtect app to Save User Credentials in order for the app to retrieve the authentication cookie for the user. Set the Save User Credentials option to Yes to save both the username and password or Save Username Only to save only the username.(macOS only) Because macOS endpoints do not support single sign-on, you must enable the GlobalProtect app to Save User Credentials in order for the app to retrieve the authentication cookie for the user. Set the Save User Credentials option to Yes to save both the username and password or Save Username Only to save only the username.
- Cookie Lifetime—Specifies the hours, days, or weeks that the cookie is valid. Typical lifetime is 24 hours for gateways—which protect sensitive information—or 15 days for the portal. The range for hours is 1–72; for weeks, 1–52; and for days, 1–365. After the cookie expires on either the portal or gateway (whichever occurs first), the portal or gateway prompts the user to authenticate, and subsequently encrypts a new cookie to send to the endpoint.
- Certificate to Encrypt/Decrypt Cookie—Specifies the RSA certificate to use to encrypt and decrypt the cookie. You must use the same certificate on the portal and gateways.As a best practice, configure the RSA certificate to use the strongest digest algorithm that your network supports.The portal and gateways use the RSA encrypt padding scheme PKCS#1 V1.5 to generate the cookie (using the public key of the certificate) and decrypt the cookie (using the private key of the certificate).
- Click OK twice to save the configuration.
- Commit the configuration.
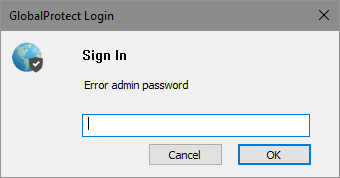
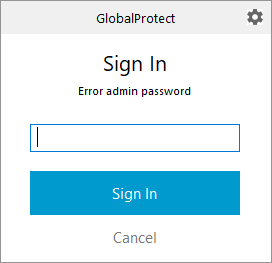
- Verify the configuration.From an endpoint running the GlobalProtect app, try to connect to the gateway or portal on which you enabled OTP authentication. You should see prompts similar to the following:
OTP Pop-Up Prompt ![]()
OTP Prompt on the GlobalProtect Status Panel ![]()


