Download PDF
Set Up the ION 2000 with an Existing Router
Table of Contents
Expand all | Collapse all
Set Up the ION 2000 with an Existing Router
Install the device with an existing router without making any changes to the network
settings. Use the inline insertion method and connect the ION 2000 to the existing router's
port.
The analytic or control mode with an existing
router allows you to insert the ION 2000 without modifying any network
settings at the remote office. The ION 2000 utilizes an inline insertion
method with fail-to-wire redundancy to accomplish this. The inline
insertion method enables the ION device to inspect or process traffic
by only requiring physical changes to the network while maintaining
or enabling additional redundancy.
While the control mode
removes an existing router at a site, it is often simpler and less
intrusive to deploy in the control mode with an existing router.
In this scenario, you can unplug or disable the existing router
after all functions are verified.
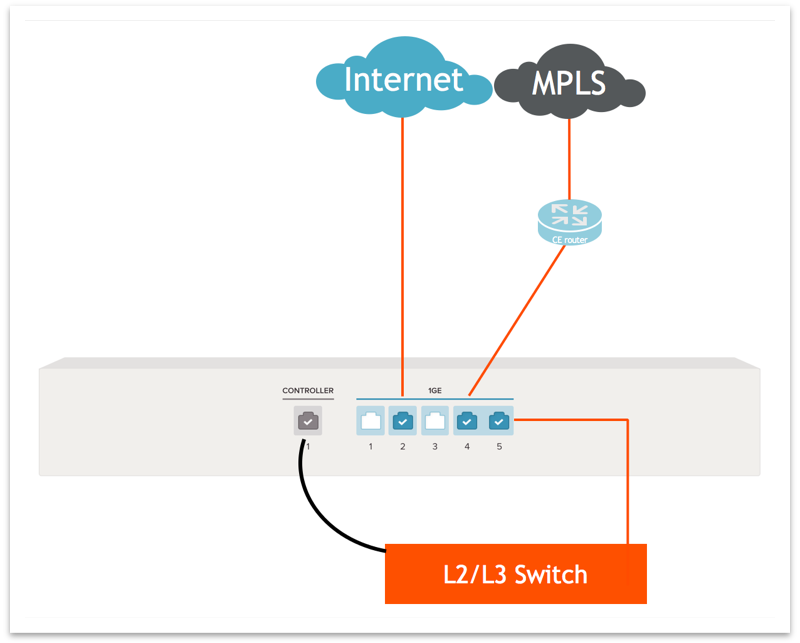
- Prepare the cabling of the ION 2000 to insert it into your network.Ensure that internet access via a private WAN connection or direct internet broadband is available at your site to allow for remote configuration of the ION 2000.Mount the ION 2000 in the desired installation location before powering on or making any network modifications.Connect the power cable to the ION device and then plug the device power cable into an AC power outlet.Power on the ION 2000 device.When the device is powered on, the power indicator turns green.Connect the cables to controller, internet, and LAN or WAN ports.
![]()
- Controller Port: Connect the controller port to an ethernet port. The controller port is used for ION-to-network controller communication and monitoring. By default, it is configured as a DHCP client.
- Internet or WAN or LAN Ports:
- Ports 1 to 3 are used as internet, WAN, or LAN ports. Ports 2 and 3 are DHCP-enabled by default.
- Ports 4 and 5 are used as WAN or LAN ports. They are pre-configured as bypass pairs with inline fail-to-wire capability.
Select any port(s) from ports 1 to 3 to configure as internet ports and plug the internet ports into a broadband internet source.- By default, the ports configured for internet are protected by a firewall. They can exist behind a traditional firewall or NAT device.
- Configure the controller port to an existing DHCP-enabled LAN with access to the internet via a private network to enable configuration of static internet port values, if the internet ports require static IP configuration.
Connect the cables to port 4 and 5 for private WAN connections as shown in step 5, and verify communication between the devices connected to the corresponding WAN or LAN ports.Best PracticeIt is best practice to execute this step during low traffic time or a network maintenance window where a 1-5 second network interruption can be tolerated.At this point, the ION 2000 displays as Connected and Online-restricted on the Prisma SD-WAN console.Next Step: Proceed to claim and configure the ION device through the Prisma SD-WAN console.

