Device Security
Send Vulnerabilities to ServiceNow
Table of Contents
Expand All
|
Collapse All
Device Security Docs
Send Vulnerabilities to ServiceNow
Manually send vulnerabilities from Device Security through Cortex XSOAR to
ServiceNow to make work orders.
| Where Can I Use This? | What Do I Need? |
|---|---|
|
One of the following subscriptions:
One of the following Cortex XSOAR setups:
|
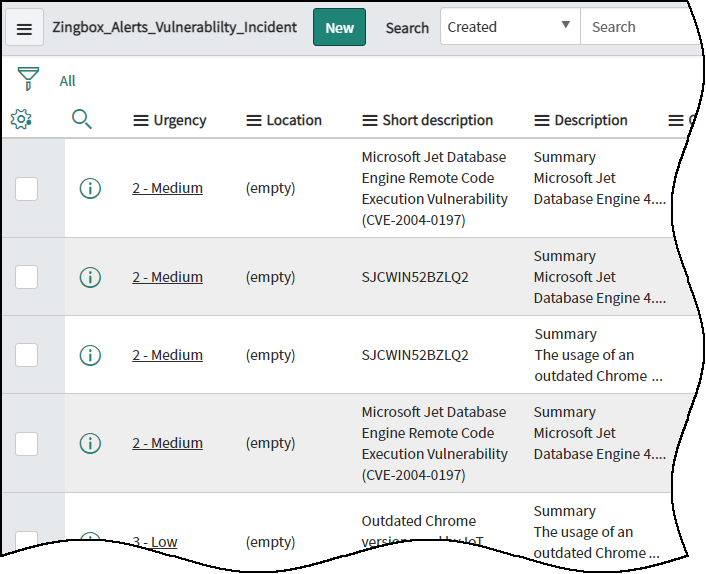
From Device Security, send a device vulnerability to ServiceNow.
Before sending it, Device Security converts
the vulnerability into a security incident, which ServiceNow receives
in its Zingbox alerts vulnerability incident table. From there,
a ServiceNow user can create a work order for a network security
analyst to investigate.
Strata Cloud Manager
Manually send vulnerabilities from Device Security in Strata Cloud Manager
through Cortex XSOAR to ServiceNow to make work orders.
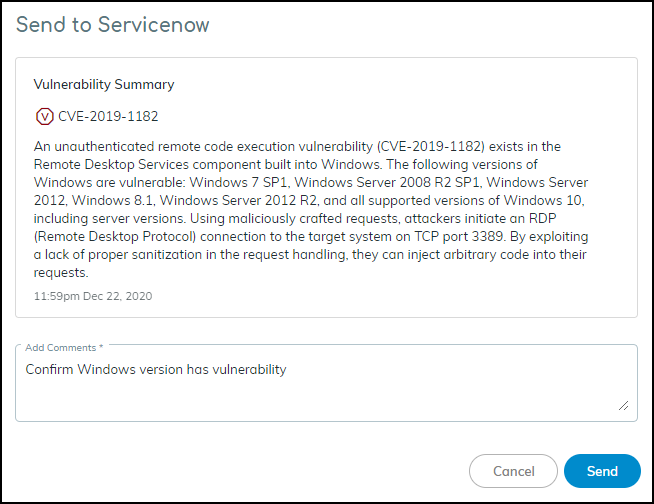
- Click RisksVulnerabilities, click a vulnerability name, and then select the check box of a vulnerable device or potentially vulnerable device that you want to investigate.Click MoreSend toServiceNow.The Send to ServiceNow panel appears.
![]() Add a comment.After you enter a comment, the Send button changes from gray to blue, indicating that you can proceed.Click Send.After you click Send, a link appears. When you click it, a new browser window opens to the XSOAR playbook for this action.
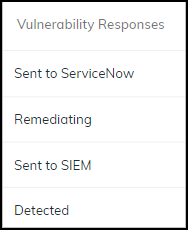
Add a comment.After you enter a comment, the Send button changes from gray to blue, indicating that you can proceed.Click Send.After you click Send, a link appears. When you click it, a new browser window opens to the XSOAR playbook for this action.![]() To confirm that the vulnerability was sent, click the link to the XSOAR playbook for this action.For the link in Device Security to open the corresponding playbook in Cortex XSOAR, you must already be logged in to your XSOAR instance before clicking it.The green boxes in the playbook indicate that a particular step was successfully performed. Following the path through the playbook gives you feedback about whether an action was carried out successfully or, if not, where the process changed course.The action “Sent to ServiceNow” appears in the Vulnerability Responses column. If you don’t see this column, click the Columns icon () and select Vulnerability Responses.
To confirm that the vulnerability was sent, click the link to the XSOAR playbook for this action.For the link in Device Security to open the corresponding playbook in Cortex XSOAR, you must already be logged in to your XSOAR instance before clicking it.The green boxes in the playbook indicate that a particular step was successfully performed. Following the path through the playbook gives you feedback about whether an action was carried out successfully or, if not, where the process changed course.The action “Sent to ServiceNow” appears in the Vulnerability Responses column. If you don’t see this column, click the Columns icon () and select Vulnerability Responses.![]()
![]() Log in to ServiceNow and check the table you created for receiving security incidents from Device Security.
Log in to ServiceNow and check the table you created for receiving security incidents from Device Security.![]() You can also send a vulnerability to ServiceNow from the Vulnerabilities section of the Device Details page.
You can also send a vulnerability to ServiceNow from the Vulnerabilities section of the Device Details page.Legacy IoT Security
Manually send vulnerabilities from the Device Security portal through Cortex XSOAR to ServiceNow to make work orders.- Click VulnerabilitiesVulnerability OverviewAll Vulnerabilities, click a vulnerability name, and then select the check box of a vulnerable device or potentially vulnerable device that you want to investigate.Click MoreSend toServiceNow.The Send to ServiceNow panel appears.
![]() Add a comment.After you enter a comment, the Send button changes from gray to blue, indicating that you can proceed.Click Send.After you click Send, a link appears. When you click it, a new browser window opens to the XSOAR playbook for this action.
Add a comment.After you enter a comment, the Send button changes from gray to blue, indicating that you can proceed.Click Send.After you click Send, a link appears. When you click it, a new browser window opens to the XSOAR playbook for this action.![]() To confirm that the vulnerability was sent, click the link to the XSOAR playbook for this action.For the link in Device Security to open the corresponding playbook in Cortex XSOAR, you must already be logged in to your XSOAR instance before clicking it.The green boxes in the playbook indicate that a particular step was successfully performed. Following the path through the playbook gives you feedback about whether an action was carried out successfully or, if not, where the process changed course.The action “Sent to ServiceNow” appears in the Vulnerability Responses column. If you don’t see this column, click the Columns icon () and select Vulnerability Responses.
To confirm that the vulnerability was sent, click the link to the XSOAR playbook for this action.For the link in Device Security to open the corresponding playbook in Cortex XSOAR, you must already be logged in to your XSOAR instance before clicking it.The green boxes in the playbook indicate that a particular step was successfully performed. Following the path through the playbook gives you feedback about whether an action was carried out successfully or, if not, where the process changed course.The action “Sent to ServiceNow” appears in the Vulnerability Responses column. If you don’t see this column, click the Columns icon () and select Vulnerability Responses.![]()
![]() Log in to ServiceNow and check the table you created for receiving security incidents from Device Security.
Log in to ServiceNow and check the table you created for receiving security incidents from Device Security.![]() You can also send a vulnerability to ServiceNow from the Vulnerabilities section of the Device Details page.
You can also send a vulnerability to ServiceNow from the Vulnerabilities section of the Device Details page.


