Device Security
Send Work Orders to AIMS
Table of Contents
Expand All
|
Collapse All
Device Security Docs
Send Work Orders to AIMS
Send security alerts and vulnerabilities from Device Security as work orders
through Cortex XSOAR to AIMS.
| Where Can I Use This? | What Do I Need? |
|---|---|
|
One of the following subscriptions:
One of the following Cortex XSOAR setups:
|
After integrating with AIMS, you can use Device Security's detection capabilities
together with the maintenance management system capabilities that AIMS provides. When
you identify a security alert or vulnerability in Device Security that requires
action, you can use the Device Security management interface to send a work order to
AIMS, through Cortex XSOAR. Device Security sends the work order to
Cortex XSOAR, which then runs a playbook to create the work order in AIMS.
Before sending a work order from Device Security to AIMS, check that the
device associated with the incident has an asset tag. AIMS requires an asset tag to find
the device in its database.
Strata Cloud Manager
Send security alerts and vulnerabilities from Device Security in Strata Cloud Manager
as work orders through Cortex XSOAR to AIMS.
- Log in to Device Security in Strata Cloud Manager and find a device with an asset tag that has a security alert or vulnerability.AIMS only accepts work orders for devices that are in its system and that it can identify by its asset tag.
- To see which devices have asset tags, click the column picker icon () to show the Asset Tag column if it’s hidden.
![]()
- Click the Asset Tag column heading to sort devices alphanumerically by asset tags. (Clicking a second time reverses their order and clicking a third time returns to the default sorting order by data.)
- Look among the devices with asset tags for one that’s impacted by a security alert or vulnerability for which you want to create a work order. Those with higher risk scores are likely to have alerts or vulnerabilities associated with them.
- Note the device name and the related alert or vulnerability.
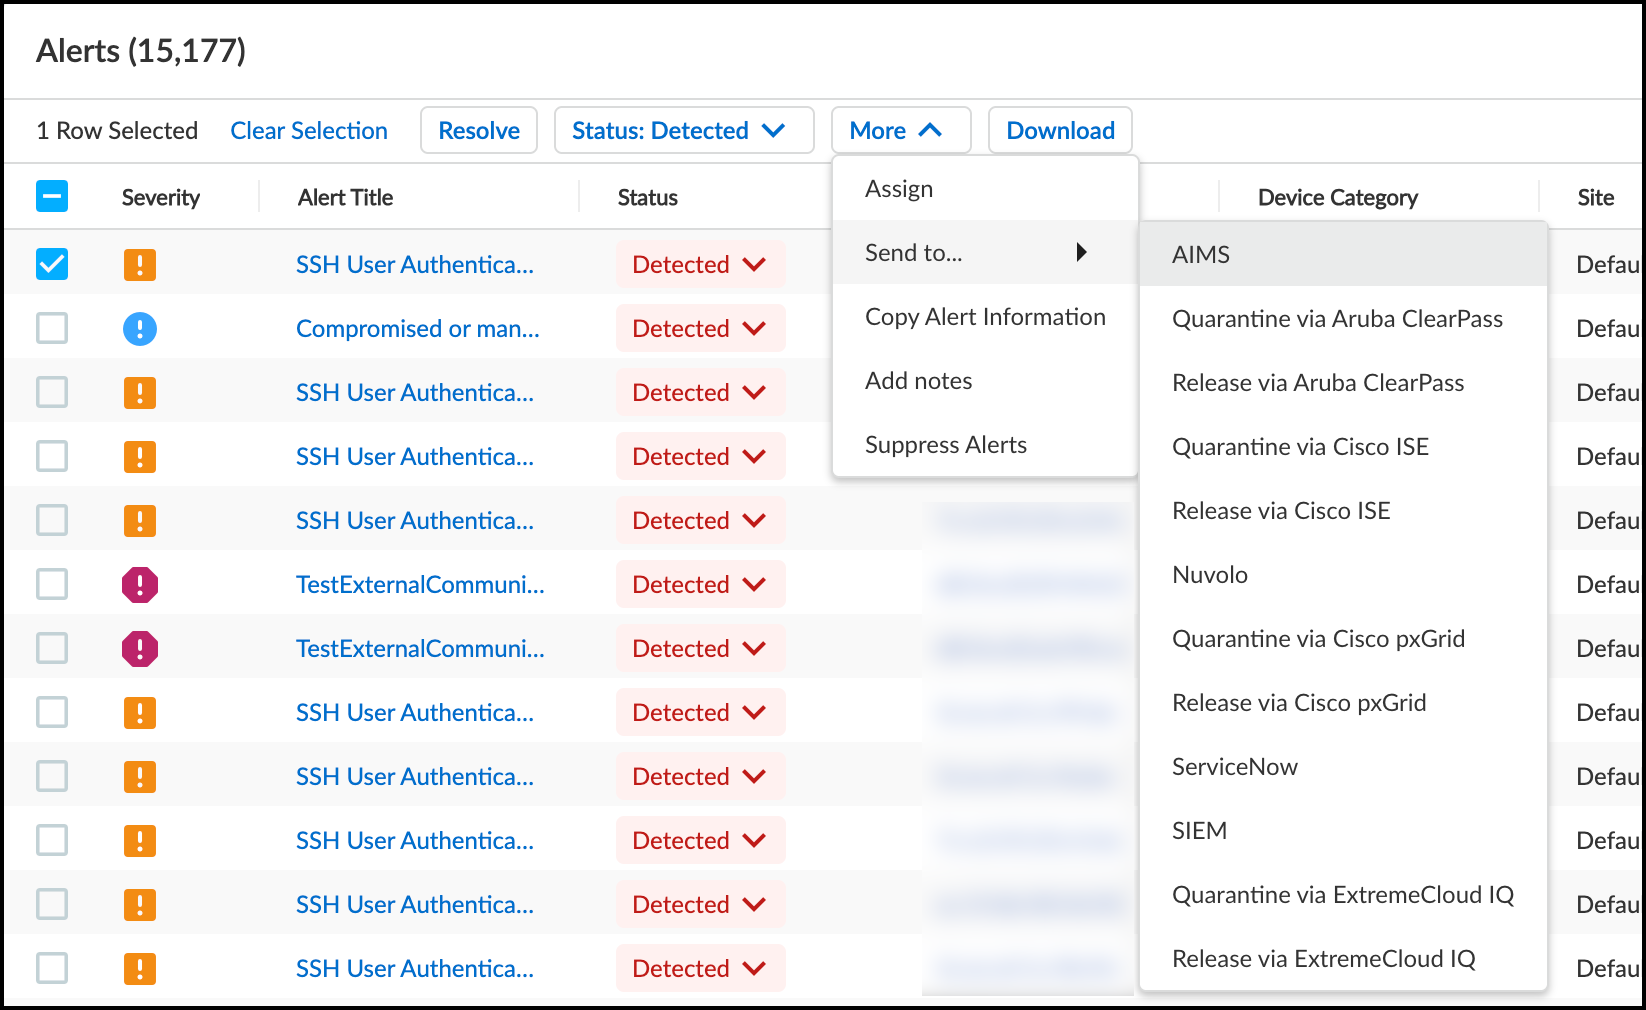
Generate a work order in Device Security in Strata Cloud Manager from a security alert or vulnerability and send it to AIMS.- To create a work order for a security alert, click AlertsSecurity Alerts, select the security alert for the impacted device you noted, and then click MoreSend toAIMS.
![]() orTo create a work order for a vulnerability, click RisksVulnerabilities, click the name of the vulnerability you noted earlier, select the device name in the Instances column, and then click MoreSend toAIMS.The Send to AIMS dialog box appears.
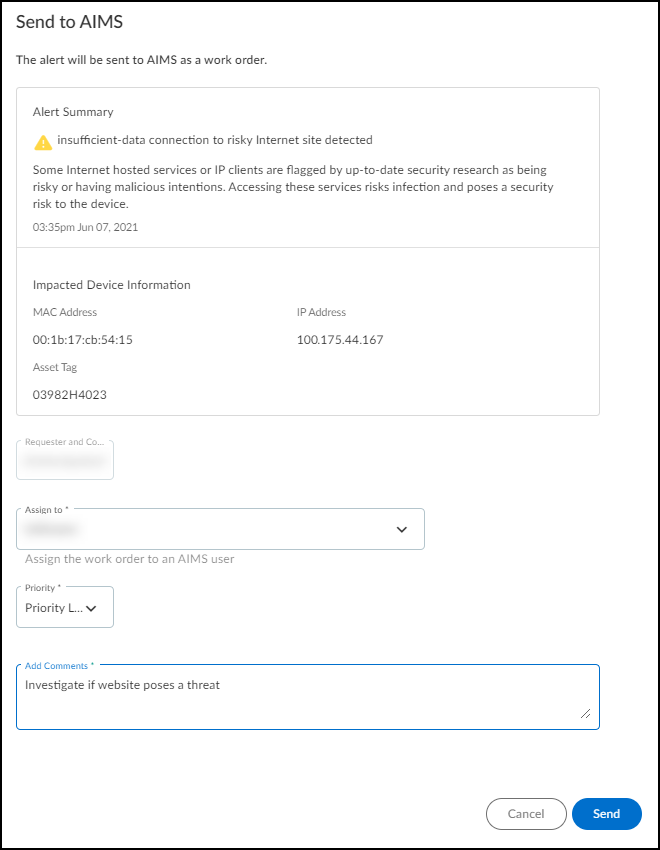
orTo create a work order for a vulnerability, click RisksVulnerabilities, click the name of the vulnerability you noted earlier, select the device name in the Instances column, and then click MoreSend toAIMS.The Send to AIMS dialog box appears. - Choose someone to assign the work order to in the Assign to list, choose a severity level in the Priority list, and enter a note in the Add Comments field.
![]() After you’ve configured these three required settings, the Send button changes from gray to blue, indicating that you can proceed.
After you’ve configured these three required settings, the Send button changes from gray to blue, indicating that you can proceed. - Send the work order to AIMS.After you click Send, a link appears. When you click it, a new browser window opens to the XSOAR playbook for this action.
![]()
- To confirm that the work order was sent, click the link to the XSOAR playbook for this action.For the link in Device Security to open the corresponding playbook in Cortex XSOAR, you must already be logged in to your XSOAR instance before clicking it.The green boxes in the playbook indicate that a particular step was successfully performed. Following the path through the playbook gives you feedback about whether an action was carried out successfully or, if not, where the process changed course.Also refresh the Security Alerts or Vulnerability Details page and hover your cursor over the entry in the Last Action column for the alert or the Vulnerability Responses column for the vulnerability instance for which you sent a work order.
Legacy IoT Security
Send security alerts and vulnerabilities from the Device Security portal
as work orders through Cortex XSOAR to AIMS.
- Log in to the Device Security portal and find a device with an asset tag that has a security alert or vulnerability.AIMS only accepts work orders for devices that are in its system and that it can identify by its asset tag.
- To see which devices have asset tags, click the column picker icon () to show the Asset Tag column if it’s hidden.
![]()
- Click the Asset Tag column heading to sort devices alphanumerically by asset tags. (Clicking a second time reverses their order and clicking a third time returns to the default sorting order by data.)
- Look among the devices with asset tags for one that’s impacted by a security alert or vulnerability for which you want to create a work order. Those with higher risk scores are likely to have alerts or vulnerabilities associated with them.
- Note the device name and the related alert or vulnerability.
Generate a work order in the Device Security portal from a security alert or vulnerability and send it to AIMS.- To create a work order for a security alert, click AlertsSecurity AlertsAll Alerts, select the security alert for the impacted device you noted, and then click MoreSend toAIMS.
![]() orTo create a work order for a vulnerability, click VulnerabilitiesVulnerability OverviewAll Vulnerabilities, click the name of the vulnerability you noted earlier, select the device name in the Instances column, and then click MoreSend toAIMS.The Send to AIMS dialog box appears.
orTo create a work order for a vulnerability, click VulnerabilitiesVulnerability OverviewAll Vulnerabilities, click the name of the vulnerability you noted earlier, select the device name in the Instances column, and then click MoreSend toAIMS.The Send to AIMS dialog box appears. - Choose someone to assign the work order to in the Assign to list, choose a severity level in the Priority list, and enter a note in the Add Comments field.
![]() After you’ve configured these three required settings, the Send button changes from gray to blue, indicating that you can proceed.
After you’ve configured these three required settings, the Send button changes from gray to blue, indicating that you can proceed. - Send the work order to AIMS.After you click Send, a link appears. When you click it, a new browser window opens to the XSOAR playbook for this action.
![]()
- To confirm that the work order was sent, click the link to the XSOAR playbook for this action.For the link in Device Security to open the corresponding playbook in Cortex XSOAR, you must already be logged in to your XSOAR instance before clicking it.The green boxes in the playbook indicate that a particular step was successfully performed. Following the path through the playbook gives you feedback about whether an action was carried out successfully or, if not, where the process changed course.Also refresh the Security Alerts or Vulnerability Details page and hover your cursor over the entry in the Last Action column for the alert or the Vulnerability Responses column for the vulnerability instance for which you sent a work order.


