Network Security
Deploy Advanced Device-ID
Table of Contents
Expand All
|
Collapse All
Network Security Docs
Deploy Advanced Device-ID
Deploy Advanced Device-ID on your NGFW and use Advanced Device-ID in Security
policy rules and policy rule recommendations.
| Where Can I Use This? | What Do I Need? |
|---|---|
|
|
You can define Security policy rules in PAN-OS using the
Advanced Device-ID objects that you created. PAN-OS uses
Advanced Device-ID to match traffic on the firewall and apply Security policy
rules based on your security posture. Create Advanced Device-ID objects in
Device Security, and create the Security policy rules in PAN-OS.
Apply Advanced Device-ID in the Security policy rules in PAN-OS.
Before creating Security policy rules that use Advanced Device-ID, make sure
you’re familiar with what is a Security Policy, the
Components of a Security Policy Rule, and
how to Create a Security Policy Rule.
Add an Advanced Device-ID Object to the Firewall
Only PAN-OS can create a local object of an
Advanced Device-ID on the firewall as part of Security policy
rule configuration. You can't add local Advanced Device-ID objects
to the firewall manually.
When you create an Advanced Device-ID object in Device Security,
associated firewalls automatically sync information from Device Security.
All new Advanced Device-ID objects appear in PAN-OS under
DevicesObjects with Locally Exists set to “No." This means that the
Advanced Device-ID exists, but no Security policy rule
currently uses it.
When you create or edit a Security policy rule to apply the
Advanced Device-ID, PAN-OS automatically creates a local copy
of the Advanced Device-ID object. You can verify this by navigating to
DevicesObjects and checking that the Locally Exists field is “Yes."

Add an Advanced Device-ID to a Security Policy Rule
Add an Advanced Device-ID to a Security policy rule to enforce the policy
on traffic coming from devices that match the Advanced Device-ID criteria.
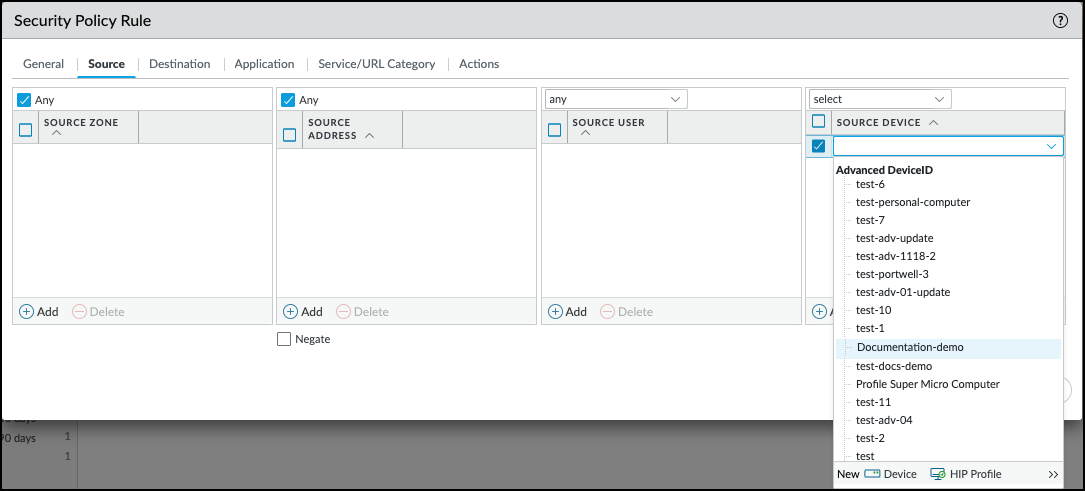
- Open the Security policy rules page.For PAN-OS managed by firewall, navigate to PoliciesSecurity.For PAN-OS managed by Panorama, navigate to PoliciesSecurityPre Rules.Select an existing policy that you want to modify, or follow the steps to Create a Security Policy Rule.Configure the following additional options under the Source tab and the Destination tab.When using Advanced Device-ID as part of a Security policy rule, either one or both the Source Device and the Destination Device can be an Advanced Device-ID object.
- Select the Source tab and Add an Advanced Device-ID under Source Device.Select the Destination tab and Add an Advanced Device-ID under Destination Device.
![]() Click OK to create the Security policy rule.Creating the Security policy rule also creates a local object for any Advanced Device-ID that you used in the Security policy rule. You can verify this by going to ObjectsDevices and checking that the Locally Exists field displays “Yes” for the Advanced Device-ID objects used.Commit your changes.
Click OK to create the Security policy rule.Creating the Security policy rule also creates a local object for any Advanced Device-ID that you used in the Security policy rule. You can verify this by going to ObjectsDevices and checking that the Locally Exists field displays “Yes” for the Advanced Device-ID objects used.Commit your changes.Import a Policy Rule Recommendation Based on Advanced Device-ID
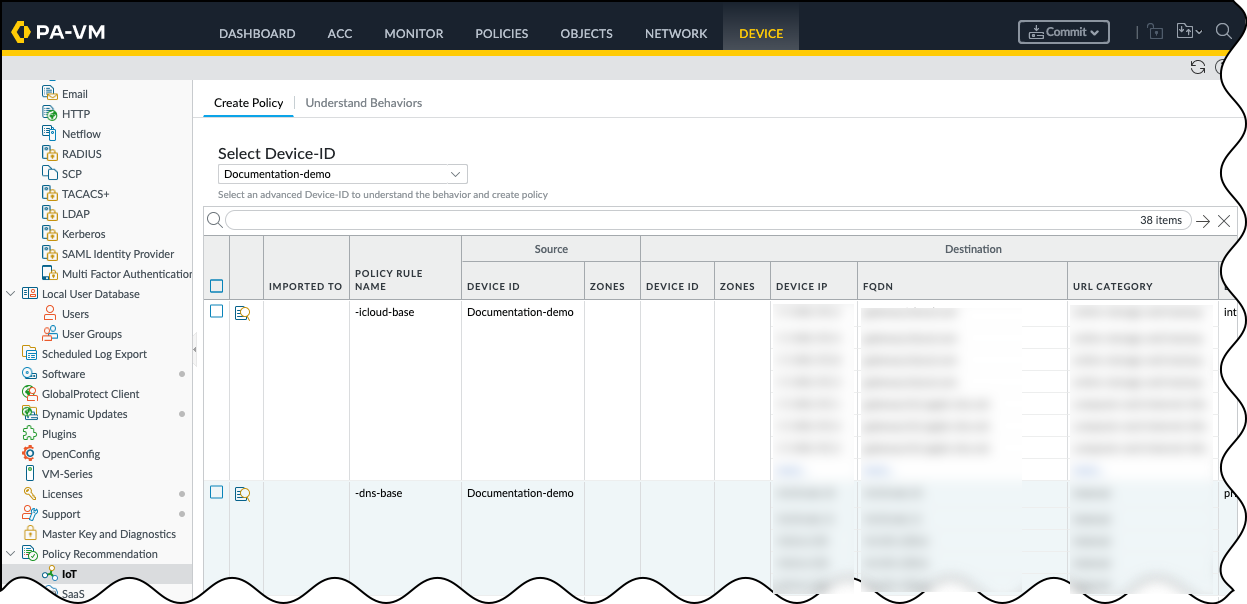
Device Security provides policy rule recommendations based on outbound traffic behavior. You can view the policy rule recommendations by Advanced Device-ID and choose which recommendations to import to your rulebase.- On your next-generation firewall or Panorama, select Device or PanoramaPolicy RecommendationIoTCreate PolicyIn the Select Device-ID drop-down, choose the Advanced Device-ID that you want to view policy rule recommendations for, and review the list of recommendations.
![]() Select the policy rule recommendations you want, and Import Policy Rule to bring up the Customize Policy pop-up.Optional In the Customize Policy pop-up, click on any policy rule recommendations for which you want to configure the destination information.This brings up the Customize Destination pop-up, where you can change the destination devices and destination device information. By default, the destination is set to any. When you're done, click OK to return to the Customize Policy pop-up.Import the customized policy rules to bring up the Import Policy Rule pop-up, enter the following, and click OK:FirewallName: Enter a name to identify the new Security policy. The default name appends the Advanced Device-ID name with the timestamp.Optional After Rule: Choose a rule after which you want to add the imported rule or rules. The default, No Rule Selection, means the firewall imports the selected rules to the top.Optional Description: Add a description to help explain what this Security policy enforces.PanoramaLocation: Choose one or more device groups where you want to import the policy rules. You can import policy rule recommendations into firewall rulebases in multiple device groups.Suggested Location: If Device Security learns about zones and device groups in the logs it receives from the NGFW, it suggests device groups for various policy rules accordingly. You can choose these suggested device groups among those available in the Location list or any other device groups if you prefer.Name: Enter a name to identify the new Security policy. The default name appends the Advanced Device-ID name with the timestamp.Destination Type: Select either Pre-Rulebase to add the recommended policy rules before rules defined locally on a firewall or Post-Rulebase to add them after rules defined locally.Optional After Rule: Choose a rule after which you want to add the imported rule or rules. The default, No Rule Selection, means the firewall imports the selected rules to the top.Optional Description: Add a description to help explain what this Security policy enforces.Click OK to bring up the Confirm Change pop-up, and then click Yes to confirm importing the policy rule recommendations to the firewall, or to multiple firewalls if configuring on Panorama.When the Status pop-up appears, click OK to acknowledge that the policy was added to the rulebase.Verify that the firewall successfully imported the policy rule recommendation by navigating to PoliciesSecurityon the firewall, or to PoliciesSecurityPre Rules on Panorama. You should see the policy rule recommendation that you imported on the list.Commit your changes.
Select the policy rule recommendations you want, and Import Policy Rule to bring up the Customize Policy pop-up.Optional In the Customize Policy pop-up, click on any policy rule recommendations for which you want to configure the destination information.This brings up the Customize Destination pop-up, where you can change the destination devices and destination device information. By default, the destination is set to any. When you're done, click OK to return to the Customize Policy pop-up.Import the customized policy rules to bring up the Import Policy Rule pop-up, enter the following, and click OK:FirewallName: Enter a name to identify the new Security policy. The default name appends the Advanced Device-ID name with the timestamp.Optional After Rule: Choose a rule after which you want to add the imported rule or rules. The default, No Rule Selection, means the firewall imports the selected rules to the top.Optional Description: Add a description to help explain what this Security policy enforces.PanoramaLocation: Choose one or more device groups where you want to import the policy rules. You can import policy rule recommendations into firewall rulebases in multiple device groups.Suggested Location: If Device Security learns about zones and device groups in the logs it receives from the NGFW, it suggests device groups for various policy rules accordingly. You can choose these suggested device groups among those available in the Location list or any other device groups if you prefer.Name: Enter a name to identify the new Security policy. The default name appends the Advanced Device-ID name with the timestamp.Destination Type: Select either Pre-Rulebase to add the recommended policy rules before rules defined locally on a firewall or Post-Rulebase to add them after rules defined locally.Optional After Rule: Choose a rule after which you want to add the imported rule or rules. The default, No Rule Selection, means the firewall imports the selected rules to the top.Optional Description: Add a description to help explain what this Security policy enforces.Click OK to bring up the Confirm Change pop-up, and then click Yes to confirm importing the policy rule recommendations to the firewall, or to multiple firewalls if configuring on Panorama.When the Status pop-up appears, click OK to acknowledge that the policy was added to the rulebase.Verify that the firewall successfully imported the policy rule recommendation by navigating to PoliciesSecurityon the firewall, or to PoliciesSecurityPre Rules on Panorama. You should see the policy rule recommendation that you imported on the list.Commit your changes.Remove an Advanced Device-ID from a Security Policy Rule
When you want to delete an Advanced Device-ID object from the firewall and Device Security, you need to remove the Advanced Device-ID from any Security policy rule that uses it. If you don't remove an Advanced Device-ID from a Security policy rule first, there can be undesirable behavior in terms of configuration management or policy enforcement.- Open the Security policy rules page.For PAN-OS managed by firewall, navigate to PoliciesSecurity.For PAN-OS managed by Panorama, navigate to PoliciesSecurityPre Rules.Select an existing policy that you want to modify, and remove the Advanced Device-ID from the Source or the Destination.
- Navigate to SourceSource Device, select the Advanced Device-ID that you want to remove, and Delete the Advanced Device-ID.Navigate to DestinationDestination Device, select the Advanced Device-ID that you want to remove, and Delete the Advanced Device-ID.Click OK to save the changes to your Security policy rule.Commit your changes.


