Set Up Antivirus, Anti-Spyware, and Vulnerability Protection
Table of Contents
Set Up Antivirus, Anti-Spyware, and Vulnerability Protection
Every Palo Alto Networks next-generation firewall
comes with predefined Antivirus, Anti-Spyware, and Vulnerability Protection profiles that
you can attach to Security policy rules. There is one predefined
Antivirus profile, default, which uses the
default action for each protocol (block HTTP, FTP, and SMB traffic and
alert on SMTP, IMAP, and POP3 traffic). There are two predefined
Anti-Spyware and Vulnerability Protection profiles:
- default—Applies the default action to all client and server critical, high, and medium severity spyware/vulnerability protection events. It does not detect low and informational events.
- strict—Applies the block response to all client and server critical, high and medium severity spyware/vulnerability protection events and uses the default action for low and informational events.
To ensure that the traffic entering your
network is free from threats, attach the predefined profiles to
your basic web access policies. As you monitor the traffic on your
network and expand your policy rulebase, you can then design more
granular profiles to address your specific security needs.
Use
the following workflow to set up the default Antivirus, Anti-Spyware,
and Vulnerability Protection Security
Profiles.
Palo Alto Networks defines
a default action for all anti-spyware and vulnerability protection
signatures. To see the default action, select or and
then select a profile. Click the Exceptions tab and then click Show
all signatures to view the list of the signatures and the corresponding
default Action. To change the default action,
create a new profile and specify an Action,
and/or add individual signature exceptions to Exceptions in
the profile.
- Verify that you have a Threat Prevention subscription.The Threat Prevention subscription bundles the antivirus, anti-spyware, and vulnerability protection features in one license. To verify that you have an active Threat Prevention subscription, select and verify that the Threat Prevention expiration date is in the future.
![]() Download the latest content.
Download the latest content.- Select and click Check Now at the bottom of the page to retrieve the latest signatures.In the Actions column, click Download and install the latest Antivirus updates and then download and then Install the latest Applications and Threats updates.Schedule content updates.Review the Best Practices for Applications and Threats Content Updates for important information on deploying updates.
- Select and then click Schedule to automatically retrieve signature updates for Antivirus and Applications and Threats.Specify the frequency and timing for the updates:
- download-only—The firewall automatically downloads the latest updates per the schedule you define but you must manually Install them.
- download-and-install—The firewall automatically downloads and installs the updates per the schedule you define.
Click OK to save the update schedule; a commit is not required.(Optional) Define a Threshold to indicate the minimum number of hours after an update becomes available before the firewall will download it. For example, setting the Threshold to 10 means the firewall will not download an update until it is at least 10 hours old regardless of the schedule.(HA only) Decide whether to Sync To Peer, which enables peers to synchronize content updates after download and install (the update schedule does not sync across peers; you must manually configure the schedule on both peers).There are additional considerations for deciding if and how to Sync To Peer depending on your HA deployment:- Active/Passive HA—If the firewalls are using the MGT port for content updates, then schedule both firewalls to download and install updates independently. However, if the firewalls are using a data port for content updates, then the passive firewall will not download or install updates unless and until it becomes active. To keep the schedules in sync on both firewalls when using a data port for updates, schedule updates on both firewalls and then enable Sync To Peer so that whichever firewall is active downloads and installs the updates and also pushes the updates to the passive firewall.
- Active/Active HA—If the firewalls are using the MGT interface for content updates, then select download-and-install on both firewalls but do not enable Sync To Peer. However, if the firewalls are using a data port, then select download-and-install on both firewalls and enable Sync To Peer so that if one firewall goes into the active-secondary state, the active-primary firewall will download and install the updates and push them to the active-secondary firewall.
(Optional) Create custom security profiles for antivirus, anti-spyware, and vulnerability protection.Alternatively, you can use the predefined default or strict profiles.Transition safely to best practice Security profiles for the best security posture.- To create custom Antivirus Profiles, select and Add a new profile. Use the Antivirus profile transition steps to safely reach your goal.
- To create custom Anti-Spyware Profiles, select and Add a new profile. Use the Anti-Spyware profile transition steps to safely reach your goal.
- To create custom Vulnerability Protection Profiles, select and Add a new profile. Use the Vulnerability Protection profile transition steps to safely reach your goal.
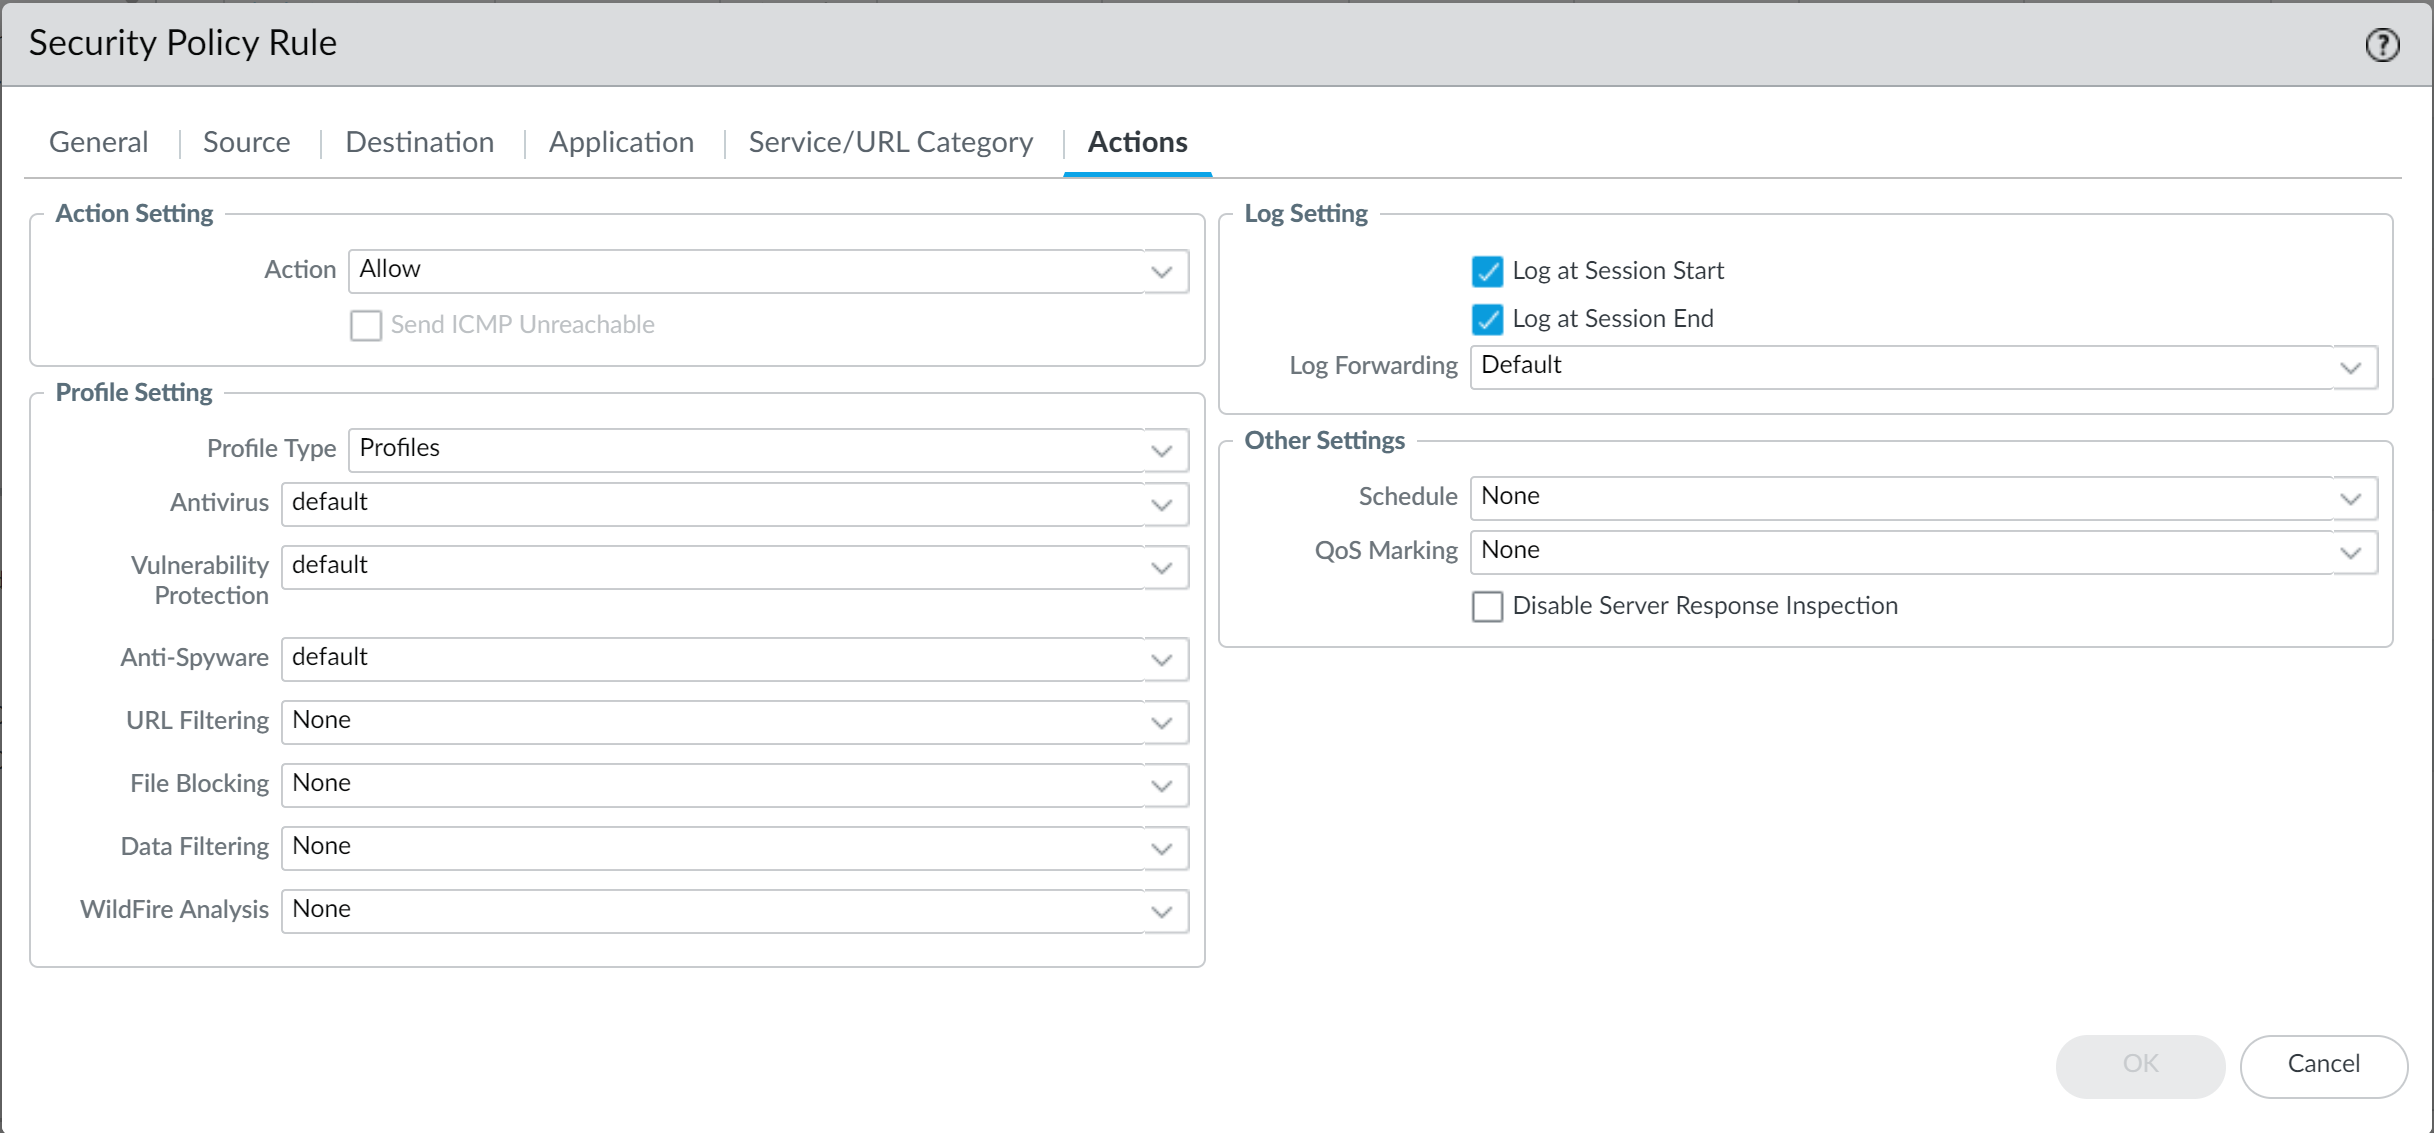
Attach security profiles to your Security policy rules.When you configure the firewall with a Security policy rule that uses a Vulnerability Protection profile to block connections, the firewall automatically blocks that traffic in hardware (see Monitor Blocked IP Addresses).- Select and select the rule you want to modify.In the Actions tab, select Profiles as the Profile Type.Select the security profiles you created for Antivirus, Anti-Spyware, and Vulnerability Protection.
![]() Commit your changes.Click Commit.
Commit your changes.Click Commit.