Best Practices for Securing Your Network from Layer 4 and Layer 7 Evasions
Table of Contents
Expand All
|
Collapse All
Next-Generation Firewall Docs
-
PAN-OS 10.0 (EoL)
- PAN-OS 11.1 & Later
- PAN-OS 11.0 (EoL)
- PAN-OS 10.2
- PAN-OS 10.1
- PAN-OS 10.0 (EoL)
- PAN-OS 9.1 (EoL)
- Cloud Management of NGFWs
-
- Management Interfaces
-
- Launch the Web Interface
- Configure Banners, Message of the Day, and Logos
- Use the Administrator Login Activity Indicators to Detect Account Misuse
- Manage and Monitor Administrative Tasks
- Commit, Validate, and Preview Firewall Configuration Changes
- Export Configuration Table Data
- Use Global Find to Search the Firewall or Panorama Management Server
- Manage Locks for Restricting Configuration Changes
-
-
- Define Access to the Web Interface Tabs
- Provide Granular Access to the Monitor Tab
- Provide Granular Access to the Policy Tab
- Provide Granular Access to the Objects Tab
- Provide Granular Access to the Network Tab
- Provide Granular Access to the Device Tab
- Define User Privacy Settings in the Admin Role Profile
- Restrict Administrator Access to Commit and Validate Functions
- Provide Granular Access to Global Settings
- Provide Granular Access to the Panorama Tab
- Provide Granular Access to Operations Settings
- Panorama Web Interface Access Privileges
-
- Reset the Firewall to Factory Default Settings
-
- Plan Your Authentication Deployment
- Configure SAML Authentication
- Configure Kerberos Single Sign-On
- Configure Kerberos Server Authentication
- Configure TACACS+ Authentication
- Configure RADIUS Authentication
- Configure LDAP Authentication
- Configure Local Database Authentication
- Configure an Authentication Profile and Sequence
- Test Authentication Server Connectivity
- Troubleshoot Authentication Issues
-
- Keys and Certificates
- Default Trusted Certificate Authorities (CAs)
- Certificate Deployment
- Configure the Master Key
- Export a Certificate and Private Key
- Configure a Certificate Profile
- Configure an SSL/TLS Service Profile
- Configure an SSH Service Profile
- Replace the Certificate for Inbound Management Traffic
- Configure the Key Size for SSL Forward Proxy Server Certificates
-
- HA Overview
-
- Prerequisites for Active/Active HA
- Configure Active/Active HA
-
- Use Case: Configure Active/Active HA with Route-Based Redundancy
- Use Case: Configure Active/Active HA with Floating IP Addresses
- Use Case: Configure Active/Active HA with ARP Load-Sharing
- Use Case: Configure Active/Active HA with Floating IP Address Bound to Active-Primary Firewall
- Use Case: Configure Active/Active HA with Source DIPP NAT Using Floating IP Addresses
- Use Case: Configure Separate Source NAT IP Address Pools for Active/Active HA Firewalls
- Use Case: Configure Active/Active HA for ARP Load-Sharing with Destination NAT
- Use Case: Configure Active/Active HA for ARP Load-Sharing with Destination NAT in Layer 3
- HA Clustering Overview
- HA Clustering Best Practices and Provisioning
- Configure HA Clustering
- Refresh HA1 SSH Keys and Configure Key Options
- HA Firewall States
-
- Use the Dashboard
- Monitor Applications and Threats
- Monitor Block List
-
- Report Types
- View Reports
- Configure the Expiration Period and Run Time for Reports
- Disable Predefined Reports
- Custom Reports
- Generate Custom Reports
- Generate the SaaS Application Usage Report
- Manage PDF Summary Reports
- Generate User/Group Activity Reports
- Manage Report Groups
- Schedule Reports for Email Delivery
- Manage Report Storage Capacity
- View Policy Rule Usage
- Use External Services for Monitoring
- Configure Log Forwarding
- Configure Email Alerts
-
- Configure Syslog Monitoring
-
- Traffic Log Fields
- Threat Log Fields
- URL Filtering Log Fields
- Data Filtering Log Fields
- HIP Match Log Fields
- GlobalProtect Log Fields
- IP-Tag Log Fields
- User-ID Log Fields
- Decryption Log Fields
- Tunnel Inspection Log Fields
- SCTP Log Fields
- Authentication Log Fields
- Config Log Fields
- System Log Fields
- Correlated Events Log Fields
- GTP Log Fields
- Syslog Severity
- Custom Log/Event Format
- Escape Sequences
- Forward Logs to an HTTP/S Destination
- Firewall Interface Identifiers in SNMP Managers and NetFlow Collectors
- Monitor Transceivers
-
- User-ID Overview
- Enable User-ID
- Map Users to Groups
- Enable User- and Group-Based Policy
- Enable Policy for Users with Multiple Accounts
- Verify the User-ID Configuration
-
- App-ID Overview
- App-ID and HTTP/2 Inspection
- Manage Custom or Unknown Applications
- Safely Enable Applications on Default Ports
- Applications with Implicit Support
- Application Level Gateways
- Disable the SIP Application-level Gateway (ALG)
- Maintain Custom Timeouts for Data Center Applications
-
- Best Practices for Securing Your Network from Layer 4 and Layer 7 Evasions
- Set Up Antivirus, Anti-Spyware, and Vulnerability Protection
- Set Up File Blocking
- Prevent Brute Force Attacks
- Customize the Action and Trigger Conditions for a Brute Force Signature
- Enable Evasion Signatures
- Monitor Blocked IP Addresses
- Threat Signature Categories
- Create Threat Exceptions
- Custom Signatures
- Share Threat Intelligence with Palo Alto Networks
- Threat Prevention Resources
-
- Decryption Overview
-
- Keys and Certificates for Decryption Policies
- SSL Forward Proxy
- SSL Forward Proxy Decryption Profile
- SSL Inbound Inspection
- SSL Inbound Inspection Decryption Profile
- SSL Protocol Settings Decryption Profile
- SSH Proxy
- SSH Proxy Decryption Profile
- Profile for No Decryption
- SSL Decryption for Elliptical Curve Cryptography (ECC) Certificates
- Perfect Forward Secrecy (PFS) Support for SSL Decryption
- SSL Decryption and Subject Alternative Names (SANs)
- TLSv1.3 Decryption
- High Availability Support for Decrypted Sessions
- Decryption Mirroring
- Configure SSL Forward Proxy
- Configure SSL Inbound Inspection
- Configure SSH Proxy
- Configure Server Certificate Verification for Undecrypted Traffic
- Enable Users to Opt Out of SSL Decryption
- Temporarily Disable SSL Decryption
- Configure Decryption Port Mirroring
- Verify Decryption
-
- How Decryption Broker Works
- Layer 3 Security Chain Guidelines
- Configure Decryption Broker with One or More Layer 3 Security Chain
- Transparent Bridge Security Chain Guidelines
- Configure Decryption Broker with a Single Transparent Bridge Security Chain
- Configure Decryption Broker with Multiple Transparent Bridge Security Chains
- Activate Free Licenses for Decryption Features
-
- About Palo Alto Networks URL Filtering Solution
- How Advanced URL Filtering Works
- URL Filtering Inline ML
- URL Filtering Use Cases
- Plan Your URL Filtering Deployment
- URL Filtering Best Practices
- Activate The Advanced URL Filtering Subscription
- Test URL Filtering Configuration
- Configure URL Filtering
- Configure URL Filtering Inline ML
- Log Only the Page a User Visits
- Create a Custom URL Category
- URL Category Exceptions
- Use an External Dynamic List in a URL Filtering Profile
- Allow Password Access to Certain Sites
- URL Filtering Response Pages
- Customize the URL Filtering Response Pages
- HTTP Header Logging
- Request to Change the Category for a URL
-
-
- Tap Interfaces
-
- Layer 2 and Layer 3 Packets over a Virtual Wire
- Port Speeds of Virtual Wire Interfaces
- LLDP over a Virtual Wire
- Aggregated Interfaces for a Virtual Wire
- Virtual Wire Support of High Availability
- Zone Protection for a Virtual Wire Interface
- VLAN-Tagged Traffic
- Virtual Wire Subinterfaces
- Configure Virtual Wires
- Configure an Aggregate Interface Group
- Configure Bonjour Reflector for Network Segmentation
- Use Interface Management Profiles to Restrict Access
- Virtual Routers
- Service Routes
- RIP
- Route Redistribution
-
- DNS Overview
- DNS Proxy Object
- DNS Server Profile
- Multi-Tenant DNS Deployments
- Configure a DNS Proxy Object
- Configure a DNS Server Profile
- Use Case 1: Firewall Requires DNS Resolution
- Use Case 2: ISP Tenant Uses DNS Proxy to Handle DNS Resolution for Security Policies, Reporting, and Services within its Virtual System
- Use Case 3: Firewall Acts as DNS Proxy Between Client and Server
- DNS Proxy Rule and FQDN Matching
- Dynamic DNS Overview
- Configure Dynamic DNS for Firewall Interfaces
-
- NAT Rule Capacities
- Dynamic IP and Port NAT Oversubscription
- Dataplane NAT Memory Statistics
-
- Translate Internal Client IP Addresses to Your Public IP Address (Source DIPP NAT)
- Enable Clients on the Internal Network to Access your Public Servers (Destination U-Turn NAT)
- Enable Bi-Directional Address Translation for Your Public-Facing Servers (Static Source NAT)
- Configure Destination NAT with DNS Rewrite
- Configure Destination NAT Using Dynamic IP Addresses
- Modify the Oversubscription Rate for DIPP NAT
- Reserve Dynamic IP NAT Addresses
- Disable NAT for a Specific Host or Interface
-
-
- Policy Types
- Policy Objects
- Track Rules Within a Rulebase
- Enforce Policy Rule Description, Tag, and Audit Comment
- Move or Clone a Policy Rule or Object to a Different Virtual System
-
- External Dynamic List
- Built-in External Dynamic Lists
- Configure the Firewall to Access an External Dynamic List
- Retrieve an External Dynamic List from the Web Server
- View External Dynamic List Entries
- Exclude Entries from an External Dynamic List
- Enforce Policy on an External Dynamic List
- Find External Dynamic Lists That Failed Authentication
- Disable Authentication for an External Dynamic List
- Register IP Addresses and Tags Dynamically
- Use Dynamic User Groups in Policy
- Use Auto-Tagging to Automate Security Actions
- CLI Commands for Dynamic IP Addresses and Tags
- Test Policy Rules
-
- Network Segmentation Using Zones
- How Do Zones Protect the Network?
-
PAN-OS 11.1 & Later
- PAN-OS 11.1 & Later
- PAN-OS 11.0 (EoL)
- PAN-OS 10.2
- PAN-OS 10.1
-
- Tap Interfaces
-
- Layer 2 and Layer 3 Packets over a Virtual Wire
- Port Speeds of Virtual Wire Interfaces
- LLDP over a Virtual Wire
- Aggregated Interfaces for a Virtual Wire
- Virtual Wire Support of High Availability
- Zone Protection for a Virtual Wire Interface
- VLAN-Tagged Traffic
- Virtual Wire Subinterfaces
- Configure Virtual Wires
- Configure a PPPoE Client on a Subinterface
- Configure an IPv6 PPPoE Client
- Configure an Aggregate Interface Group
- Configure Bonjour Reflector for Network Segmentation
- Use Interface Management Profiles to Restrict Access
-
- DHCP Overview
- Firewall as a DHCP Server and Client
- Firewall as a DHCPv6 Client
- DHCP Messages
- Dynamic IPv6 Addressing on the Management Interface
- Configure an Interface as a DHCP Server
- Configure an Interface as a DHCPv4 Client
- Configure an Interface as a DHCPv6 Client with Prefix Delegation
- Configure the Management Interface as a DHCP Client
- Configure the Management Interface for Dynamic IPv6 Address Assignment
- Configure an Interface as a DHCP Relay Agent
-
- DNS Overview
- DNS Proxy Object
- DNS Server Profile
- Multi-Tenant DNS Deployments
- Configure a DNS Proxy Object
- Configure a DNS Server Profile
- Use Case 1: Firewall Requires DNS Resolution
- Use Case 2: ISP Tenant Uses DNS Proxy to Handle DNS Resolution for Security Policies, Reporting, and Services within its Virtual System
- Use Case 3: Firewall Acts as DNS Proxy Between Client and Server
- DNS Proxy Rule and FQDN Matching
-
- NAT Rule Capacities
- Dynamic IP and Port NAT Oversubscription
- Dataplane NAT Memory Statistics
-
- Translate Internal Client IP Addresses to Your Public IP Address (Source DIPP NAT)
- Create a Source NAT Rule with Persistent DIPP
- PAN-OS
- Strata Cloud Manager
- Enable Clients on the Internal Network to Access your Public Servers (Destination U-Turn NAT)
- Enable Bi-Directional Address Translation for Your Public-Facing Servers (Static Source NAT)
- Configure Destination NAT with DNS Rewrite
- Configure Destination NAT Using Dynamic IP Addresses
- Modify the Oversubscription Rate for DIPP NAT
- Reserve Dynamic IP NAT Addresses
- Disable NAT for a Specific Host or Interface
-
- Network Packet Broker Overview
- How Network Packet Broker Works
- Prepare to Deploy Network Packet Broker
- Configure Transparent Bridge Security Chains
- Configure Routed Layer 3 Security Chains
- Network Packet Broker HA Support
- User Interface Changes for Network Packet Broker
- Limitations of Network Packet Broker
- Troubleshoot Network Packet Broker
-
- Enable Advanced Routing
- Logical Router Overview
- Configure a Logical Router
- Create a Static Route
- Configure BGP on an Advanced Routing Engine
- Create BGP Routing Profiles
- Create Filters for the Advanced Routing Engine
- Configure OSPFv2 on an Advanced Routing Engine
- Create OSPF Routing Profiles
- Configure OSPFv3 on an Advanced Routing Engine
- Create OSPFv3 Routing Profiles
- Configure RIPv2 on an Advanced Routing Engine
- Create RIPv2 Routing Profiles
- Create BFD Profiles
- Configure IPv4 Multicast
- Configure MSDP
- Create Multicast Routing Profiles
- Create an IPv4 MRoute
-
-
PAN-OS 11.2
- PAN-OS 11.2
- PAN-OS 11.1
- PAN-OS 11.0 (EoL)
- PAN-OS 10.2
- PAN-OS 10.1
- PAN-OS 10.0 (EoL)
- PAN-OS 9.1 (EoL)
- PAN-OS 9.0 (EoL)
- PAN-OS 8.1 (EoL)
- Cloud Management and AIOps for NGFW
End-of-Life (EoL)
Best Practices for Securing Your Network from Layer 4 and Layer 7 Evasions
To monitor and protect your network from most Layer
4 and Layer 7 attacks, here are a few recommendations.
- Upgrade to the most current PAN-OS software version and content release version to ensure that you have the latest security updates. See Install Content and Software Updates.
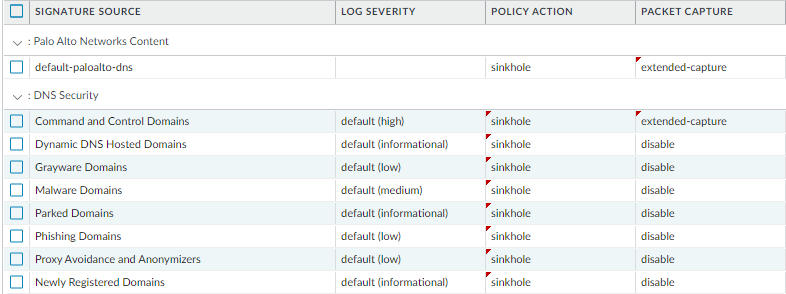
- Enable DNS Security (requires a Threat Prevention and DNS Security subscription license) to sinkhole malicious DNS requests. Palo Alto Networks recommends using the following DNS Security category configuration settings in your Anti-Spyware profile:
- For the log severity settings, use the default settings:
- For the policy action, set all signature sources to sinkhole.
- For packet capture, set Command and Control Domains to extended-capture. Leave all other categories to default settings.
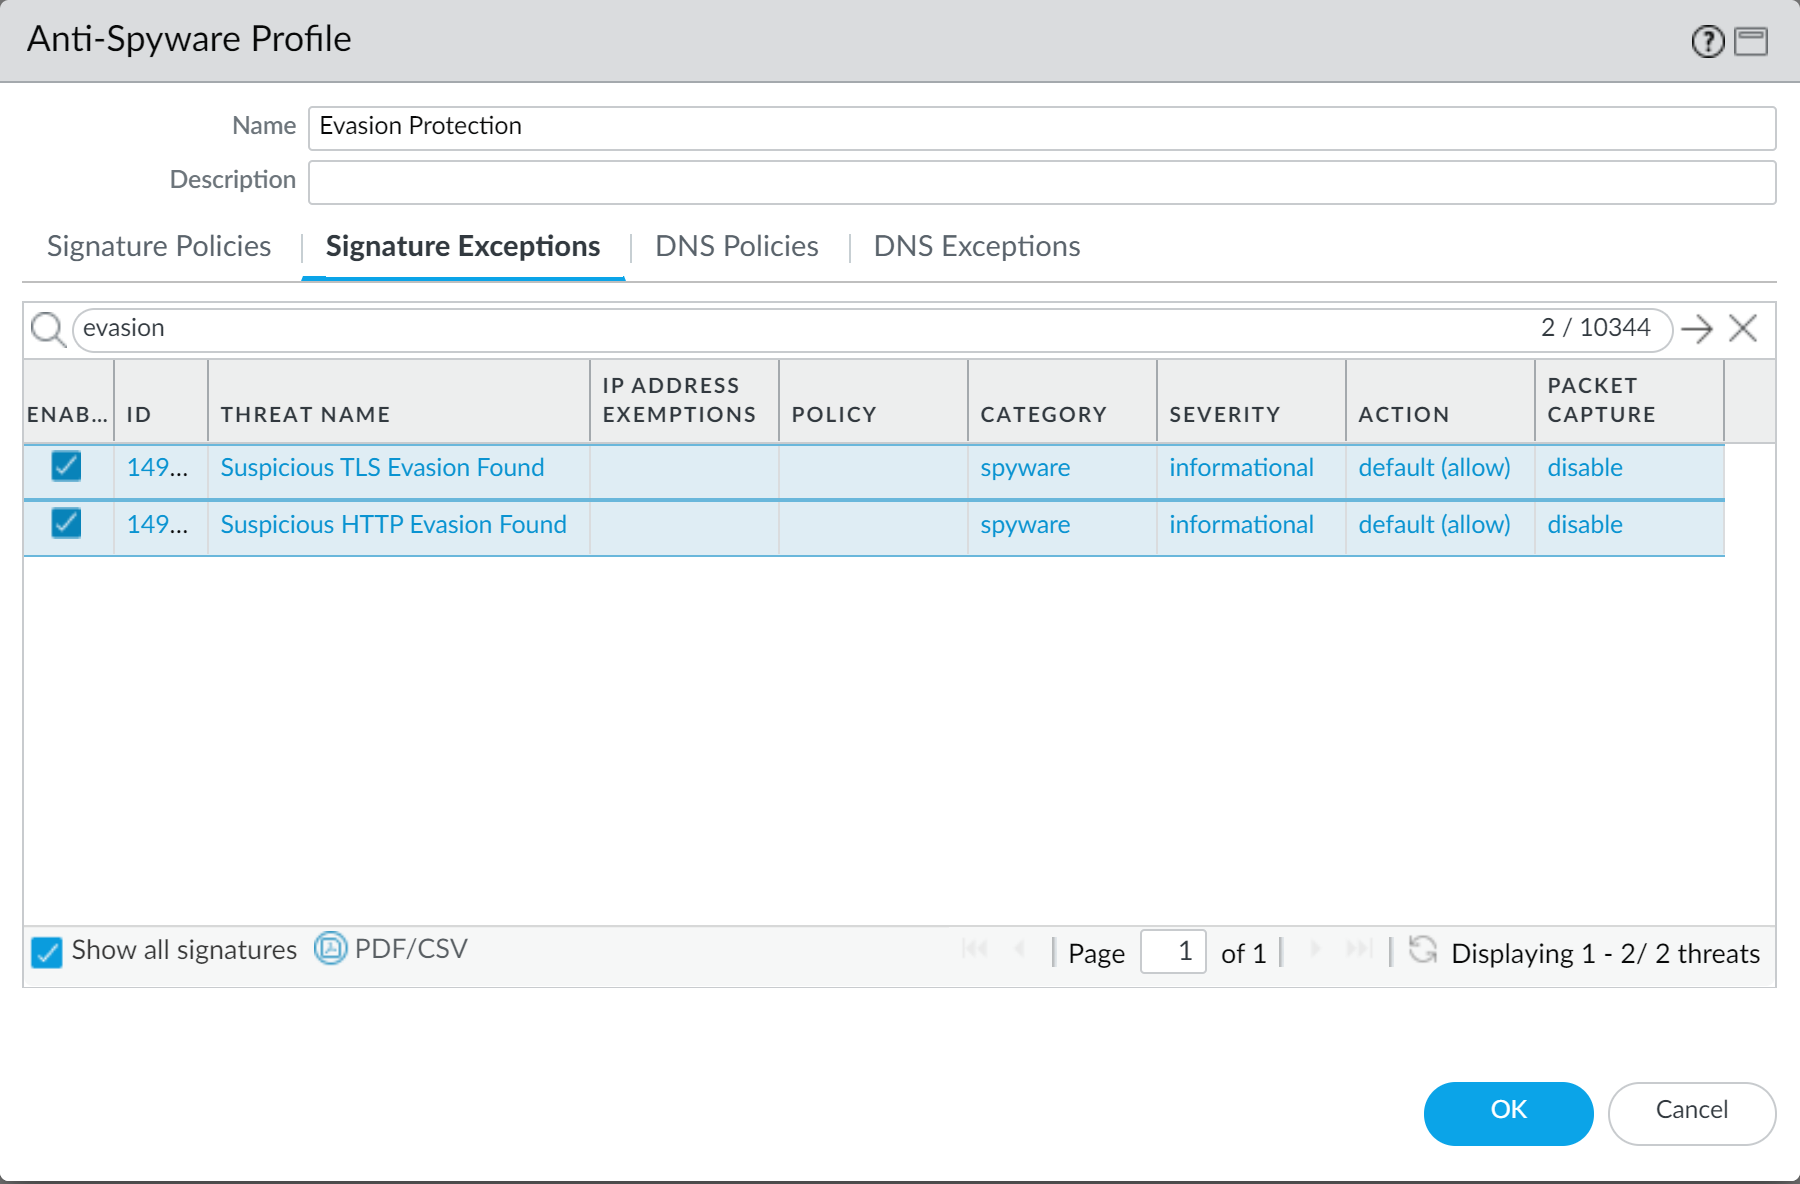
For more information on related anti-spyware settings, see Best Practice Internet Gateway Anti-Spyware Profile. - Set up the firewall to act as a DNS proxy and enable evasion signatures:DNS proxy is not part of the firewall security policy engine; instead, it directs the firewall to resolve DNS hostnames, while maintaining domain to IP mapping, which is crucial for preventing TLS/HTTP evasion.
- When acting as a DNS proxy, the firewall resolves DNS requests and caches hostname-to-IP address mappings to quickly and efficiently resolve future DNS queries.
- Evasion signatures that detect crafted HTTP or TLS requests can send alerts when clients connect to a domain other than the domain specified in the original DNS request. Make sure to configure DNS proxy before you enable evasion signatures. Without DNS proxy, evasion signatures can trigger alerts when a DNS server in the DNS load balancing configuration returns different IP addresses—for servers hosting identical resources—to the firewall and client in response to the same DNS request.
- For servers, create Security policy rules to allow only the application(s) that you sanction on each server. Verify that the standard port for the application matches the listening port on the server. For example, to ensure that only SMTP traffic is allowed to your email server, set the Application to smtp and set the Service to application-default. If your server uses only a subset of the standard ports (for example, if your SMTP server uses only port 587 while the SMTP application has standard ports defined as 25 and 587), create a new custom service that includes only port 587 and use that new service in your security policy rule instead of application-default. Additionally, make sure you restrict access to specific source and destinations zones and sets of IP addresses.
- Block all unknown applications and traffic using the Security policy. Typically, the only applications classified as unknown traffic are internal or custom applications on your network and potential threats. Unknown traffic can be either non-compliant applications or protocols that are anomalous or abnormal or it can be known applications that are using non-standard ports, both of which should be blocked. See Manage Custom or Unknown Applications.
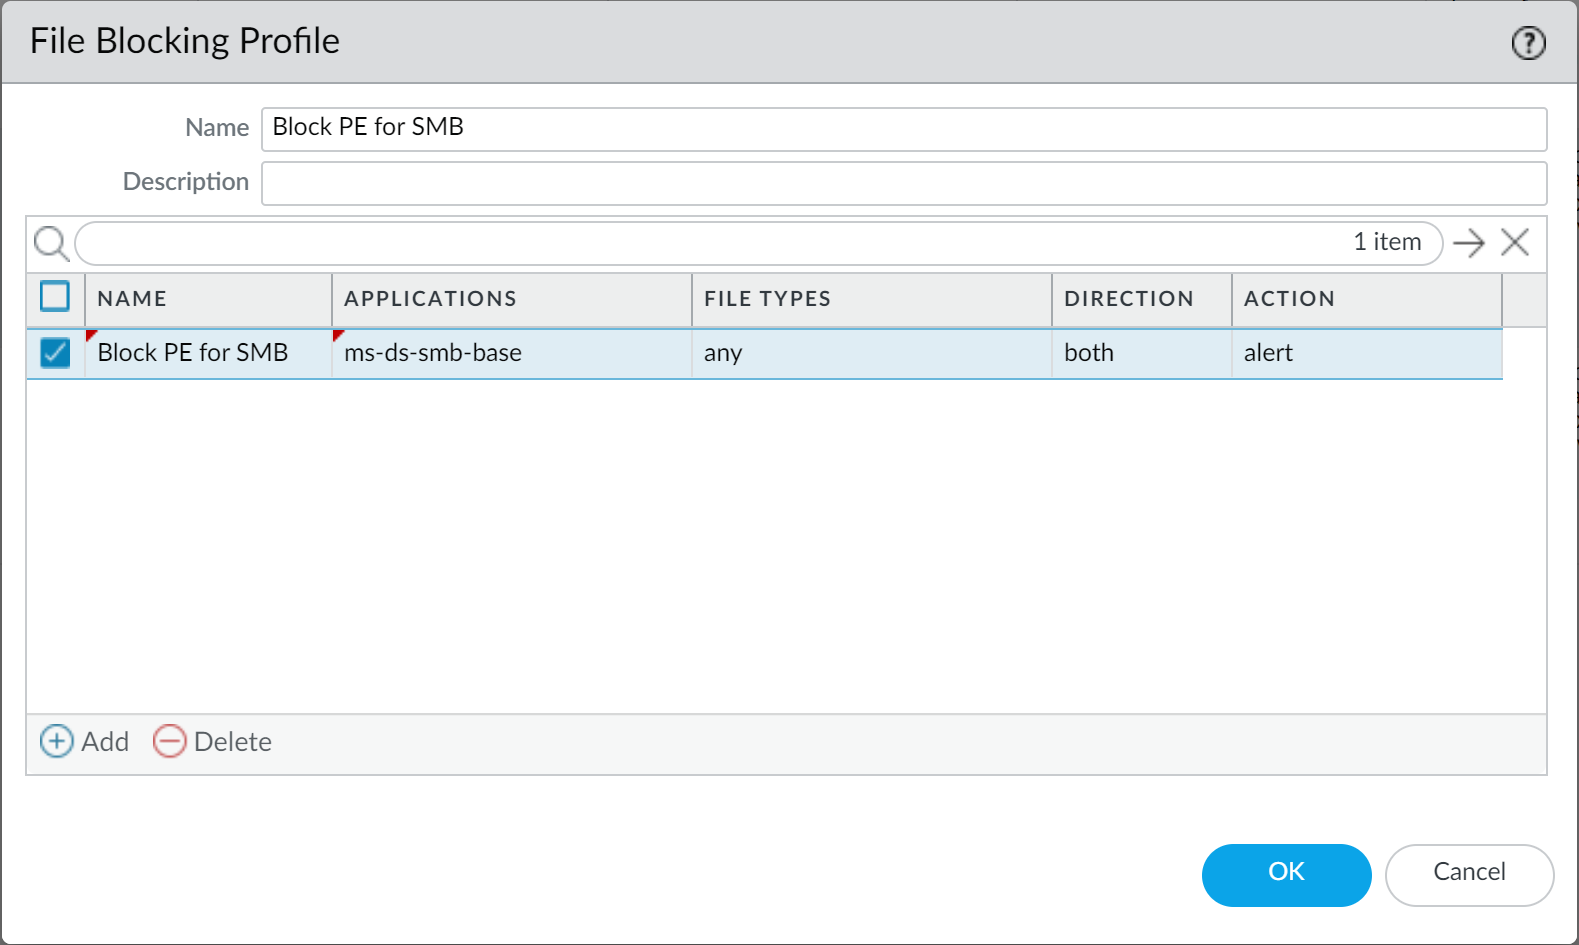
- Set Up File Blocking to block Portable Executable (PE) file types for internet-based SMB (Server Message Block) traffic from traversing trust to untrust zones (ms-ds-smb applications).
- Block malicious variants of PE (portable executables), ELF and MS Office files, and PowerShell and shell scripts in real-time. Enabling WildFire Inline ML allows you to dynamically analyze files using machine learning on the firewall. This additional layer of antivirus protection complements the WildFire-based signatures to provide extended coverage for files of which signatures do not already exist.
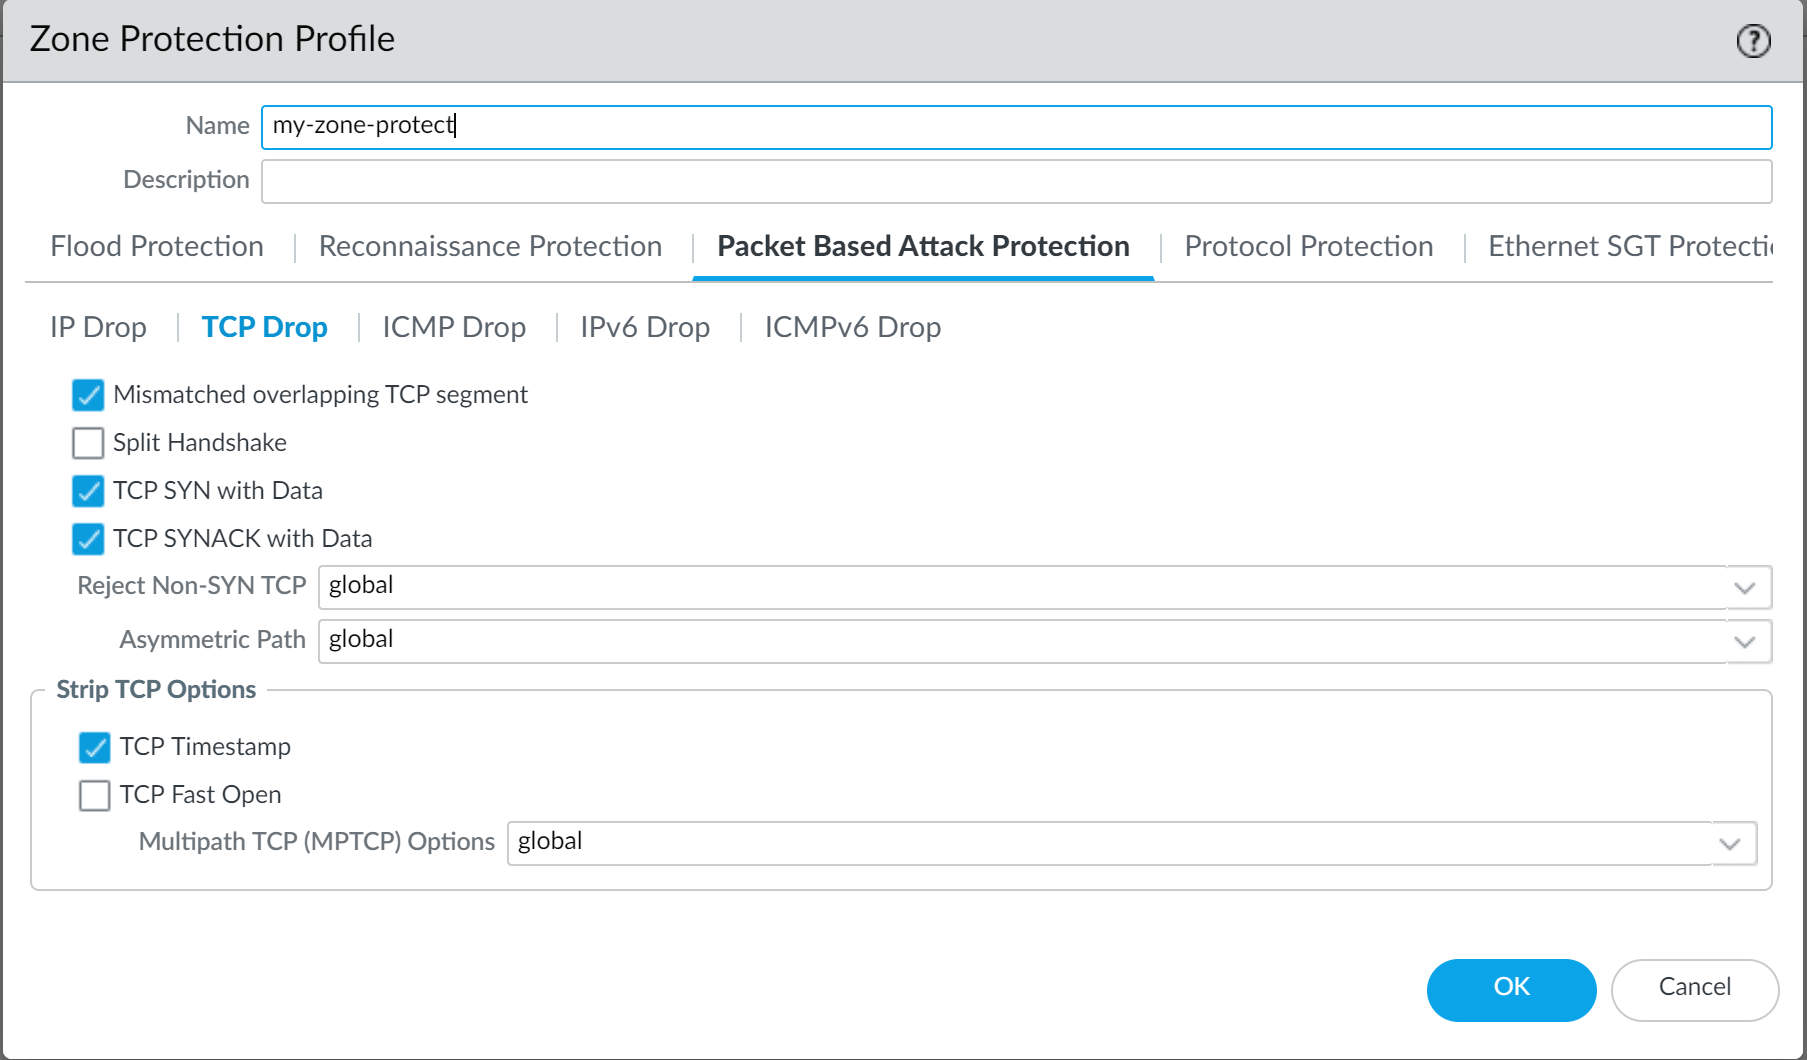
- Create a Zone Protection profile that is configured to protect against packet-based attacks (NetworkNetwork ProfilesZone Protection):
- Select the option to drop Malformed IP packets (Packet Based Attack ProtectionIP Drop).
- Enable the drop Mismatched overlapping TCP segment option (Packet Based Attack ProtectionTCP Drop).By deliberately constructing connections with overlapping but different data in them, attackers attempt to cause misinterpretation of the intent of the connection and deliberately induce false positives or false negatives. Attackers also use IP spoofing and sequence number prediction to intercept a user's connection and inject their own data into that connection. Selecting the Mismatched overlapping TCP segment option specifies that PAN-OS discards frames with mismatched and overlapping data. Received segments are discarded when they are contained within another segment, when they overlap with part of another segment, or when they contain another complete segment.
- Enable the drop TCP SYN with Data and drop TCP SYNACK with Data options (Packet Based Attack ProtectionTCP Drop).Dropping SYN and SYN-ACK packets that contain data in the payload during a three-way handshake increases security by blocking malware contained in the payload and preventing it from extracting unauthorized data before the TCP handshake is completed.
- Strip TCP timestamps from SYN packets before the firewall forwards the packet (Packet Based Attack ProtectionTCP Drop).When you enable the Strip TCP Options - TCP Timestamp option, the TCP stack on both ends of the TCP connection will not support TCP timestamps. This prevents attacks that use different timestamps on multiple packets for the same sequence number.
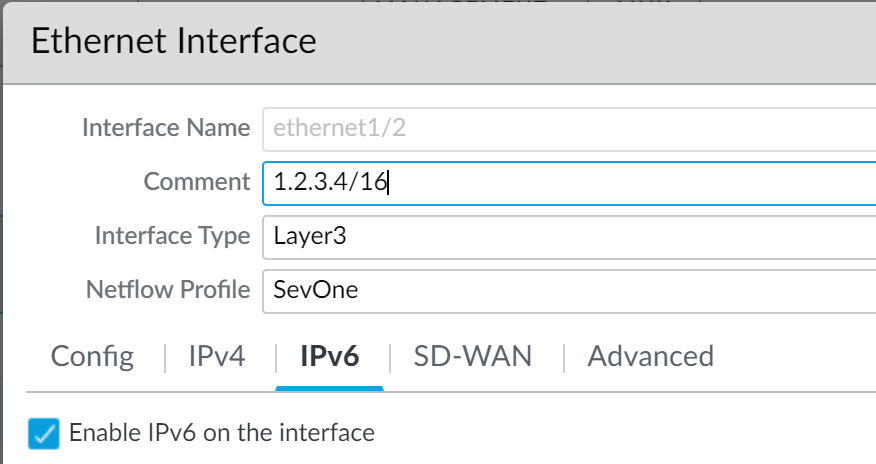
- If you configure IPv6 addresses on your network hosts, be sure to enable support for IPv6 if not already enabled (NetworkInterfacesEthernet > IPv6).Enabling support for IPv6 allows access to IPv6 hosts and also filters IPv6 packets encapsulated in IPv4 packets, which prevents IPv6 over IPv4 multicast addresses from being leveraged for network reconnaissance.
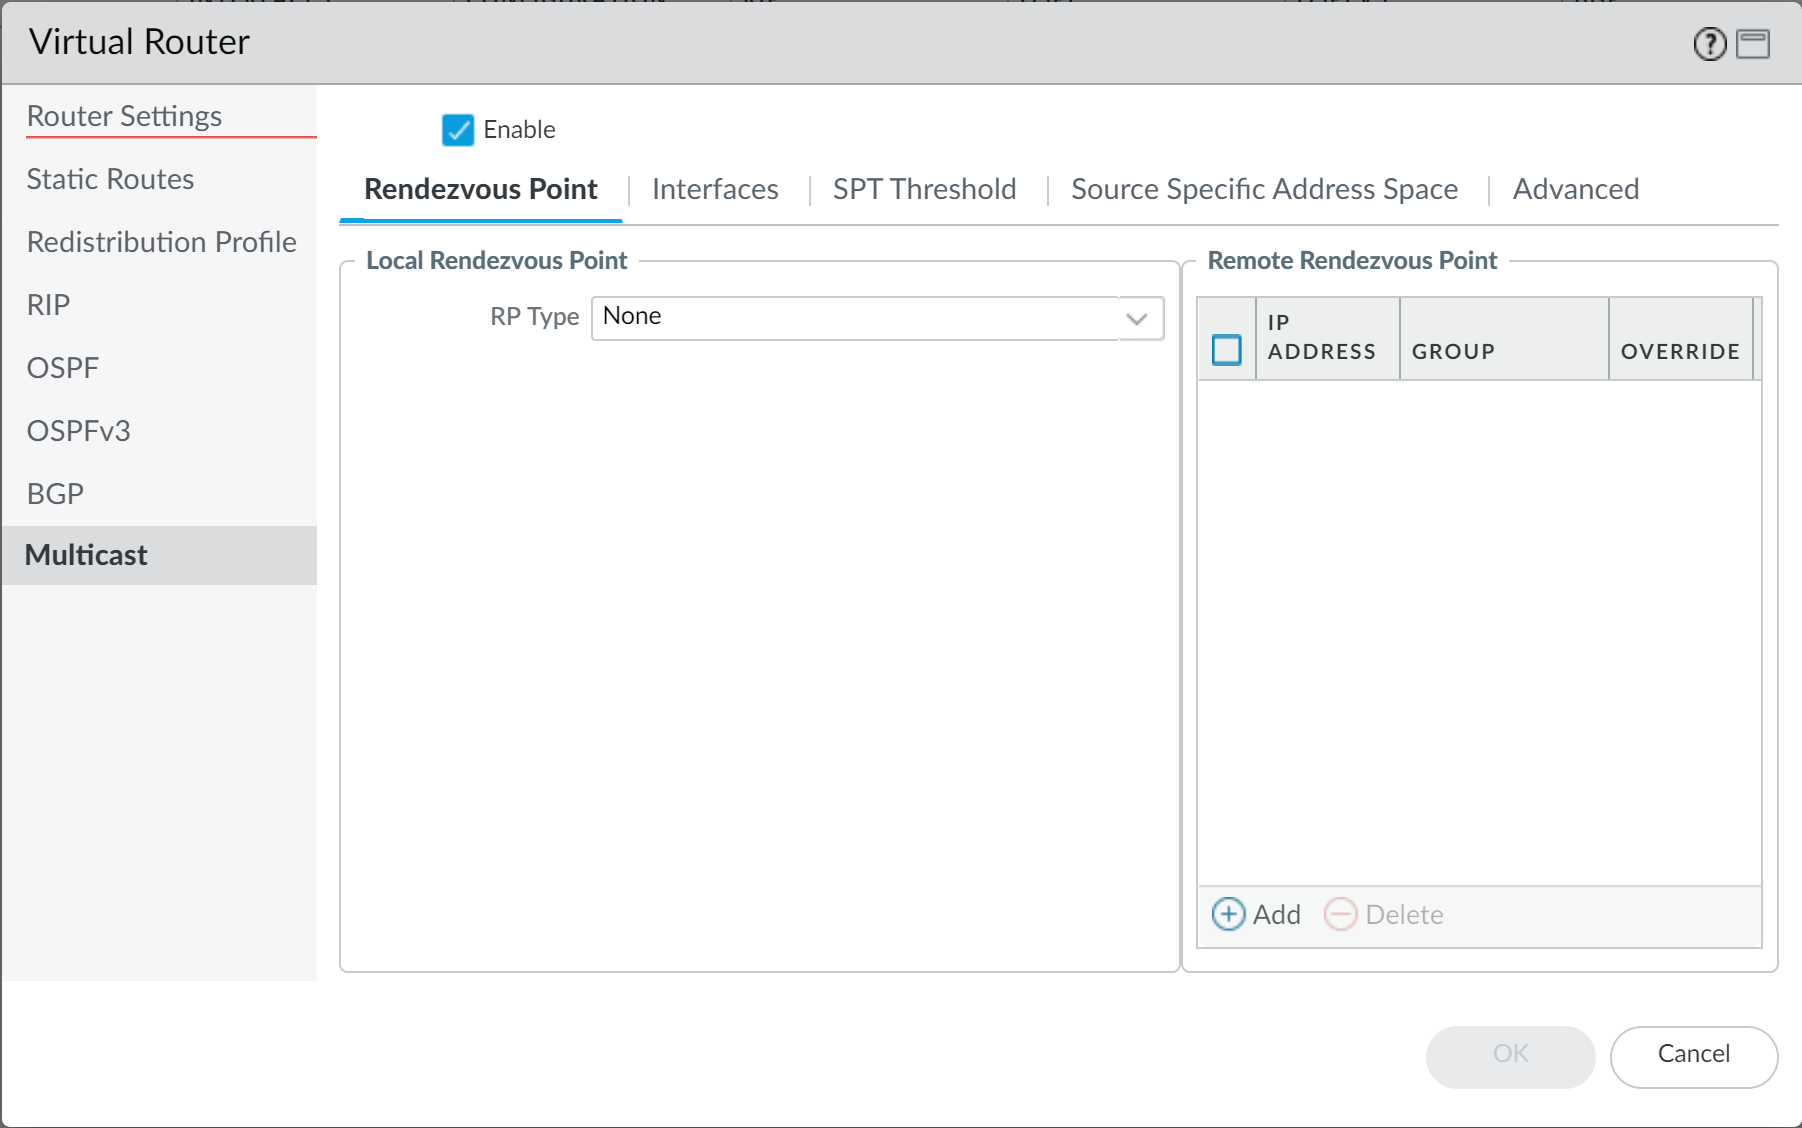
- Enable support for multicast traffic so that the firewall can enforce policy on multicast traffic (NetworkVirtual RouterMulticast).
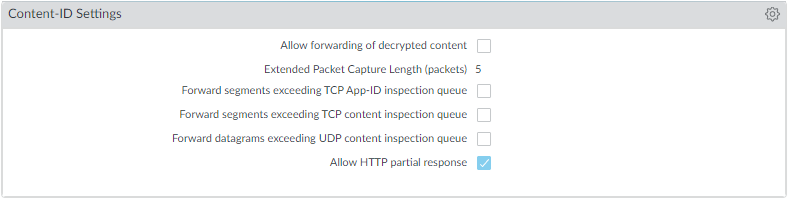
- Disable the options to Forward datagrams exceeding UDP content inspection queue and Forward segments exceeding TCP content inspection queue (DeviceSetupContent-IDContent-ID Settings).By default, when the TCP or UDP content inspection queues are full, the firewall skips content inspection for TCP segments or UDP datagrams that exceed the queue limit of 64. Disabling this option ensures content inspection for all TCP and UDP datagrams that the firewall allows. Only under specific circumstances—for example, if the firewall platform is not sized appropriately to align with a use case—could disabling this setting impact performance.
- Disable the Allow HTTP partial response (DeviceSetupContent-IDContent-ID Settings).The HTTP partial response option allows a client to fetch only part of a file. When a next-generation firewall in the path of a transfer identifies and drops a malicious file, it terminates the TCP session with an RST packet. If the web browser implements the HTTP header range option, it can start a new session to fetch only the remaining part of the file, which prevents the firewall from triggering the same signature again due to the lack of context into the initial session and, at the same time, allows the web browser to reassemble the file and deliver the malicious content. Disabling this option prevents this from happening.Allow HTTP partial response is enabled on the firewall by default. This provides maximum availability but increases the risk of a successful cyberattack. For maximum security, disable this option to prevent the web browser from starting a new session to fetch the rest of a file after the firewall terminates the original session due to malicious activity. Disabling HTTP partial response affects HTTP-based data transfers which use the RANGE header, which may cause service anomalies for certain applications. After you disable HTTP partial response, validate the operation of your business-critical applications.If you experience HTTP data transfer disruption on a business-critical application, you can create an Application Override policy for that specific application. Because Application Override bypasses App-ID (including threat and content inspection), create an Application Override policy for only the specific business-critical application, and specify sources and destinations to limit the rule (principle of least privilege access). Do not create Application Override policy unless you must. For information about Application Override policies, refer to https://knowledgebase.paloaltonetworks.com/KCSArticleDetail?id=kA10g000000ClVLCA0.
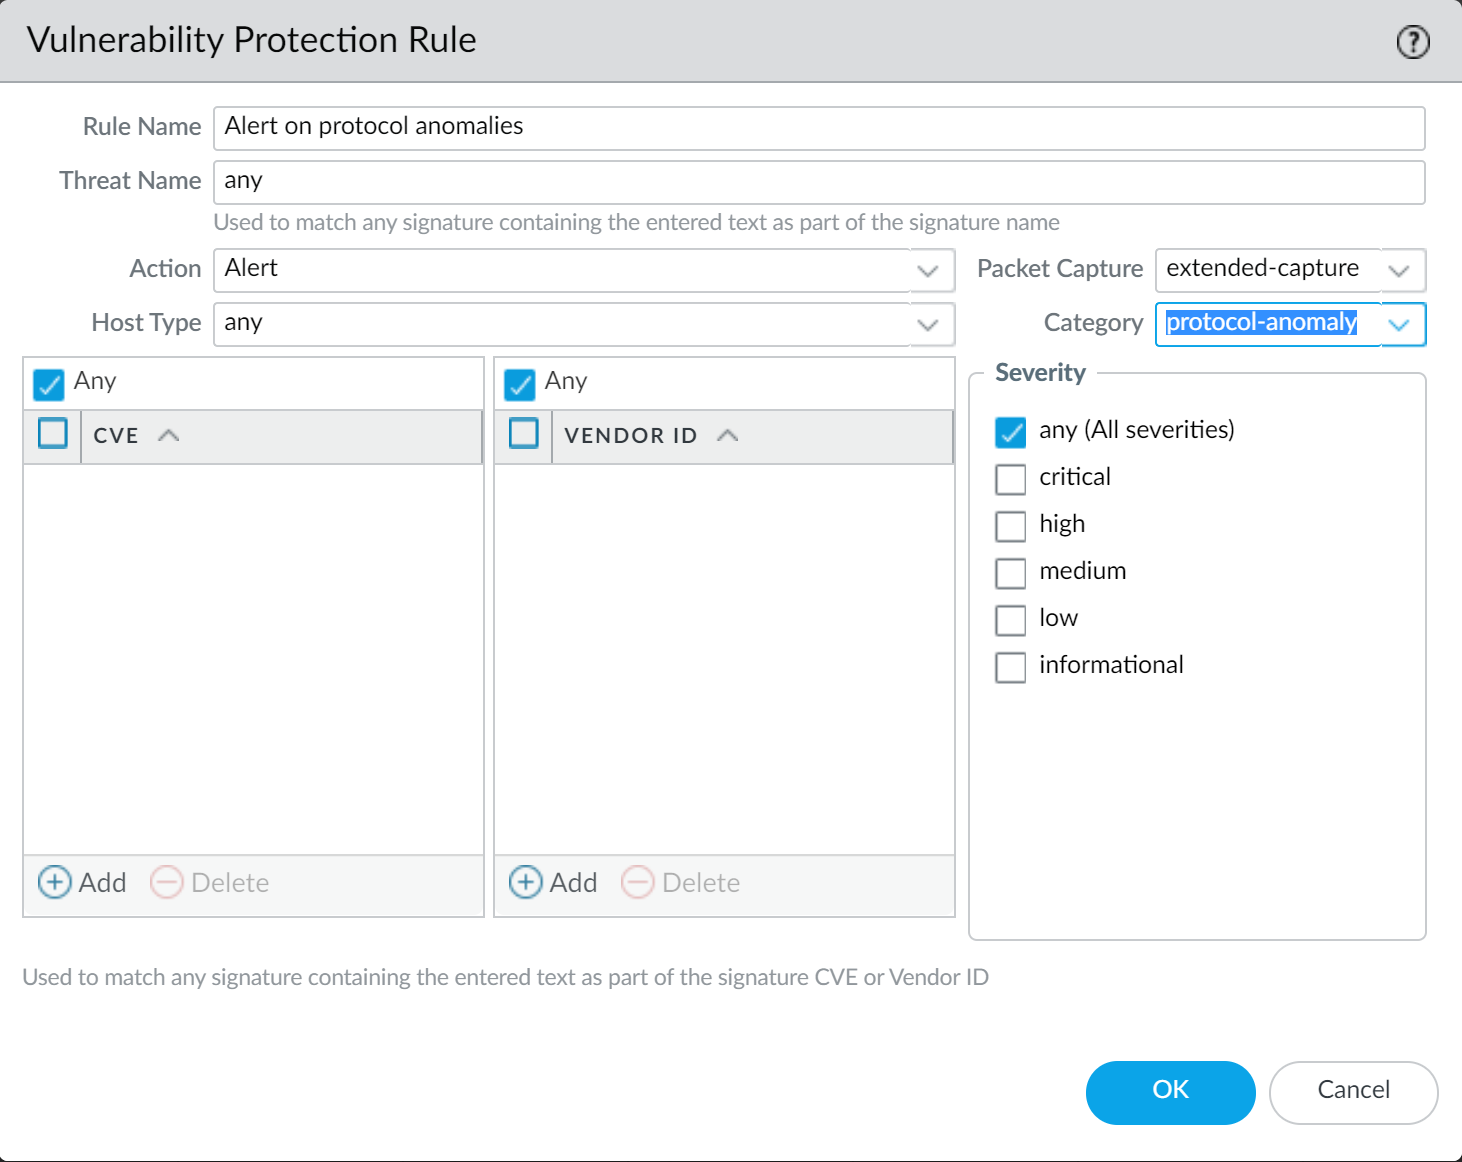
- Create a Vulnerability Protection Profile that blocks protocol anomalies and all vulnerabilities with low and high severities.A protocol anomaly occurs when a protocol behavior deviates from standard and compliant usage. For example, a malformed packet, poorly written application, or an application running on a non-standard port would all be considered protocol anomalies, and could be used as evasion tools.If yours is a mission-critical network, where the business’s highest priority is application availability, you should begin by alerting on protocol anomalies for a period of time to ensure that no critical internal applications are using established protocols in a non-standard way. If you find that certain critical applications trigger protocol anomaly signatures, you can then exclude those applications from protocol anomaly enforcement. To do this, add another rule to the Vulnerability Protection Profile that allows protocol anomalies and attach the profile to the security policy rule that enforces traffic to and from the critical applications.Make sure that Vulnerability Protection Profile rules and security policy rules that allow protocol anomalies for critical internal applications are listed above rules that block protocol anomalies. Traffic is evaluated against security policy rules and associated Vulnerability Protection Profiles rules from top to bottom, and is enforced based on the first matching rule.
- Begin by alerting on protocol anomalies:Create a Vulnerability Protection Profile rule with the Action set to Alert, the Category set to protocol-anomaly, and the Severity set to Any. Monitor your traffic to determine if any critical internal applications are using established protocols in non-standard ways. If you find this to be true, continue to allow protocol anomalies for those applications, and then block protocol anomalies for all other applications.
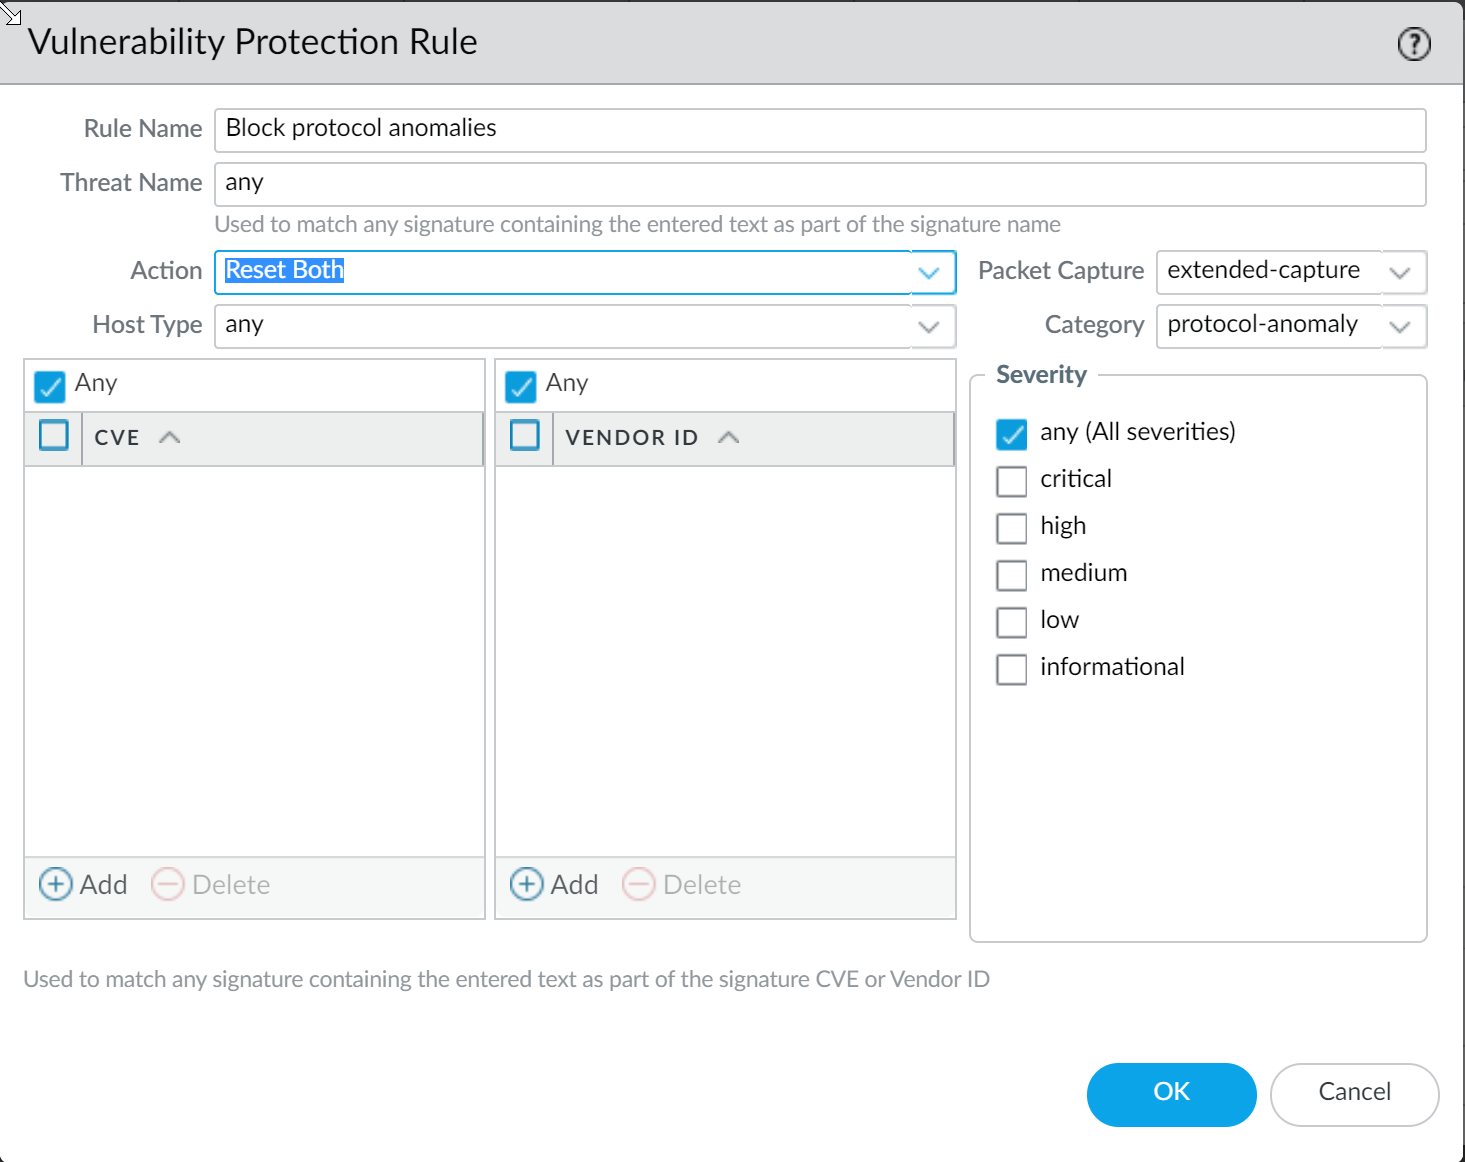
- Block protocol anomalies:Create a Vulnerability Protection Profile rule with the Category set to protocol-anomaly, the rule Action set to Reset Both, and the Severity set to Any.
- Optionally allow protocol anomalies for critical applications that use established protocols in a non-standard way. To do this, create a Vulnerability Protection Profile rule that allows protocol anomalies: set the rule Action to Allow, the Category to protocol-anomaly, and the Severity to any. Attach the Vulnerability Protection Profile rule to the security policy rule that enforces traffic to and from critical applications.
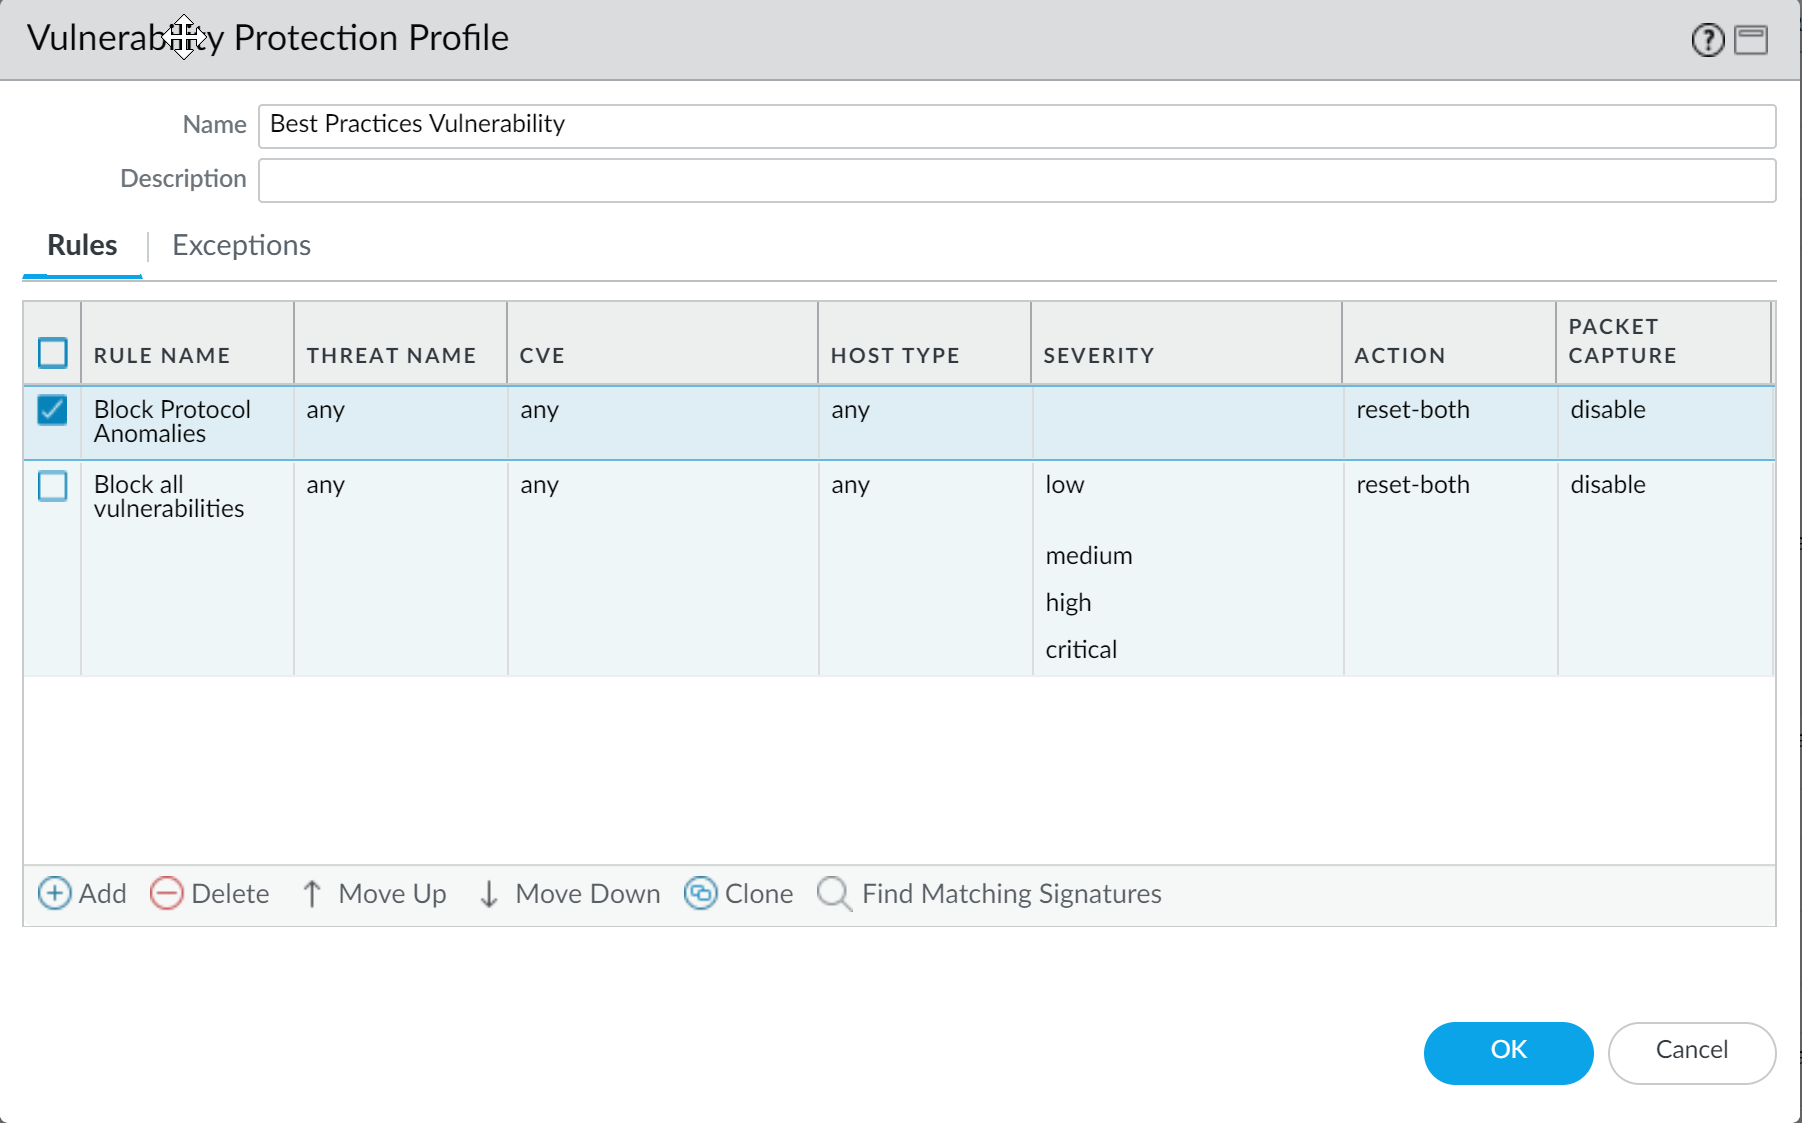
- Add another rule to the Vulnerability Protection profile to block all vulnerabilities with low and higher severity. This rule must be listed after the rule that blocks protocol anomalies.
- Continue to attach the following security profiles to your Security policy rules to provide signature-based protection:
- An Anti-Spyware profile to block all spyware with severity low and higher.
- An Antivirus profile to block all content that matches an antivirus signature.