Configure Dynamic DNS for Firewall Interfaces
Table of Contents
Configure Dynamic DNS for Firewall Interfaces
Configure the firewall to use a DDNS service to update
your changing domain name-to-IP address mappings so it provides
accurate IP address resolutions to its clients.
Before you configure DDNS for
a firewall interface:
- Determine the hostname that you registered with your DDNS provider.
- Obtain the public SSL certificate from the DDNS service and import it in to the firewall.
- (If you use FreeDNS Afraid.org v1 or FreeDNS Afraid.org Dynamic API v1) On the DDNS server, the Dynamic DNS service tab includes the following option: Link updates of the same IP together? When this option is enabled, the DDNS service updates all hostnames in DNS records that contain the old IP address that is changing, not just the DNS record for a single hostname and IP address. To avoid updating DNS records of hosts you didn’t intend to update, you should disable the Link updates of the same IP together? option so that the DDNS server updates only the DNS record that contains the specific hostname with the new IP address that is in the DDNS update.
- Configure DDNS.
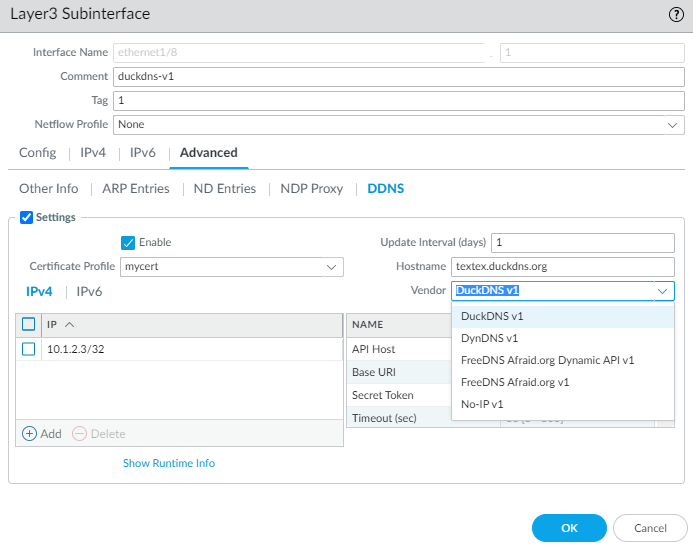
- Select and select a Layer 3 interface, subinterface, or Aggregate Ethernet (AE) interface; or select and select an interface or subinterface.Select and select Settings.Enable DDNS. You must initially enable DDNS to configure it. (If your DDNS configuration is unfinished, you can save it without enabling it so that you do not lose your partial configuration.)Enter the Update Interval (days), which is the number of days between updates that the firewall sends to the DDNS service to update IP addresses mapped to FQDNs (default is 1; range is 1 to 30). Choose an interval based on how frequently your IP addresses change. (The updates that the firewall sends at regular intervals are in addition to the updates the firewall sends upon receiving an address change. The updates sent at regular intervals are to ensure that updates sent per address change are not lost, for example.)Enter the Hostname for the interface, which is already registered with the DDNS service (for example, www.serverA.companyx.com or serverA).Make sure this hostname matches the hostname you registered with your DDNS service. You should enter an FQDN for the hostname; the firewall doesn’t validate the hostname except to confirm that the syntax uses only valid characters allowed by DNS for a domain name.Select IPv4 and select one or more IPv4 addresses assigned to the interface or Add an IPv4 address to associate with the hostname (for example, 10.1.1.1). You can select only as many IPv4 addresses as the DDNS service allows. All selected IPv4 addresses are registered with the DDNS service. Select at least one IPv4 or one IPv6 address.Select IPv6 and select one or more IPv6 addresses assigned to the interface or Add an IPv6 address to associate with the hostname. You can select only as many IPv6 addresses as the DDNS service allows. All selected IPv6 addresses are registered with the DDNS service. Select at least one IPv4 or one IPv6 address.Select or create a new certificate profile (Certificate Profile) using the imported SSL certificate from the DDNS service to verify the SSL certificate of the DDNS service when the firewall first connects to a DDNS service to register an IP address and at every update. When the firewall connects to the DDNS service to send updates, the DDNS service presents the firewall with an SSL certificate signed by the certificate authority (CA) so that the firewall can authenticate the DDNS service.Select the Vendor (and version number) you are using for DDNS service.
![]() Palo Alto Networks may change the supported DDNS service providers via a content update.In the Vendor field, the Palo Alto Network DDNS selection is a reserved DDNS service for Palo Alto Networks features such as SD-WAN and ZTP, and shouldn’t be selected for this current task. If you mistakenly select Palo Alto Networks DDNS when the corresponding supporting feature isn’t enabled, an error message will appear.The vendor choice determines the vendor-specific Name and Value fields below the Vendor field. Some Value fields are read-only to notify you of the parameters the firewall uses to connect to the DDNS service. Configure the remaining Value fields, such as a password that the DDNS service provides to you and a timeout that the firewall uses if it doesn’t receive an update from the DDNS service.Click OK.(Optional) If you want the firewall to communicate with the DDNS service using an interface other than the management interface, configure a service route for DDNS (Set Up Network Access for External Services).Commit your changes.View DDNS information for the interface.
Palo Alto Networks may change the supported DDNS service providers via a content update.In the Vendor field, the Palo Alto Network DDNS selection is a reserved DDNS service for Palo Alto Networks features such as SD-WAN and ZTP, and shouldn’t be selected for this current task. If you mistakenly select Palo Alto Networks DDNS when the corresponding supporting feature isn’t enabled, an error message will appear.The vendor choice determines the vendor-specific Name and Value fields below the Vendor field. Some Value fields are read-only to notify you of the parameters the firewall uses to connect to the DDNS service. Configure the remaining Value fields, such as a password that the DDNS service provides to you and a timeout that the firewall uses if it doesn’t receive an update from the DDNS service.Click OK.(Optional) If you want the firewall to communicate with the DDNS service using an interface other than the management interface, configure a service route for DDNS (Set Up Network Access for External Services).Commit your changes.View DDNS information for the interface.- Select or and select the interface you configured. (Interfaces with DDNS configured display the DDNS icon——in the Features field.)
![]() Select and Settings.Show Runtime Info to see the DDNS information for the interface, including the Last return code (result of the last FQDN update) and Last time (date and time) the DDNS service received an FQDN update.
Select and Settings.Show Runtime Info to see the DDNS information for the interface, including the Last return code (result of the last FQDN update) and Last time (date and time) the DDNS service received an FQDN update.