Set Up Network Access for External Services
Table of Contents
Set Up Network Access for External Services
Learn how to set up an in-band data interface instead
of the MGT interface to enable your firewall to access remote services,
such as DNS servers, content updates, and license retrieval.
By default, the firewall uses the MGT interface
to access remote services, such as DNS servers, content updates,
and license retrieval. If you do not want to enable external network
access to your management network, you must set up an in-band data
port to provide access to required external services and set up
service routes to instruct the firewall what port to use to access
the external services.
Do not enable
management access from the internet or from other untrusted zones
inside your enterprise security boundary. Follow the Best
Practices for Securing Administrative Access to ensure that
you are properly securing your firewall.
This
task requires familiarity with firewall interfaces, zones, and policies.
For more information on these topics, see Configure
Interfaces and Zones and Set
Up a Basic Security Policy.
- Decide which interface you want to use for access to external services and connect it to your switch or router port.The interface you use must have a static IP address.Log in to the web interface.Using a secure connection (https) from your web browser, log in using the new IP address and password you assigned during initial configuration (https://<IP address>). You will see a certificate warning; that is okay. Continue to the web page.(Optional) The firewall comes preconfigured with a default virtual wire interface between ports Ethernet 1/1 and Ethernet 1/2 (and a corresponding default security policy and zones). If you do not plan to use this virtual wire configuration, you must manually delete the configuration to prevent it from interfering with other interface settings you define.You must delete the configuration in the following order:
- To delete the default security policy, select , select the rule, and click Delete.To delete the default virtual wire, select , select the virtual wire and click Delete.To delete the default trust and untrust zones, select , select each zone and click Delete.To delete the interface configurations, select and then select each interface (ethernet1/1 and ethernet1/2) and click Delete.Commit the changes.Configure the interface you plan to use for external access to management services.
- Select and select the interface that corresponds to the interface you cabled in Step 1.Select the Interface Type. Although your choice here depends on your network topology, this example shows the steps for Layer3.On the Config tab, expand the Security Zone drop-down and select New Zone.In the Zone dialog, enter a Name for new zone, for example Management, and then click OK.Select the IPv4 tab, select the Static radio button, and click Add in the IP section, and enter the IP address and network mask to assign to the interface, for example 192.168.1.254/24. You must use a static IP address on this interface.
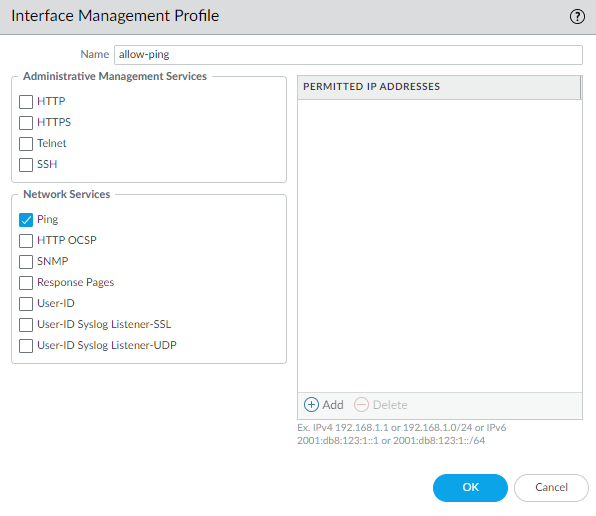
![]() Select , expand the Management Profile drop-down, and select New Management Profile.Enter a Name for the profile, such as allow_ping, and then select the services you want to allow on the interface. For the purposes of allowing access to the external services, you probably only need to enable Ping and then click OK.These services provide management access to the firewall, so only select the services that correspond to the management activities you want to allow on this interface. For example, don’t enable HTTP or Telnet because those protocols transmit in plaintext and therefore aren’t secure. Or if you plan to use the MGT interface for firewall configuration tasks through the web interface or CLI, you don’t enable HTTP, HTTPS, SSH, or Telnet so that you prevent unauthorized access through the interface (if you must allow HTTPS or SSH in this scenario, limit access to a specific set of Permitted IP Addresses). For details, see Use Interface Management Profiles to Restrict Access.
Select , expand the Management Profile drop-down, and select New Management Profile.Enter a Name for the profile, such as allow_ping, and then select the services you want to allow on the interface. For the purposes of allowing access to the external services, you probably only need to enable Ping and then click OK.These services provide management access to the firewall, so only select the services that correspond to the management activities you want to allow on this interface. For example, don’t enable HTTP or Telnet because those protocols transmit in plaintext and therefore aren’t secure. Or if you plan to use the MGT interface for firewall configuration tasks through the web interface or CLI, you don’t enable HTTP, HTTPS, SSH, or Telnet so that you prevent unauthorized access through the interface (if you must allow HTTPS or SSH in this scenario, limit access to a specific set of Permitted IP Addresses). For details, see Use Interface Management Profiles to Restrict Access.![]() To save the interface configuration, click OK.Configure the Service Routes.By default, the firewall uses the MGT interface to access the external services it requires. To change the interface the firewall uses to send requests to external services, you must edit the service routes.This example shows how to set up global service routes. For information on setting up network access to external services on a virtual system basis rather than a global basis, see Customize Service Routes to Services for Virtual Systems.
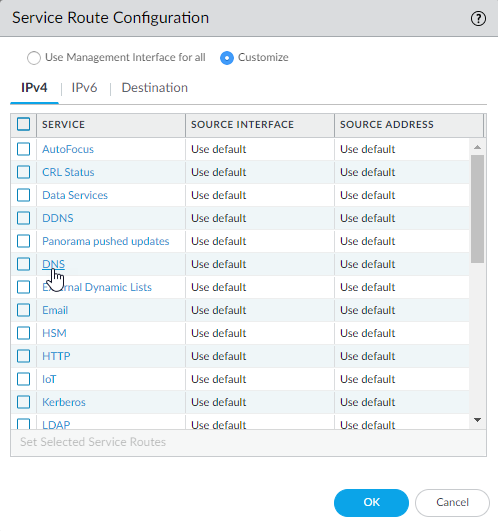
To save the interface configuration, click OK.Configure the Service Routes.By default, the firewall uses the MGT interface to access the external services it requires. To change the interface the firewall uses to send requests to external services, you must edit the service routes.This example shows how to set up global service routes. For information on setting up network access to external services on a virtual system basis rather than a global basis, see Customize Service Routes to Services for Virtual Systems.- Select and click Service Route Configuration.
![]() For the purposes of activating your licenses and getting the most recent content and software updates, you will want to change the service route for DNS, Palo Alto Networks Services, URL Updates, and AutoFocus.Click the Customize radio button, and select one of the following:
For the purposes of activating your licenses and getting the most recent content and software updates, you will want to change the service route for DNS, Palo Alto Networks Services, URL Updates, and AutoFocus.Click the Customize radio button, and select one of the following:- For a predefined service, select IPv4 or IPv6 and click the link for the service. To limit the drop-down list for Source Address, select Source Interface and select the interface you just configured. Then select a Source Address (from that interface) as the service route.If more than one IP address is configured for the selected interface, the Source Address drop-down allows you to select an IP address.
- To create a service route for a custom destination, select Destination, and click Add. Enter a Destination IP address. An incoming packet with a destination address that matches this address will use as its source the Source Address you specify for this service route. To limit the drop-down for Source Address, select a Source Interface. If more than one IP address is configured for the selected interface, the Source Address drop-down allows you to select an IP address.
![]() Click OK to save the settings.Repeat Steps 5.2 - 5.3 above for each service route you want to modify.Commit your changes.Configure an external-facing interface and an associated zone and then create a security policy rule to allow the firewall to send service requests from the internal zone to the external zone.
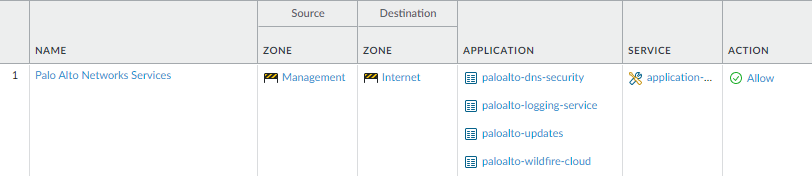
Click OK to save the settings.Repeat Steps 5.2 - 5.3 above for each service route you want to modify.Commit your changes.Configure an external-facing interface and an associated zone and then create a security policy rule to allow the firewall to send service requests from the internal zone to the external zone.- Select and then select the external-facing interface. Select Layer3 as the Interface Type, Add the IP address (on the IPv4 or IPv6 tab), and create the associated Security Zone (on the Config tab), such as Internet. This interface must have a static IP address; you do not need to set up management services on this interface.To set up a security rule that allows traffic from your internal network to the Palo Alto Networks update server, select and click Add.As a best practice when creating Security policy rules, use application-based rules instead of port-based rules to ensure that you are accurately identifying the underlying application regardless of the port, protocol, evasive tactics, or encryption in use. Always leave the Service set to application-default. In this case, create a security policy rule that allows access to the update server (and other Palo Alto Networks services).
![]() Create a NAT policy rule.
Create a NAT policy rule.- If you are using a private IP address on the internal-facing interface, you will need to create a source NAT rule to translate the address to a publicly routable address. Select and then click Add. At a minimum you must define a name for the rule (General tab), specify a source and destination zone, Management to Internet in this case (Original Packet tab), and define the source address translation settings (Translated Packet tab) and then click OK.Commit your changes.
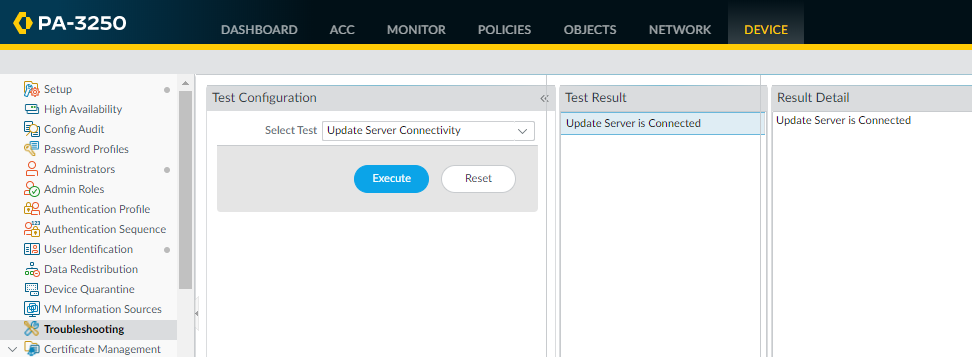
![]() Select and verify that you have connectivity from the data port to the external services, including the default gateway, using the Ping connectivity test, and the Palo Alto Networks Update Server using the Update Server Connectivity test. In this example, the firewall connectivity to the Palo Alto Networks Update Server is tested.After you verify you have the required network connectivity, continue to Register the Firewall and Activate Subscription Licenses.
Select and verify that you have connectivity from the data port to the external services, including the default gateway, using the Ping connectivity test, and the Palo Alto Networks Update Server using the Update Server Connectivity test. In this example, the firewall connectivity to the Palo Alto Networks Update Server is tested.After you verify you have the required network connectivity, continue to Register the Firewall and Activate Subscription Licenses.- Select Update Server from the Select Test drop-down.Execute the Palo Alto Networks Update Server connectivity test.
![]() Access the firewall CLI, and use the following command to retrieve information on the support entitlement for the firewall from the Palo Alto Networks update server:
Access the firewall CLI, and use the following command to retrieve information on the support entitlement for the firewall from the Palo Alto Networks update server:request support checkIf you have connectivity, the update server will respond with the support status for your firewall. Because your firewall is not registered, the update server will return the following message:Contact Us https://www.paloaltonetworks.com/company/contact-us.html Support Home https://www.paloaltonetworks.com/support/tabs/overview.html Device not found on this update server