Configure the Portal to Authenticate Satellites
Table of Contents
Configure the Portal to Authenticate Satellites
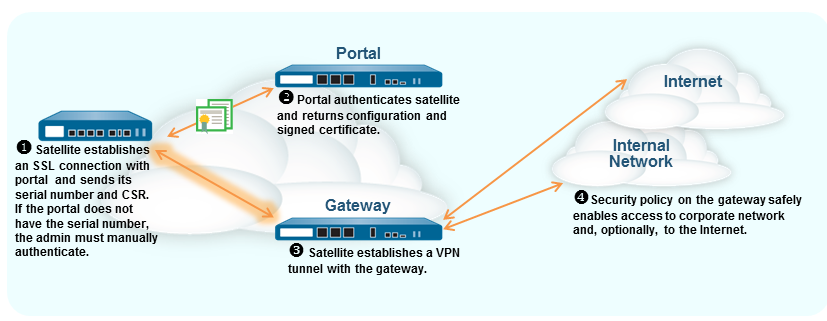
In order to register with the LSVPN, each
satellite must establish an SSL/TLS connection with the portal.
After establishing the connection, the portal authenticates the satellite
to ensure that is authorized to join the LSVPN. After successfully
authenticating the satellite, the portal will issue a server certificate
for the satellite and push the LSVPN configuration specifying the
gateways to which the satellite can connect and the root CA certificate
required to establish an SSL connection with the gateways.
There
are two ways that the satellite can authenticate to the portal during
its initial connection:
- (Best Practice)Username and password—If you would rather provision your satellites without manually entering the serial numbers of the satellites into the portal configuration, you can instead require the satellite administrator to authenticate when establishing the initial connection to the portal. Although the portal will always look for the serial number in the initial request from the satellite, if it cannot identify the serial number, the satellite administrator must provide a username and password to authenticate to the portal. Because the portal will always fall back to this form of authentication, you must create an authentication profile in order to commit the portal configuration. This requires that you set up an authentication profile for the portal LSVPN configuration even if you plan to authenticate satellites using the serial number.
- Serial number—You can configure the portal with the serial number of the satellite firewalls that are authorized to join the LSVPN for deployments where the firewall hosting the portal is running PAN-OS 10.0 or lower; serial number authentication is not supported on firewalls running PAN-OS 10.1 or later. During the initial satellite connection to the portal, the satellite presents its serial number to the portal and if the portal has the serial number in its configuration, the satellite will be successfully authenticated. You add the serial numbers of authorized satellites when you configure the portal. See Configure the Portal.
The following workflow
describes how to set up the portal to authenticate satellites using
local database authentication. External authentication methods are
not supported for satellite authentication.
- Set up local database authentication so that the satellite administrator can authenticate the satellite to the portal.
- Select and Add the user account to the local database.Add the user account to the local database.Configure an authentication profile.
- Select .Enter a Name for the profile and then set the Type to Local Database.Click OK and Commit your changes.Authenticate the satellite.To authenticate the satellite to the portal, the satellite administrator must provide the username and password configured in the local database.
- Select and click the Gateway Info link in the Status column of the tunnel configuration you created for the LSVPN.Click the enter credentials link in the Portal Status field and username and password required to authenticate the satellite to the portal.After the portal successfully authenticates to the portal for the first time, the portal generates a satellite cookie, which it uses to authenticate the satellite on subsequent sessions.
