Configure MFA Between RSA SecurID and the Firewall
Table of Contents
Configure MFA Between RSA SecurID and the Firewall
Multi-factor authentication allows you to
protect company assets by using multiple factors to verify a user’s
identity before allowing them to access network resources. To enable
multi-factor authentication (MFA) between the firewall and the RSA
SecurID Access Cloud Authentication Service, you must first configure
the RSA SecurID Service so that you have the details that you need
to configure the firewall to authenticate users using multiple factors. After
you have performed the required configuration on the RSA SecurID
Access Console, you can configure the firewall to integrate with
RSA SecurID.
The Palo Alto Networks next-generation firewall
integrates with the RSA SecurID Access Cloud Authentication Service.
The MFA API integration with RSA SecurID is supported for cloud-based services
only and does not support two-factor authentication for the on-premise
Authentication Manager when the second factor uses the Vendor Specific
API. The minimum content version required for this integration is
752 and PAN-OS 8.0.2.
Get the RSA SecurID Access Cloud Authentication Service Details
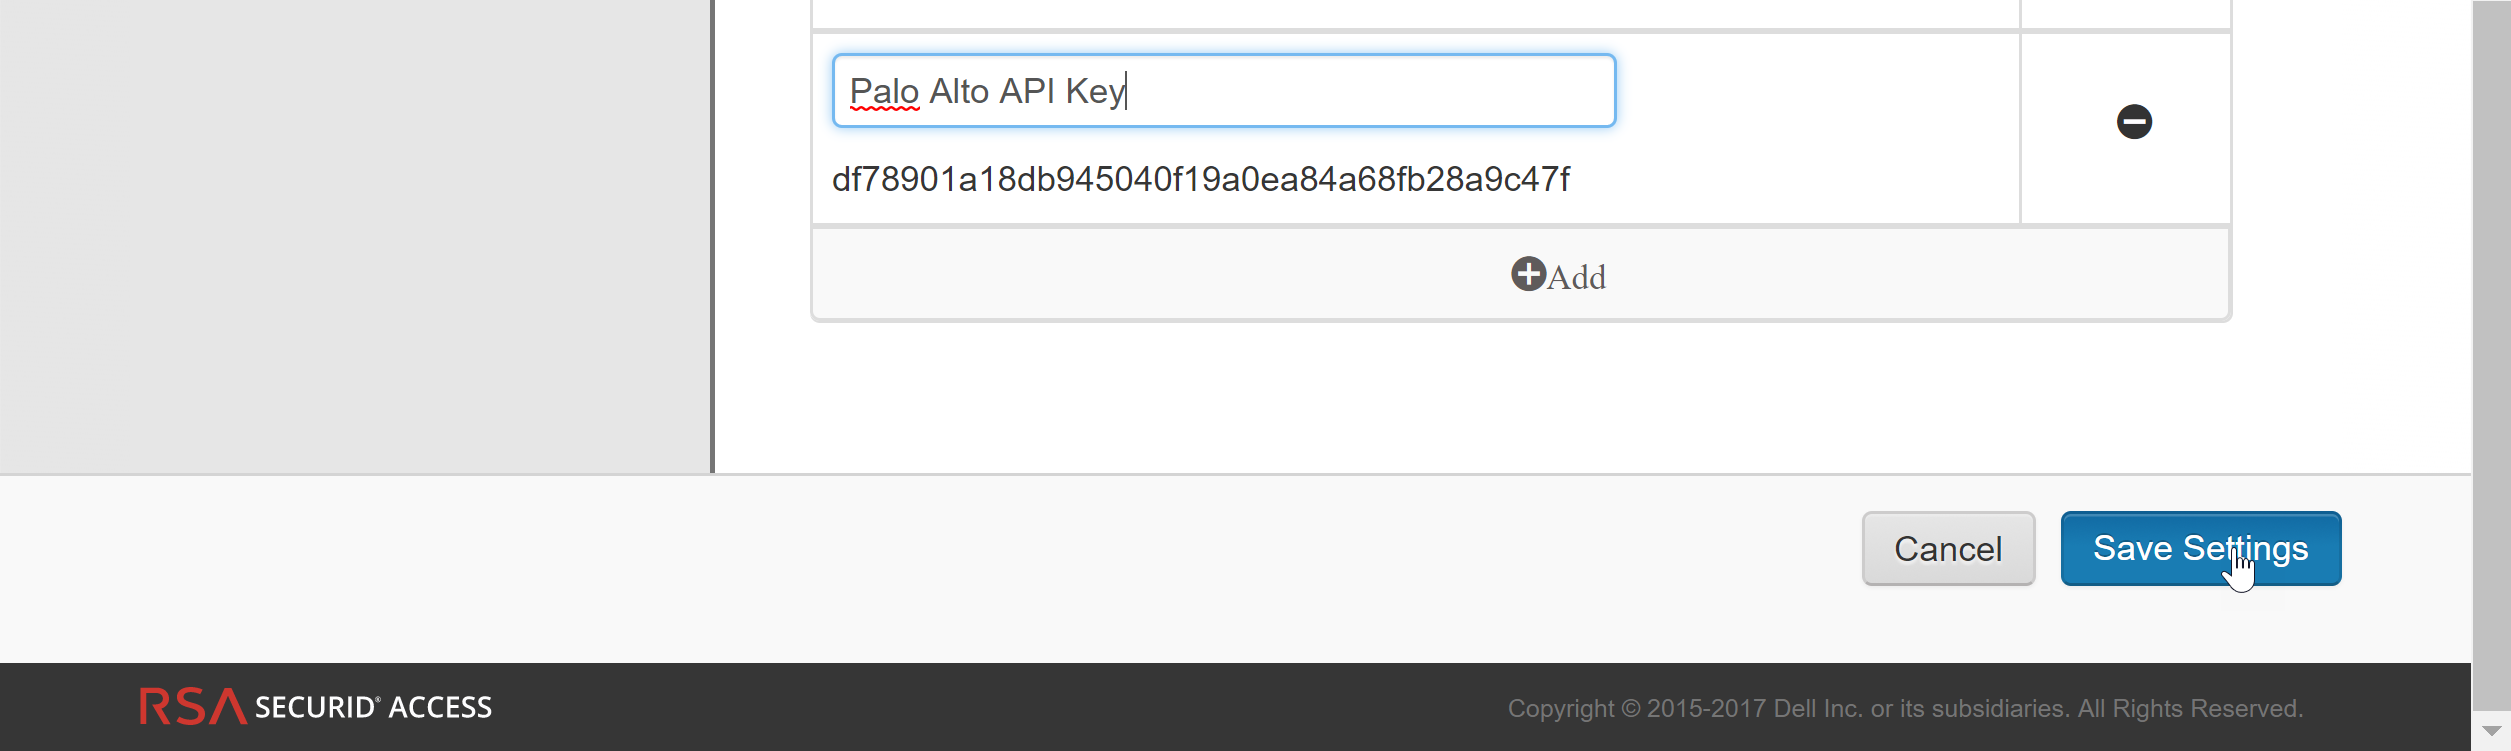
- Generate the RSA SecurID API key—Log on to RSA SecurID Access Console and select . Add a new key and then Save Settings and Publish Changes.
![]() Get the RSA SecurID Access endpoint API (Authentication Service Domain) to which the firewall must connect—Select , pick an Identity Router to Edit and jot down the Authentication Service Domain. In this example it is https://rsaready.auth-demo.auth.
Get the RSA SecurID Access endpoint API (Authentication Service Domain) to which the firewall must connect—Select , pick an Identity Router to Edit and jot down the Authentication Service Domain. In this example it is https://rsaready.auth-demo.auth.![]() Get the Access Policy ID—Select and jot down the name of the access policy that will allow the firewall to act as an authentication client to the RSA SecurID service. The policy must be configured to use either the RSA Approve or the RSA Tokencode authentication methods only.
Get the Access Policy ID—Select and jot down the name of the access policy that will allow the firewall to act as an authentication client to the RSA SecurID service. The policy must be configured to use either the RSA Approve or the RSA Tokencode authentication methods only.![]()
Configure the Firewall for MFA with RSA SecurID
After you Get the RSA SecurID Access Cloud Authentication Service Details, you can configure the firewall to prompt users for an RSA SecurID token when MFA is invoked.- Configure the firewall to trust the SSL certificate provided by the RSA SecurID Access endpoint API.
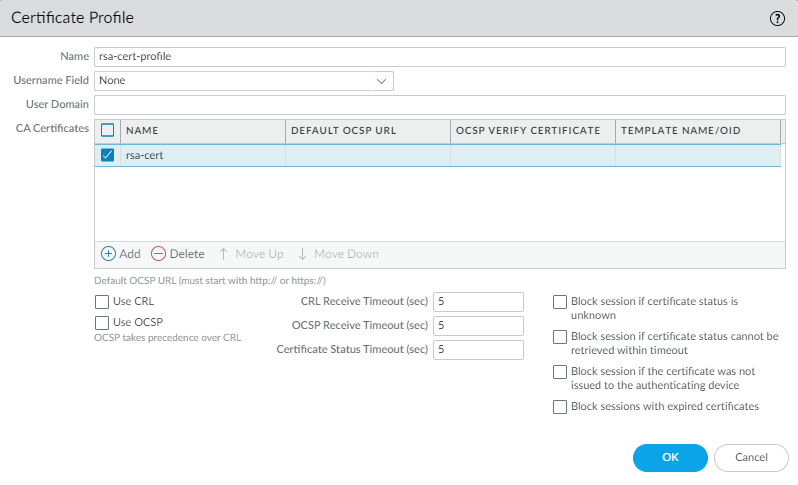
- Export the SSL certificate from the RSA SecurID Access endpoint and import it into the firewall.To enable trust between the firewall and the RSA SecurID Access endpoint API, you must either import a self-signed certificate, or the CA certificate used to sign the certificate.Configure a Certificate Profile ( and click Add).
![]() Configure Authentication Portal () in Redirect mode to display a web form for authenticating to RSA SecureID. Make sure to specify the Redirect Host as an IP address or a hostname (with no periods in its name) that resolves to the IP address of the Layer 3 interface on the firewall to which web requests are redirected.
Configure Authentication Portal () in Redirect mode to display a web form for authenticating to RSA SecureID. Make sure to specify the Redirect Host as an IP address or a hostname (with no periods in its name) that resolves to the IP address of the Layer 3 interface on the firewall to which web requests are redirected.![]() Configure a multi-factor authentication server profile to specify how the firewall must connect with the RSA SecurID cloud service and click Add).
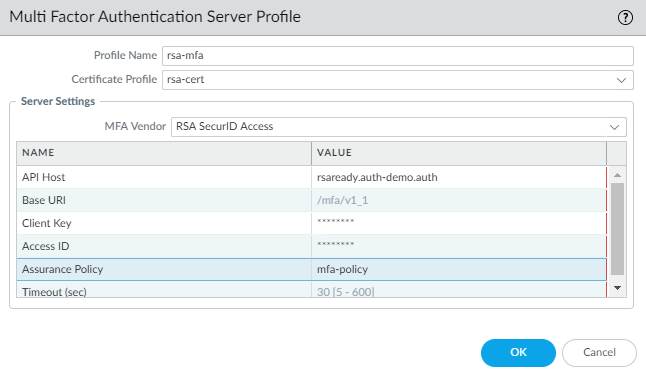
Configure a multi-factor authentication server profile to specify how the firewall must connect with the RSA SecurID cloud service and click Add).- Enter a Name to identify the MFA server profile.Select the Certificate Profile that you created earlier, rsa-cert-profile in this example. The firewall will use this certificate when establishing a secure connection with RSA SecurID cloud service.In the MFA Vendor drop-down, select RSA SecurID Access.Configure the Value for each attribute that you noted in Get the RSA SecurID Access Cloud Authentication Service Details:
- API Host—Enter the hostname or IP address of the RSA SecurID Access API endpoint to which the firewall must connect, rsaready.auth-demo.auth in this example.
- Base URI —Do not modify the default value (/mfa/v1_1)
- Client Key—Enter the RSA SecurID Client Key.
- Access ID—Enter the RSA SecurID Access ID.
- Assurance Policy—Enter the RSA SecurID Access Policy name, mfa-policy in this example.
- Timeout—The default is 30 seconds.
![]() Save the profile.Configure an authentication profile ( and click Add).The profile defines the order of the authentication factors that users must respond to.
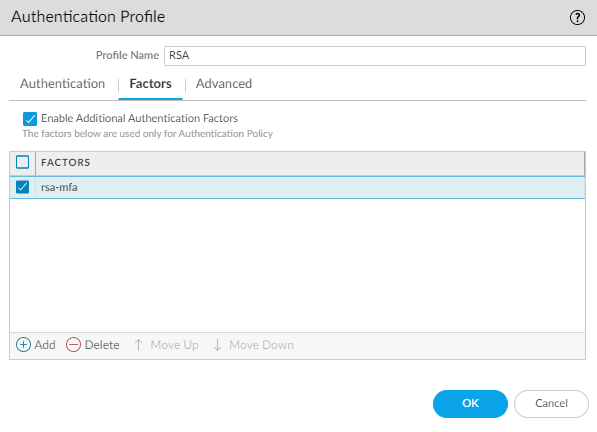
Save the profile.Configure an authentication profile ( and click Add).The profile defines the order of the authentication factors that users must respond to.- Select the Type for the first authentication factor and select the corresponding Server Profile.Select Factors, Enable Additional Authentication Factors, and Add the rsa-mfa server profile you created earlier in this example.
![]() Click OK to save the authentication profile.Configure an authentication enforcement object. ( and click Add).Make sure to select the authentication profile you just defined called RSA in this example.
Click OK to save the authentication profile.Configure an authentication enforcement object. ( and click Add).Make sure to select the authentication profile you just defined called RSA in this example.![]() Configure an Authentication policy rule. ( and click Add)Your authentication policy rule must match the services and applications you want to protect, specify the users who must authenticate, and include the authentication enforcement object that triggers the authentication profile. In this example, RSA SecurID Access authenticates all users who accessing HTTP, HTTPS, SSH, and VNC traffic with the authentication enforcement object called RSA Auth Enforcement (in Actions, select the Authentication Enforcement object).
Configure an Authentication policy rule. ( and click Add)Your authentication policy rule must match the services and applications you want to protect, specify the users who must authenticate, and include the authentication enforcement object that triggers the authentication profile. In this example, RSA SecurID Access authenticates all users who accessing HTTP, HTTPS, SSH, and VNC traffic with the authentication enforcement object called RSA Auth Enforcement (in Actions, select the Authentication Enforcement object).![]() Commit your changes on the firewall.Verify that users on your network are being secured using RSA SecurID using the Push or PIN Code authentication method you enabled.
Commit your changes on the firewall.Verify that users on your network are being secured using RSA SecurID using the Push or PIN Code authentication method you enabled.- Push authentication
- Ask a user on your network to launch a web browser and access a website. The Authentication Portal page with the IP address or hostname for the Redirect Host you defined earlier should display.
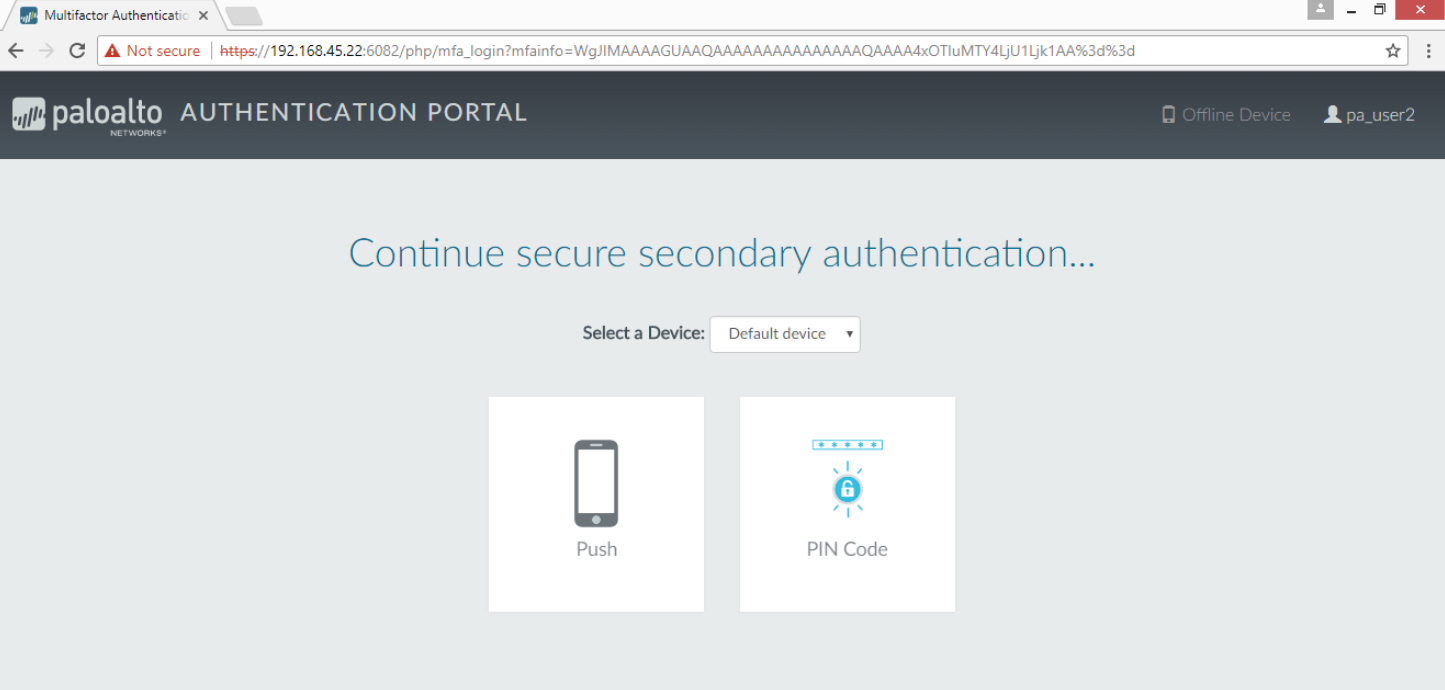
- Verify that the user enters the credentials for the first authentication factor and then continues to the secondary authentication factor, and selects Push.
![]()
- Check for a Sign-In request on the RSA SecurID Access application on the user’s mobile device.
- Ask the user to Accept the Sign-In Request on the mobile device, and wait for a few seconds for the firewall to receive the notification of successful authentication. The user should be able to access the requested website.
![]() To test an authentication failure, Decline the sign-in request on the mobile device.
To test an authentication failure, Decline the sign-in request on the mobile device.
PIN Code authentication- Ask a user on your network to launch a web browser and access a website. The Authentication Portal page with the IP address or hostname for the redirect host you defined earlier should display.
- Verify that the user enters the credentials for the first authentication factor and then continues to the secondary authentication factor, and selects PIN Code.
![]()
- Check that a PIN Code displays on the RSA SecurID Access application on the user’s mobile device.
![]()
- Ask the user to copy the PIN code in the Enter the PIN... prompt of the web browser and click Submit. Wait for a few seconds for the firewall to receive the notification of successful authentication. The user should be able to access the requested website.