Install Content Updates
Table of Contents
Install Content Updates
To ensure that you are always protected from
the latest threats (including those that have not yet been discovered),
you must ensure that you keep your firewalls up-to-date with the
latest content and software updates published by Palo Alto Networks.
The Dynamic Content Updates available
to you depend on which Subscriptions you have.
Follow
these steps to install content updates. You can also set a schedule
for content updates, to define the frequency at which the firewall
retrieves and installs updates.
Applications and Threats content
updates work a little differently than other update types—to get
the most out of the latest application knowledge and threat prevention,
follow the guidelines to Deploy Applications and Threats Content Updates instead of
the steps here.
- Ensure that the firewall has access to the update server.
- By default, the firewall accesses the Update Server at updates.paloaltonetworks.com so that the firewall receives content updates from the server to which it is closest. If your firewall has limited access to the Internet, it might be necessary to configure your allow list to enable access to servers involved in update downloads. For more information about content update servers, refer to Content Delivery Network Infrastructure for Dynamic Updates. If you want additional reference information or are experiencing connectivity and update download issues, please refer to https://knowledgebase.paloaltonetworks.com/KCSArticleDetail?id=kA14u0000001UtRCAU.If your device is located in mainland China, Palo Alto Networks recommends using the updates.paloaltonetworks.cn server for update downloads.(Optional) Click Verify Update Server Identity for an extra level of validation to enable the firewall to check that the server’s SSL certificate is signed by a trusted authority. This is enabled by default.(Optional) If the firewall needs to use a proxy server to reach Palo Alto Networks update services, in the Proxy Server window, enter:
- Server—IP address or host name of the proxy server.
- Port—Port for the proxy server. Range: 1-65535.
- User—Username to access the server.
- Password—Password for the user to access the proxy server. Re-enter the password at Confirm Password.
(Optional) Configure up to three reconnection attempts if a connection failure occurs. Use debug set-content-download-retry attempts to set the number of connection attempts. The default is 0.Check for the latest content updates.Select and click Check Now (located in the lower left-hand corner of the window) to check for the latest updates. The link in the Action column indicates whether an update is available:- Download—Indicates that a new update file is available. Click the link to begin downloading the file directly to the firewall. After successful download, the link in the Action column changes from Download to Install.
![]() You cannot download the antivirus update until you have installed the Application and Threats update.
You cannot download the antivirus update until you have installed the Application and Threats update.- Revert—Indicates that a previously installed version of the content or software version is available. You can choose to revert to the previously installed version.
Install the content updates.Installation can take up to 10 minutes on a PA-220 firewall and up to two minutes on a PA-5200 Series, PA-7000 Series, or VM-Series firewall.Click the Install link in the Action column. When the installation completes, a check mark displays in the Currently Installed column.![]() Schedule each content update.Repeat this step for each update you want to schedule.Stagger the update schedules because the firewall can only download one update at a time. If you schedule the updates to download during the same time interval, only the first download will succeed.
Schedule each content update.Repeat this step for each update you want to schedule.Stagger the update schedules because the firewall can only download one update at a time. If you schedule the updates to download during the same time interval, only the first download will succeed.- Set the schedule of each update type by clicking the None link.
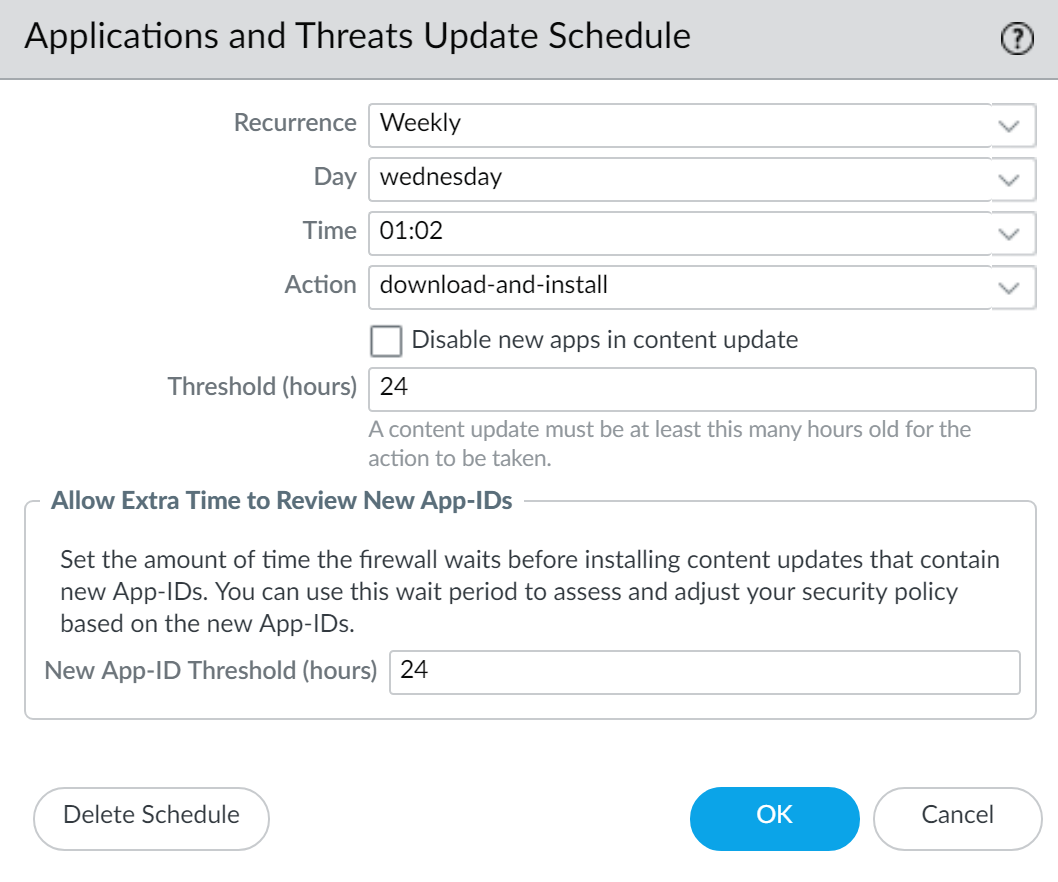
![]() Specify how often you want the updates to occur by selecting a value from the Recurrence drop-down. The available values vary by content type (WildFire updates are available in Real-time, Every Minute, Every 15 Minutes, Every 30 minutes, or Every Hour whereas Applications and Threats updates can be scheduled for Weekly, Daily, Hourly, or Every 30 Minutes and Antivirus updates can be scheduled for Hourly, Daily, or Weekly).You can also select None (Manual) for Applications and Threats or for Antivirus updates. This means there is no recurring schedule for this item and you must manually install updates. To fully remove the schedule node, select Delete Schedule.Specify the Time and (or, minutes past the hour in the case of WildFire), if applicable depending on the Recurrence value you selected, Day of the week that you want the updates to occur.Specify whether you want the system to Download Only or, as a best practice, Download And Install the update.Enter how long after a release to wait before performing a content update in the Threshold (Hours) field. In rare instances, errors in content updates may be found. For this reason, you may want to delay installing new updates until they have been released for a certain number of hours.If you have mission critical applications that must be 100% available, set the threshold for Applications or Applications and Threats updates to a minimum of 24 hours or more and follow the Best Practices for Applications and Threats Content Updates. Additionally, While scheduling content updates is a one-time or infrequent task, after you’ve set the schedule, you’ll need to continue to Manage New and Modified App-IDs that are included in content releases, as these App-IDs can change how security policy is enforced.(Optional) Enter the New App-ID Thresholds in hours to set the amount of time the firewall waits before installing content updates that contain new App-IDs.
Specify how often you want the updates to occur by selecting a value from the Recurrence drop-down. The available values vary by content type (WildFire updates are available in Real-time, Every Minute, Every 15 Minutes, Every 30 minutes, or Every Hour whereas Applications and Threats updates can be scheduled for Weekly, Daily, Hourly, or Every 30 Minutes and Antivirus updates can be scheduled for Hourly, Daily, or Weekly).You can also select None (Manual) for Applications and Threats or for Antivirus updates. This means there is no recurring schedule for this item and you must manually install updates. To fully remove the schedule node, select Delete Schedule.Specify the Time and (or, minutes past the hour in the case of WildFire), if applicable depending on the Recurrence value you selected, Day of the week that you want the updates to occur.Specify whether you want the system to Download Only or, as a best practice, Download And Install the update.Enter how long after a release to wait before performing a content update in the Threshold (Hours) field. In rare instances, errors in content updates may be found. For this reason, you may want to delay installing new updates until they have been released for a certain number of hours.If you have mission critical applications that must be 100% available, set the threshold for Applications or Applications and Threats updates to a minimum of 24 hours or more and follow the Best Practices for Applications and Threats Content Updates. Additionally, While scheduling content updates is a one-time or infrequent task, after you’ve set the schedule, you’ll need to continue to Manage New and Modified App-IDs that are included in content releases, as these App-IDs can change how security policy is enforced.(Optional) Enter the New App-ID Thresholds in hours to set the amount of time the firewall waits before installing content updates that contain new App-IDs.![]() Click OK to save the schedule settings.Click Commit to save the settings to the running configuration.Update PAN-OS.Always update content before updating PAN-OS. Every PAN-OS version has a minimum supported content release version.
Click OK to save the schedule settings.Click Commit to save the settings to the running configuration.Update PAN-OS.Always update content before updating PAN-OS. Every PAN-OS version has a minimum supported content release version.- Review the Release Notes.