Verify SSH Connection to Firewall
Table of Contents
Verify SSH Connection to Firewall
Verify the SSH connection to the management port on the
firewall.
Palo Alto Networks firewalls come with Secure
Shell (SSH) preconfigured; firewalls can act as both an SSH server
and an SSH client. You can verify your SSH connection to the management
port of the firewall during remote access to ensure that, when you
log in remotely, you are logging in to the firewall. You can also
refresh the SSH keys and specify other options for the keys.
After
you initially log in through the console to the command-line interface
(CLI), the firewall boots up and displays six fingerprints (hashed
SSH keys). When you then remotely access the management port on
the firewall for the first time, the SSH client presents a fingerprint
to you and it must match one of the fingerprints you noted from
the console login. This match verifies that the firewall you access
remotely is your firewall and that there is no malicious device
between your device and the firewall intercepting Hello packets
or presenting a false fingerprint.
To ensure you are logging in to your firewall,
perform this task when you first access your firewall remotely (when
you Perform Initial Configuration)
and whenever you change the default host key type or regenerate
the host keys for the management port.
- Perform Initial Configuration and
note the fingerprints that the firewall displays upon booting up.When you connect to the console port (Step 3 of Perform Initial Configuration), the firewall boots up and displays SSH fingerprints. Make note of these fingerprints.If the firewall is in FIPS-CC mode, it displays the fingerprints in sha1 hash in base64 encoding, as in the following example:SSH Fingerprints-------------------256 +nvDTw9G6FpjVRYCN7qYWMmZxB0 (ECDSA)384 Slx984ndSKeRU+YOkNh9R/4u8IM (ECDSA)521 sph8wuC3Y/p6zvFr0sGnrzim3wo (ECDSA)2048 kK3+bBRaJpJQOM+qE8Bl9SKCQPg (RSA)3072 gtFBWm65/+D7dqUdDDc3P6hJu1g (RSA)4096 CQnLFnMF1BfBwV7y5bhYQyawpcc (RSA)If the firewall is in non-FIPS-CC mode, it displays the fingerprints in md5 hash in hex encoding, as in the following example:SSH Public key fingerprints:256 5c:73:5c:88:ea:ba:04:f7:9a:72:07:67:74:20:0c:09 (ECDSA)384 f2:69:5c:0b:e2:26:e1:39:ca:2f:46:00:df:d5:aa:c0 (ECDSA)521 8f:00:fa:d0:b9:a5:c5:4d:9d:f5:cd:0d:2c:86:99:25 (ECDSA)2048 0c:01:69:54:1e:21:08:9d:65:37:3b:50:4a:03:70:d6 (RSA)3072 1f:ae:d8:1a:b6:8d:9a:4b:c2:fd:74:ca:dc:4f:ca:19 (RSA)4096 38:88:fb:62:07:19:cf:89:88:a0:6d:22:4b:fa:f4:23 (RSA)
- (Optional) Display fingerprints from the SSH
server (the firewall).Display the fingerprints using the CLI if you forgot to note the fingerprints that the SSH server displayed upon boot up or if you regenerated a host key or changed your default host key type. To effectively compare fingerprints, specify the same format that your SSH client uses (the device from which you will remotely log in): either base64 or hex format, and hash-type format of md5, sha1, or sha256.There is no md5 hash type in FIPS-CC mode.The following example displays SSH server fingerprints in hex format and md5 hash type.admin@PA-3060> show ssh-fingerprints format hex hash-type md5SSH Public key fingerprints:256 5c:73:5c:88:ea:ba:04:f7:9a:72:07:67:74:20:0c:09 (ECDSA)384 f2:69:5c:0b:e2:26:e1:39:ca:2f:46:00:df:d5:aa:c0 (ECDSA)521 8f:00:fa:d0:b9:a5:c5:4d:9d:f5:cd:0d:2c:86:99:25 (ECDSA)2048 0c:01:69:54:1e:21:08:9d:65:37:3b:50:4a:03:70:d6 (RSA)3072 1f:ae:d8:1a:b6:8d:9a:4b:c2:fd:74:ca:dc:4f:ca:19 (RSA)4096 38:88:fb:62:07:19:cf:89:88:a0:6d:22:4b:fa:f4:23 (RSA)
- Continue to Perform Initial Configuration on the firewall so that you assign an IP address to the management interface and commit your changes.
- Disconnect the firewall from your computer.
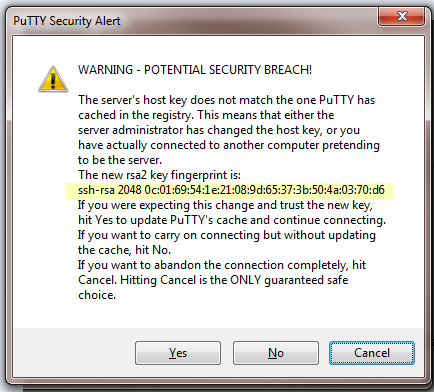
- Initiate remote access to the firewall and view the fingerprint. Using terminal emulation software, such as PuTTY, launch an SSH management session to the firewall using the IP address you assigned to it.
![]() Before you can proceed with the connection, the SSH client presents a fingerprint as in the following example:
Before you can proceed with the connection, the SSH client presents a fingerprint as in the following example:![]() If you have already logged in to the firewall (and have not changed the key), the SSH client already has the key stored in its database and therefore doesn’t present a fingerprint.
If you have already logged in to the firewall (and have not changed the key), the SSH client already has the key stored in its database and therefore doesn’t present a fingerprint. - Verify matching fingerprints.
- Verify that the fingerprint that the SSH client (PuTTY) presented matches one of the fingerprints you noted from logging in to the console port in the first step.
- A match verifies that the firewall you remotely accessed
is the same firewall you connected to on the console port. You typically
want the SSH client to update its cache, so respond to the warning
with Yes to continue connecting. In this
example, the fingerprint in the preceding graphic matches the RSA
2048 fingerprint from the SSH server (firewall) in Step 1 (and Step
2) of this procedure.If there is no match or you receive a mismatch warning, you aren’t connecting to the expected device; Cancel the connection attempt.If you see a match but you don’t want the SSH client to update its cache, respond with No, which allows you to continue connecting. Respond with No if the firewall is configured with multiple default host keys and you want to connect using a specific host key without updating the SSH client cache.
To verify your SSH connection to the firewall after you have regenerated a host key or changed the default host key type, perform a procedure similar to this one, starting with logging in to the console port. In this case, Step 2 is required; execute the show ssh-fingerprints CLI command (with the applicable format and hash-type) and note the one fingerprint that displays. Omit Step 3 and continue with Step 4, finishing the rest of the procedure. Verify that the fingerprint from the SSH client matches the fingerprint you noted from Step 2.