Configure the Palo Alto Networks Terminal Server (TS) Agent for User Mapping
Table of Contents
Expand All
|
Collapse All
Next-Generation Firewall Docs
-
PAN-OS 10.1
- PAN-OS 11.1 & Later
- PAN-OS 11.0 (EoL)
- PAN-OS 10.2
- PAN-OS 10.1
- PAN-OS 10.0 (EoL)
- PAN-OS 9.1 (EoL)
- Cloud Management of NGFWs
-
- Management Interfaces
-
- Launch the Web Interface
- Configure Banners, Message of the Day, and Logos
- Use the Administrator Login Activity Indicators to Detect Account Misuse
- Manage and Monitor Administrative Tasks
- Commit, Validate, and Preview Firewall Configuration Changes
- Export Configuration Table Data
- Use Global Find to Search the Firewall or Panorama Management Server
- Manage Locks for Restricting Configuration Changes
-
-
- Define Access to the Web Interface Tabs
- Provide Granular Access to the Monitor Tab
- Provide Granular Access to the Policy Tab
- Provide Granular Access to the Objects Tab
- Provide Granular Access to the Network Tab
- Provide Granular Access to the Device Tab
- Define User Privacy Settings in the Admin Role Profile
- Restrict Administrator Access to Commit and Validate Functions
- Provide Granular Access to Global Settings
- Provide Granular Access to the Panorama Tab
- Provide Granular Access to Operations Settings
- Panorama Web Interface Access Privileges
-
- Reset the Firewall to Factory Default Settings
-
- Plan Your Authentication Deployment
- Pre-Logon for SAML Authentication
- Configure SAML Authentication
- Configure Kerberos Single Sign-On
- Configure Kerberos Server Authentication
- Configure TACACS+ Authentication
- Configure RADIUS Authentication
- Configure LDAP Authentication
- Configure Local Database Authentication
- Configure an Authentication Profile and Sequence
- Test Authentication Server Connectivity
- Troubleshoot Authentication Issues
-
- Keys and Certificates
- Default Trusted Certificate Authorities (CAs)
- Certificate Deployment
- Configure the Master Key
- Export a Certificate and Private Key
- Configure a Certificate Profile
- Configure an SSL/TLS Service Profile
- Configure an SSH Service Profile
- Replace the Certificate for Inbound Management Traffic
- Configure the Key Size for SSL Forward Proxy Server Certificates
-
- HA Overview
-
- Prerequisites for Active/Active HA
- Configure Active/Active HA
-
- Use Case: Configure Active/Active HA with Route-Based Redundancy
- Use Case: Configure Active/Active HA with Floating IP Addresses
- Use Case: Configure Active/Active HA with ARP Load-Sharing
- Use Case: Configure Active/Active HA with Floating IP Address Bound to Active-Primary Firewall
- Use Case: Configure Active/Active HA with Source DIPP NAT Using Floating IP Addresses
- Use Case: Configure Separate Source NAT IP Address Pools for Active/Active HA Firewalls
- Use Case: Configure Active/Active HA for ARP Load-Sharing with Destination NAT
- Use Case: Configure Active/Active HA for ARP Load-Sharing with Destination NAT in Layer 3
- HA Clustering Overview
- HA Clustering Best Practices and Provisioning
- Configure HA Clustering
- Refresh HA1 SSH Keys and Configure Key Options
- HA Firewall States
- Reference: HA Synchronization
-
- Use the Dashboard
- Monitor Applications and Threats
- Monitor Block List
-
- Report Types
- View Reports
- Configure the Expiration Period and Run Time for Reports
- Disable Predefined Reports
- Custom Reports
- Generate Custom Reports
- Generate the SaaS Application Usage Report
- Manage PDF Summary Reports
- Generate User/Group Activity Reports
- Manage Report Groups
- Schedule Reports for Email Delivery
- Manage Report Storage Capacity
- View Policy Rule Usage
- Use External Services for Monitoring
- Configure Log Forwarding
- Configure Email Alerts
-
- Configure Syslog Monitoring
-
- Traffic Log Fields
- Threat Log Fields
- URL Filtering Log Fields
- Data Filtering Log Fields
- HIP Match Log Fields
- GlobalProtect Log Fields
- IP-Tag Log Fields
- User-ID Log Fields
- Decryption Log Fields
- Tunnel Inspection Log Fields
- SCTP Log Fields
- Authentication Log Fields
- Config Log Fields
- System Log Fields
- Correlated Events Log Fields
- GTP Log Fields
- Audit Log Fields
- Syslog Severity
- Custom Log/Event Format
- Escape Sequences
- Forward Logs to an HTTP/S Destination
- Firewall Interface Identifiers in SNMP Managers and NetFlow Collectors
- Monitor Transceivers
-
- User-ID Overview
- Enable User-ID
- Map Users to Groups
- Enable User- and Group-Based Policy
- Enable Policy for Users with Multiple Accounts
- Verify the User-ID Configuration
-
- App-ID Overview
- App-ID and HTTP/2 Inspection
- Manage Custom or Unknown Applications
- Safely Enable Applications on Default Ports
- Applications with Implicit Support
-
- Prepare to Deploy App-ID Cloud Engine
- Enable or Disable the App-ID Cloud Engine
- App-ID Cloud Engine Processing and Usage
- New App Viewer (Policy Optimizer)
- Add Apps to an Application Filter with Policy Optimizer
- Add Apps to an Application Group with Policy Optimizer
- Add Apps Directly to a Rule with Policy Optimizer
- Replace an RMA Firewall (ACE)
- Impact of License Expiration or Disabling ACE
- Commit Failure Due to Cloud Content Rollback
- Troubleshoot App-ID Cloud Engine
- Application Level Gateways
- Disable the SIP Application-level Gateway (ALG)
- Maintain Custom Timeouts for Data Center Applications
-
- Decryption Overview
-
- Keys and Certificates for Decryption Policies
- SSL Forward Proxy
- SSL Forward Proxy Decryption Profile
- SSL Inbound Inspection
- SSL Inbound Inspection Decryption Profile
- SSL Protocol Settings Decryption Profile
- SSH Proxy
- SSH Proxy Decryption Profile
- Profile for No Decryption
- SSL Decryption for Elliptical Curve Cryptography (ECC) Certificates
- Perfect Forward Secrecy (PFS) Support for SSL Decryption
- SSL Decryption and Subject Alternative Names (SANs)
- TLSv1.3 Decryption
- High Availability Not Supported for Decrypted Sessions
- Decryption Mirroring
- Configure SSL Forward Proxy
- Configure SSL Inbound Inspection
- Configure SSH Proxy
- Configure Server Certificate Verification for Undecrypted Traffic
- Enable Users to Opt Out of SSL Decryption
- Temporarily Disable SSL Decryption
- Configure Decryption Port Mirroring
- Verify Decryption
- Activate Free Licenses for Decryption Features
-
- Policy Types
- Policy Objects
- Track Rules Within a Rulebase
- Enforce Policy Rule Description, Tag, and Audit Comment
- Move or Clone a Policy Rule or Object to a Different Virtual System
-
- External Dynamic List
- Built-in External Dynamic Lists
- Configure the Firewall to Access an External Dynamic List
- Retrieve an External Dynamic List from the Web Server
- View External Dynamic List Entries
- Exclude Entries from an External Dynamic List
- Enforce Policy on an External Dynamic List
- Find External Dynamic Lists That Failed Authentication
- Disable Authentication for an External Dynamic List
- Register IP Addresses and Tags Dynamically
- Use Dynamic User Groups in Policy
- Use Auto-Tagging to Automate Security Actions
- CLI Commands for Dynamic IP Addresses and Tags
- Application Override Policy
- Test Policy Rules
-
- Network Segmentation Using Zones
- How Do Zones Protect the Network?
-
PAN-OS 11.1 & Later
- PAN-OS 11.1 & Later
- PAN-OS 11.0 (EoL)
- PAN-OS 10.2
- PAN-OS 10.1
-
- Tap Interfaces
-
- Layer 2 and Layer 3 Packets over a Virtual Wire
- Port Speeds of Virtual Wire Interfaces
- LLDP over a Virtual Wire
- Aggregated Interfaces for a Virtual Wire
- Virtual Wire Support of High Availability
- Zone Protection for a Virtual Wire Interface
- VLAN-Tagged Traffic
- Virtual Wire Subinterfaces
- Configure Virtual Wires
- Configure a PPPoE Client on a Subinterface
- Configure an IPv6 PPPoE Client
- Configure an Aggregate Interface Group
- Configure Bonjour Reflector for Network Segmentation
- Use Interface Management Profiles to Restrict Access
-
- DHCP Overview
- Firewall as a DHCP Server and Client
- Firewall as a DHCPv6 Client
- DHCP Messages
- Dynamic IPv6 Addressing on the Management Interface
- Configure an Interface as a DHCP Server
- Configure an Interface as a DHCPv4 Client
- Configure an Interface as a DHCPv6 Client with Prefix Delegation
- Configure the Management Interface as a DHCP Client
- Configure the Management Interface for Dynamic IPv6 Address Assignment
- Configure an Interface as a DHCP Relay Agent
-
- DNS Overview
- DNS Proxy Object
- DNS Server Profile
- Multi-Tenant DNS Deployments
- Configure a DNS Proxy Object
- Configure a DNS Server Profile
- Use Case 1: Firewall Requires DNS Resolution
- Use Case 2: ISP Tenant Uses DNS Proxy to Handle DNS Resolution for Security Policies, Reporting, and Services within its Virtual System
- Use Case 3: Firewall Acts as DNS Proxy Between Client and Server
- DNS Proxy Rule and FQDN Matching
-
- NAT Rule Capacities
- Dynamic IP and Port NAT Oversubscription
- Dataplane NAT Memory Statistics
-
- Translate Internal Client IP Addresses to Your Public IP Address (Source DIPP NAT)
- Create a Source NAT Rule with Persistent DIPP
- PAN-OS
- Strata Cloud Manager
- Enable Clients on the Internal Network to Access your Public Servers (Destination U-Turn NAT)
- Enable Bi-Directional Address Translation for Your Public-Facing Servers (Static Source NAT)
- Configure Destination NAT with DNS Rewrite
- Configure Destination NAT Using Dynamic IP Addresses
- Modify the Oversubscription Rate for DIPP NAT
- Reserve Dynamic IP NAT Addresses
- Disable NAT for a Specific Host or Interface
-
- Network Packet Broker Overview
- How Network Packet Broker Works
- Prepare to Deploy Network Packet Broker
- Configure Transparent Bridge Security Chains
- Configure Routed Layer 3 Security Chains
- Network Packet Broker HA Support
- User Interface Changes for Network Packet Broker
- Limitations of Network Packet Broker
- Troubleshoot Network Packet Broker
-
- Enable Advanced Routing
- Logical Router Overview
- Configure a Logical Router
- Create a Static Route
- Configure BGP on an Advanced Routing Engine
- Create BGP Routing Profiles
- Create Filters for the Advanced Routing Engine
- Configure OSPFv2 on an Advanced Routing Engine
- Create OSPF Routing Profiles
- Configure OSPFv3 on an Advanced Routing Engine
- Create OSPFv3 Routing Profiles
- Configure RIPv2 on an Advanced Routing Engine
- Create RIPv2 Routing Profiles
- Create BFD Profiles
- Configure IPv4 Multicast
- Configure MSDP
- Create Multicast Routing Profiles
- Create an IPv4 MRoute
-
-
PAN-OS 11.2
- PAN-OS 11.2
- PAN-OS 11.1
- PAN-OS 11.0 (EoL)
- PAN-OS 10.2
- PAN-OS 10.1
- PAN-OS 10.0 (EoL)
- PAN-OS 9.1 (EoL)
- PAN-OS 9.0 (EoL)
- PAN-OS 8.1 (EoL)
- Cloud Management and AIOps for NGFW
Configure the Palo Alto Networks Terminal Server (TS) Agent for User Mapping
Use the following procedure to install and
configure the TS agent on the terminal server. To map all your users,
you must install the TS agent on all terminal servers to which your
users log in.
If you are using TS agent 7.0 or a later
version, disable any Sophos antivirus software on the TS agent host.
Otherwise, the antivirus software overwrites the source ports that
the TS agent allocates.
For information about default values,
ranges, and other specifications, refer to Configure User Mapping for Terminal Server Users. For information
about the terminal servers supported by the TS agent and the number
of TS agents supported on each firewall model, refer to the Palo Alto Networks Compatibility Matrix.
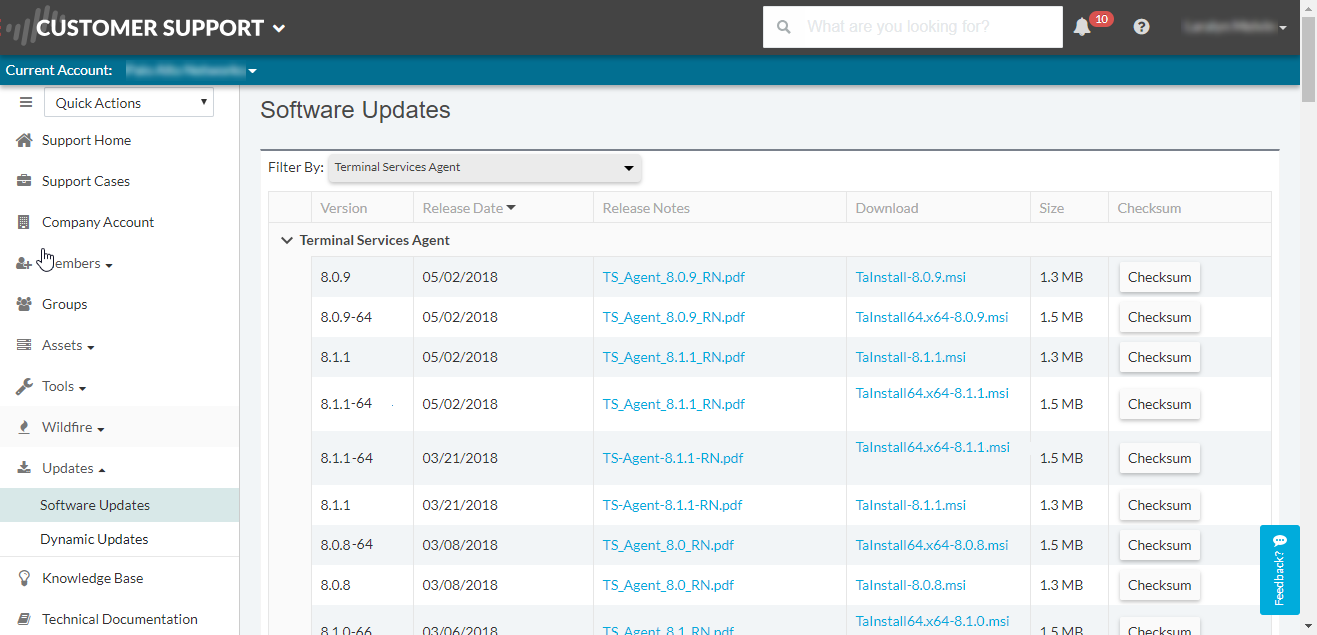
- Download the TS agent installer.
- Log in to the Palo Alto Networks Customer Support Portal.
- Select UpdatesSoftware Updates.
- Set Filter By to Terminal Services Agent and select the version of the agent you want to install from the corresponding Download column. For example, to download TS agent 9.0, select TaInstall-9.0.msi.
- Save the TaInstall.x64-x.x.x-xx.msi or TaInstall-x.x.x-xx.msi file on the systems where you plan to install the agent; be sure to select the appropriate version based on whether the Windows system is running a 32-bit or a 64-bit OS.
- Run the installer as an administrator.
- Open the Windows Start menu, right-click the Command Prompt program, and Run as administrator.
- From the command line, run the .msi file you downloaded. For example, if you saved the TaInstall-9.0.msi file to the Desktop, then enter the following:
C:\Users\administrator.acme>cd Desktop C:\Users\administrator.acme\Desktop>TaInstall-9.0.0-1.msi
- Follow the setup prompts to install the agent using the default settings. The setup installs the agent in C:\ProgramFiles\Palo Alto Networks\Terminal Server Agent.To ensure correct port allocation, you must use the default Terminal Server agent installation folder location.
- When the installation completes, Close the setup dialog.If you are upgrading to a TS agent version that has a newer driver than the existing installation, the installation wizard prompts you to reboot the system after you upgrade.
- Define the range of ports for the TS agent to allocate to end users.The System Source Port Allocation Range and System Reserved Source Ports specify the range of ports that are allocated to non-user sessions. Make sure the values in these fields do not overlap with the ports you designate for user traffic. These values can be changed only by editing the corresponding Windows registry settings. The TS agent does not allocate ports for network traffic emitted by session 0.
- Open the Windows Start menu and select Terminal Server Agent to launch the Terminal Server agent application.
- Configure (side menu) the agent.
- Enter the Source Port Allocation Range (default is 20,000-39,999). This is the full range of port numbers that the TS agent will allocate for user mapping. The port range you specify cannot overlap the System Source Port Allocation Range.
- (Optional) If there are ports or port ranges within the source port allocation that you do not want the TS agent to allocate to user sessions, specify them as Reserved Source Ports. To include multiple ranges, use commas with no spaces (for example: 2000-3000,3500,4000-5000).
- Specify the number of ports to allocate to each individual user upon login to the terminal server (Port Allocation Start Size Per User); default is 200.
- Specify the Port Allocation Maximum Size Per User, which is the maximum number of ports the Terminal Server agent can allocate to an individual user.
- Specify whether to continue processing traffic from the user if the user runs out of allocated ports. The Fail port binding when available ports are used up option is enabled by default, which indicates that the application will fail to send traffic when all ports are used. To enable users to continue using applications when they run out of ports, disable (clear) this option, but if you do, this traffic may not be identified with User-ID.
- If the terminal server stops responding when you attempt to shut it down, enable the Detach agent driver at shutdown option.
- (Optional) Assign your own certificates for mutual authentication between the TS agent and the firewall.
- Obtain your certificate for the TS agent from your enterprise PKI or generate one on your firewall. The private key of the server certificate must be encrypted and the certificate must be uploaded in PEM file format. Perform one of the following tasks to upload a certificate:
- Generate a Certificate and export it.
- Export a certificate from your enterprise certificate authority (CA).
- Add a server certificate to the TS agent.
- On the TS agent, select Server Certificate and Add a new certificate.
- Enter the path and name of the certificate file received from the CA or browse to the certificate file.
- Enter the private key password.
- Click OK.
- Commit your changes.
The TS agent uses a self-signed certificate on port 5009 with following information:Issuer: CN=Terminal Server Agent, OU=Engineering, O=Palo Alto Networks, L=Santa Clara, S=California, C=USSubject: CN=Terminal Server Agent, OU=Engineering, O=Palo Alto Networks, L=Santa Clara, S=California, C=US - Configure and assign the certificate profile for the firewall.
- Select DeviceCertificate ManagementCertificate Profile to Configure a Certificate Profile.You can assign only one certificate profile for Windows User-ID agents and TS agents. Therefore, your certificate profile must include all certificate authorities that issued certificates uploaded to connected Windows User-ID and TS agents.
- Select DeviceUser IdentificationConnection Security.
- Edit (
- Click OK.
- Commit your changes.
- Configure the firewall to connect to the Terminal Server agent.Complete the following steps on each firewall you want to connect to the Terminal Server agent to receive user mappings:
- Select DeviceUser IdentificationTerminal Server Agents and Add a new TS agent.
- Enter a Name for the Terminal Server agent.
- Enter the hostname or IP address of the Windows Host on which the Terminal Server agent is installed.The hostname or IP address must resolve to a static IP address. If you change the existing hostname, the TS agent resets when you commit the changes to resolve the new hostname. If the hostname resolves to multiple IP addresses, the TS agent uses the first address in the list.
- (Optional) Enter the hostname or IP address for any Alternative IP Addresses that can appear as the source IP address for the outgoing traffic.The hostname or IP address must resolve to a static IP address. You can enter up to 8 IP addresses or hostnames.
- Enter the Port number on which the agent will listen for user mapping requests. This value must match the value configured on the Terminal Server agent. By default, the port is set to 5009 on the firewall and on the agent. If you change it on the firewall, you must also change the Listening Port on the Terminal Server agent Configure dialog to the same port.
- Make sure that the configuration is Enabled and then click OK.
- Commit your changes.
- Verify that the Connected status displays as connected (a green light).
- Verify that the Terminal Server agent is successfully mapping IP addresses to usernames and that the firewalls can connect to the agent.
- Open the Windows Start menu and select Terminal Server Agent.
- Verify that the firewalls can connect by making sure the Connection Status of each firewall in the Connection List is Connected.
- Verify that the Terminal Server agent is successfully mapping port ranges to usernames (Monitor in the side menu) and confirm that the mapping table is populated.
- (Windows 2012 R2 servers only) Disable Enhanced Protected Mode in Microsoft Internet Explorer for each user who uses that browser.This task is not necessary for other browsers, such as Google Chrome or Mozilla Firefox.To disable Enhanced Protected Mode for all users, use Local Security Policy.Perform these steps on the Windows Server:
- Start Internet Explorer.
- Select SettingsInternet optionsAdvanced and scroll to the Security section.
- Disable (clear) the Enable Enhanced Protected Mode option.
- Click OK.In Internet Explorer, Palo Alto Networks recommends that you do not disable Protected Mode, which differs from Enhanced Protected Mode.