DHCPv6 Client with Prefix Delegation
Table of Contents
DHCPv6 Client with Prefix Delegation
Configure an interface as a DHCPv6 client with prefix
delegation.
A PAN-OS firewall can act as a DHCPv6 client to request an IPv6 address
for its interface and an IPv6 prefix and options from a DHCPv6 server, thereby
provisioning a Layer 3 Ethernet, VLAN, or Aggregate Ethernet (AE) interface. DHCPv6
client reduces your IPv6 address provisioning effort and potential errors, and
automates the task of getting your hosts onto the network.
Furthermore,
the DHCPv6 client firewall supports prefix delegation. An ISP assigns
prefixes to a DHCPv6 server, which assigns prefixes to the DHCPv6
client firewall. The firewall then assigns a subnet from the prefix
pool of delegated prefixes to one or more of its host-facing interfaces.
The delegated interfaces distribute the addresses from the delegated
pool to the local network using Neighbor Discovery Protocol (NDP)
with stateless address autoconfiguration (SLAAC). The delegated
interfaces also provide other parameters using NDP. Configure prefix delegation
if there are hosts connected to the firewall that need dynamic IPv6
addressing. Prefix delegation simplifies network provisioning on
customer-facing LAN networks.
To configure a firewall interface
that is facing the hosts on the network, you configure the interface
type to be inherited. Only inherited interfaces
can advertise those selected prefixes from the prefix pool to the
hosts. Each host constructs its own IPv6 address using the delegated
prefix and its MAC address or EUI-64 (Extended Unique Identifier), at
the discretion of the host.
The following example topology
has a firewall, a DHCPv6 server north of the firewall, and hosts
on two LANs south of the firewall.

The firewall
interface that faces the delegating router is a Stateless Address
Autoconfiguration (SLAAC) client. The firewall interface that faces
the host is a SLAAC server; the host is a SLAAC client. The DHCPv6
client allocates a /64 prefix from the prefix pool to the inherited
interface. The firewall configures an IPv6 address on an inherited
interface using SLAAC and sends RAs with the prefix to autoconfigure
the host interfaces using SLAAC.
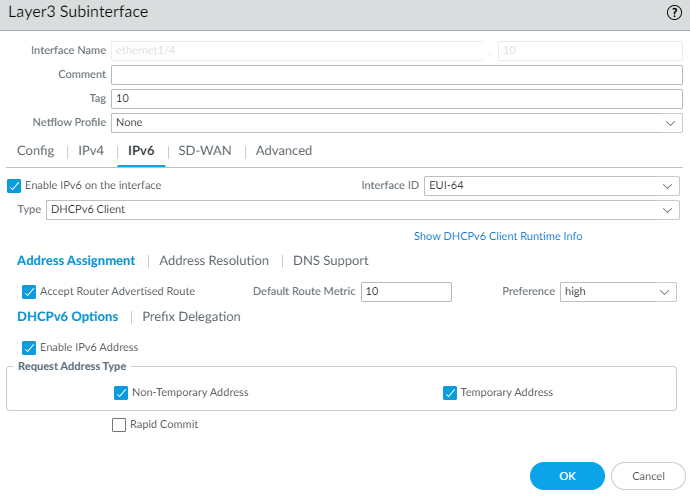
You first configure the interface
facing the DHCPv6 server and ISP to be a DHCPv6 Client and
request a Non-Temporary or Temporary address for itself. This interface
also requests a delegated prefix on behalf of the host-facing interface.
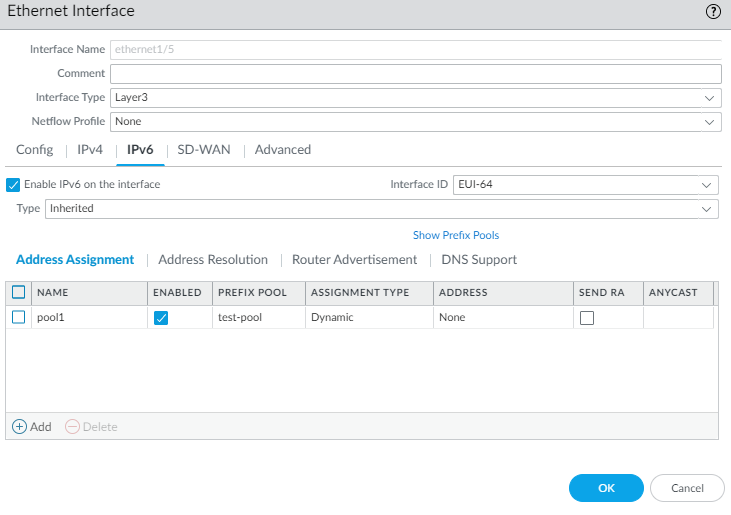
You then configure an interface facing the hosts as an inherited interface
that provides prefix delegation to the LAN hosts.
- Select an Ethernet, AE, or VLAN interface (that faces the DHCPv6 server and ISP) to be a DHCPv6 client.
- Select or select and select an AE interface, or select .For Interface Type, select Layer3.Add Subinterface if you want a single Ethernet or VLAN interface facing the ISP to be separated into subinterfaces.Select IPv6 and Enable IPv6 on the interface.Configure an interface that faces the ISP to be a DHCPv6 client and request its leased, temporary and/or non-temporary IPv6 address.
- For Type, select DHCPv6 Client.Select Address Assignment and Accept Router Advertised Route.
![]() Select DHCPv6 Options and Enable IPv6 Address. Request a Non-Temporary and/or Temporary Address.Select Prefix Delegation and Enable Prefix Delegation.
Select DHCPv6 Options and Enable IPv6 Address. Request a Non-Temporary and/or Temporary Address.Select Prefix Delegation and Enable Prefix Delegation.![]() For a DHCPv6 Client, configure address resolution.For a DHCPv6 Client, configure DNS support.
For a DHCPv6 Client, configure address resolution.For a DHCPv6 Client, configure DNS support.- Enable DNS Recursive Name Server and select:
- DHCPv6—The DHCPv6 Server sends the DNS Recursive Name Server information to the client.
- Manual—You configure the DNS Recursive
Name Server.
![]()
Configure Domain Search List.Configure a host-facing interface to inherit the IPv6 prefix and advertise allocated /64 prefixes to the hosts.- Select or select and select an AE interface, or select .Select a Layer 3 interface, select IPv6, and Enable IPv6 on the interface.For Type, select Inherited.
![]() Select Address Assignment and Add a pool.
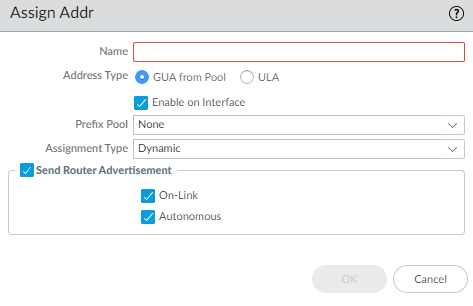
Select Address Assignment and Add a pool.![]() For Address Type, select one of the following:
For Address Type, select one of the following:- GUA from Pool—Global Unicast Address that comes from the Prefix Pool.
- ULA—Unique Local Address is a private address in the address range fc00::/7 for connectivity within a private network. Select ULA if there is no DHCPv6 Server.
Enable on Interface.Select the Prefix Pool from which to get the GUA.Select Assignment Type:- Dynamic—The DHCPv6 client chooses an identifier to configure the inherited interface.
- Dynamic with Identifier—Enter an identifier in the range 0 to 4,000.
For Inherited interface, configure Address Resolution, Router Advertisement, and DNS Support.Commit.