Prisma Access
Strata Cloud Manager
Table of Contents
Expand All
|
Collapse All
Prisma Access Docs
-
- 6.1 Preferred and Innovation
- 6.0 Preferred and Innovation
- 5.2 Preferred and Innovation
- 5.1 Preferred and Innovation
- 5.0 Preferred and Innovation
- 4.2 Preferred
- 4.1 Preferred
- 4.0 Preferred
- 3.2 Preferred and Innovation
- 3.1 Preferred and Innovation
- 3.0 Preferred and Innovation
- 2.2 Preferred
-
-
- 4.0 & Later
- Prisma Access China
-
-
Strata Cloud Manager
Here’s how to add a site-based remote network using Strata Cloud Manager.
- From Strata Cloud Manager, go to ConfigurationOnboardingOnboard Branch Sites.
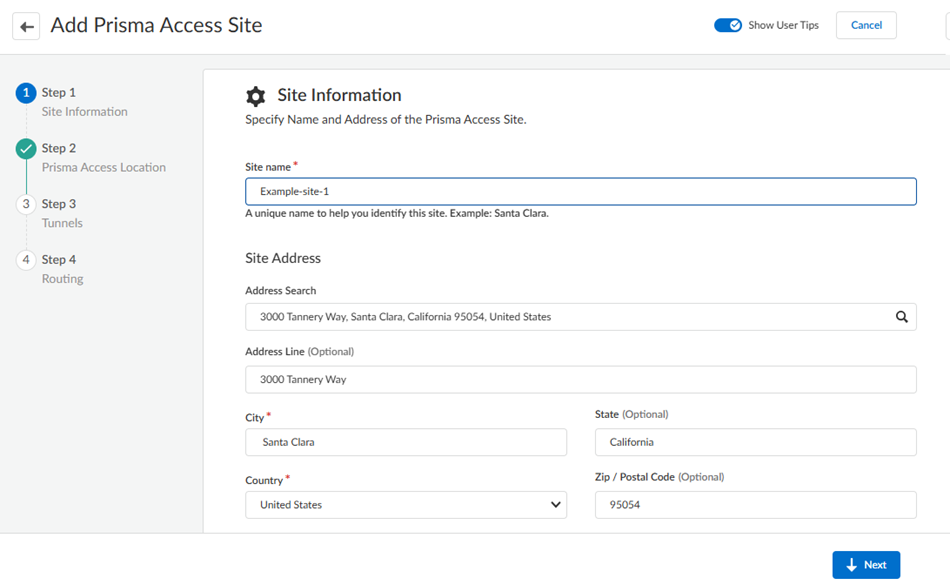
![]() In Branch Site Management, Add a third-party branch site.If you are licensed for Prisma SD-WAN and want to configure that type of branch site, use the procedure to configure Prisma SD-WAN.Add Site and give the remote network a descriptive Site name.Select the City and Country of the site.For more precise searches, add an address.
In Branch Site Management, Add a third-party branch site.If you are licensed for Prisma SD-WAN and want to configure that type of branch site, use the procedure to configure Prisma SD-WAN.Add Site and give the remote network a descriptive Site name.Select the City and Country of the site.For more precise searches, add an address.![]() Click Next.Select a location and a site type.
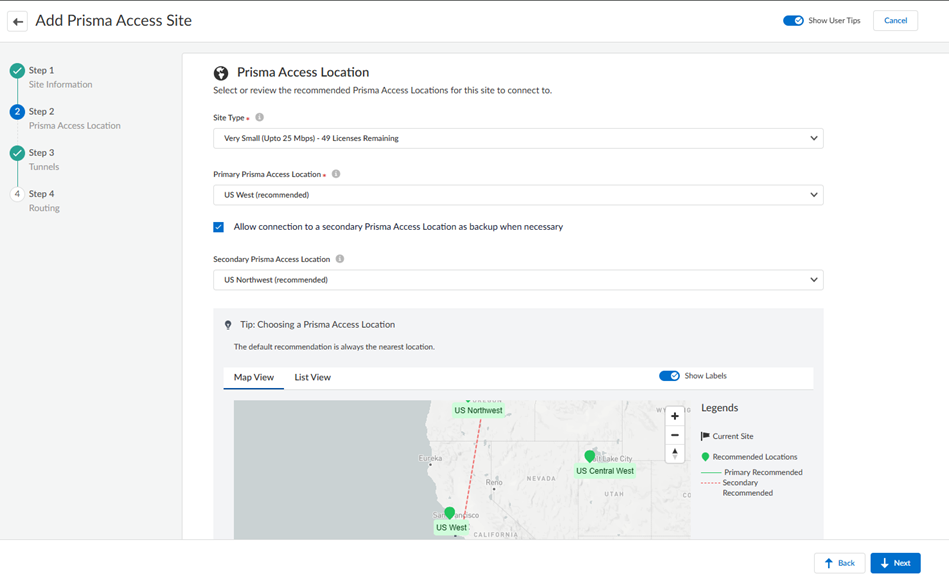
Click Next.Select a location and a site type.- Select a Site Type.The types are based on bandwidth.Some locations don't support X-Large sites; in this case, that choice is grayed out.Select a Primary Prisma Access Location.If multiple locations are Recommended in the list; select the location that works best for your deployment.
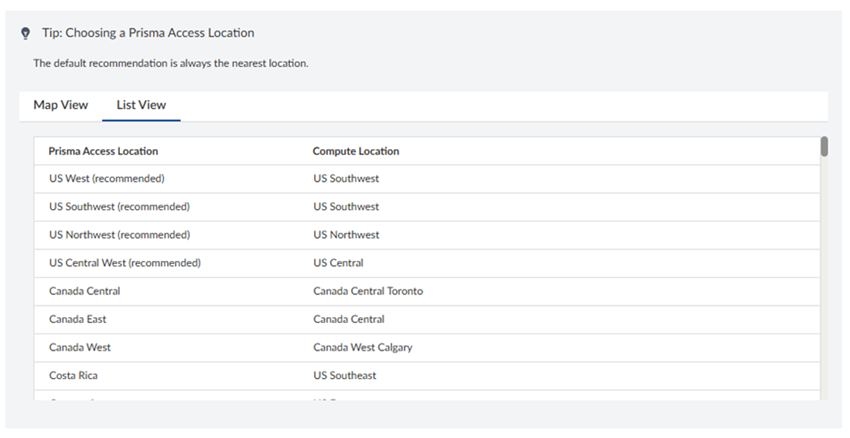
![]() (Optional) To create a secondary (backup) site, select Allow connection to a secondary Prisma Access Location as backup when necessary and then select a Secondary Prisma Access Location.If you select this choice, Prisma Access prepopulates the best secondary location or locations that are in a different compute location than the primary location. If multiple locations are Recommended; select the location that works best for your deployment.You can toggle between Map View and List View to see the best location for your site.
(Optional) To create a secondary (backup) site, select Allow connection to a secondary Prisma Access Location as backup when necessary and then select a Secondary Prisma Access Location.If you select this choice, Prisma Access prepopulates the best secondary location or locations that are in a different compute location than the primary location. If multiple locations are Recommended; select the location that works best for your deployment.You can toggle between Map View and List View to see the best location for your site.![]() Select a QoS Profile to use for this site, or Add a new one.Prisma Access uses a single QoS Profile per site.
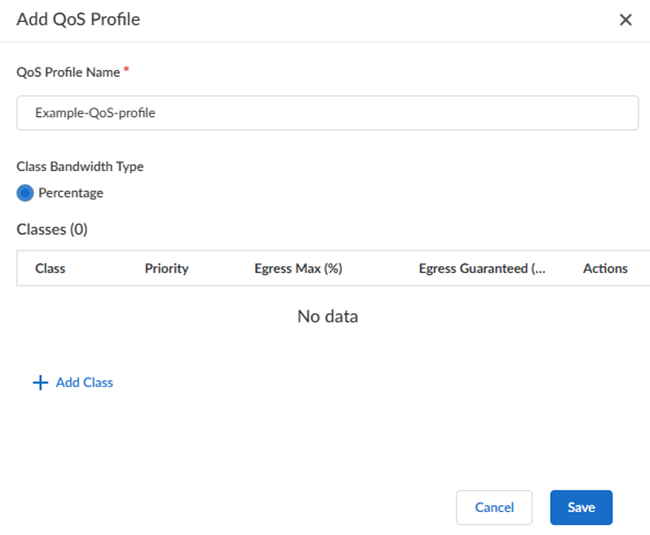
Select a QoS Profile to use for this site, or Add a new one.Prisma Access uses a single QoS Profile per site.![]() If you have not yet created a QoS Profile, Add a QoS Profile, specifying the following values:
If you have not yet created a QoS Profile, Add a QoS Profile, specifying the following values:- Enter a unique QoS Profile Name.
- Select a Class Bandwidth Type of Percentage. Prisma Access does not support bandwidth types of Mbps in site-based QoS profiles.
- (Optional) Enter an Egress Guaranteed (Mbps) value that represents the guaranteed bandwidth for this profile in Mbps.
- Enter a Class Bandwidth Type of either
Percentage or Mbps.
![]()
- In the Classes section, Add Class and specify how
to mark up to eight individual QoS classes.
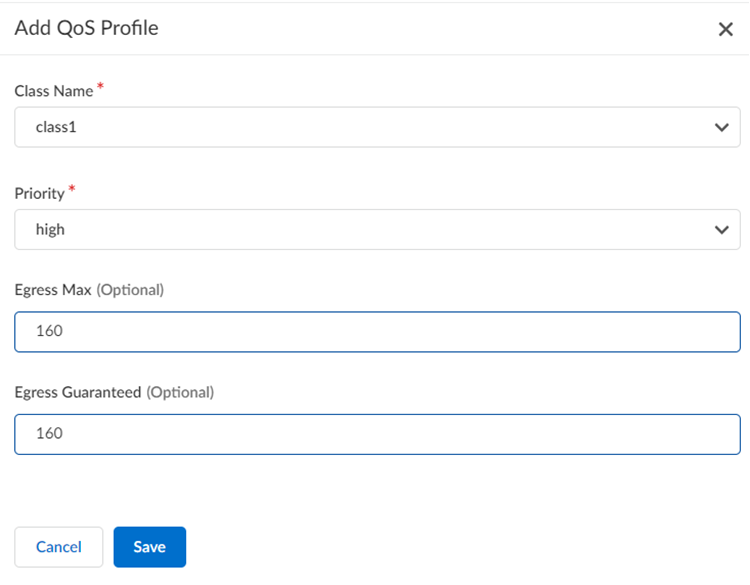
- Enter a Class Name.
- Select the Priority for the class (either real-time, high, medium, or low).
- (Optional) Enter an Egress Max that represents the maximum throughput (in Mbps) for traffic leaving the service connection or remote network connection.
- (Optional) Enter an Egress Guaranteed value that represents the guaranteed bandwidth for this profile (in Mbps).
- Save your changes, Save your QoS profile, and go to the Next step.
![]() Define Tunnel & Circuit Settings.
Define Tunnel & Circuit Settings.- Select a Tunnel Mode: either Active/Active or Active/Passive.The tunnel mode specifies how many of your ISP circuits you want to utilize for the remote network. Specify a minimum of one circuit and a maximum of four circuits.
- If you select Active/Passive (the default setting), Prisma Access utilizes either one or two ISP circuits to create two active tunnels. If the active tunnel goes down, the passive tunnel becomes active.
- If you select Active/Active, Prisma Access Prisma Access utilizes either two or four ISP circuits to create either two or four active tunnels, respectively.
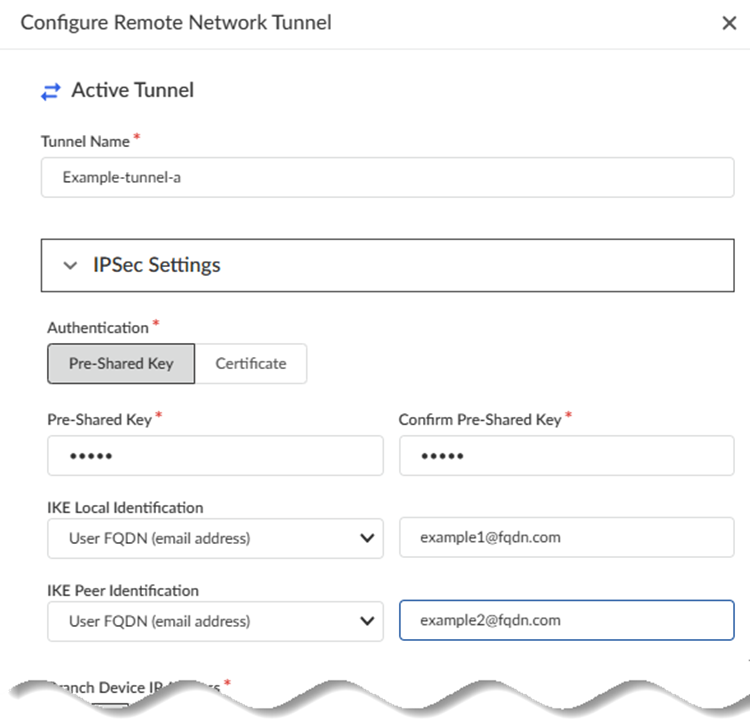
Select the Number of circuits to use.Prisma Access assigns tunnels based on the number of circuits you specify here, and whether your deployment is Active/Active or Active/Passive, as shown in the following table.(Optional) Configure your IPSec tunnel settings.Prisma Access provides you with default IPSec tunnel settings. These settings determine the IPSec and IKE crypto settings for the remote network tunnel. If you want to change them, select the Primary Tunnel and Edit your settings.If you specify a secondary location, Prisma Access autopopulates the values from the primary tunnel to the secondary tunnel; to edit the secondary tunnel, select that tunnel and Edit the settings.Make a note of these settings; you must match the settings on the customer premises equipment (CPE) that terminates the IPSec tunnel at your site.- Give the Active tunnel a unique Tunnel Name.
- Specify IPSec Settings.
- Specify an Authentication type
(either Pre-Shared Key or
Certificate).If you specify Pre-Shared Key, enter and confirm the Pre-Shared Key.If you specify a Certificate, enter the Local Certificate to use. This certificate must already exist in Strata Cloud Manager.
- (Required for Dynamic Branch IP Addresses Only) Specify the IKE Local Identification (either IP Address, Distinguished Name (Subject), User FQDN (email address), or FQDN (hostname) .
- (Required for Dynamic Branch IP Addresses Only)
Specify the IKE Peer
Identification (either IP
Address, Distinguished Name
(Subject), User FQDN (email
address), or FQDN (hostname).
If you specify a Dynamic branch IP address, specify either the IKE Local Identification, IKE Peer Identification, or both; at least one of those IPSec settings are required.
![]()
- Specify an Authentication type
(either Pre-Shared Key or
Certificate).
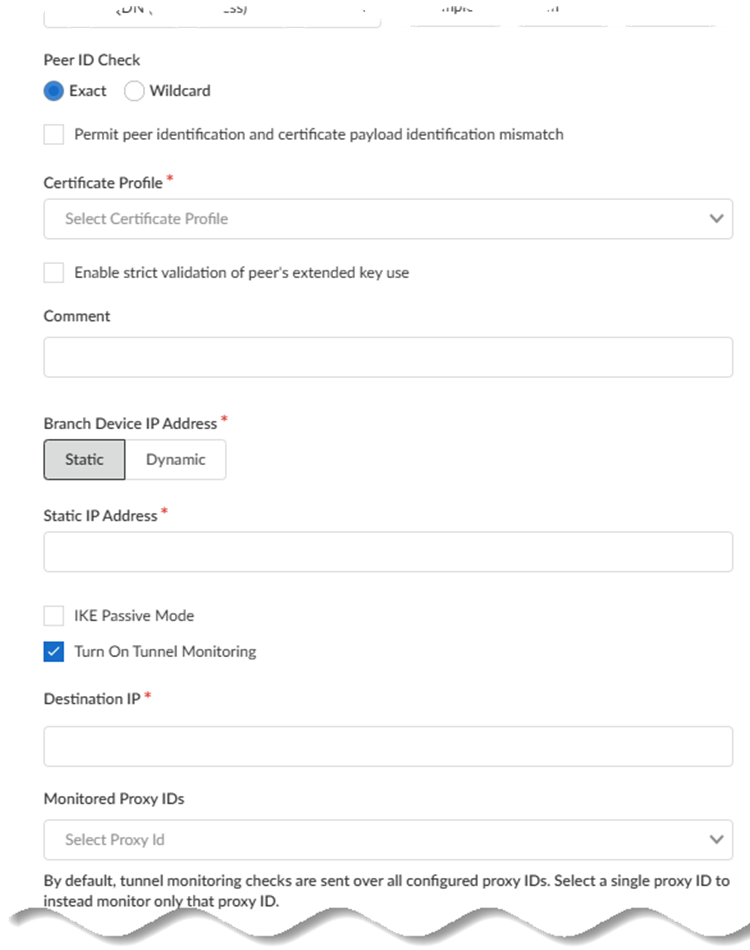
- Specify the type of Peer ID Check:
- Exact—Ensures that the local setting and peer IKE ID payload match exactly.
- Wildcard—Allows the peer identification to match as long as every character before the wildcard (*) matches. The characters after the wildcard don't need to match.
- (Optional) Permit peer identification and certificate payload identification mismatch to allow a successful IKE security association (SA) even when the peer identification does not match the peer identification in the certificate.
- Choose a Certificate Profile. A certificate profile contains information about how to authenticate the peer gateway.
- (Optional) Enable strict validation of peer’s extended key use to control strictly how the key can be used.
- Choose the Branch Device IP Address
(Static or
Dynamic).
- If you select Static, enter the Static IP Address to use for the IPSec tunnel.
- If you specify Dynamic, which obtains the IP address automatically, specify either the IKE Local Identification, IKE Peer Identification, or both; at least one of those IPSec settings are required.
- (Optional, Recommended) Enable IKE Passive
Mode to have Prisma Access respond to IKE
connections but not initiate them. While not required, IKE Passive Mode is the recommended setting.
- (Optional) Turn on Tunnel
Monitoring. Enter a Tunnel Monitoring Destination IP address on the remote network for Prisma Access to determine whether the tunnel is up and, if your branch IPSec device uses a policy-based VPN, enter the associated Proxy ID as the Monitored Proxy ID.
![]()
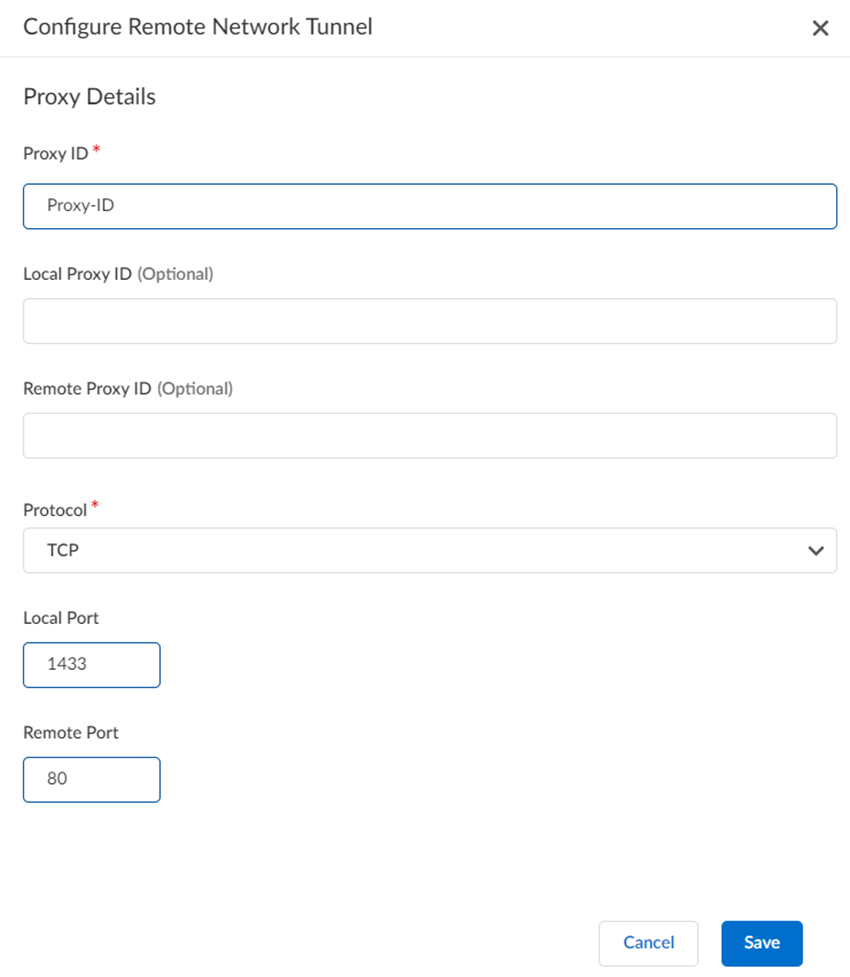
- (Optional) If you need a proxy ID:
- Add Proxy ID and enter the Proxy ID.
- Optionally, enter the Local Proxy ID and Remote Proxy ID.
- Enter the Protocol to use for the proxy ID. Enter a Number, TCP, or UDP.
- Specify a Local Port and Remote Port for TCP or UDP.
- Save your changes.
![]()
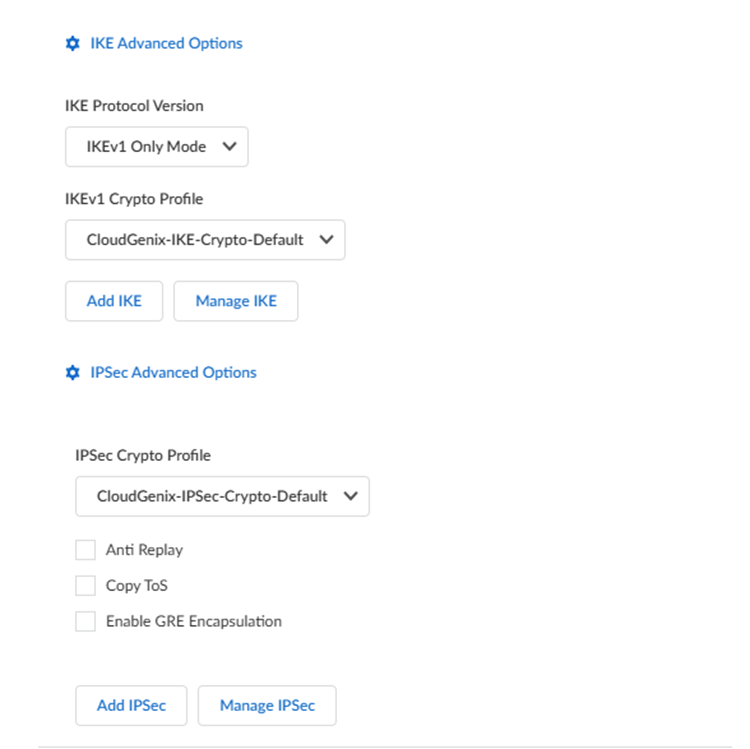
- (Optional) Specify IKE Advanced
Options.
- Select an IKE Protocol Version.
- Select an IKEv1 Crypto
Profile.To add a crypto profile, Add IKE. To manage an existing IKE profile, Manage IKE and select the profile to edit.
- Select an IKEv2 Crypto
Profile.To add a crypto profile, Add IKE. To manage an existing IKE profile, Manage IKE and select the profile to edit.
- (Optional) Specify IPSec Advanced
Options.
- Select an IPSec Crypto
Profile.To add a crypto profile, Add IPSec. To manage an existing IPSec profile, Manage IPSec and select the profile to edit.
![]()
- Select an IPSec Crypto
Profile.
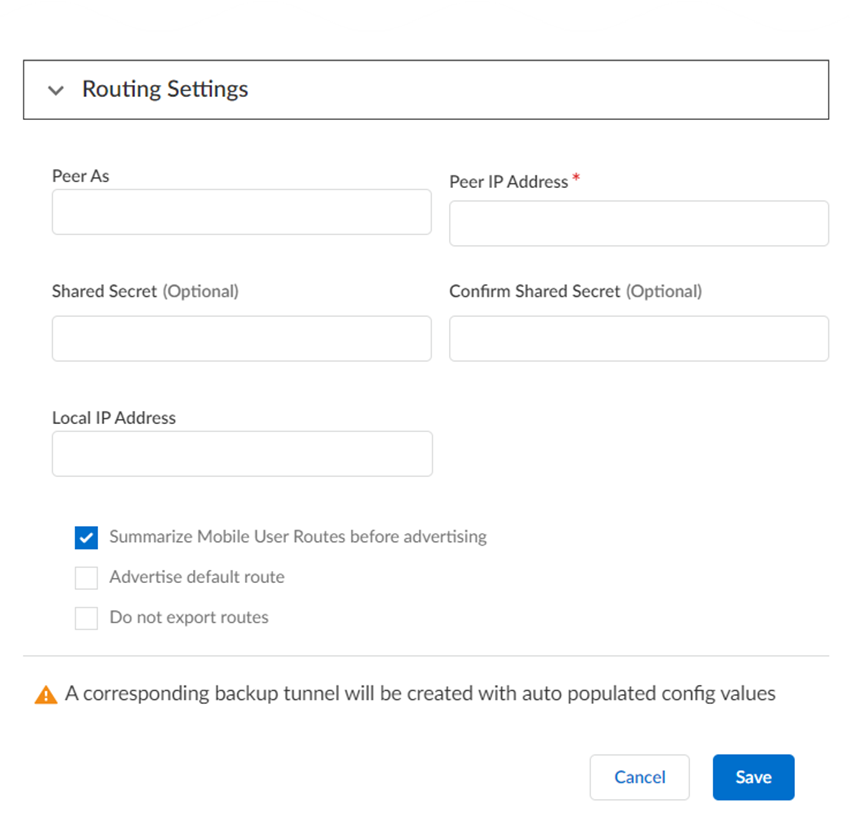
- Choose your routing settings.
- Select the Routing Type (either
Static or
Dynamic).If you select Static, Add the IP subnets or IP addresses that you want to secure at the site.If you select Dynamic:
- Enter the Peer As (the
autonomous system (AS) for your network). Use an RFC 6996-compliant BGP Private AS number.
- Enter the Peer IP Address assigned as the Router ID of the eBGP router on the HQ or data center network.
- (Optional) Enter a Shared Secret password to authenticate BGP peer communications.
- Enter the Local IP Address that Prisma Access uses as its Local IP address for BGP.
- (Optional) Summarize Mobile User Routes before advertising to reduce the number of mobile user IP subnet advertisements over BGP to your CPE by having Prisma Access summarize the subnets before it advertises them.
- (Optional) Advertise Default Route to have Prisma Access originate a default route advertisement for the remote network using eBGP. Be sure that your network does not have another default route advertised by BGP, or you could introduce routing issues in your network.
- (Optional) Don't Export Routes to prevent Prisma Access from forwarding routes into the HQ or data center.
- Enter the Peer As (the
autonomous system (AS) for your network).
- Select the Routing Type (either
Static or
Dynamic).
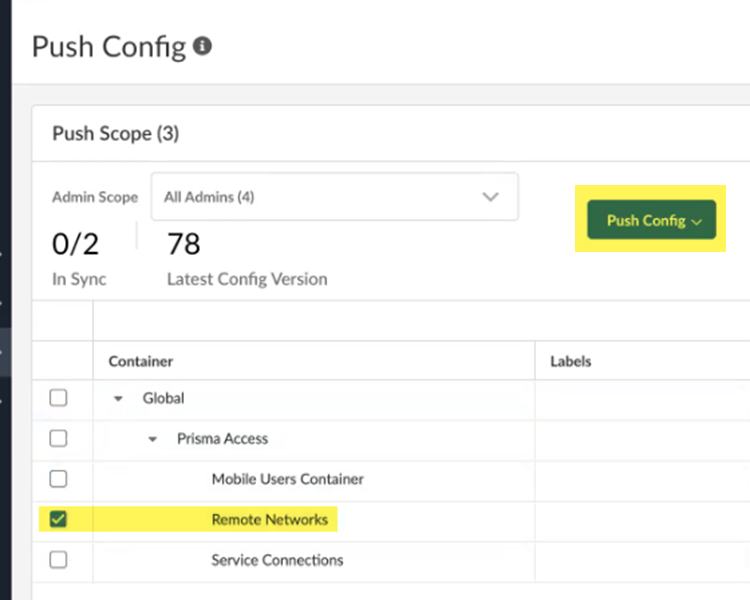
Save your IPSec tunnel changes.![]() Save & Exit.Push Configuration to save your configuration changes, making sure to select Remote Networks in the Push Scope.
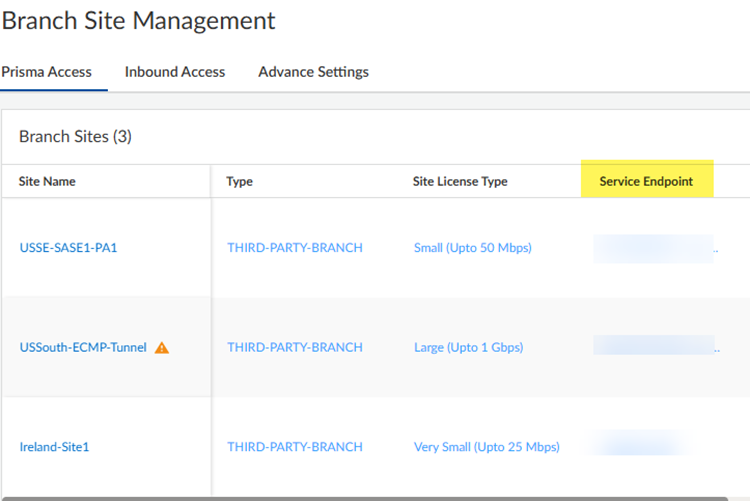
Save & Exit.Push Configuration to save your configuration changes, making sure to select Remote Networks in the Push Scope.![]() Find the Service Endpoint address (the IP or FQDN address you use on your CPE to terminate the IPSec tunnel).As a best practice, specify the FQDN instead of the IP address.
Find the Service Endpoint address (the IP or FQDN address you use on your CPE to terminate the IPSec tunnel).As a best practice, specify the FQDN instead of the IP address.- Go to ConfigurationPrisma Access SetupBranch SitesPrisma Access.Find the Service Endpoint address.
![]()


