Prisma Access
Configure App Acceleration in Prisma Access (Strata Cloud Manager)
Table of Contents
Expand All
|
Collapse All
Prisma Access Docs
-
- 6.1 Preferred and Innovation
- 6.0 Preferred and Innovation
- 5.2 Preferred and Innovation
- 5.1 Preferred and Innovation
- 5.0 Preferred and Innovation
- 4.2 Preferred
- 4.1 Preferred
- 4.0 Preferred
- 3.2 Preferred and Innovation
- 3.1 Preferred and Innovation
- 3.0 Preferred and Innovation
- 2.2 Preferred
-
-
- 4.0 & Later
- Prisma Access China
-
-
Configure App Acceleration in Prisma Access (Strata Cloud Manager)
Configure App Acceleration in a Prisma Access (Managed by Strata Cloud Manager) deployment.
To configure App Acceleration in a Prisma Access (Managed by Strata Cloud Manager) deployment, complete this
task.
- (Optional) Disable the Quick UDP Internet Connections (QUIC) protocol.App Acceleration can’t accelerate apps at Layer 7 without disabling QUIC.
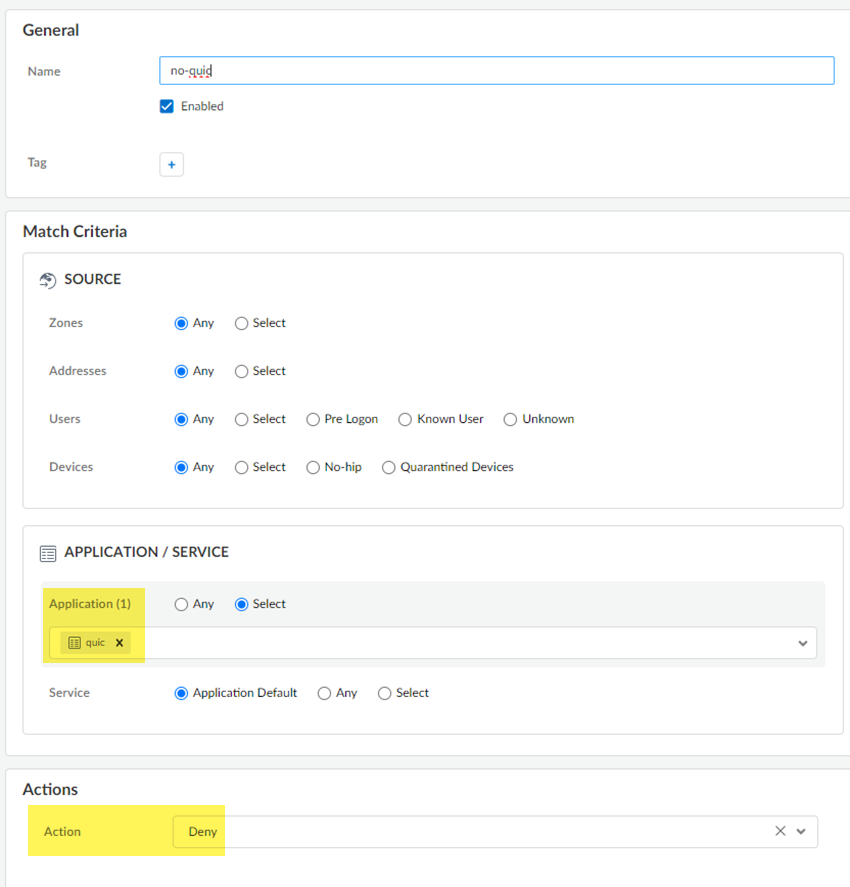
- Go to ConfigurationNGFW & Prisma AccessSecurity ServicesSecurity Policy and Add RulePre Rules.Create this Security policy rule in the Global configuration scope.Select an Application/Service of quic and an Actions of Deny.
![]() Save your changes.Go to ConfigurationNGFW & Prisma AccessObjectsServiceServices and Add services for UDP port 80 and UDP port 443.Palo Alto Networks recommends adding services for UDP port 80 and UDP port 443 and creating an additional security policy to block UDP traffic on those ports, because newer versions of QUIC might be misidentified as unknown-udp.
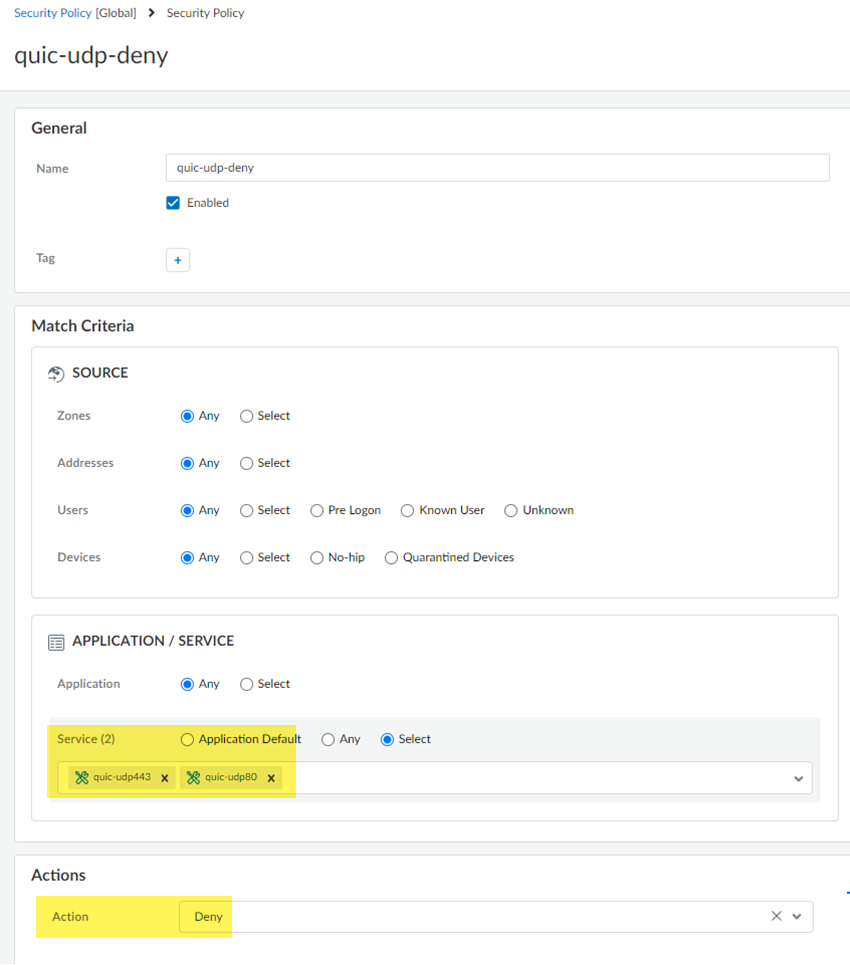
Save your changes.Go to ConfigurationNGFW & Prisma AccessObjectsServiceServices and Add services for UDP port 80 and UDP port 443.Palo Alto Networks recommends adding services for UDP port 80 and UDP port 443 and creating an additional security policy to block UDP traffic on those ports, because newer versions of QUIC might be misidentified as unknown-udp.![]() Return to ConfigurationNGFW & Prisma AccessSecurity ServicesSecurity Policy and Add Rule for a second security policy, specifying the services under Application/Service and an Action of Deny.
Return to ConfigurationNGFW & Prisma AccessSecurity ServicesSecurity Policy and Add Rule for a second security policy, specifying the services under Application/Service and an Action of Deny.![]() When completed, you will have two Security policy rules: One that blocks the QUIC protocol and one that blocks traffic on UDP ports 80 and 443.
When completed, you will have two Security policy rules: One that blocks the QUIC protocol and one that blocks traffic on UDP ports 80 and 443.![]() Import a root certificate authority (CA) certificate and private key in Strata Cloud Manager in the Prisma Access scope to use with App Acceleration and push your changes.A self-signed root CA/certificate is the top-most certificate in a certificate chain. App Acceleration uses the root CA/certificates to create certificates for the accelerated apps. Push the root CA/certificate in Prisma Access so that App Acceleration can begin creation of the app-specific certificates.The root CA/certificate must have these characteristics: :
Import a root certificate authority (CA) certificate and private key in Strata Cloud Manager in the Prisma Access scope to use with App Acceleration and push your changes.A self-signed root CA/certificate is the top-most certificate in a certificate chain. App Acceleration uses the root CA/certificates to create certificates for the accelerated apps. Push the root CA/certificate in Prisma Access so that App Acceleration can begin creation of the app-specific certificates.The root CA/certificate must have these characteristics: :- The CA must be a trusted CA.You can use an intermediate certificate; however be sure that you mark it as a forward trust certificate and a trusted root CA as shown in this procedure.
- (Recommended) The CA should be unique and used for App Acceleration only.
- The CA can't be expired. Make a note of the CA expiration date, and renew the certificate before it expires. If a CA/certificate in use by App Acceleration expires, users will receive an SSL error when trying to access accelerated apps. It's critical to ensure that the CA is valid when App Acceleration is in use by your organization.
- It must include a key.
- It must use a passphrase.
- It must be in the Prisma Access scope.
- (Mobile Users—GlobalProtect™ Deployments Only) It must be
installed in the local root certificate store. You can perform this installation by adding it to the list of trusted certificates as described in this procedure or, if you're using Active Directory (AD), you can distribute the root CA from AD using an AD Group Policy Object (GPO).
If you ever need to change the root CA/certificate, you must upload it and commit your changes before you can use the changed certificate.- Go to ConfigurationNGFW and Prisma AccessObjectsCertificate Management.Import a certificate.
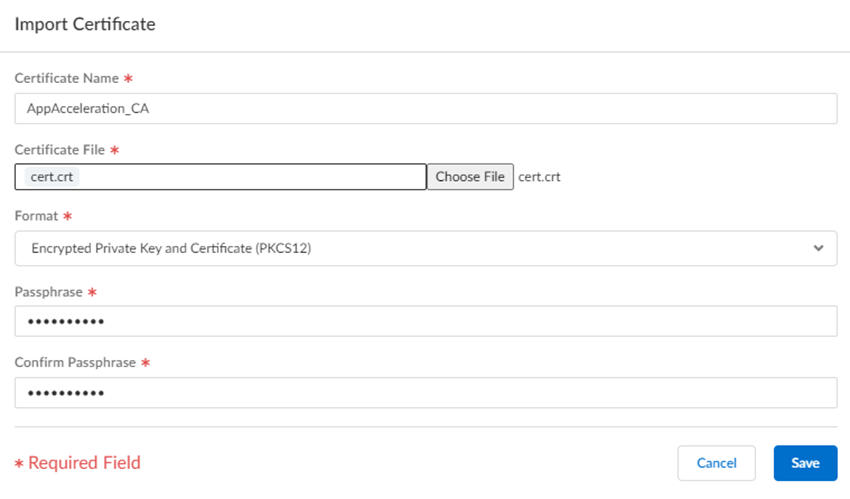
![]() Select the following parameters:
Select the following parameters:- Enter a unique Certificate Name for the
certificate, such as
AppAcceleration_CA.The name is case-sensitive and can be up to 31 characters long. Use only letters, numbers, hyphens, and underscores in the name.
- Choose File and browse for the Certificate File received from the CA and Open it.
- Select a Format:
- Encrypted Private Key and Certificate (PKCS12)—This is the default and most common format, in which the key and certificate are in a single container (Certificate File).
- Base64 Encoded Certificate (PEM)—You must import the key separately from the certificate. You're required to select a Key File if you select this format.
- Enter a Passphrase and Confirm Passphrase.
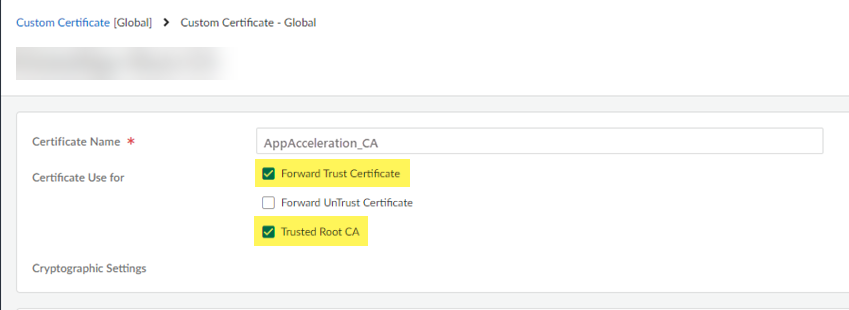
Save your changes.![]() Mark the root CA/certificate you added as a forward trust certificate and a trusted root CA.If you don't specify the certificate as a forward trust certificate and trusted root CA, users will encounter SSL errors when trying to access accelerated apps when using SSL decryption.
Mark the root CA/certificate you added as a forward trust certificate and a trusted root CA.If you don't specify the certificate as a forward trust certificate and trusted root CA, users will encounter SSL errors when trying to access accelerated apps when using SSL decryption.- Select the root CA/certificate you added.Select the certificate as a Forward Trust Certificate and Trusted Root CA.
![]() Update the certificate.
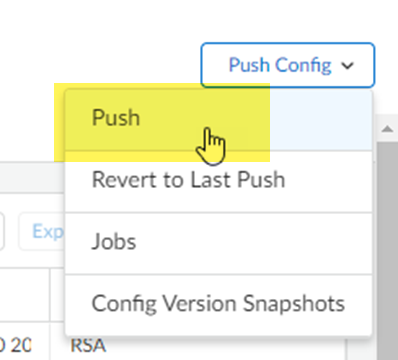
Update the certificate.![]() Push your changes.
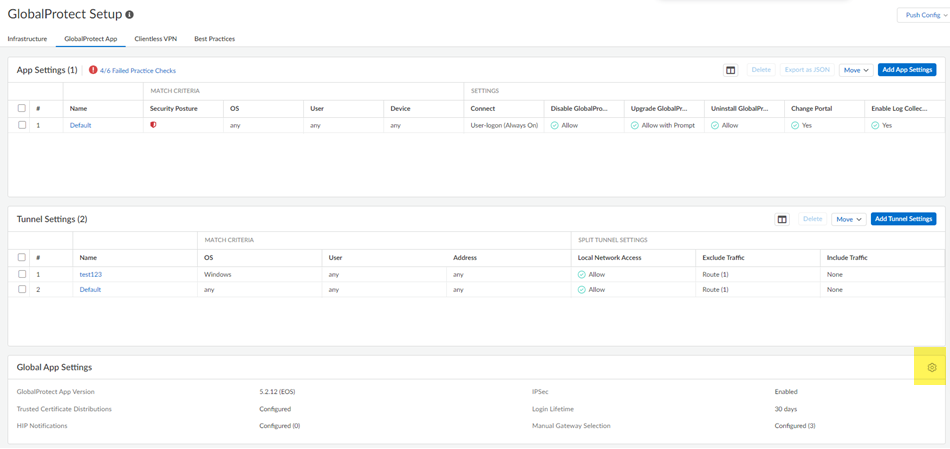
Push your changes.![]() (Mobile Users—GlobalProtect Deployments Only) Add the root CA/certificate you added to the list of GlobalProtect trusted certificates and install it in the local root certificate store.Alternatively, if you're using Active Directory, you can distribute the root CA from AD using an Active Directory GPO.
(Mobile Users—GlobalProtect Deployments Only) Add the root CA/certificate you added to the list of GlobalProtect trusted certificates and install it in the local root certificate store.Alternatively, if you're using Active Directory, you can distribute the root CA from AD using an Active Directory GPO.- Go to ConfigurationNGFW and Prisma AccessConfiguration ScopePrisma AccessGlobalProtectGlobalProtect AppGlobal App Settings.Click the gear to edit the Settings.
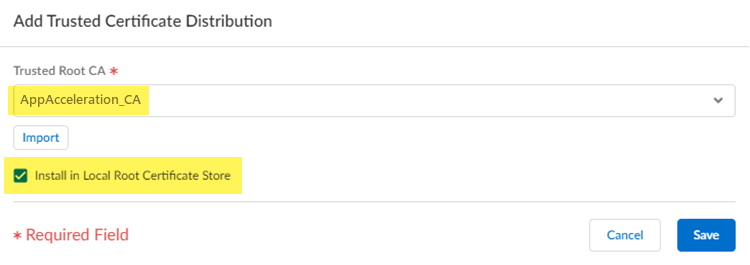
![]() Add Trusted Certificate Distribution.
Add Trusted Certificate Distribution.![]() Select the Trusted Root CA you created in a previous step and select Install in Local Root Certificate Store.
Select the Trusted Root CA you created in a previous step and select Install in Local Root Certificate Store.![]() Save your changes.Push your changes.Enable App Acceleration and choose the certificate file you created.
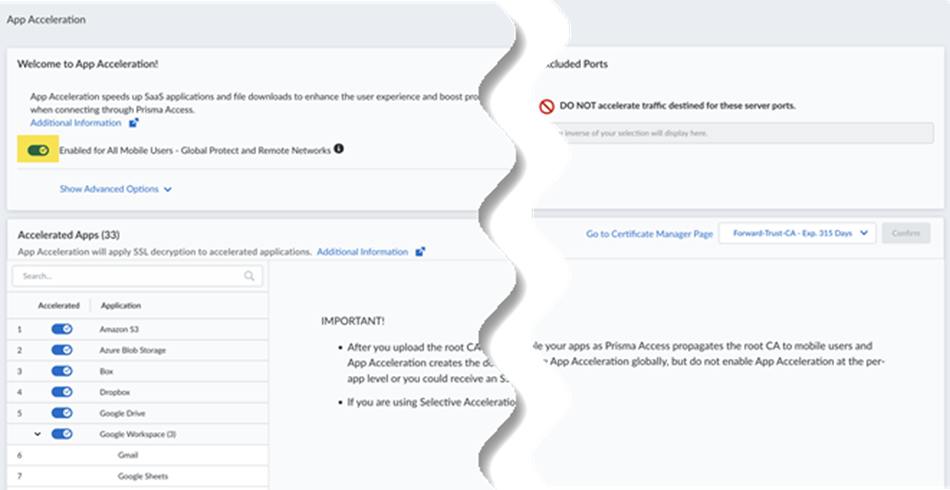
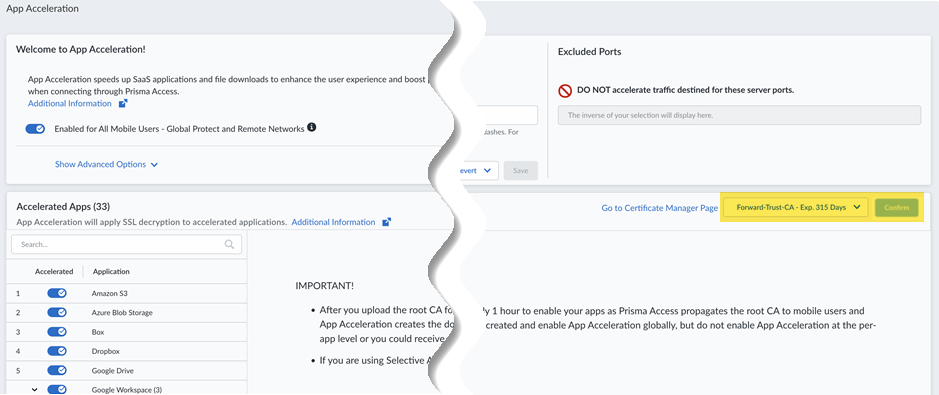
Save your changes.Push your changes.Enable App Acceleration and choose the certificate file you created.- Go to ConfigurationApp Acceleration.Move the slider to the right to have App Acceleration be Enabled for all Mobile Users—GlobalProtect and Remote Networks.If commits are ongoing, App Acceleration settings will take effect after all commits are complete.
![]() App Acceleration will be enabled for all TCP traffic. If you wish to accelerate SaaS apps, you will need to select a root CA/certificate, as shown in the next step.Select the certificate you created in a previous step and Confirm your change.If you need to change the certificate from an existing one, make sure you have committed and pushed the certificate to your firewalls and users, then select it here. Commit the new certificate before you select it.
App Acceleration will be enabled for all TCP traffic. If you wish to accelerate SaaS apps, you will need to select a root CA/certificate, as shown in the next step.Select the certificate you created in a previous step and Confirm your change.If you need to change the certificate from an existing one, make sure you have committed and pushed the certificate to your firewalls and users, then select it here. Commit the new certificate before you select it.![]() After you import the certificate, you must wait until App Acceleration generates domain-specific certificates for each app. This process can take up to 1 hour. In the meantime, you can move the slider for the Accelerated Apps to the left to temporarily disable App Acceleration and access the apps until the certificates are generated; if you don't, you might receive an SSL error until the certificates are generated.Allow up to 10 minutes for acceleration to be active after you have turned it on for a given application.(Optional) Specify the ports to include or exclude for App Acceleration .Selective Acceleration by Port lets you specify which network traffic receives acceleration based on destination server ports. This granular control lets you boost application performance while leaving other traffic unaffected. By default, all ports are accelerated.When you use Selective Acceleration by port, make a note of the following guidelines:
After you import the certificate, you must wait until App Acceleration generates domain-specific certificates for each app. This process can take up to 1 hour. In the meantime, you can move the slider for the Accelerated Apps to the left to temporarily disable App Acceleration and access the apps until the certificates are generated; if you don't, you might receive an SSL error until the certificates are generated.Allow up to 10 minutes for acceleration to be active after you have turned it on for a given application.(Optional) Specify the ports to include or exclude for App Acceleration .Selective Acceleration by Port lets you specify which network traffic receives acceleration based on destination server ports. This granular control lets you boost application performance while leaving other traffic unaffected. By default, all ports are accelerated.When you use Selective Acceleration by port, make a note of the following guidelines:- If accelerating SaaS apps with App Acceleration, you must include port 443 in the accelerated ports in order to boost SaaS apps.
- If you are using App Security with App Acceleration, and have defined an app with custom ports, you must include those ports for the defined app traffic to be secured. Excluding the ports from App Acceleration prevents App Security traffic inspection.
- To select the ports to accelerate, enter a single port, multiple ports
using commas between the ports, a range of ports using dashes, or any
combination of the preceding entries. App Acceleration accelerates the
traffic for those ports. The ports that App Acceleration excludes
display in the Excluded Ports area.
![]()
- To select the ports to exclude from acceleration, Switch to
invert selection and enter the ports to exclude. App
Acceleration accelerates every port you do not select.
![]()
- To revert your changes to the last saved setting or the original default setting, select Revert.
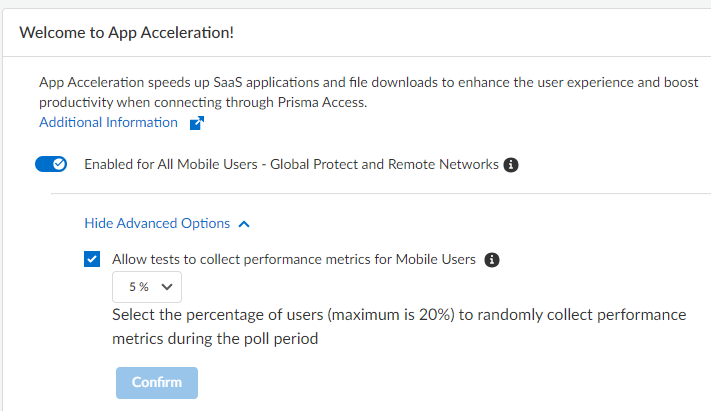
(Optional) Show Advanced Options and change the metric testing parameters.- (Optional) To disable the collection of metrics to obtain
performance information, deselect Allow tests to collect
performance metrics for Mobile Users.Palo Alto Networks recommends that you enable metric collection to view the app performance improvements when using App Acceleration.
- (Optional) To change the percentage of users for which predictive tests are processed from the default of 5%, select another percentage in the drop-down and Confirm the changes.
![]()
(Optional) To view details about the applications that have been accelerated in your environment, go to InsightsOperationalApp Acceleration.

