Prisma Access
Configure Secure Inbound Access for Remote Network Sites for Locations that Allocate Bandwidth by Location
Table of Contents
Configure Secure Inbound Access for Remote Network Sites for Locations that Allocate Bandwidth by Location
Configure secure inbound access for remote network sites
for locations that allocate bandwidth by location.
| Where Can I Use This? | What Do I Need? |
|---|---|
|
|
- Select , Add a connection, and configure the remote network, including routing and IPSec tunnel options.See Prisma Access Remote Networks for details. Your deployment might onboard bandwidth by compute location or by location; either method is supported for inbound access.Make sure that you are selecting one of the supported locations for Inbound Access.Click the Inbound Access tab to configure inbound access options.
- Select Enable to enable inbound access for the remote network.If you selected a location that is unsupported for inbound access, Prisma Access prompts you to select a supported one.(Optional) To disable source NAT, deselect Enable Source NAT.By default, source NAT is enabled. If the IPSec-capable device at your remote network site is capable of performing symmetric return (such as a Palo Alto Networks next-generation firewall), or if you have not selected Allow inbound flows to other Remote Networks over the Prisma Access backbone, deselect Enable source NAT.You must Enable source NAT in the Inbound Access tab if you select this check box. Source NAT is a requirement to allow inbound flows to other remote networks.
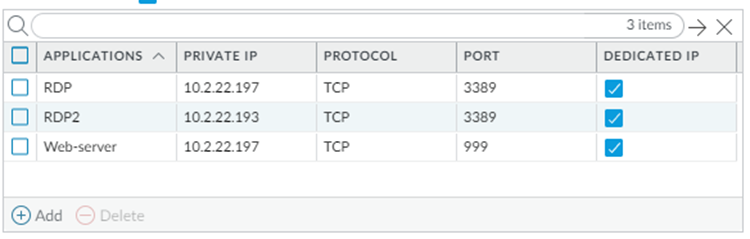
![]() Add the applications to provide secure inbound access.You can configure up to 100 inbound applications for each group of provisioned public IP addresses (either 5 or 10). Enter a unique Private IP address, Protocol, and Port combination for each application. It is acceptable to use duplicate private IP addresses and ports for two applications, as long as you select TCP for one application and UDP for another application.Provide the following values:
Add the applications to provide secure inbound access.You can configure up to 100 inbound applications for each group of provisioned public IP addresses (either 5 or 10). Enter a unique Private IP address, Protocol, and Port combination for each application. It is acceptable to use duplicate private IP addresses and ports for two applications, as long as you select TCP for one application and UDP for another application.Provide the following values:- Specify the name of the Application.
- Specify the Private IP address to use with this application.
- Specify the Protocol to use with the application (TCP or UDP).
- Specify the Port to use with the application.
- Choose whether you want to dedicate a single public IP address to a single application; to do so, select Dedicated IP.
![]() Click OK to save your changes.Save and Commit your changes.Wait approximately 30 minutes for Prisma Access to generate the public IP addresses; then select and make a note of the Public Address that is associated with the App Name for application you created.If you selected Dedicated IP, find the single application that is associated with the Public Address.
Click OK to save your changes.Save and Commit your changes.Wait approximately 30 minutes for Prisma Access to generate the public IP addresses; then select and make a note of the Public Address that is associated with the App Name for application you created.If you selected Dedicated IP, find the single application that is associated with the Public Address.![]() Create security policies to allow traffic from the inbound internet users.Because Prisma Access’ default security policy only allows untrust-to-untrust traffic, you need to configure security polices to allow untrust-to-trust traffic for your inbound access applications. Palo Alto Networks recommends that you limit the type of access you permit to inbound applications. The following examples provide access to SSH servers, web portals, and RDP servers.
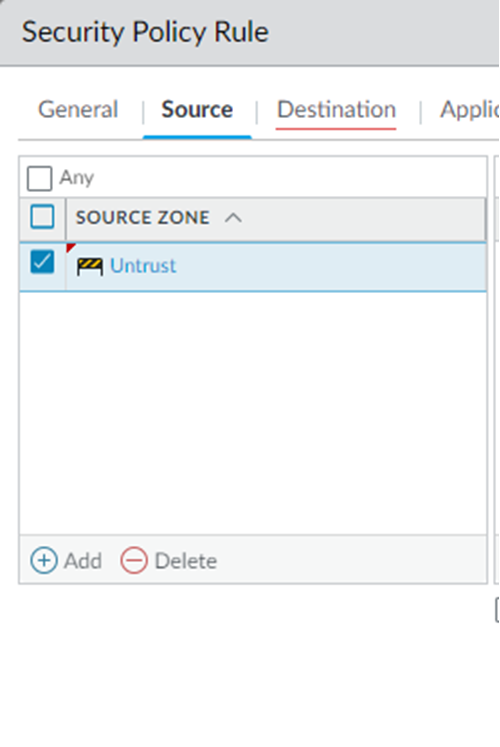
Create security policies to allow traffic from the inbound internet users.Because Prisma Access’ default security policy only allows untrust-to-untrust traffic, you need to configure security polices to allow untrust-to-trust traffic for your inbound access applications. Palo Alto Networks recommends that you limit the type of access you permit to inbound applications. The following examples provide access to SSH servers, web portals, and RDP servers.- Select and Add a policy.Be sure to create this policy under the Remote_Network_Device_Group device group.Select the Source traffic as Untrust.
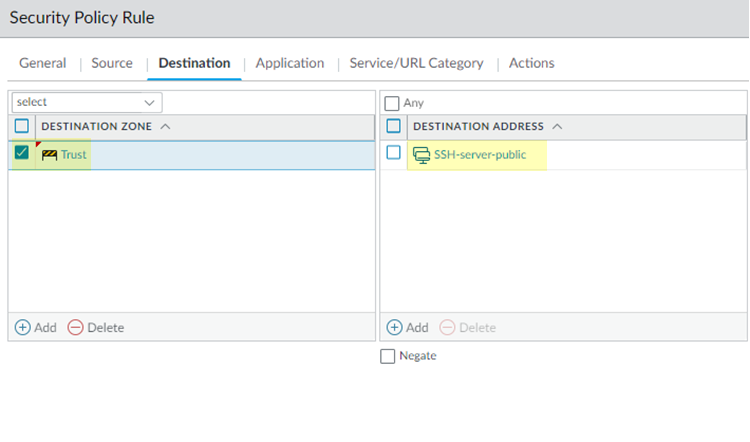
![]() Create a policy to allow SSH server traffic by selecting the Destination Zone for destination traffic as Trust and specifying a Destination Address of SSH-server-public. This is an Address or Address Group object you created that has a list of all the public IP addresses that are used for SSH login.
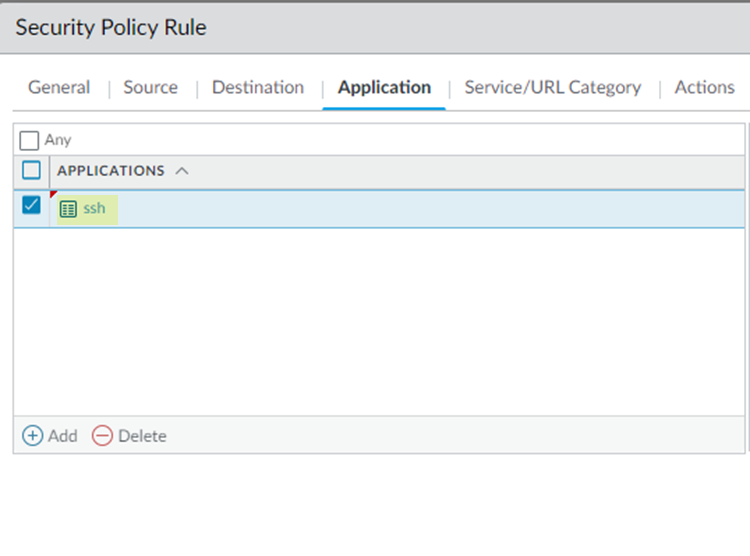
Create a policy to allow SSH server traffic by selecting the Destination Zone for destination traffic as Trust and specifying a Destination Address of SSH-server-public. This is an Address or Address Group object you created that has a list of all the public IP addresses that are used for SSH login.![]() Select an Application of ssh.
Select an Application of ssh.![]() Select a Service/URL Category of application-default to allow or deny applications based only their default ports as defined by Palo Alto Networks.In Actions, select Allow.Click OK to save the policy.Create a policy to allow web portal access by creating a policy in the previous steps but substituting the following settings in the Destination and Application tabs:
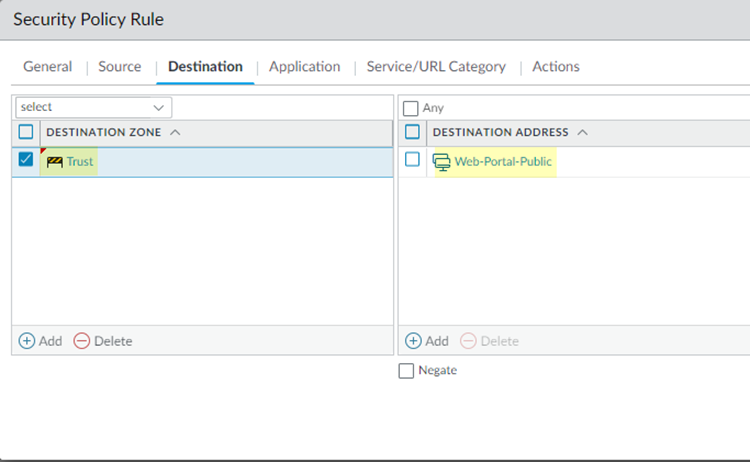
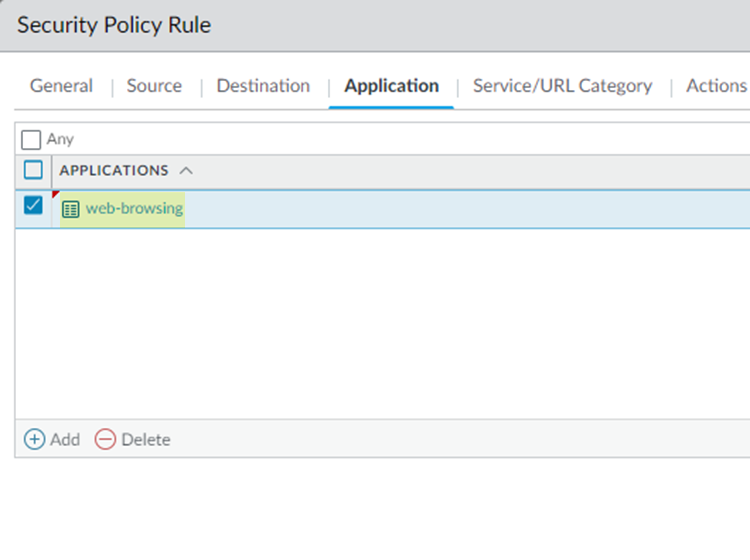
Select a Service/URL Category of application-default to allow or deny applications based only their default ports as defined by Palo Alto Networks.In Actions, select Allow.Click OK to save the policy.Create a policy to allow web portal access by creating a policy in the previous steps but substituting the following settings in the Destination and Application tabs:- Select a Destination Address of an Address or Address Group of Web-Portal-Public, which contains all the public IP addresses of the web portal.
![]()
- Select an Application of web-browsing.
![]()
Create a security policy for RDP server access, using the same settings as you did for the other policies but creating an Address or Address Group object called RDP-Server-Public, which contains the public IP addresses for the RDP server, as the Destination Address and webrdp as the Application.When complete, you have three different policies to allow SSH server access, web portal access, and RDP server access.![]() Save and Commit your changes.Check that the remote network connection is operational and correctly processing inbound traffic.
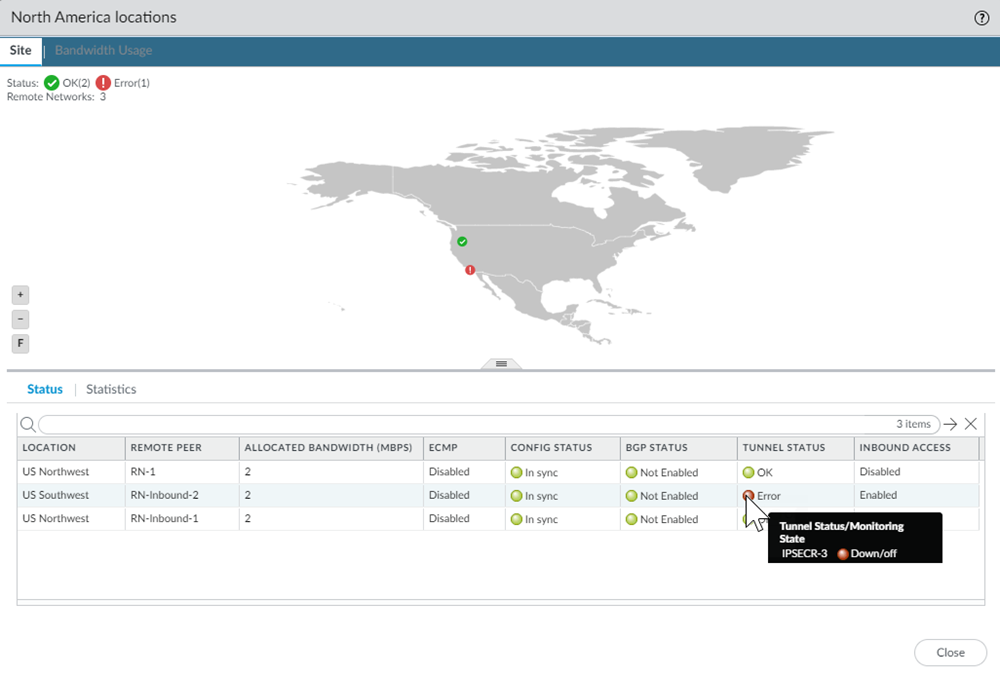
Save and Commit your changes.Check that the remote network connection is operational and correctly processing inbound traffic.- Select and hover over the Status and Config Status areas to see the tunnel’s status.If you find issues, select , select the location of the remote network tunnel in the map, and hover over the Tunnel Status area to determine the cause of the error.
![]()