Prisma Access in China
Table of Contents
Prisma Access in China
Learn how to set up Prisma Access in China.
| Where Can I Use This? | What Do I Need? |
|---|---|
|
|
The rapid transition to a hybrid workforce, where employees can now work fluidly between
corporate offices, branch offices, home offices, or on the road has accelerated the
change in how and where business is done, including organizations in China. You can use
Prisma Access to secure mobile users, branch offices, and headquarters and data
center locations in China. If your organization currently uses Explicit Proxies and PAC
files, you can seamlessly transition from traditional or cloud proxy-based secure web
gateway (SWG) solutions to Prisma Access. This is especially beneficial for securing
mobile users' internet access. Additionally, Prisma Access Explicit Proxy feature is
ideal for organizations that require proxy usage for compliance reasons and to protect
endpoints deployed in no-default route networks.
The instances of Prisma Access in China are hosted in China and manage your
organization's cybersecurity infrastructure while following all regulations and
mandates. What's more, Prisma Access China enables a consistent end-user experience,
extending consistent visibility and control to locations within mainland China.
The procedures you use to onboard Prisma Access locations in mainland China follow
the same procedures you use to onboard Prisma Access deployments in other locations
around the globe. However, make sure that you're aware of the following differences:
- Deployment Type (New or Existing) —You can only deploy Prisma Access China in a new Prisma Access environment. Upgrades or migrations from an existing Prisma Access deployment are not supported.
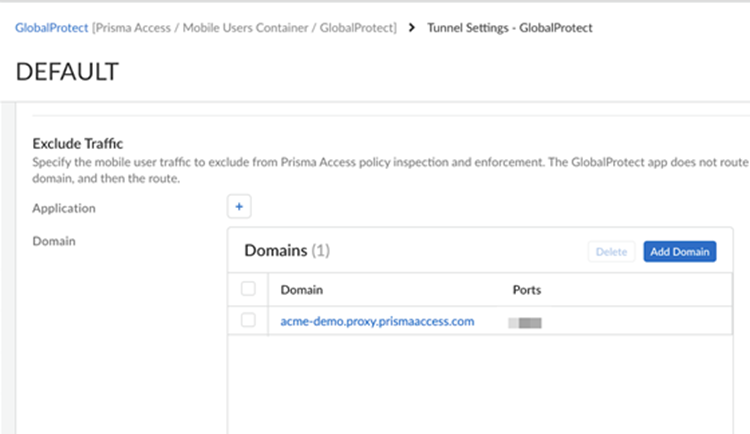
- Deployment Type (Panorama and Cloud Managed Prisma Access) —Prisma Access China is supported with both Cloud Managed and Panorama Managed Prisma Access deployments.Prisma Access China uses a Cloud Management interface that has a different look and feel than the Prisma Access (Managed by Strata Cloud Manager) interface; your Prisma Access Cloud Managed interface looks like the following example screenshot.
![]()
- Required SKUs—When you purchase Prisma Access for a deployment in mainland China, SKUs are required that are specific to Prisma Access China. Work with your authorized Palo Alto Networks representative or partner to make sure that you purchase the correct SKUs for your China deployment.Note: Be sure that your representative or partner uses the SKUs for Cortex Data Lake (CDL) and ADEM-AIOPS instead of Strata Logging Service and Strata Cloud Manager Essentials or Pro, respectively.
- Supported Panorama Versions (Prisma Access (Managed by Panorama) Deployments Only)—If you decide to use Prisma Access (Managed by Panorama), Prisma Access China requires a special build in China; before you begin installation, you must deploy your hardware or virtual (AWS, KVM, or ESXi) Panorama appliance from one of the following images that are available in mainland China.
- Panorama-AWS-10.2.3 (AWS)
- Panorama-KVM-10.2.3-h4.qcow2 (KVM)
- One or more of the following ESXi images:
- If your deployment does not use the Cloud Identity Engine for authentication, download and install this image: Panorama-ESX-10.2.3-h4.ova
- If your deployment uses the Cloud Identity Engine for
authentication, download and install the Panorama-ESX-10.2.3-h4.ova image, then download and install
this image on top of the ova image: Panorama_pc-10.2.4-ch139In addition, if your deployment uses the Cloud Identity Engine, reach out to your Palo Alto Networks team, who will open a case to copy the correct certificate authority (CA) certs to use with the Cloud Identity Engine in China.
After you install the base Panorama images, Palo Alto Networks recommends that you upgrade your Panorama version to a version of 11.2.5 or later to address a certifcate issue with Prisma Access China deployments.
Only use a new Panorama appliance with Prisma Access China. Use this appliance to manage Prisma Access China only, don't use it to manage on-premises firewalls. - Required Panorama Physical Location (Panorama Managed Deployments Only)—The Panorama you use to manage Prisma Access China must be installed and located in mainland China. If it's a hardware appliance, it must be based in mainland China; if it's a Panorama virtual appliance, the cloud location where the appliance is instantiated must be in China.
- Supported Locations—Prisma Access China supports a subset of locations in mainland China.
- Supported Strata Logging Service Region—Prisma Access China
supports the Strata Logging Service China region only, which is
automatically populated for you during product activation.Be sure to note the Limitations in Strata Logging Service China and Known Issues for Strata Logging Service before starting your deployment.
- Required GlobalProtect Version—Prisma Access China supports all the GlobalProtect versions supported in a standard Prisma Access.
- Feature Support— Prisma Access supports Mobile Users—Explicit Proxy deployments in China. You can use one of the following methods to connect:
- GlobalProtect in Proxy mode
- GlobalProtect in Tunnel and Proxy mode
- PAC file with Kerberos
- PAC file with SAML authentication
- Cloud Identity Engine (CIE) authentication
- Proxy mode with remote networks
- Private IP address visibility with Proxy mode on remote networks
- Private application access
Prisma Access explicit proxy in China currently does not support IP address optimization, traffic steering and traffic replication.If you use Strata Cloud Manager to manage your explicit proxy deployment, reach to your Palo Alto Networks Account representative to enable explicit proxy in China. - ZTNA Connector Deployment— If you're setting up a ZTNA Connector in the mainland China, add the following URLs to your organization's allow lists:
- https://locator.jade.cgnx.net
- https://controller.jade.cgnx.net
- https://sdwan-stats-jade-cn.cgnx.net
- https://toolkitsessions.jade.cgnx.net
- https://vmfg.faber.cgnx.net
- Mobile User IP Address Support—When you configure mobile user IP address Pools in a Prisma Access deployment, use only a Worldwide pool. Selecting a regional or location group address can cause errors on commit.
- Required Cloud Services Plugin Version—4.1.0-h20If you're running a plugin version earlier than 4.1.0-h20 (for example, 3.2.1-h18), you should upgrade your plugin to the minimum required version.
- Feature Support—All features and add-ons are supported with Prisma Access China, except for the following add-ons and functionality:
- Base Prisma Access Functionality—The following Prisma Access functionality isn't supported:For a detailed list of nonsupported features, contact your Palo Alto Networks representative.
- To access external SaaS apps or other external internet resources outside of China through a cross-border line (for example, an MPLS line), you can use traffic steering to redirect mobile user or remote network traffic to a service connection before sending it to the internet.
- GlobalProtect Portal Name Change—The GlobalProtect portal name for Prisma Access China is <portal-name>.prismaaccess.cn.
- Other Prisma Access Component and Add-On Compatibility—The supported add-ons depend on your license type and your customer's privacy profile and governance. Prisma Access China provides you with two licenses: Level 1 provides a solution that limits the amount of Personal Identifiable Information (PII) exporting out of mainland China and Level 2 allows more add-ons and features that don't restrict data exporting to outside of China.
- ZTNA Connector Traffic Logging—All Prisma Access logs are stored in Strata Logging Service, providing centralized analysis, reporting, and forensics across all users, applications, and locations.
The following table shows you the support for other Prisma Access components and add-ons; a check mark (√) indicates that it's supported and dash (—) indicates that it's not supported:Component or Add-On Level 1 License Support (Panorama Only) Level 2 License Support Access to private apps via service connection √ For Enterprise licenses, five service connections are provided with the license. For Business Premium and Enterprise licenses, additional service connections are available as an add-on.√ For Enterprise licenses, five service connections are provided with the license. For Business Premium and Enterprise licenses, additional service connections are available as an add-on.Standard Threat Prevention √ √ Advanced Threat Prevention — √ Advanced URL Filtering — √ Advanced WildFire — √ Autonomous DEM — √ (available as an add-on) DNS Security √ √ Enterprise DLP — √ (available as an add-on) IoT Security — √ (available as an add-on) Next-Generation Cloud Access Security Broker (CASB-X) — √ (available as an add-on) Remote Browser Isolation √ (available as an add-on) √ (available as an add-on) SaaS Inline — √ (available as an add-on) Standard URL Filtering √ √ ZTNA Connector — √ With Prisma Access China license you get 10 connectors, 20,000 FQDNs, and 1024 IP subnets. The Private App add-on license provides 200 ZTNA Connectors, 20,000 FQDNs, and 1024 IP subnet functionality. - Base Prisma Access Functionality—The following Prisma Access functionality isn't supported: