Prisma Access
Add Microsoft Entra ID
Table of Contents
Add Microsoft Entra ID
Add Microsoft Entra ID
| Where Can I Use This? | What Do I Need? |
|---|---|
|
|
Add an Microsoft Entra ID (Formerly Azure Active Directory (Azure AD)) in the Cloud Identity Engine to allow the
Cloud Identity Engine to collect data from your Microsoft Entra ID for policy enforcement and
user visibility.
Before you begin, set up your Microsoft Entra ID in your Microsoft Azure
account.
To add a Microsoft Entra ID in the Cloud Identity Engine, you must have at least the
following role privileges in Microsoft Entra ID: Application Administrator and Cloud
Application Administrator. For more information about roles in Microsoft Entra ID, refer
to the following link. You must have an administrative
account for the directory to grant the following required permissions.
- Access Azure Service Management
- View your basic profile
- Maintain access to data for which you have given it access
- Read directory data
- View your email address
- From Prisma Access, open the Cloud Identity Engine app associated with your tenant.
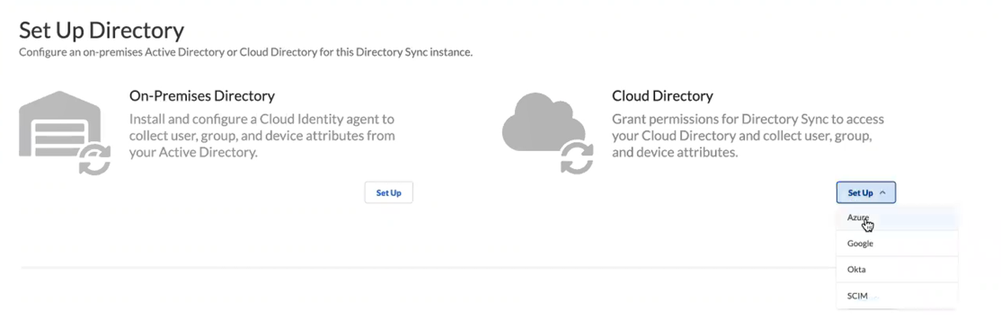
- Go to .In the Cloud Identity Engine app, select .Set Up a Cloud Directory, and select Azure.
![]() Sync your directory with Microsoft Entra ID.
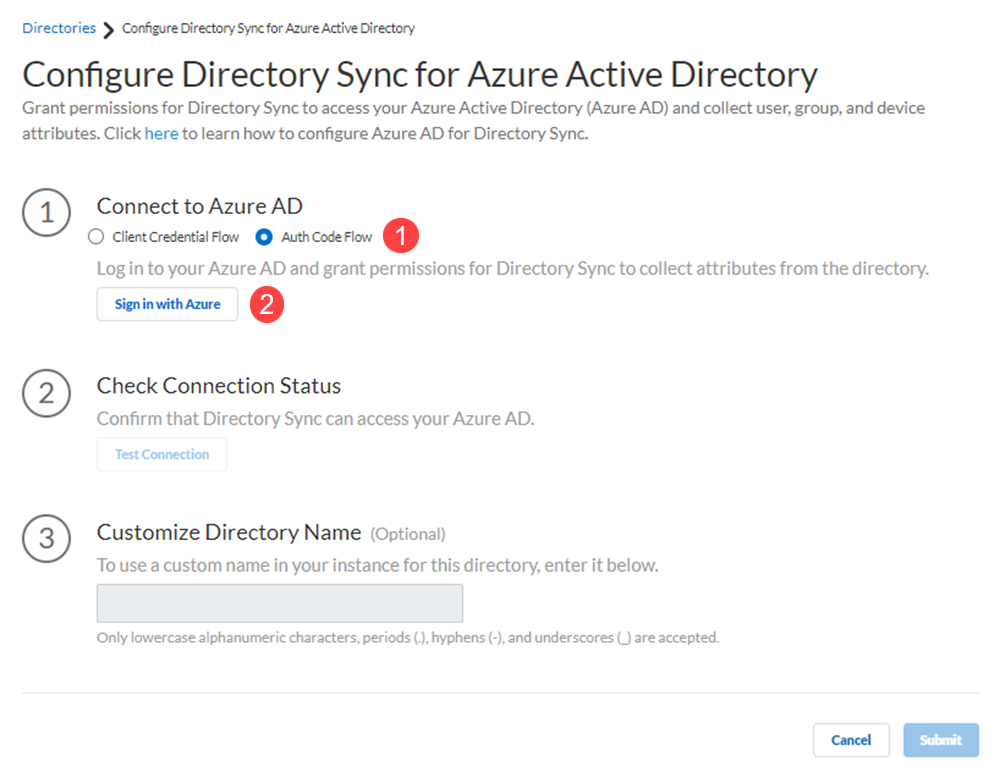
Sync your directory with Microsoft Entra ID.- Connect to Microsoft Entra ID using the authentication code flow or the client credential flow.This example uses the authentication code to log in to Microsoft Entra ID. Using the client credential flow requires you to configure your Microsoft Entra ID with necessary permissions, so ensure you have completed all of the pre-deployment steps necessary to Deploy Client Credential Flow for Microsoft Entra ID.Sign in with Azure.
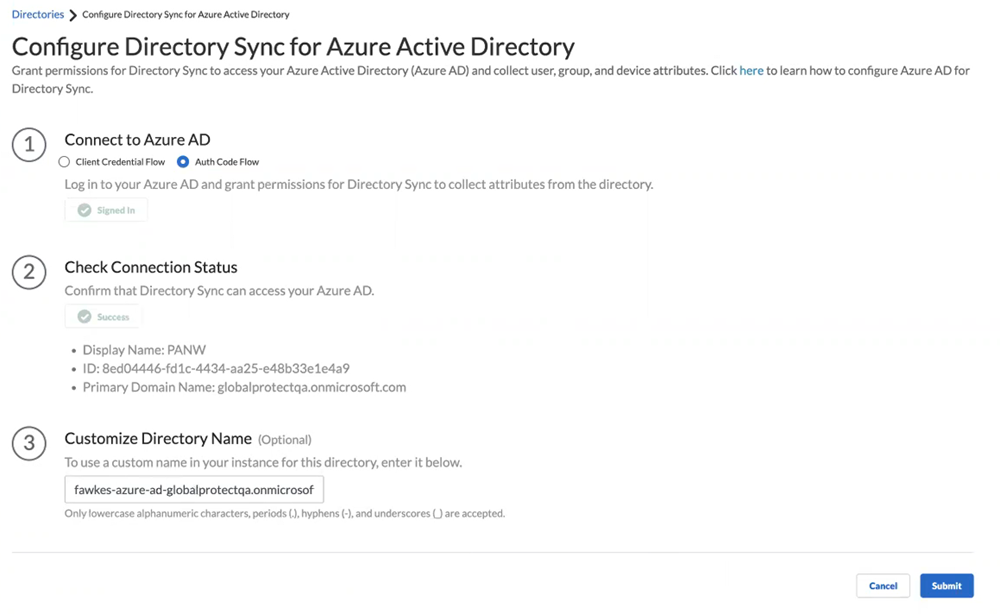
![]() Enter credentials to sign in, Consent on behalf of your organization to grant the permissions that the Cloud Identity Engine requires to get the metadata with the list of directories and Accept to confirm.Test Connection to confirm that the Cloud Identity Engine instance can successfully communicate with the Azure directory.The Cloud Identity Engine checks for the primary directory. While the test is in progress, the button displays Testing. When the Cloud Identity Engine verifies the connection, the button displays Success and lists the domain name and ID for the directory. If the connection is not successful, the button displays Failed and a red exclamation point. If this occurs, confirm you have entered your Azure credentials correctly. If you have more than one directory in your Microsoft Entra ID, select the radio button for each directory and Test Connection. Submit each directory individually.Customize Directory Name to enter a different name for the directory.If you are collecting data for the same domain from both an on-premises Active Directory (AD) and an Microsoft Entra ID, Palo Alto Networks recommends that you create a separate Cloud Identity Engine instance for each directory type. If you must use the same Cloud Identity Engine instance and want to collect data from both an on-premises AD and an Microsoft Entra ID, you must customize the directory name for the Microsoft Entra ID (for example, by adding .aad to Customize Directory Name) then Reconnect Microsoft Entra ID. Any applications that you associate with the Cloud Identity Engine use the custom directory name.
Enter credentials to sign in, Consent on behalf of your organization to grant the permissions that the Cloud Identity Engine requires to get the metadata with the list of directories and Accept to confirm.Test Connection to confirm that the Cloud Identity Engine instance can successfully communicate with the Azure directory.The Cloud Identity Engine checks for the primary directory. While the test is in progress, the button displays Testing. When the Cloud Identity Engine verifies the connection, the button displays Success and lists the domain name and ID for the directory. If the connection is not successful, the button displays Failed and a red exclamation point. If this occurs, confirm you have entered your Azure credentials correctly. If you have more than one directory in your Microsoft Entra ID, select the radio button for each directory and Test Connection. Submit each directory individually.Customize Directory Name to enter a different name for the directory.If you are collecting data for the same domain from both an on-premises Active Directory (AD) and an Microsoft Entra ID, Palo Alto Networks recommends that you create a separate Cloud Identity Engine instance for each directory type. If you must use the same Cloud Identity Engine instance and want to collect data from both an on-premises AD and an Microsoft Entra ID, you must customize the directory name for the Microsoft Entra ID (for example, by adding .aad to Customize Directory Name) then Reconnect Microsoft Entra ID. Any applications that you associate with the Cloud Identity Engine use the custom directory name.- The custom directory name is the alias for your Microsoft Entra ID in your Cloud Identity Engine instance; it does not change the name on your directory. If you do not enter a custom directory name, the Cloud Identity Engine uses the default domain name.
- The Cloud Identity Engine supports lowercase alphanumeric characters, periods (.), hyphens (-), and underscores (_).
- If you associate the Cloud Identity Engine with Cortex XDR, the customized directory name must be identical to the Domain you select in Cortex XDR.The custom directory name must match the corresponding directory name in any app that you associate with the Cloud Identity Engine. For example, if you are using the Cloud Identity Engine with Cortex XDR, the custom directory name in the Cloud Identity Engine must be the same as the directory name in Cortex XDR.
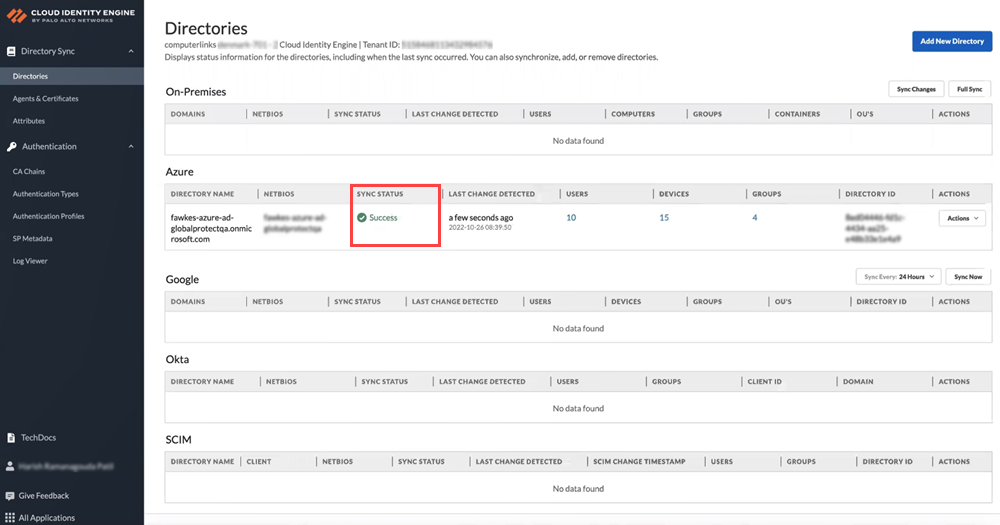
Submit the configuration changes.![]() When you submit the configuration, the Cloud Identity Engine connects to your Microsoft Entra ID and begins synchronizing attributes. The Sync Status column displays In Progress while the Cloud Identity Engine collects the attributes.
When you submit the configuration, the Cloud Identity Engine connects to your Microsoft Entra ID and begins synchronizing attributes. The Sync Status column displays In Progress while the Cloud Identity Engine collects the attributes.![]()