SaaS Security
Begin Scanning a Confluence Data Center App
Table of Contents
Begin Scanning a Confluence Data Center App
Authorize Data Security to connect to Confluence
Data Center to scan all content shared within the app.
| Where Can I Use This? | What Do I Need? |
|---|---|
|
Or any of the following licenses that include the Data Security license:
|
To connect a Confluence Data Center app and
begin scanning assets, you need to:
- Ensure that you add your region-specific IP addresses to the allowed list so that firewalls don’t block them.
- Ensure that you have a Confluence Data Center Administrator account with workspace-level permissions.
- Grant Data Security access to Confluence Data Center.
- Add the Confluence Data Center app to Data Security, providing Data Security information about your Confluence Data Center account.
Support for automated remediation capabilities varies by SaaS application.
Supported Content
|
Support For
|
Details
|
|---|---|
|
Scan Content
| Page content, Attachments, Comments |
|
Backward Scan
|
Yes
|
|
Forward Scan
|
Yes
|
|
Rescan
|
No
|
|
Selective Scan
|
No
|
|
Exposure
|
Internal, External, Company
By default, the backward scan limit is set to 1 year. To
extend this limit to more than 1 year, contact SaaS
Security Technical Support.
|
|
Remediation Actions
|
|
|
Post-Remediation Actions (Actions after Admin
Quarantine):
You can delete, restore, or download a quarantined file
after performing a remediation action (for example
quarantine or incident generation).
|
|
|
Notifications
|
|
|
User Activities
|
|
|
Snippet Support
|
Yes
|
|
Known License/Version restrictions
|
Supported Versions
|
|
Caveats/Notes
|
None
|
Add Confluence Data Center App
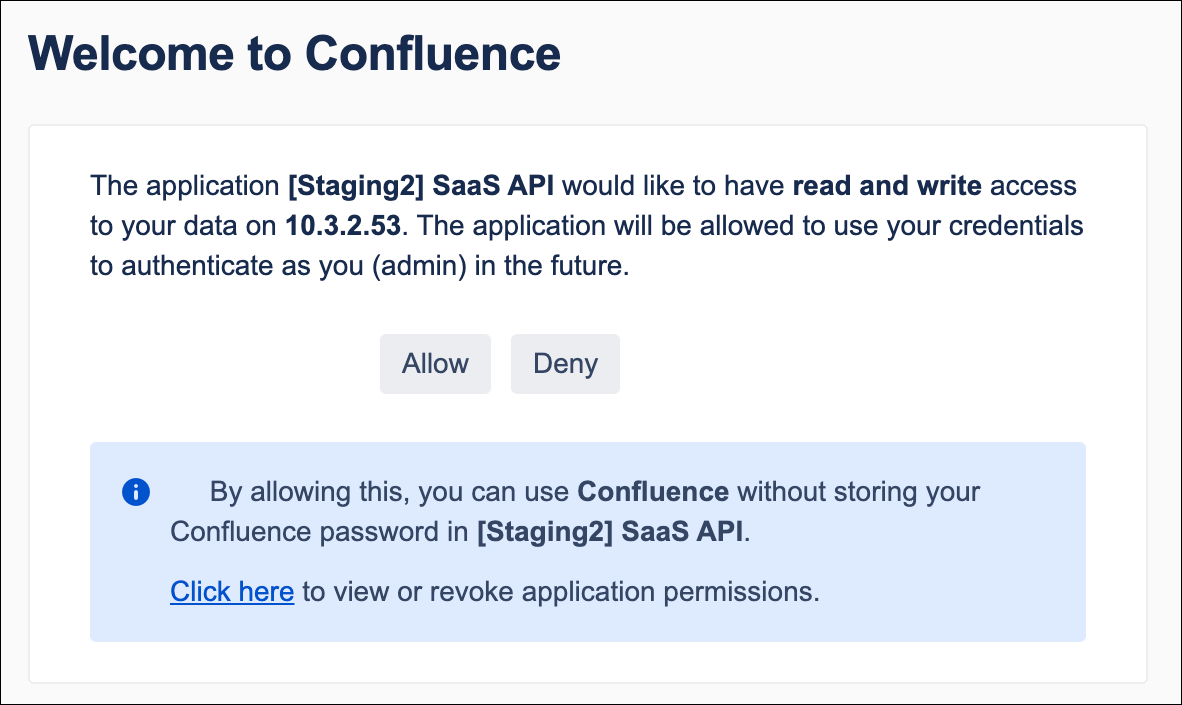
In order for Data Security to scan assets, you must consent to specific permissions during
adding the Confluence Data Center app.
- (Recommended) Add your Confluence Data Center domain as an internal domain.Log in to Strata Cloud Manager.Select .
![]()
![]() Sign in to the Atlassian workspace with an account that has workspace-level Administrator permissions.Follow the onscreen instructions in Step 1: In Confluence, select Confluence settings (cog icon) > General Configuration > Application links > Create Link.Follow the onscreen instructions in Step 2: In the Create Link page, ensure that Atlassian product is selected. Enter the tenant home page address (given in step 2 of the wizard). Ignore the No response warning, and click Continue.Follow the onscreen instructions in Step 3: In the Link applications page, enter the Application Name as Palo Alto Networks CASB.Follow the onscreen instructions in Step 4: Choose the Application Type as Generic application from the drop-down.Because you're only retrieving data from Confluence, you only need to set up a one-way (incoming link) communication for the client to Confluence. You can leave all other input fields blank.Follow the onscreen instructions in Step 6: Select the Create incoming link check box. Click Continue.Follow the onscreen instructions in Step 7: The following consumer details for the client are provided in your wizard:
Sign in to the Atlassian workspace with an account that has workspace-level Administrator permissions.Follow the onscreen instructions in Step 1: In Confluence, select Confluence settings (cog icon) > General Configuration > Application links > Create Link.Follow the onscreen instructions in Step 2: In the Create Link page, ensure that Atlassian product is selected. Enter the tenant home page address (given in step 2 of the wizard). Ignore the No response warning, and click Continue.Follow the onscreen instructions in Step 3: In the Link applications page, enter the Application Name as Palo Alto Networks CASB.Follow the onscreen instructions in Step 4: Choose the Application Type as Generic application from the drop-down.Because you're only retrieving data from Confluence, you only need to set up a one-way (incoming link) communication for the client to Confluence. You can leave all other input fields blank.Follow the onscreen instructions in Step 6: Select the Create incoming link check box. Click Continue.Follow the onscreen instructions in Step 7: The following consumer details for the client are provided in your wizard:- Consumer key
- Consumer name
- Public key
Follow the onscreen instructions in Step 8: Add your region-specific IP addresses to the allowed list so that firewalls don’t block them.Follow the onscreen instructions in Step 9: To onboard your Confluence instance on the Data Security platform, you must provide access to your Confluence instance. To do that, enter your Server URL and click Add to Confluence.![]() After onboarding is complete, Data Security adds the new Confluence Data Center app to the list of Cloud Apps as Confluence Data Center n, where n is the number of Confluence Data Center app instances that you have connected to Data Security. You’ll specify a descriptive name soon.Data Security creates webhooks on your Confluence Data Center instance during onboarding. It is not deleted even after you have deleted or offboarded your connector. To delete the webhooks, in the Confluence administration page, select , and delete ConfluenceDataCenter Webhook.
After onboarding is complete, Data Security adds the new Confluence Data Center app to the list of Cloud Apps as Confluence Data Center n, where n is the number of Confluence Data Center app instances that you have connected to Data Security. You’ll specify a descriptive name soon.Data Security creates webhooks on your Confluence Data Center instance during onboarding. It is not deleted even after you have deleted or offboarded your connector. To delete the webhooks, in the Confluence administration page, select , and delete ConfluenceDataCenter Webhook.Apply Rate Limiting to Confluence Data Center App
By default, rate limiting is disabled for Confluence Data Center. If you enable rate limiting, users who exceed the API requests limit are listed under List of limited accounts. You can exempt specific users from rate limiting by adding them to the Exemption list.Identify Risks
When you add a new cloud app and enable scanning, Data Security automatically scans the cloud app against the default data patterns and displays the match occurrences. You can take action now to improve your scan results and identify risks.- To start scanning the new Confluence Data Center app for risks, select .Monitor the scan results.During the discovery phase, Data Security scans files and matches them against enabled default policy rules.Verify that your default policy rules are effective. If the results don’t capture all the risks or you see false positives, proceed to the next step.(Optional) Add new policy rules.Consider the business use of your app, then identify risks unique to your enterprise. As necessary, add new:(Optional) Configure or edit a data pattern.You can Configure Data Patterns to identify specific strings of text, characters, words, or patterns to make it possible to find all instances of text that match a data pattern you specify.Next step: Proceed to Customize Confluence Data Center App and Fix Confluence Data Center App Onboarding Issues, if necessary.
Customize Confluence Data Center App
If you plan to manage more than one instance of Confluence app, consider differentiating your instances.- (Optional) Give a descriptive name to this app instance.
- Select the Confluence link on the Cloud Apps list.Enter a descriptive Name.Click Done to save your changes.Next step: Proceed to Fix Confluence Data Center App Onboarding Issues.
Fix Confluence Data Center App Onboarding Issues
The most common issues related to onboarding the Confluence app are as follows:SymptomExplanationSolutionDuring creating application links, the Confluence web interface displays errors, requesting required Service provider, Shared secret, Request Token URL, and Access Token URL.These errors are not related to onboarding. These errors occur when you forget to select the Create income link check box.Delete the application links you created and recreate them with the Create income link selected.