SaaS Security
Begin Scanning a Jira Data Center App
Table of Contents
Begin Scanning a Jira Data Center App
Authorize Data Security to connect to Jira Data Center
to scan all content shared within the app.
| Where Can I Use This? | What Do I Need? |
|---|---|
|
Or any of the following licenses that include the Data Security license:
|
To connect a Jira Data Center app and begin
scanning assets, you need to:
- Ensure that you add your region-specific IP addresses to the allowed list so that firewalls don’t block them.
- Ensure that you have a Jira Data Center Administrator account with workspace-level permissions.
- Grant Data Security access to Jira Data Center.
- Add the Jira Data Center app to Data Security, providing Data Security information about your Jira Data Center account.
Support for automated remediation capabilities varies by SaaS application.
Supported Content
|
Support For
|
Details
|
|---|---|
|
Scan Content
| Issue Descriptions, Comments, Attachments, Projects |
|
Backward Scan
|
Yes
Data Security performs a backward scan spanning
15 years from the date of onboarding for both existing
and new customers. The default rate limit is 100
requests per second, but you can also set your own
limit. This rate limit is divided between forward and
backward scans. When the rate limit reaches 60% of the
threshold, the backward scan halts. However, it resumes
once the rate limit falls below this threshold. The
recommended rate limit is 10 requests per second. A
minimum rate limit of 2 requests per second is
recommended so that your forward scanning is not
adversely affected.
|
|
Forward Scan
|
Yes
|
|
Rescan
|
No
|
|
Selective Scan
|
N/A
|
|
Exposure
|
No
|
|
Remediation Actions
|
|
|
Post-Remediation Actions (Actions after Admin
Quarantine):
You can delete, restore, or download a quarantined file
after performing a remediation action (for example
quarantine or incident generation).
|
|
|
Notifications
|
|
|
User Activities
|
|
|
Snippet Support
|
Yes
|
|
Known License/Version restrictions
|
Supported Versions
|
|
Caveats/Notes
|
None
|
Add Jira Data Center App
In order for Data Security to scan assets, you must consent to specific permissions during
adding the Jira Data Center app.
- (Recommended) Add your Jira Data Center domain as an internal domain.(Optional): Ensure you have added the region-specific IP addresses to the allowed list on your NGFW or Prisma Access tenant so that these IP addresses are not blocked.Log in to Strata Cloud Manager.Select .
![]()
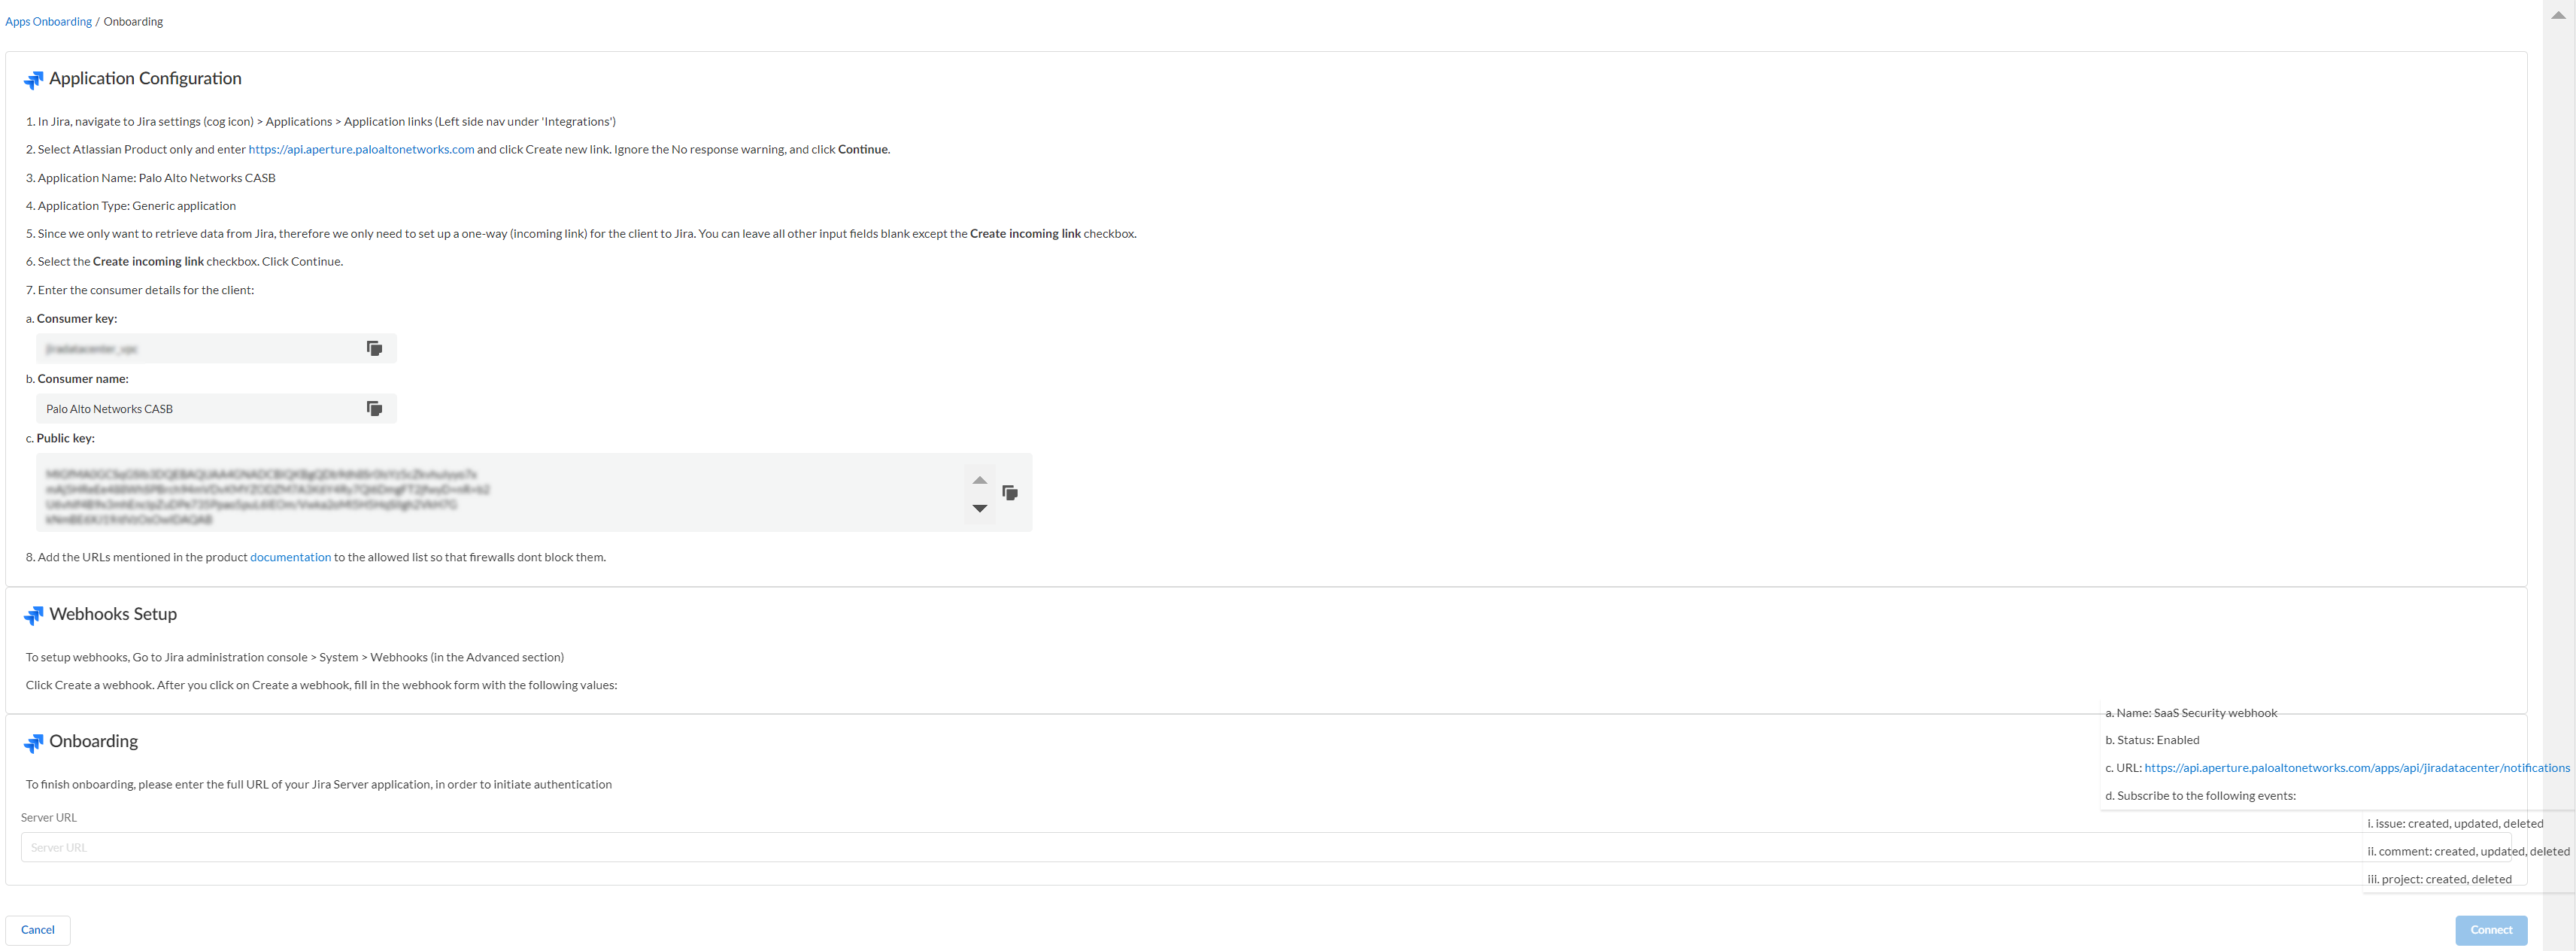
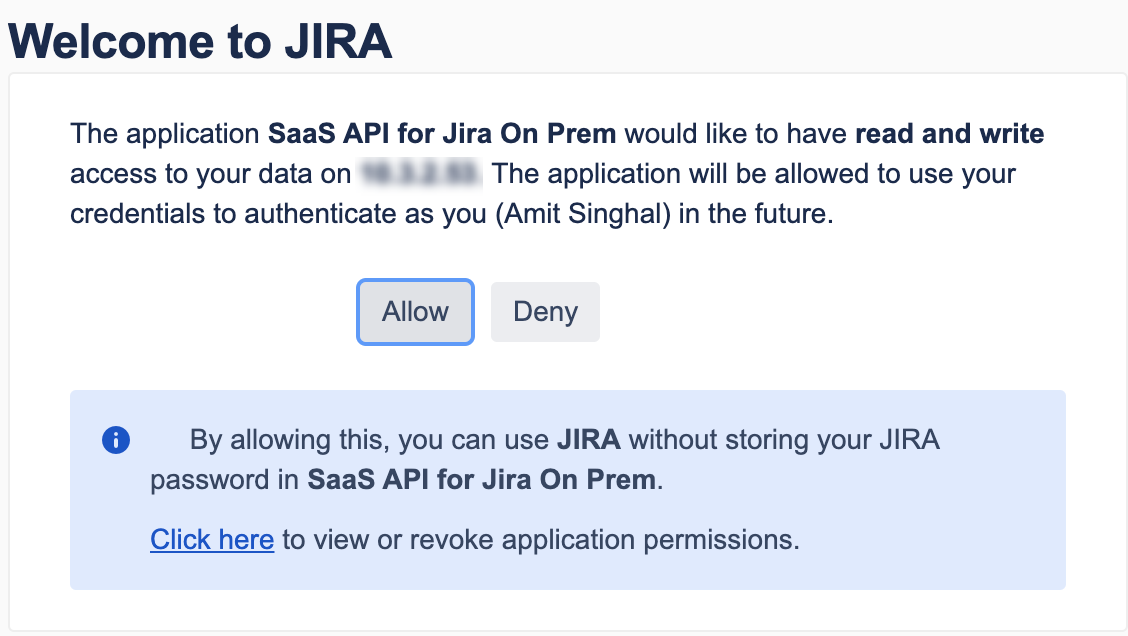
![]() Sign in to the Atlassian workspace with an account that has workspace-level Administrator permissions.Follow the onscreen instructions in Step 1: In Jira Data Center, select Jira settings (cog icon) > Applications > Application links > Create Link.Follow the onscreen instructions in Step 2: In the Create Link page, ensure that Atlassian product is selected. Enter the tenant home page address. Ignore the No response warning, and click Continue.Follow the onscreen instructions in Step 3: In the Link applications page, enter the Application Name as Palo Alto Networks CASB.Follow the onscreen instructions in Step 4: Choose the Application Type as Generic application from the drop-down.Because you are only retrieving data from Jira, you only need to set up a one-way (incoming link) communication for the client to Jira. You can leave all other input fields blank.Follow the onscreen instructions in Step 6: Select the Create incoming link check box. Click Continue.Follow the onscreen instructions in Step 7: The following consumer details for the client are provided in your wizard:
Sign in to the Atlassian workspace with an account that has workspace-level Administrator permissions.Follow the onscreen instructions in Step 1: In Jira Data Center, select Jira settings (cog icon) > Applications > Application links > Create Link.Follow the onscreen instructions in Step 2: In the Create Link page, ensure that Atlassian product is selected. Enter the tenant home page address. Ignore the No response warning, and click Continue.Follow the onscreen instructions in Step 3: In the Link applications page, enter the Application Name as Palo Alto Networks CASB.Follow the onscreen instructions in Step 4: Choose the Application Type as Generic application from the drop-down.Because you are only retrieving data from Jira, you only need to set up a one-way (incoming link) communication for the client to Jira. You can leave all other input fields blank.Follow the onscreen instructions in Step 6: Select the Create incoming link check box. Click Continue.Follow the onscreen instructions in Step 7: The following consumer details for the client are provided in your wizard:- Consumer key
- Consumer name
- Public key
Follow the onscreen instructions in Step 8: Add your region-specific IP addresses to the allowed list so that firewalls don’t block them.Follow the onscreen instructions in Step 9: To onboard your Jira instance on the Data Security platform, you must provide access to your Jira instance. To do that, enter your Server URL and click Add to Jira.![]() Follow the onscreen instructions in Step 10: To setup Webhooks, select Jira administration console > System > Webhooks (in the Advanced section).Follow the onscreen instructions in Step 11: Click Create a WebHook and complete the form with the following values:
Follow the onscreen instructions in Step 10: To setup Webhooks, select Jira administration console > System > Webhooks (in the Advanced section).Follow the onscreen instructions in Step 11: Click Create a WebHook and complete the form with the following values:- Name: SaaS Security webhook
- Status: Enabled
- URL: Enter the URL that you see in the wizard
- Subscribe to the following events and click Create:
- Issue: created, updated, deleted
- Comment: created, updated, deleted
- Project: created, deleted
After onboarding is complete, Data Security adds the new Jira Data Center app to the list of Cloud Apps as Jira Data Center n, where n is the number of Jira Data Center app instances that you have connected to Data Security. You’ll specify a descriptive name soon.Customize Jira Data Center App
After you add the Jira Data Center app, customize the app to make use of capabilities that are unique to this app or that differentiate this app instance from others.- (Optional) Give a descriptive name to this app instance.
- Select the Jiran link on the Cloud Apps list.Enter a descriptive Name to differentiate this instance of Jira Data Center from other instances.Click Done to save your changes.Next step: Proceed to Identify Risks.
Identify Risks
When you add a new cloud app, then enable scanning, Data Security automatically scans the cloud app against the default data patterns and displays the match occurrences. You can take action now to improve your scan results and identify risks.- To start scanning the new Jira Data Center app for risks, select .Monitor the scan results.During the discovery phase, as Data Security scans files and matches them against enabled policy rules:
- Verify that Data Security displays assets.
- Verify that your default policy rules are effective. If the results don’t capture all risks or you see false positives, proceed to next step to improve your results.
(Optional) Modify match criteria for existing policy rules.(Optional) Add new policy rules.Consider the business use of your cloud app, then identify risks unique to your enterprise. As necessary, add new:(Optional) Configure or edit a data pattern.You can Configure Data Patterns to identify specific strings of text, characters, words, or patterns to make it possible to find all instances of text that match a data pattern you specify.Next step: Proceed to Fix Jira Data Center App Onboarding and Scan Issues, if necessary.Fix Jira Data Center App Onboarding and Scan Issues
The most common issues related to onboarding a Jira Data Center app are as follows:SymptomExplanationSolutionAttachments embedded in comments don’t display in SaaS Security web interface.Attachments embedded inside descriptions or comments are not currently supported—only attachments added through the attach button are scanned for violations.This is expected behavior. However, periodically monitor the support because new support is added regularly.Attachments embedded in descriptions don’t display in SaaS Security web interface.Primary Email of the asset owner related to Jira app doesn’t display in the SaaS Security web interface.Sometimes users explicitly block outsiders (apps or people) from viewing their contact information, which includes email address.Set Contact Email address to Anyone to display this information.From Profile and visibility, navigate to and enable Anyone.Comments for user activity and events display in the SaaS Security web interface, but one comment appears to be a duplicate of another as the Target Name for each is the same.All comments have a unique Target Name. However, the SaaS Security web interface only displays the first 16 characters for optimal viewing as some names can be quite long.This is expected behavior and by design.FAQs for Jira Data Center App
The most common questions related to onboarding a Jira Data Center app are as follows:QuestionAnswerWhat are the different events or activities supported for Jira Data Center app?Create and delete of issues, projects, comments, and attachments.Delete is defined as permanently deletion. See Fix Jira Data Center App Onboarding and Scan Issues.How are Issue description violations named?They are named using the format Issue: {issue-key}.How are Issue comment violations named?They are named using the format `Comment: {issue-key}.How are Issue attachment violations named?They are named using the format `Attachment: {attachment-name}.How do I search for all assets related to a Jira Issue?You can retrieve assets as follows:- Description violations and comment violations—Type the Issue-Key
- Attachment violations—Search by attachment name or by application name.