SaaS Security
Onboard a Salesforce App to SSPM Using a Connected App
Table of Contents
Onboard a Salesforce App to SSPM Using a Connected App
Connect a Salesforce instance to SSPM to detect posture risks.
For SSPM to detect posture risks in your Salesforce instance, you must onboard your
Salesforce instance to SSPM. Through the onboarding process, SSPM can connect to the
Salesforce API through a Connected App that you create. By leveraging the OAuth 2.0
protocol, the Connected App provides the secure framework for SSPM to access your
Salesforce configuration. Once authenticated, SSPM uses the API to scan your
Salesforce environment for misconfigured settings and account risks.
The supported Salesforce editions for SSPM scans are the following editions:
- Enterprise Edition
- Unlimited Edition
- Developer Edition
- Professional Edition with the API Add-on
To access your Salesforce instance, SSPM requires the following information, which
you will specify during the onboarding process.
| Item | Description |
|---|---|
| Instance URL | The unique web address for your Salesforce instance. SSPM uses this address to locate and communicate with your specific environment. The instance URL has the format https://<instance_name>.my.salesforce.com. |
| Client ID |
SSPM will access a Salesforce API through a Salesforce Connected
App that you create. Salesforce generates the Client ID to
uniquely identify the Connected App. The Client ID acts as a
username for SSPM to identify itself during the connection
process.
The Salesforce interface calls this ID
the Consumer Key. |
| Client Secret |
SSPM will access a Salesforce API through a Salesforce Connected
App that you create. Salesforce generates the Client Secret,
which acts as a password that SSPM uses to securely authenticate
and establish the OAuth connection.
The Salesforce interface calls this
secret the Consumer Secret. |
To onboard your Salesforce instance, you complete the following actions:
The following steps assume that you are using the
Salesforce Lightning Experience UI, which is now the default UI for most Salesforce
accounts. If you are using the Salesforce Classic UI, you can click the
Switch to Lightening Experience in your page header to
follow these instructions.
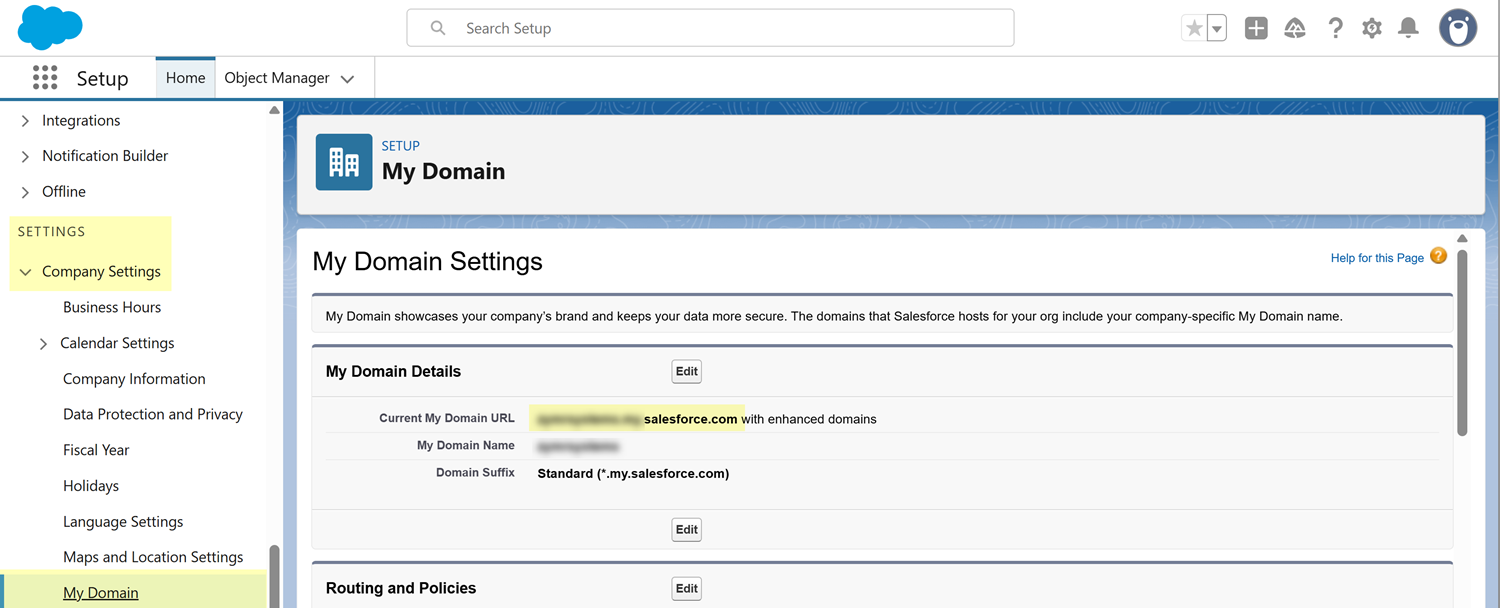
- Make note of your organization's Salesforce instance (domain) URL.Your instance URL, which is typically used as your login URL, has the format https://<instance_name>.my.salesforce.com. You will provide this entire URL, including the https:// prefix, to SSPM during the onboarding process.If necessary, you can locate your instance URL from the My Domain Settings page.
- Click the settings icon (gear icon) in the upper-right corner of the page, and select Setup.From the Setup page's left navigation pane, select . These items appear under the SETTINGS section of the menu.On the My Domain Settings page, the Current My Domain URL field contains your instance URL. Remember to add the https:// prefix when you provide this URL to SSPM.
![]() Create a Connected App in Salesforce.Creating a Connected App establishes a secure identity for SSPM within your Salesforce environment. This identity enables Salesforce to recognize SSPM and authorize its API requests.
Create a Connected App in Salesforce.Creating a Connected App establishes a secure identity for SSPM within your Salesforce environment. This identity enables Salesforce to recognize SSPM and authorize its API requests.- Identify the Salesforce user account that you will use to create your Connected App.Required Permissions: To create a Connected App, the account must be assigned to the System Administrator Profile, or have a permission set that includes the following permissions:
- Customize Application
- Manage Connected Apps or Modify All Data
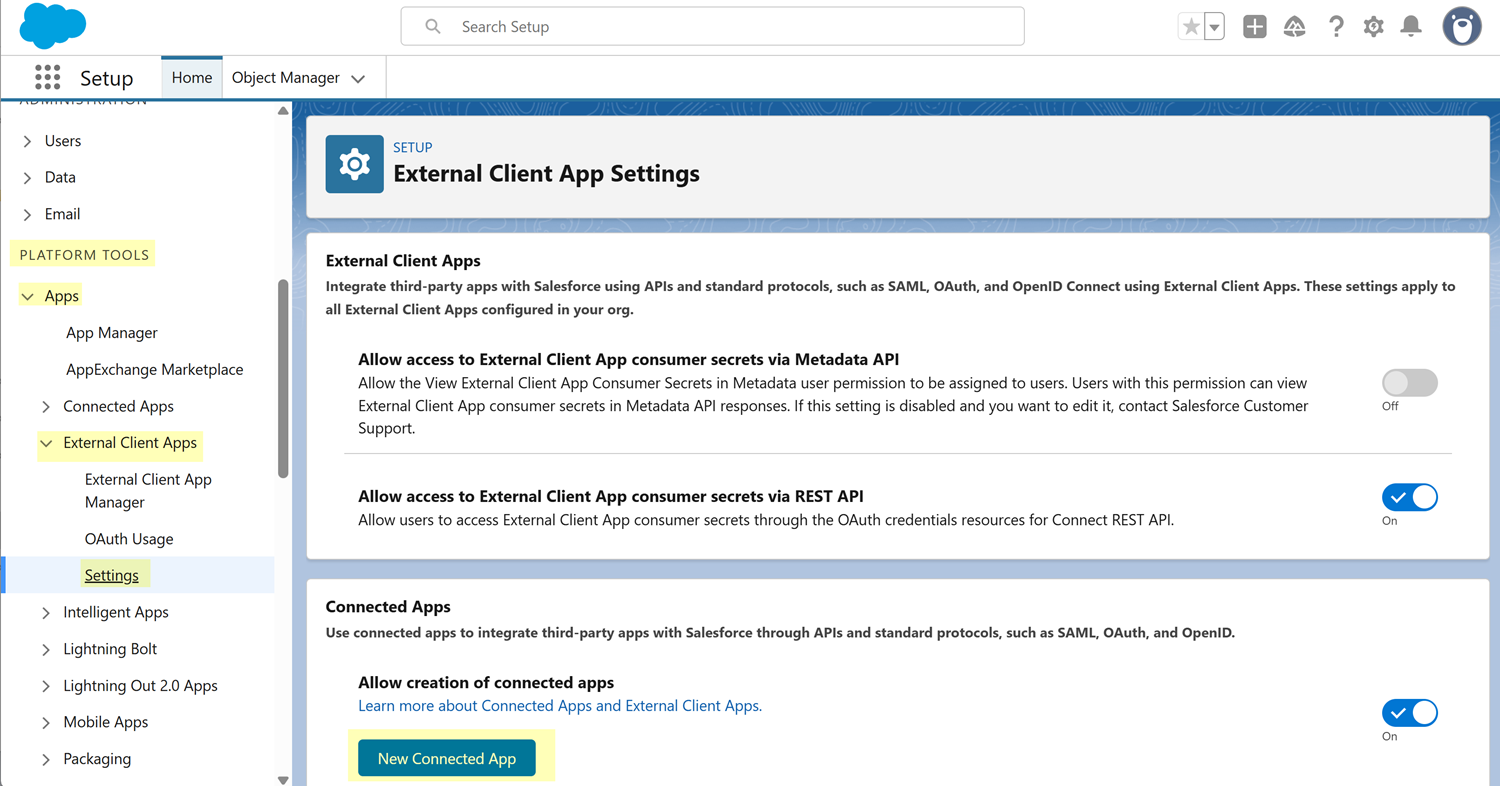
Log in to the Salesforce account that you identified.Navigate to your Setup page. To do this, click the settings icon (gear icon) in the upper-right corner of the page, and select Setup.Navigate to the External Client App Settings page. To navigate to this page, from the Setup page's left navigation pane, select . These items appear under the PLATFORM TOOLS section of the menu.On the External Client App Settings page, click New Connected App.![]() Fill in the fields on the New Connected App page.
Fill in the fields on the New Connected App page.- Under Basic Information, take the
following actions:
- In the Connected App Name field, specify a meaningful name, such as SSPM Connector. Salesforce will also automatically format this name for system use (such as replacing spaces with underscores) in the API Name field. Using a clear, descriptive name ensures that SSPM activity is easily identifiable in your Salesforce audit logs and describes the Connected App's purpose to other administrators.
- In the Contact Email field, enter a valid email address that Salesforce can use to contact you or your support team regarding this integration. We recommend using a shared administrative or security team email alias to ensure that these alerts are seen even if a specific individual leaves the organization.
- Under API (Enable OAuth Settings), take
the following actions:
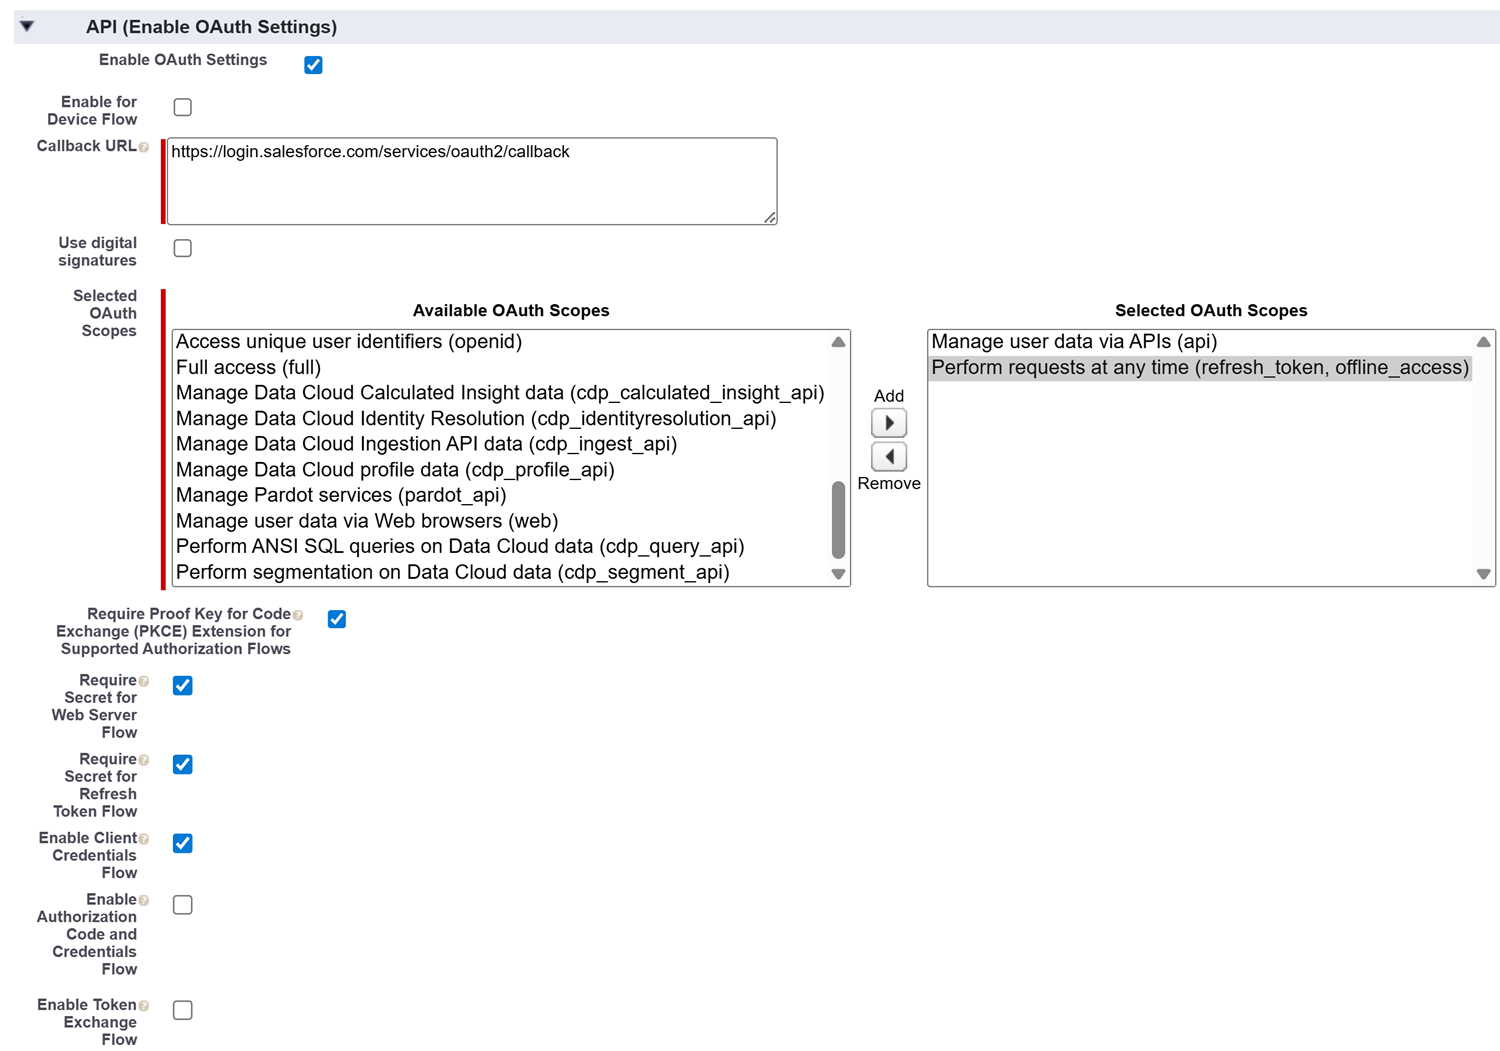
- Select the Enable OAuth Settings
checkbox. Selecting the Enable OAuth Settings checkbox expands the API (Enable OAuth Settings) section to show additional fields.
- In the Callback URL field, specify the following
callback URL:
https://login.salesforce.com/services/oauth2/callbackThis URL acts as a secure "return address" that allows Salesforce to safely complete the authentication process with SSPM. Ensure you enter the URL exactly as shown, as this field is case-sensitive.
- In the Available OAuth Scopes list, select the following scopes and click the Add arrow to move them to the Selected OAuth Scopes list:
- Manage user data via APIs (api)
- Perform requests at any time (refresh_token, offline_access)
- Select the following checkboxes:
- Require Proof Key for Code Exchange (PKCE) Extension for Supported Authorization Flows
- Require Secret for Web Server Flow
- Require Secret for Refresh Token Flow
- Enable Client Credentials Flow
- Select the Enable OAuth Settings
checkbox.
![]() Save your Connected App.Salesforce saves the Connected App.Salesforce requires a brief period (typically up to 10 minutes) to propagate your new Connected App settings across its global network. You do not need to wait before completing the remaining steps. You can Continue with the next steps.You won't receive a confirmation message when this propagation is complete. If you receive an authentication error when you first attempt to connect SSPM to Salesforce, wait a few minutes and try again. This pause will allow the Salesforce Identity service to fully update.Configure access policies for your Connected App.Now that you have created the Connected App, you must define its security policies. These settings enable the authorization flow for your SSPM users, and specify which user account will provide the underlying permissions for SSPM’s activity.
Save your Connected App.Salesforce saves the Connected App.Salesforce requires a brief period (typically up to 10 minutes) to propagate your new Connected App settings across its global network. You do not need to wait before completing the remaining steps. You can Continue with the next steps.You won't receive a confirmation message when this propagation is complete. If you receive an authentication error when you first attempt to connect SSPM to Salesforce, wait a few minutes and try again. This pause will allow the Salesforce Identity service to fully update.Configure access policies for your Connected App.Now that you have created the Connected App, you must define its security policies. These settings enable the authorization flow for your SSPM users, and specify which user account will provide the underlying permissions for SSPM’s activity.- On the Connected App Detail page, click Edit.If you navigated away from the Connected App Detail page, complete the following steps to open the Connected App Detail page:
- From the Setup page's left navigation, select . These items appear under the PLATFORM TOOLS section of the menu.
- Locate your Connected App on this page, and click Edit.
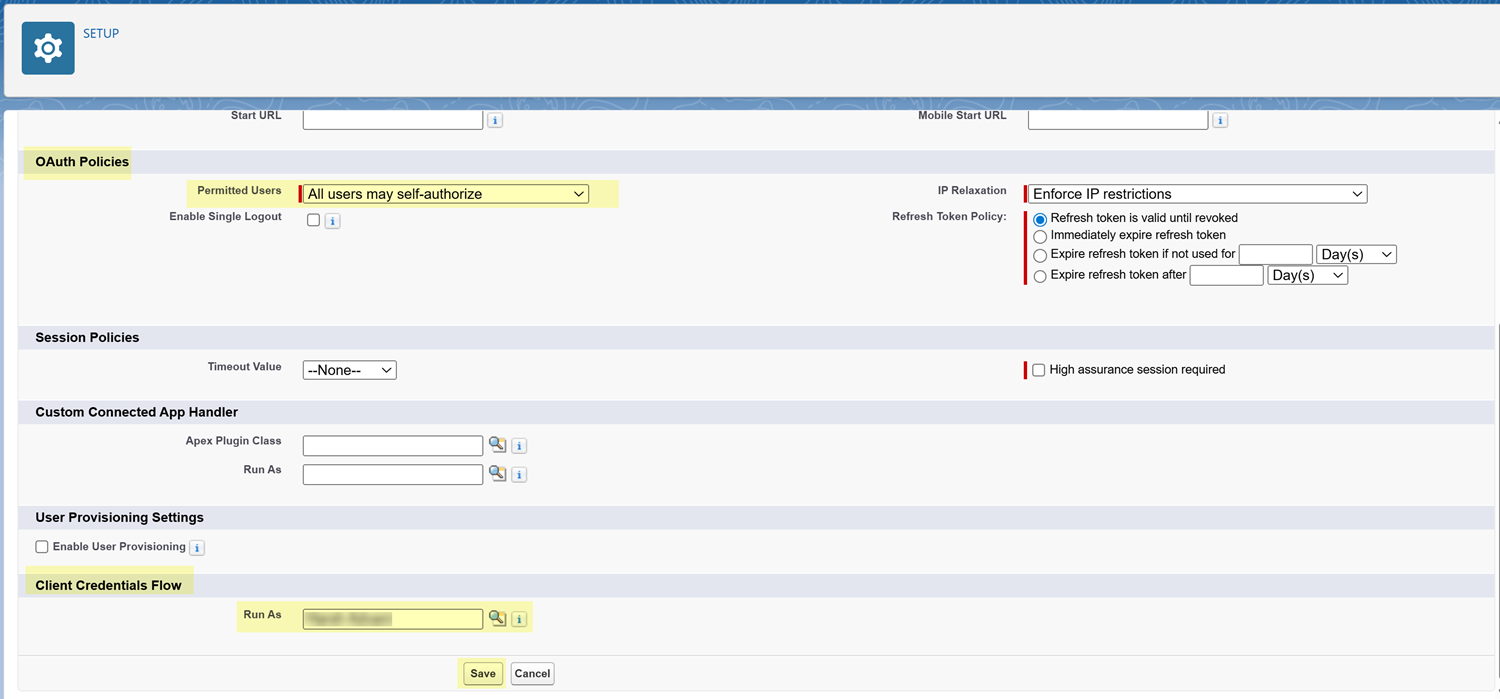
On the Connected App Detail page, click Manage.Edit Policies.Under OAuth Policies, set the Permitted Users to All users may self-authorize.Under Client Credentials Flow, specify the Run As user. The Run As user must be a user assigned to the System Administrator Profile.Save your changes.![]() Copy the credentials (Client ID and Client Secret) for your Connected App.SSPM will use these credentials to establish a secure connection to your Salesforce instance.
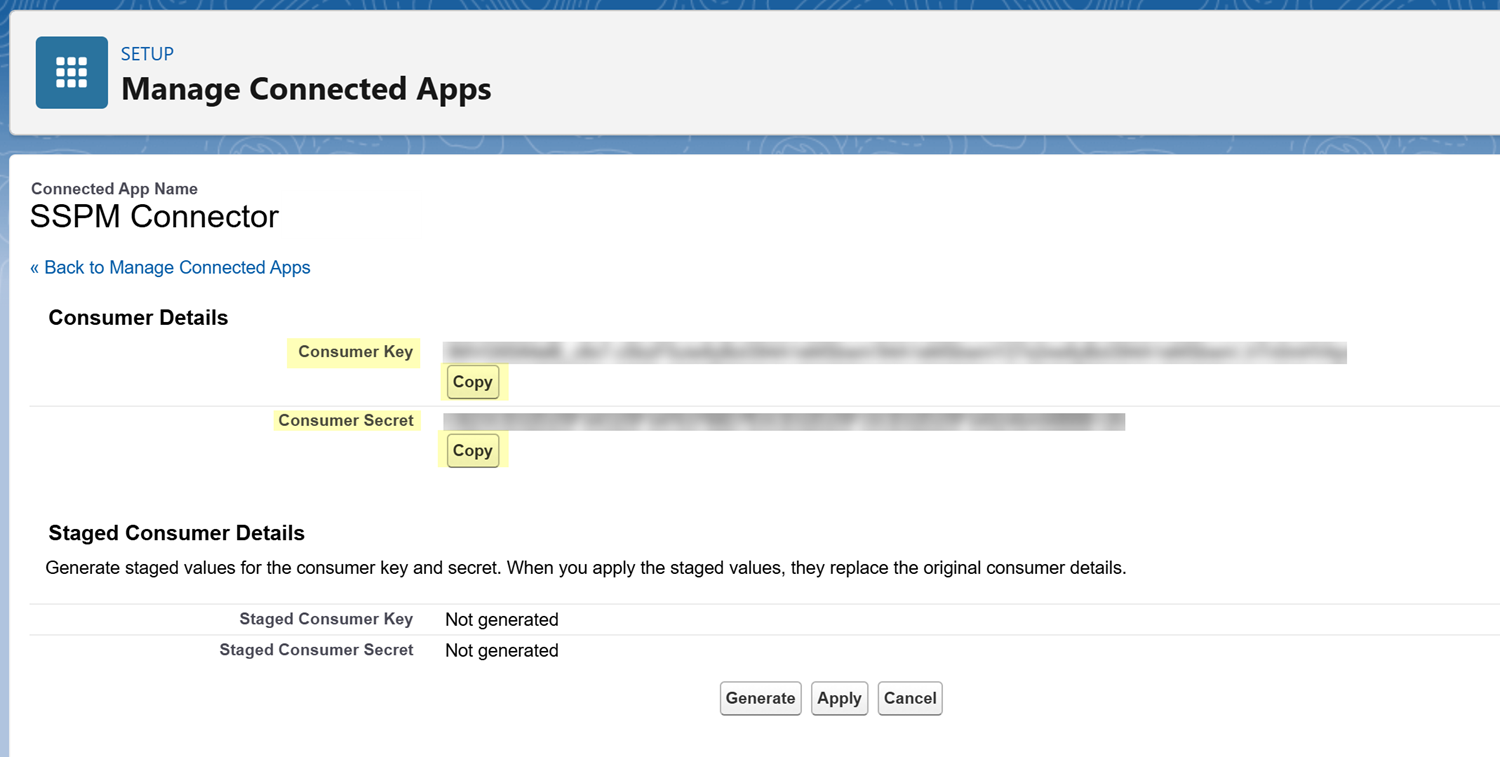
Copy the credentials (Client ID and Client Secret) for your Connected App.SSPM will use these credentials to establish a secure connection to your Salesforce instance.- Navigate to the App Manager page.From the Setup page's left navigation pane, select . These items appear under the PLATFORM TOOLS section of the menu.On the Connected App Detail page, locate the API (Enable OAuth Settings) section and click Manage Consumer Details.Salesforce displays the Consumer Key (Client ID) and Consumer Secret (Client Secret).Copy the Client ID and Client Secret and paste them into a text file.Do not continue to the next step unless you have copied the Client ID and Client Secret. You must provide this information to SSPM during the onboarding process.
![]() Connect SSPM to your Salesforce instance.In SSPM, complete the following steps to enable SSPM to connect to your Salesforce instance.
Connect SSPM to your Salesforce instance.In SSPM, complete the following steps to enable SSPM to connect to your Salesforce instance.- Log in to Strata Cloud Manager.Select and click the Salesforce tile.On the Posture Security tab, Add New instance.On the Permissions page, select whether you want SSPM to connect with Read Permissions only or Read and Write Permissions.On the Authentication page, select Service Principal.Enter your Instance URL and the application credentials (Client ID and Client Secret).Connect.