GlobalProtect
Configure a Per-App VPN Configuration for Windows 10 UWP Endpoints Using Workspace ONE
Table of Contents
Configure a Per-App VPN Configuration for Windows 10 UWP Endpoints Using Workspace ONE
You can enable access to internal resources from your managed mobile endpoints by configuring
GlobalProtect VPN access using Workspace ONE. In a per-app VPN configuration, you
can specify which managed apps can send traffic through the GlobalProtect VPN
tunnel. Unmanaged apps will continue to connect directly to the internet instead of
through the GlobalProtect VPN tunnel.
Because Workspace ONE does not yet list GlobalProtect as an official connection provider for
Windows endpoints, you must select an alternate VPN provider, edit the settings
for the GlobalProtect app, and import the configuration back into the VPN
profile as described in the following workflow.
Use the following steps to configure a per-app VPN configuration for Windows 10 UWP endpoints
using Workspace ONE:
- Download the GlobalProtect app for Windows 10
UWP:
- Download the GlobalProtect app directly from the Microsoft Store.
- From the Workspace ONE console, modify an existing Windows 10 UWP profile add a
new one.
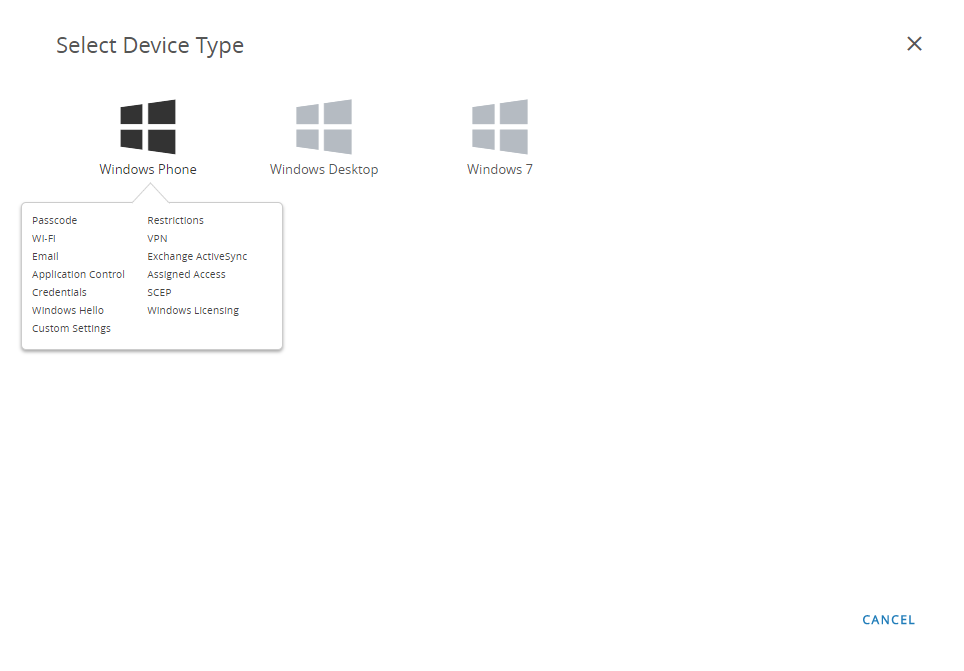
- Select , and then ADD a new profile.
- Select Windows as the platform and
Windows Phone as the device type.
![]()
![]()
- Configure the General settings:
- Enter a Name for the profile.
- (Optional) Enter a brief Description of the profile that indicates its purpose.
- (Optional) Set the Deployment method to Managed to enable the profile to be removed automatically upon unenrollment
- (Optional) Select an Assignment Type to determine how the profile is deployed to endpoints. Select Auto to deploy the profile to all endpoints automatically, Optional to enable the end user to install the profile from the Self-Service Portal (SSP) or to manually deploy the profile to individual endpoints, or Compliance to deploy the profile when an end user violates a compliance policy applicable to the endpoint.
- (Optional) In the Managed By field, enter the Organization Group with administrative access to the profile.
- (Optional) In the Assigned Groups field, add the Smart Groups to which you want the profile added. This field includes an option to create a new Smart Group, which can be configured with specs for minimum OS, device models, ownership categories, organization groups, and more.
- (Optional) Indicate whether you want to include any Exclusions to the assignment of this profile. If you select Yes, the Excluded Groups field displays, enabling you to select the Smart Groups that you wish to exclude from the assignment of this profile.
![]()
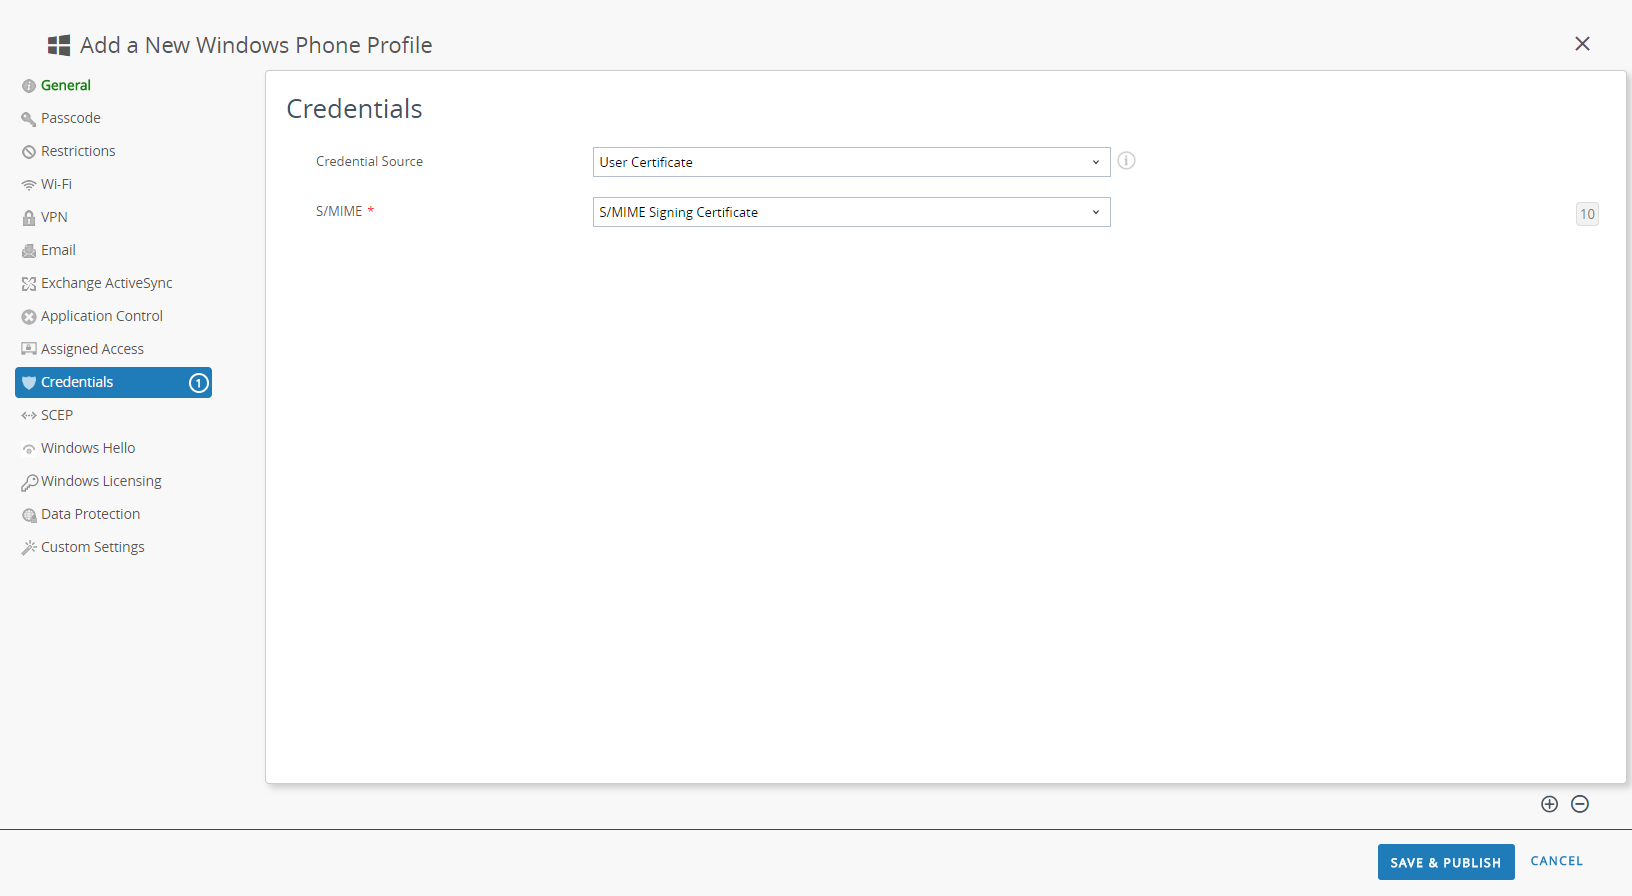
- Configure the Credentials settings:All per-app VPN configurations require certificate-based authentication.
- To pull client certificates from Workspace ONE users:
- Set the Credential Source to User Certificate.
- Select the S/MIME Signing Certificate (default).
![]()
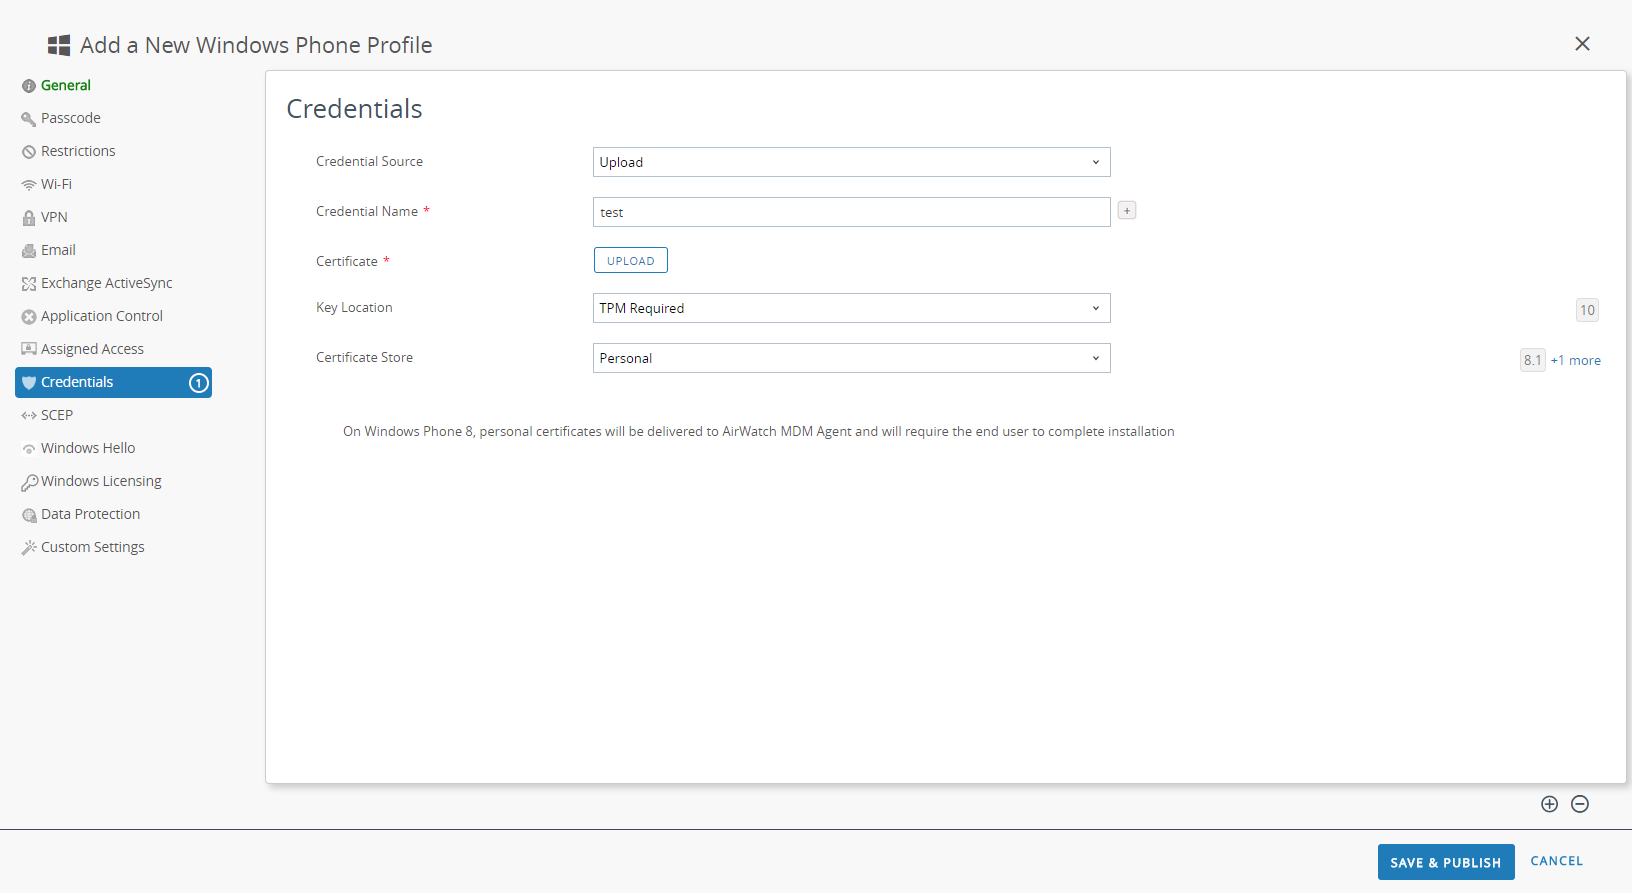
- To upload a client certificate manually:
- Set the Credential Source to Upload.
- Enter a Credential Name.
- Click UPLOAD to locate and select the certificate that you want to upload.
- After you select a certificate, click SAVE.
- Select the Key Location where you want to store the certificate’s private key:
- TPM Required—Store the private key on a Trusted Platform Module. If a Trusted Platform Module is not available on the endpoint, the private key cannot be installed.
- TPM If Present—Store the private key on a Trusted Platform Module if one is available on the endpoint. If a Trusted Platform Module is not available on the endpoint, the private key is stored in the endpoint software.
- Software—Store the private key in the endpoint software.
- Passport—Save the private key to Microsoft Passport. To use this option, Workspace ONE Protection Agent must be installed on the endpoint.
- Set the Certificate Store to Personal.
![]()
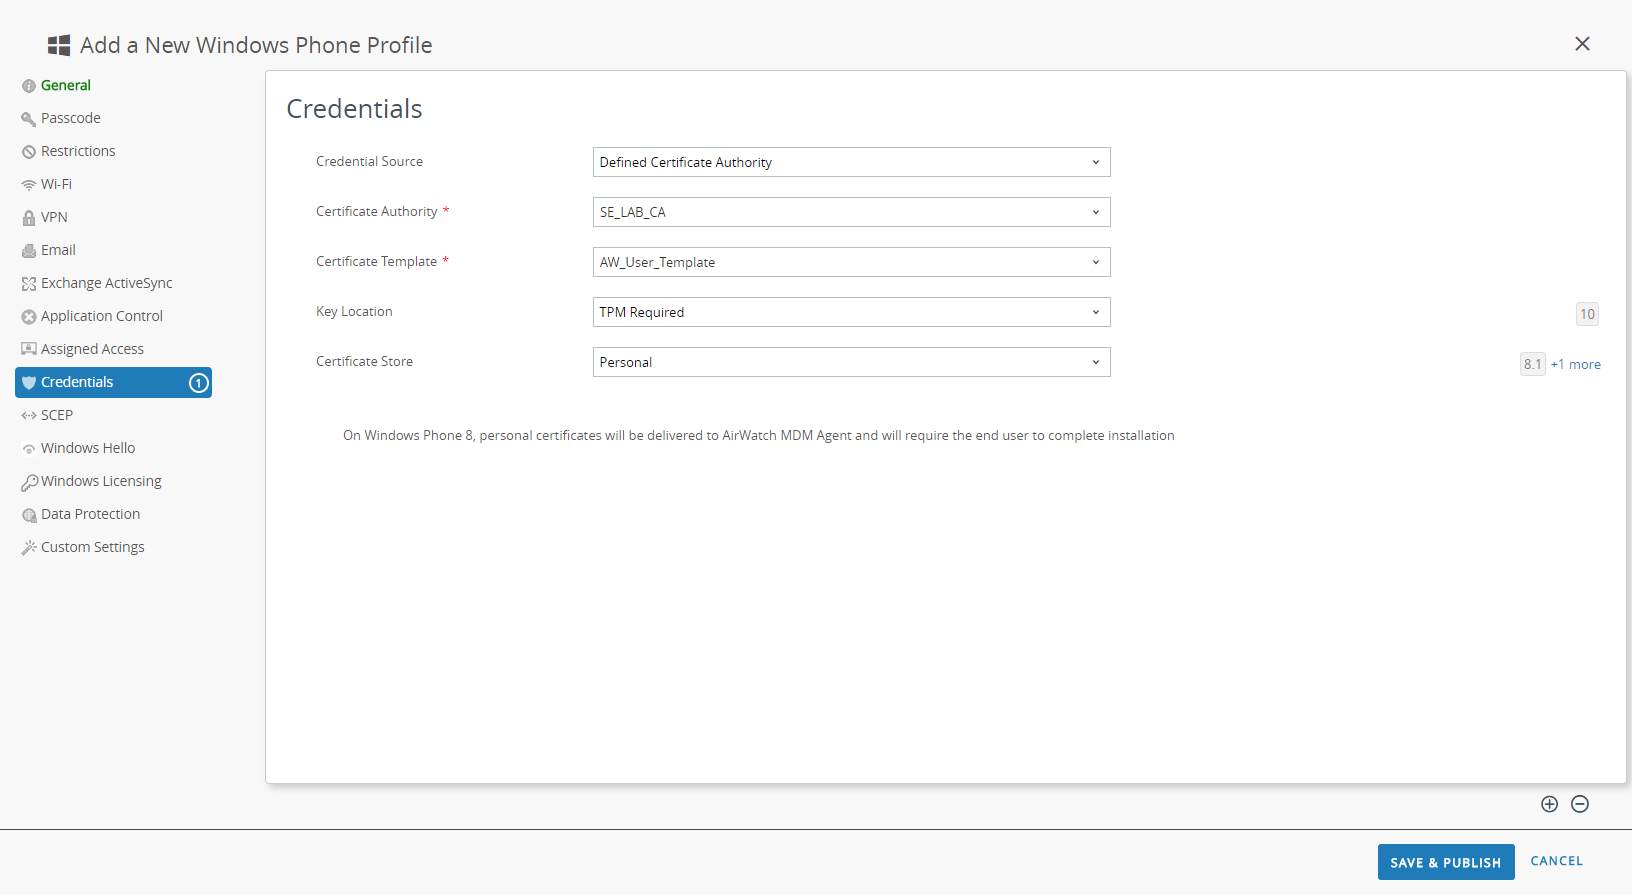
- To use a predefined certificate authority and template:
- Set the Credential Source to Defined Certificate Authority.
- Select the Certificate Authority from which you want obtain certificates.
- Select the Certificate Template for the certificate authority.
- Select the Key Location where you want to store the certificate’s private key:
- TPM Required—Store the private key on a Trusted Platform Module. If a Trusted Platform Module is not available on the endpoint, the private key cannot be installed.
- TPM If Present—Store the private key on a Trusted Platform Module if one is available on the endpoint. If a Trusted Platform Module is not available on the endpoint, the private key is stored in the endpoint software.
- Software—Store the private key in the endpoint software.
- Passport—Save the private key to Microsoft Passport. To use this option, Workspace ONE Protection Agent must be installed on the endpoint.
- Set the Certificate Store to Personal.
![]()
- Configure the VPN settings:
- Enter the Connection Name that the endpoint displays.
- Select an alternate Connection Type provider (do not select IKEv2, L2TP, PPTP, or Automatic, as these do not have the associated vendor settings required for the GlobalProtect VPN profile).You must select an alternate vendor because Workspace ONE has not yet listed GlobalProtect as an official connection provider for Windows endpoints.
- In the Server field, enter the hostname or IP address of the GlobalProtect portal to which users connect.
- In the Authentication area, select a certificate-based Authentication Type to specify the method to authenticate end users.All per-app VPN configurations require certificate-based authentication.
![]()
- (Optional) To permit GlobalProtect to save user credentials, ENABLE the option to Remember Credentials in the Policies area.
- In the VPN Traffic Rules area, ADD NEW PER-APP VPN RULE to specify rules for specific legacy apps (typically .exe files) or modern apps (typically downloaded from the Microsoft Store):
- (Optional) Enable VPN On Demand to allow the GlobalProtect connection to establish automatically when the app is launched.
- Select a Routing Policy to specify whether to send app traffic through the VPN tunnel.
- (Optional) Configure specific VPN Traffic Filters to route app traffic through the VPN tunnel only if it matches specific match criteria that you define, such as IP address and port.Add match criteria by clicking ADD NEW FILTER. When prompted, enter a Filter Name and corresponding Filter Value.
![]()
- SAVE & PUBLISH your changes.
- Configure per-app VPN settings for a new managed app
or modify the settings for an existing managed app.After configuring the settings for the app and enabling per-app VPN, you can publish the app to a group of users and enable the app to send traffic through the GlobalProtect VPN tunnel.
- Select .
- To add a new app, select ADD APPLICATION.
To modify the settings for an existing app, locate the app in the
list of Public apps and then select the edit () icon in the actions menu next to the row.
![]()
![]()
- In the Managed By field, select the organization group that will manage this app.
- Set the Platform to Windows Phone.
- Select your preferred Source for
locating the app:
- SEARCH APP STORE—Enter the Name of the app.
- ENTER URL—Enter the Microsoft Store URL for the app (for example, to search for the Dropbox mobile app by URL, enter https://www.microsoft.com/en-us/p/dropbox-mobile/9wzdncrfj0pk).
![]()
- Click NEXT.If you chose to search the Microsoft Store, SELECT the app from the list of search results.
![]()
- On the Add Application dialog, ensure that the app Name is correct. This is the name that will appear in the Workspace ONE App Catalog.
- (Optional) Assign the app to pre-defined or custom Categories
for ease-of-access in the Workspace ONE App Catalog.
![]()
- SAVE & ASSIGN the new app.
- On the Update Assignment dialog, select Assignments and
then click ADD ASSIGNMENT to add the Smart
Groups that will have access to this app.
![]()
- In the Select Assignment Groups field, select the Smart Groups that you want to grant access to this app.
- Select the App Delivery Method. If you select AUTO, the app is automatically deployed to the specified Smart Groups. If you select ON DEMAND, the app must be deployed manually.
- ADD the new assignment.
![]()
- (Optional) To exclude certain Smart Groups
from accessing the app, select Exclusions and
then select the Smart Groups that you want to exclude from the Exclusion field.
![]()
- SAVE & PUBLISH the configuration to the assigned Smart Groups.
- To set the connection type provider to GlobalProtect,
edit the VPN profile in XML.To minimize additional edits in the raw XML, review the settings in your VPN profile before you export the configuration. If you need to change a setting after you export the VPN profile, you can make the changes in the raw XML or, you can update the setting in the VPN profile and perform this step again.
- In the , select the radio button next to the new profile you added in the previous steps, and then select </>XML at the top of the table. Workspace ONE opens the XML view of the profile.
- Export the profile and then open it in a text editor of your choice.
- Edit the following settings for GlobalProtect:
- In the LoclURI element that specifies the PluginPackageFamilyName, change the element to:<LocURI>./Vendor/MSFT/VPNv2/PaloAltoNetworks/PluginProfile/PluginPackageFamilyName</LocURI>
- In the Data element that follows, change the value to:<Data>PaloAltoNetworks.GlobalProtect_rn9aeerfb38dg</Data>
- Save your changes to the exported profile.
- Return to Workspace ONE and select .
- Create (select ) and name a new profile.
- Select , and then copy and paste the edited configuration.
- Save & Publish your changes.
- Clean up the original profile by selecting the original profile from , and then selecting . Workspace ONE moves the profile to the Inactive list.
- Test the configuration.