Replace a Drive on a PA-5200 Series Firewall
Table of Contents
Replace a Drive on a PA-5200 Series Firewall
Learn how to replace a drive on a PA-5200 Series firewall.
The PA-5200 Series firewalls have two solid-state
drives (SSDs) used for system files and system logs and two hard-disk
drives (HDDs) used for network traffic log storage. Each drive pair
is in a RAID 1 array so that if a drive fails, you can replace the
failed drive (using the same model drive) without service interruption.
The system drives are labeled SYS 1 and SYS 2 and the log drives
are labeled LOG 1 and LOG 2.
When ordering a replacement
drive from Palo Alto Networks or your reseller, you receive two
drives. This ensures that if the replacement drive is not the same
model as the failed drive, you can install two new matching drives.
If the replacement drive model is the same as the failed drive,
you need only replace one failed drive and can store the second
drive as a spare. For firewalls in an HA pair, there is no requirement
that the drive sizes match between the paired systems.
The
procedures to replace a system drive (SSD) and a log drive (HDD)
are different.
Replace a Log Drive on a PA-5200 Series Firewall
The following procedure describes how to replace
a failed log drive. There are two scenarios: one where the replacement
drive is the same model as the failed drive and one where the replacement
drive is not the same model.
In a high availability
(HA) configuration, if one log drive fails (or if both log drives
fail) in the active firewall, the firewall enters the non-functional
HA state and fails over. If the firewall is not in an HA configuration
and one log drive fails, the firewall continues to operate. If both
log drives fail in a non-HA configuration, the firewall continues
to operate but it does not log network traffic and you cannot commit
the configuration until there is at least one functioning log drive.
Depending on the size of the drive, it may
take several hours for the new disk to be formatted and synced.
- Identify the failed drive and determine the drive
model by running the following operational command to view the status and model fields:
admin@PA-5220> show system raid detailThe following output shows that the Log1 drive failed and that the model number of that drive is ST2000NX0253. The system log also shows an error that indicates which drive failed (Log1 or Log2).Disk Pair Log Available Status clean, degraded Disk id Log1 Present model : ST2000NX0253 size : 1907729 MB status : failed Disk id Log2 Present model : ST2000NX0253 size : 1907729 MB status : active sync - Remove the failed drive from the RAID 1 array configuration.
In this example, run the following command to remove the Log1 drive
from the array:
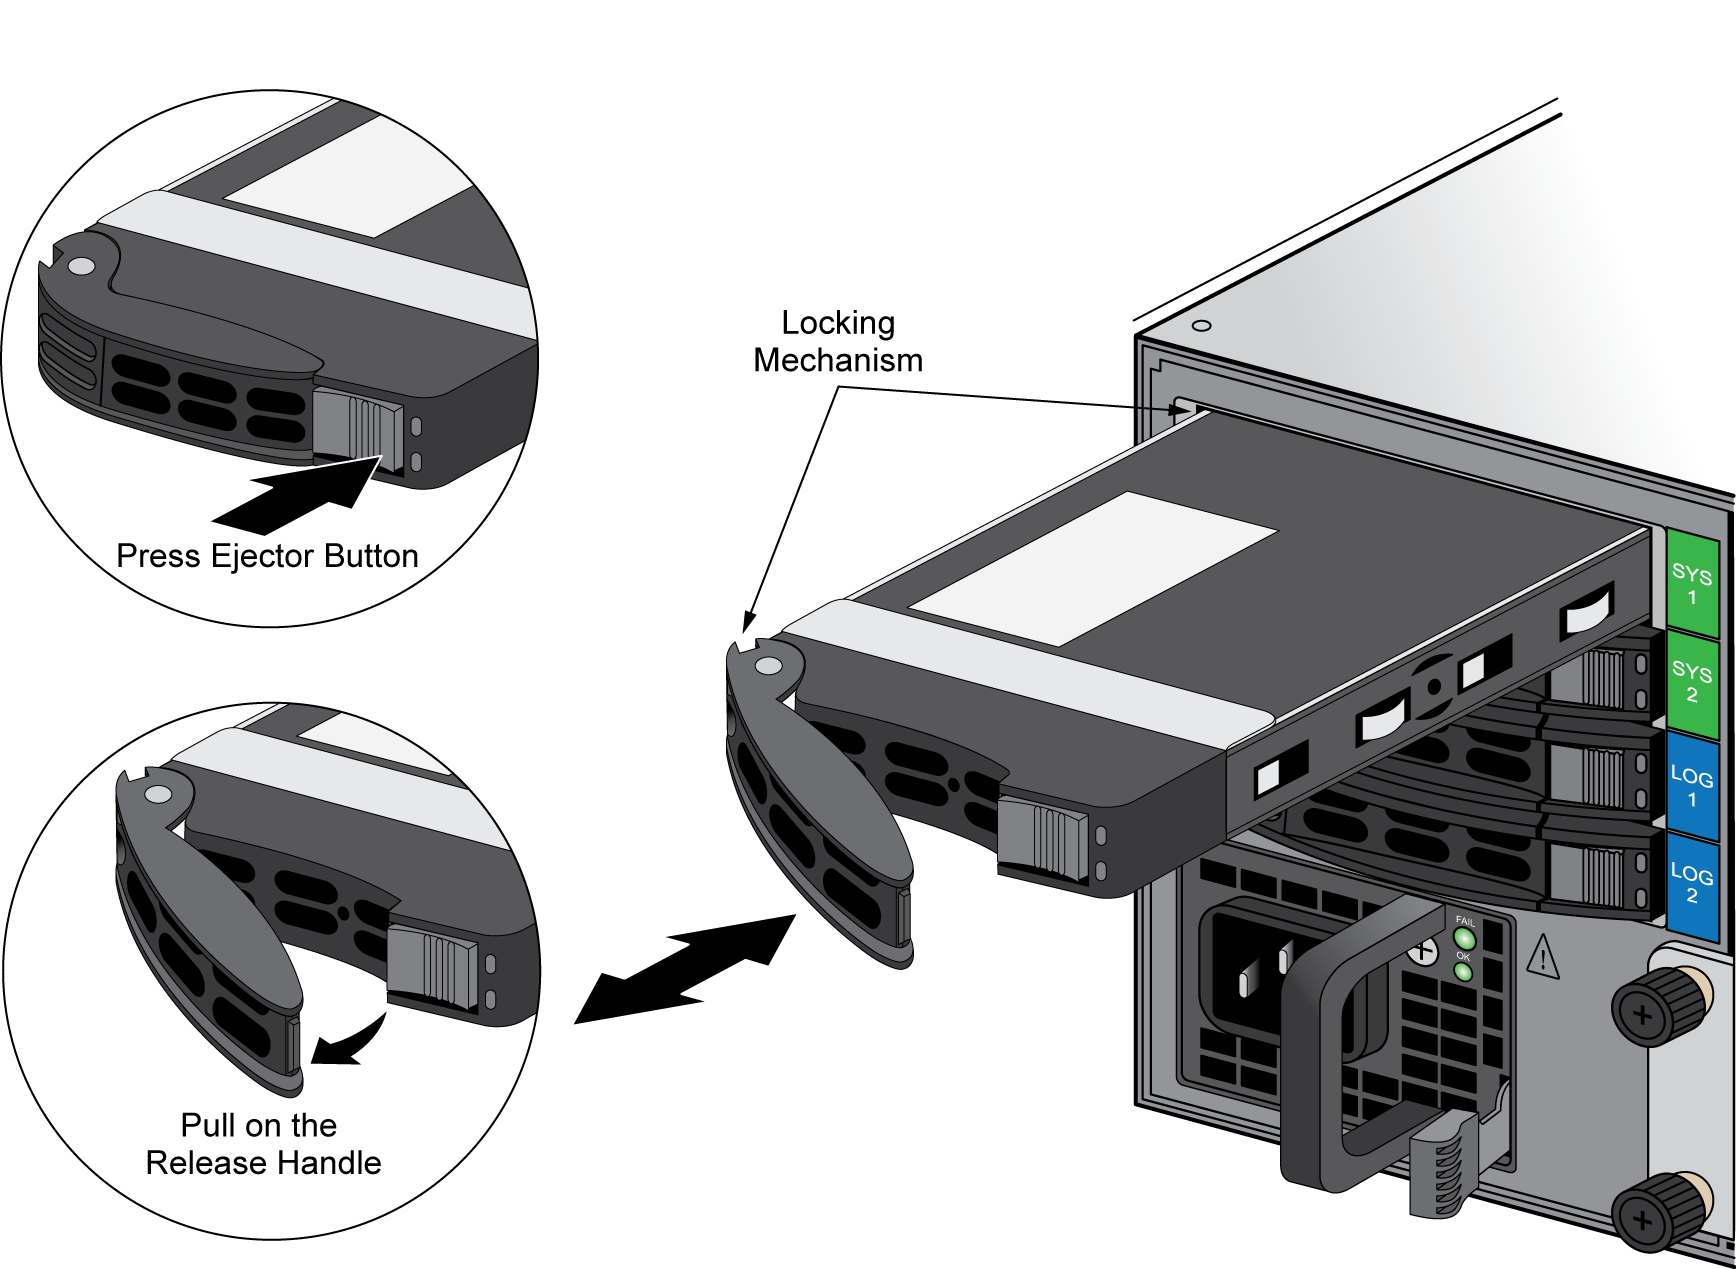
admin@PA-5220> request system raid remove log1 - Press the ejector button on the drive carrier to release
the carrier handle and gently pull the handle toward you to remove
the carrier and drive.The illustration shows how to remove a system (SYS) drive. The procedure to remove a log drive is the same.
![]()
- Remove the replacement drive from the packaging and determine the drive model. You will compare this model number with the model number of the failed drive to determine which replacement procedure to use in 7.
- Install the replacement drive in the drive carrier.
- Remove the replacement drive from the antistatic bag and place it on an antistatic surface. Place the failed drive next to the replacement drive with the connectors facing the same direction.
- Remove the four screws that hold the failed drive in the carrier and remove the drive from the carrier.
- Install the replacement drive in the carrier and secure it using the four screws you removed from the failed drive.
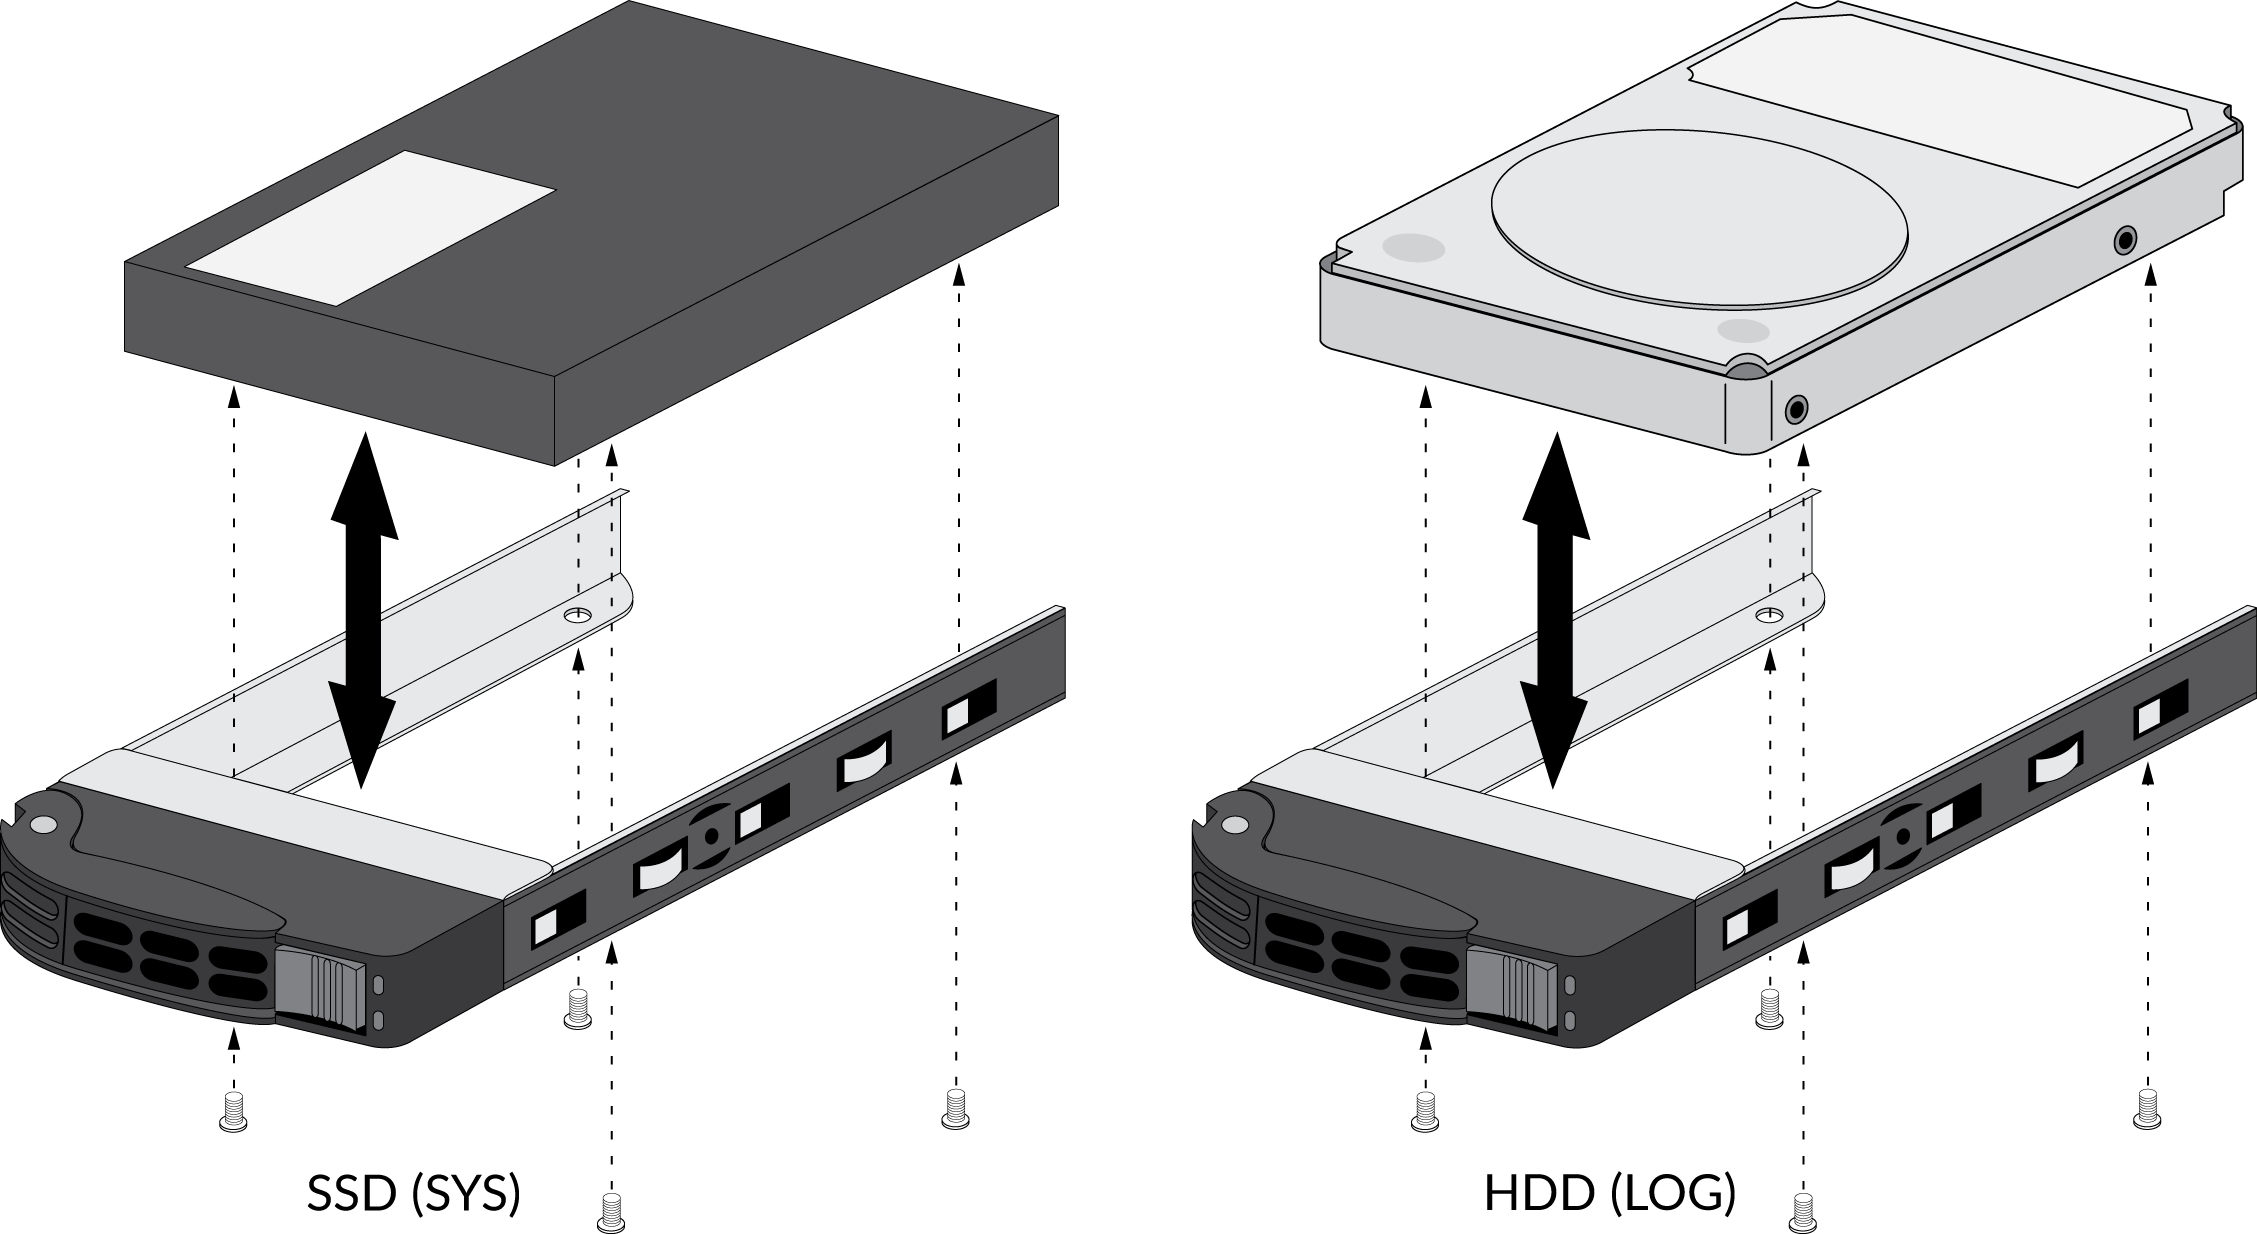
The illustration shows an SSD system drive and an HDD log drive; the procedure to swap the drive is the same for both.![]()
- Install the carrier with the replacement drive:
- Ensure that the drive carrier lever is in the open position; if it is not, press the ejector button on the drive carrier to release the lever and pull it out until it is fully open.
- Slide the carrier assembly into the empty drive bay until it is about 1/4” (.64cm) from being fully inserted.
- Before fully inserting the carrier, ensure that the lever attaches to the locking mechanism on the firewall and then close the lever to seat the carrier.
- Choose from the following two installation procedures based on your findings in 4:
- Same model
replacement drive only) Add the replacement drive (that is the same
model as the failed drive) to the RAID 1 array:
- Add the replacement drive to the RAID 1
array. In this example, run the following command to add the LOG
1 drive to the array:
admin@PA-5220> request system raid add log1If the replacement drive was previously used in a different Palo Alto Networks firewall, include the force option in this command to force the system to reformat the drive and add it to the array. If you reboot the firewall after removing the failed drive from the array, the force option is not required. This is because the system will recognize that a drive was missing and it will automatically reformat the newly inserted drive and will add it to the array. - Periodically view the RAID status until you see that Disk Pair Log shows Available,
the status shows clean, and the status
for each drive shows active sync status.
To view RAID status, run the following command:
admin@PA-5220> show system raid detailThe following output shows that both log drives are in the active sync state:Disk Pair Log Available Status clean Disk id Log1 Present model : ST2000NX0253 size : 1907729 MB status : active sync Disk id Log2 Present model : ST2000NX0253 size : 1907729 MB status : active sync
- Add the replacement drive to the RAID 1
array. In this example, run the following command to add the LOG
1 drive to the array:
- Different
model replacement drive only) Add the replacement drive (that is
a different model than the failed drive) to the RAID 1 array:When you initiate the copy command as described in the following steps, logging stops and you cannot view logs until the copy is complete and the disk pair shows Available.
- (Optional) Suspend the firewall
with the failed drive if it is the active firewall in an HA configuration.The firewall will fail over when the copy process in this procedures starts but you can choose to Verify Failover or manually suspend the firewall with the failed drive before you continue.
- Copy the data from the other drive in the RAID 1 array
to the replacement drive. In this example, run the following command
to copy the data from the Log2 drive
to the Log1 drive:
admin@PA-5220> request system raid copy from log2 to log1 - Run the following CLI command to view the status of
the copy:
admin@PA-5220> show system raid detailPeriodically run this command until the copy is complete and the Disk Pair Log shows Available.At this point, the Log2 drive shows not in use because the drive models are not the same.Disk Pair Log Available Status clean, degraded Disk id Log1 Present model : ST2000NX0999 size : 1907729 MB status : active sync Disk id Log2 Present model : ST2000NX0253 size : 1907729 MB status : not in use - Replace the other drive in the array so the drive models in the array are the same. In this example, physically remove the Log2 drive, remove it from the carrier, and then install the second replacement drive in the carrier. 9.e shows how to swap drives in a carrier.
- Add
the second replacement drive to the RAID 1 array. In this example,
run the following command to add the Log2 drive to the array:
admin@PA-5220> request system raid add log2The system automatically starts to configure the new drive to mirror the other drive in the RAID 1 array. - Periodically view the RAID status until you see that
the Disk Pair Log shows Available and
both drives show active sync status.
To view RAID status, run the following command:
admin@PA-5220> show system raid detailThe following output shows that both drives are in the active sync state:Disk Pair Log Available Status clean Disk id Log1 Present model : ST2000NX0999 size : 1907729 MB status : active sync Disk id Log2 Present model : ST2000NX0999 size : 1907729 MB status : active sync
- (Optional) Suspend the firewall
with the failed drive if it is the active firewall in an HA configuration.
Replace a System Drive on a PA-5200 Series Firewall
The following procedure describes how to replace
a failed system drive. There are two scenarios: one where the replacement
drive is the same model as the failed drive and one where the replacement
drive is not the same model.
If you replace a system
drive with a different model drive, you must boot the firewall into
the Maintenance Recovery Tool (MRT) to copy data between drives.
In a high availability (HA) configuration, suspend the firewall
with the failed drive as described in this procedure.
In a
high availability (HA) configuration, if one system drive fails
(or if both system drives fail) in the active firewall, the firewall
enters the non-functional HA state and fails over. If the firewall
is not in an HA configuration and one system drive fails, the firewall
continues to operate. If both system drives fail in a non-HA configuration,
you will need to replace the systems drives and restore the firewall
configuration from a recent configuration backup.
- Identify the failed drive and determine the drive model.When the system drives are functioning normally, all system drive partitions show both drives with the status clean. If a system drive fails, the Overall System Drives RAID status shows degraded, one or more failed partition array shows clean, degraded, and one of the drives will be missing (Sys1 or Sys2).In this example, the output from the show system raid detail command shows that the drive model is MICRON_M510DC_MT, the panlogs partition shows the status clean, degraded, and drive Sys1 is missing from the panlogs array; together, these indicate that you need to replace the Sys1 drive.
admin@PA-5220> show system raid detail

Overall System Drives RAID status           degraded
-----------------------------------------------------------------------------
Drive status
   Disk id Sys1                             Present     (MICRON_M510DC_MT)
   Disk id Sys2                             Present     (MICRON_M510DC_MT)
-----------------------------------------------------------------------------
Partition status

panlogs                                     clean, degraded
   Drive id Sys2                            active sync
maint                                       clean
   Drive id Sys1                            active sync
   Drive id Sys2                            active sync
sysroot0                                    clean
   Drive id Sys1                            active sync
   Drive id Sys2                            active sync
sysroot1                                    clean
   Drive id Sys1                            active sync
   Drive id Sys2                            active sync
pancfg                                      clean
   Drive id Sys1                            active sync
   Drive id Sys2                            active sync
panrepo                                     clean
   Drive id Sys1                            active sync
   Drive id Sys2                            active sync
swap                                        clean
   Drive id Sys1                            active sync
   Drive id Sys2                            active sync
- Remove the failed drive from the RAID 1 array. In this
example, run the following command to remove drive Sys1 from
the array:
admin@PA-5220> request system raid remove sys1 - Confirm that the failed drive is removed from all partitions.
In the following output of the show system raid detail, you
see that drive id Sys1 is now missing
from all partitions.
admin@PA-5220> show system raid detail

Overall System Drives RAID status              degraded
-----------------------------------------------------------------------------
Drive status
   Disk id Sys1                                Present  (MICRON_M510DC_MT)
   Disk id Sys2                                Present  (MICRON_M510DC_MT)
-----------------------------------------------------------------------------
Partition status

panlogs                                        clean, degraded
   Drive id Sys2                               active sync
maint                                          clean, degraded
   Drive id Sys2                               active sync
sysroot0                                       clean, degraded
   Drive id Sys2                               active sync
sysroot1                                       clean, degraded
   Drive id Sys2                               active sync
pancfg                                         clean, degraded
   Drive id Sys2                               active sync
panrepo                                        clean, degraded
   Drive id Sys2                               active sync
swap                                           clean, degraded
   Drive id Sys2                               active sync
- Press the ejector button on the drive carrier to release
the carrier handle and gently pull the handle toward you to remove
the carrier and drive.
![]()
- Remove the replacement drive from the packaging, determine the drive model, and place it on an antistatic surface. Then compare this model number with the model number of the failed drive to determine which replacement procedure to use in 7.
- Install
the replacement drive in the drive carrier.
- Place the failed drive next to the replacement drive with the connectors facing the same direction.
- Remove the four screws that hold the failed drive in the carrier and remove the drive from the carrier.
- Install the replacement drive in the carrier and secure
it using the four screws you removed from the failed drive.The illustration shows an SSD system drive and an HDD log drive; the procedure to swap the drive is the same for both.
![]()
- Install
the replacement drive in the firewall.
- Ensure that the drive carrier lever is in the open position; if it is not, press the ejector button on the drive carrier to release the lever and pull it out until it is fully open.
- Slide the replacement drive and carrier assembly into the empty drive bay until it is about 1/4” (.6cm) from being fully inserted.
- Before fully inserting the drive carrier, ensure that the lever attaches to the locking mechanism on the firewall and then close the lever to seat the carrier.
- Choose from the following two installation procedures based on your findings in 5:
- Same model
replacement drive only) Add the replacement drive (one that is the
same model as the failed drive) to the RAID 1 array:
- Add the replacement drive to the RAID 1
array. In this example, run the following command to add the SYS
1 drive to the array:
admin@PA-5220> request system raid add sys1If the replacement drive was previously used in a different Palo Alto Networks firewall, include the force option in this command to force the system to reformat the drive and add it to the array. If you reboot the firewall after removing the failed drive from the array, the force option is not required. Because the firewall recognizes that a drive is missing and it will automatically reformat the newly inserted drive and adds it to the array. - Periodically view the RAID status until you see that
the Overall System Drives RAID status shows Good,
all partitions show clean, and both
drives show active sync. To view RAID
status, run the following command:
admin@PA-5220> show system raid detailDo not reboot the firewall until all partitions are ready; otherwise, the system drives may become out of sync and the firewall will not boot.Overall System Drives RAID status Good --------------------------------------------------------------------------- Drive status Disk id Sys1 Present (MICRON_M510DC_MT) Disk id Sys2 Present (MICRON_M510DC_MT) --------------------------------------------------------------------------- Partition status panlogs clean Drive id Sys1 active sync Drive id Sys2 active sync maint clean Drive id Sys1 active sync Drive id Sys2 active sync sysroot0 clean Drive id Sys1 active sync Drive id Sys2 active sync sysroot1 clean Drive id Sys1 active sync Drive id Sys2 active sync pancfg clean Drive id Sys1 active sync Drive id Sys2 active sync panrepo clean Drive id Sys1 active sync Drive id Sys2 active sync swap clean Drive id Sys1 active sync Drive id Sys2 active sync
- Add the replacement drive to the RAID 1
array. In this example, run the following command to add the SYS
1 drive to the array:
- Different
model replacement drive only) Add the replacement drive (one that
is a different model than the failed drive) to the RAID 1 array:
- Connect a serial cable from your computer to the Console port on the firewall and connect to the firewall using terminal emulation software that is configured to use 9600-8-N-1 settings.
- (Optional) Suspend the firewall with the failed drive
if it is the active firewall in an HA configuration.The firewall fails over when you boot into the Maintenance Recover Tool (MRT) as described in the following step but you can choose to Verify Failover or manually suspend the firewall that contains the failed drive.
- Reboot the firewall with the failed drive into the
MRT by running the following command:
admin@PA-5220> debug system maintenance-mode - Press Enter on CONTINUE and then navigate to RAID and press Enter again.
- Navigate to the Migrate Drive section and select the drive to migrate. In this example, select Migrate drive Sys2 -> Sys1 to initiate the process of copying the system data from the Sys2 drive to the Sys1 replacement drive.
- After migration is complete, remove the other system drive. In this example, remove the Sys2 drive.
- Press Esc to go back to the main menu and then press Enter on Reboot.
- After the firewall boots PAN-OS, replace the other drive in the array so the drives in the array are the same model. In this example, first remove the Sys2 drive from the carrier and install the second replacement drive (one that is the same model as Sys1) into the carrier (see 6). Then, install the second replacement drive in slot Sys 2.
- Add the second replacement drive to the RAID 1 array.
In this example, run the following command to add drive Sys2 to
the array
admin@PA-5220> request system raid add sys2If the replacement drive was previously used as a system drive in a different Palo Alto Networks firewall, include the force option in this command to force the system to reformat the drive and add it to the array. If you reboot the firewall after removing the failed drive from the array, the force option is not required. Because the firewall recognizes that a system drive is missing and automatically reformats the newly inserted drive and adds it to the array.The system automatically starts to configure the new drive to mirror the other drive in the RAID 1 array. - Periodically view the RAID status until you see that
the Overall System Drives RAID status shows Good,
all partitions show clean, and both
drives show active sync. To view RAID
status, run the following command:
admin@PA-5220> show system raid detailDo not reboot the firewall until all partitions are ready; otherwise, the system drives may become out of sync and the firewall will not boot.Overall System Drives RAID status Good --------------------------------------------------------------------------- Drive status Disk id Sys1 Present (MICRON_M510DC_MT) Disk id Sys2 Present (MICRON_M510DC_MT) --------------------------------------------------------------------------- Partition status panlogs clean Drive id Sys1 active sync Drive id Sys2 active sync maint clean Drive id Sys1 active sync Drive id Sys2 active sync sysroot0 clean Drive id Sys1 active sync Drive id Sys2 active sync sysroot1 clean Drive id Sys1 active sync Drive id Sys2 active sync pancfg clean Drive id Sys1 active sync Drive id Sys2 active sync panrepo clean Drive id Sys1 active sync Drive id Sys2 active sync swap clean Drive id Sys1 active sync Drive id Sys2 active sync