Device Security
Quarantine a Device Using Cisco ISE pxGrid
Table of Contents
Expand All
|
Collapse All
Device Security Docs
Quarantine a Device Using Cisco ISE pxGrid
Use the Device Security integration with Cisco ISE pxGrid to quarantine IoT devices of
concern.
| Where Can I Use This? | What Do I Need? |
|---|---|
|
One of the following subscriptions:
One of the following Cortex XSOAR setups:
|
After integrating Device Security with Cisco ISE pxGrid, you can selectively
quarantine devices through Cisco ISE pxGrid. Cisco ISE quarantines impacted devices
by applying a policy that Device Security generates in one of its
exception rules.
Strata Cloud Manager
Use the Device Security integration with Cisco ISE pxGrid to quarantine IoT devices of
concern in Device Security in Strata Cloud Manager.
Put a Device in Quarantine Using Cisco ISE pxGrid
Put a Device in Quarantine Using Cisco ISE pxGrid
Let’s say you want to quarantine a device because you saw an alert that concerns
you. In Device Security in Strata Cloud Manager, use the
Quarantine via Cisco pxGrid option.
Device Security sends a quarantine command through Cortex XSOAR, the
XSOAR engine, and pxGrid to ISE.
In response, ISE sends a
Disconnect-Request message to the switch through which the impacted
device accesses the network and disconnects it. When the device
reconnects, ISE checks the quarantine policy it received from
Device Security, finds that it applies to the device requesting access,
and assigns it to a quarantine VLAN. The device remains in quarantine
while you investigate the cause of the alert. Once it’s resolved,
you can then use the Release via Cisco pxGrid option to return the device
to its regularly assigned VLAN.
For information about
creating an authorization profile and exception authorization policy
that assigns a quarantined device to a specific VLAN, see the
“Setup Adaptive Network Control”
chapter in the Cisco Identity Services Engine Administration Guide,
Release 2.2.
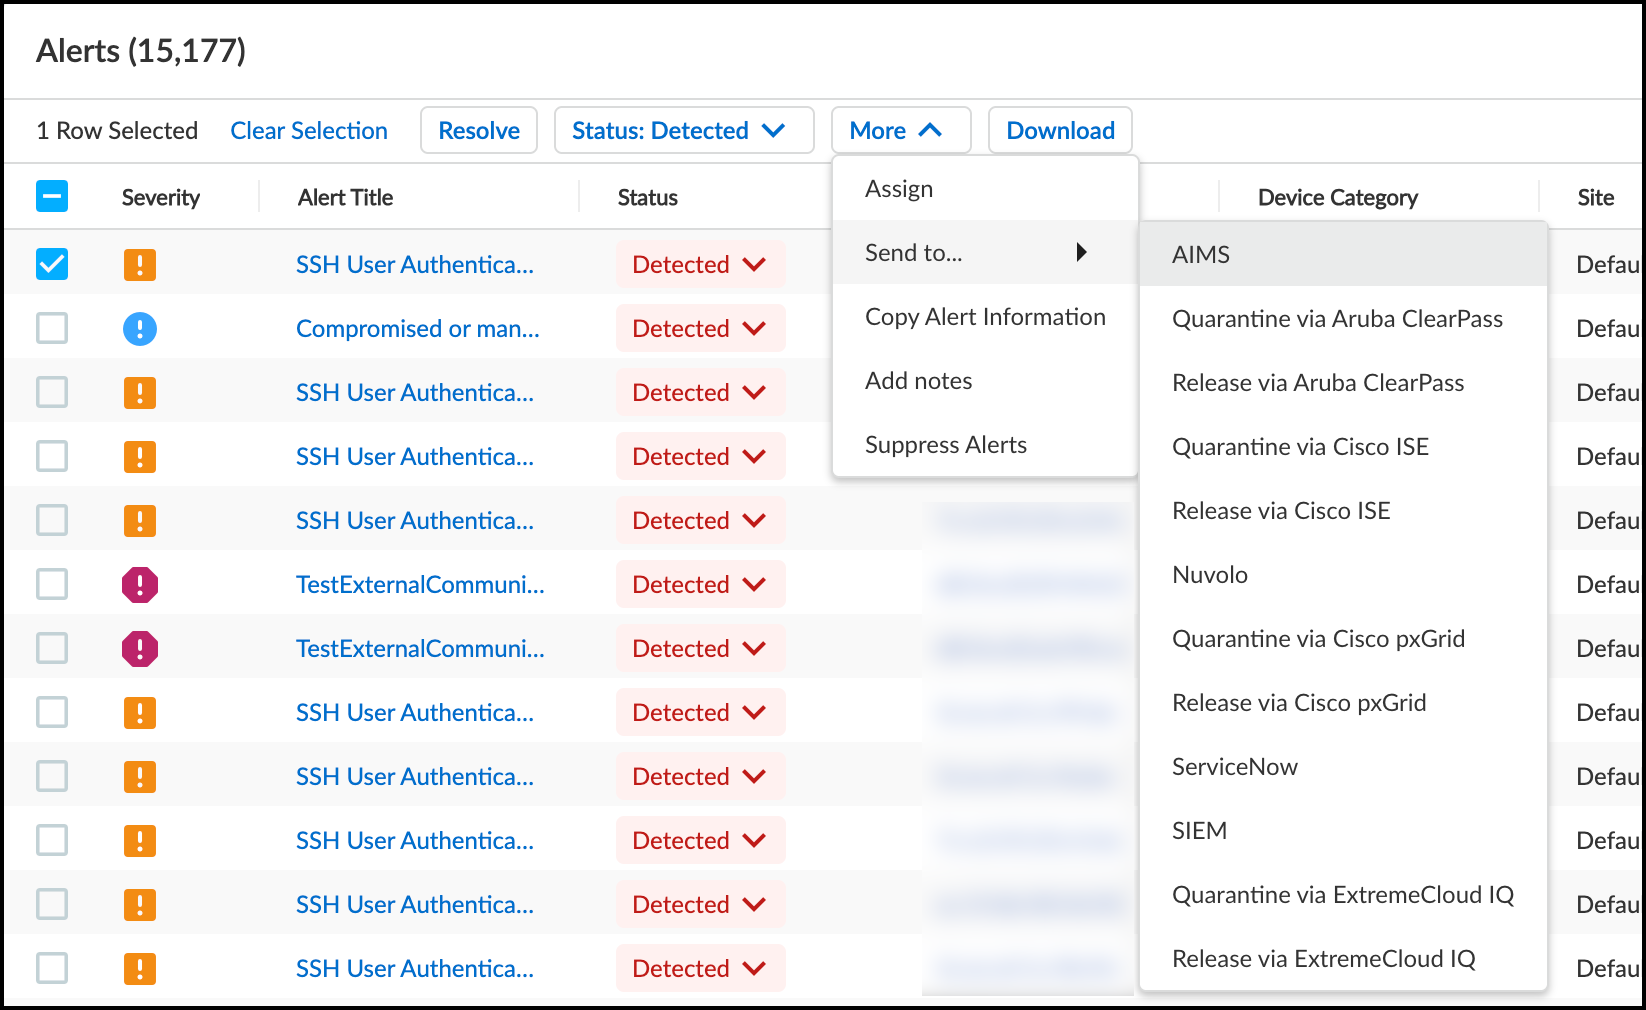
- In Device Security in Strata Cloud Manager, click AlertsSecurity Alerts and select one of the alerts.This option is also available in the Action menu in the Alerts section on the Device Details page.Click MoreSend toQuarantine via Cisco pxGrid.
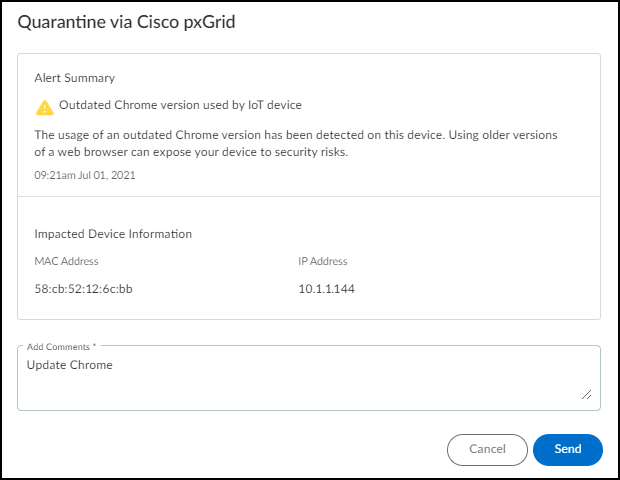
![]() Add a comment.After you enter a comment, the Send button changes from gray to blue, indicating that you can proceed.
Add a comment.After you enter a comment, the Send button changes from gray to blue, indicating that you can proceed.![]() Click Send.Device Security automatically creates a policy called panw_iot_quarantine_anc_policy, assigns it to the device, and sends it through Cisco pxGrid to ISE. The policy appears in the ISE web interface at OperationsAdaptive Network ControlEndpoint Assignment.
Click Send.Device Security automatically creates a policy called panw_iot_quarantine_anc_policy, assigns it to the device, and sends it through Cisco pxGrid to ISE. The policy appears in the ISE web interface at OperationsAdaptive Network ControlEndpoint Assignment.![]() After you click Send, a link appears in Device Security. When you click it, a new browser window opens to the XSOAR playbook for this action.
After you click Send, a link appears in Device Security. When you click it, a new browser window opens to the XSOAR playbook for this action.![]() To confirm that the task completed, click the link to the XSOAR playbook for this action.For the link in Device Security to open the corresponding playbook in Cortex XSOAR, you must already be logged in to your XSOAR instance before clicking it.The green boxes in the playbook indicate that a particular step was successfully performed. Following the path through the playbook gives you feedback about whether an action was carried out successfully or, if not, where the process changed course.
To confirm that the task completed, click the link to the XSOAR playbook for this action.For the link in Device Security to open the corresponding playbook in Cortex XSOAR, you must already be logged in to your XSOAR instance before clicking it.The green boxes in the playbook indicate that a particular step was successfully performed. Following the path through the playbook gives you feedback about whether an action was carried out successfully or, if not, where the process changed course.Release a Device from Quarantine Using Cisco ISE pxGrid
Release a Device from Quarantine Using Cisco ISE pxGridRemoving a device from quarantine is the same procedure as putting it in quarantine except that you select the alert on the AlertsSecurity Alerts page and then click MoreSend toRelease via Cisco pxGrid. This option is also available in the Action menu in the Risks and Alerts sections on the Device Details page.![]() Device Security removes the device from the quarantine policy and sends ISE a command through Cortex XSOAR, the XSOAR engine, and pxGrid to reset authorization for the device. Cisco ISE sends another Disconnect-Request message to the switch, causing it to disconnect the device. This time when the device reconnects and requests network access, ISE does not find a policy match and accepts the device back onto the network, assigning it to its usual, unquarantined VLAN.
Device Security removes the device from the quarantine policy and sends ISE a command through Cortex XSOAR, the XSOAR engine, and pxGrid to reset authorization for the device. Cisco ISE sends another Disconnect-Request message to the switch, causing it to disconnect the device. This time when the device reconnects and requests network access, ISE does not find a policy match and accepts the device back onto the network, assigning it to its usual, unquarantined VLAN.
Legacy IoT Security
Use the Device Security integration with Cisco ISE pxGrid to quarantine IoT devices of
concern in the Device Security portal.
Put a Device in Quarantine Using Cisco ISE pxGrid
Put a Device in Quarantine Using Cisco ISE pxGrid
Let’s say you want to quarantine a device because you saw an alert that concerns
you. In the Device Security portal, use the
Quarantine via Cisco pxGrid option.
Device Security sends a quarantine command through Cortex XSOAR, the
XSOAR engine, and pxGrid to ISE.
In response, ISE sends a
Disconnect-Request message to the switch through which the impacted
device accesses the network and disconnects it. When the device
reconnects, ISE checks the quarantine policy it received from
Device Security, finds that it applies to the device requesting access,
and assigns it to a quarantine VLAN. The device remains in quarantine
while you investigate the cause of the alert. Once it’s resolved,
you can then use the Release via Cisco pxGrid option to return the device
to its regularly assigned VLAN.
For information about
creating an authorization profile and exception authorization policy
that assigns a quarantined device to a specific VLAN, see the
“Setup Adaptive Network Control”
chapter in the Cisco Identity Services Engine Administration Guide,
Release 2.2.
- In Device Security in Strata Cloud Manager, click AlertsSecurity AlertsAll Alerts and select one of the alerts.This option is also available in the Action menu in the Alerts section on the Device Details page.Click MoreSend toQuarantine via Cisco pxGrid.
![]() Add a comment.After you enter a comment, the Send button changes from gray to blue, indicating that you can proceed.
Add a comment.After you enter a comment, the Send button changes from gray to blue, indicating that you can proceed.![]() Click Send.Device Security automatically creates a policy called panw_iot_quarantine_anc_policy, assigns it to the device, and sends it through Cisco pxGrid to ISE. The policy appears in the ISE web interface at OperationsAdaptive Network ControlEndpoint Assignment.
Click Send.Device Security automatically creates a policy called panw_iot_quarantine_anc_policy, assigns it to the device, and sends it through Cisco pxGrid to ISE. The policy appears in the ISE web interface at OperationsAdaptive Network ControlEndpoint Assignment.![]() After you click Send, a link appears in Device Security. When you click it, a new browser window opens to the XSOAR playbook for this action.
After you click Send, a link appears in Device Security. When you click it, a new browser window opens to the XSOAR playbook for this action.![]() To confirm that the task completed, click the link to the XSOAR playbook for this action.For the link in Device Security to open the corresponding playbook in Cortex XSOAR, you must already be logged in to your XSOAR instance before clicking it.The green boxes in the playbook indicate that a particular step was successfully performed. Following the path through the playbook gives you feedback about whether an action was carried out successfully or, if not, where the process changed course.
To confirm that the task completed, click the link to the XSOAR playbook for this action.For the link in Device Security to open the corresponding playbook in Cortex XSOAR, you must already be logged in to your XSOAR instance before clicking it.The green boxes in the playbook indicate that a particular step was successfully performed. Following the path through the playbook gives you feedback about whether an action was carried out successfully or, if not, where the process changed course.Release a Device from Quarantine Using Cisco ISE pxGrid
Release a Device from Quarantine Using Cisco ISE pxGridRemoving a device from quarantine is the same procedure as putting it in quarantine except that you select the alert on the AlertsSecurity Alerts page and then click MoreSend toRelease via Cisco pxGrid. This option is also available in the Action menu in the Risks and Alerts sections on the Device Details page.![]() Device Security removes the device from the quarantine policy and sends ISE a command through Cortex XSOAR, the XSOAR engine, and pxGrid to reset authorization for the device. Cisco ISE sends another Disconnect-Request message to the switch, causing it to disconnect the device. This time when the device reconnects and requests network access, ISE does not find a policy match and accepts the device back onto the network, assigning it to its usual, unquarantined VLAN.
Device Security removes the device from the quarantine policy and sends ISE a command through Cortex XSOAR, the XSOAR engine, and pxGrid to reset authorization for the device. Cisco ISE sends another Disconnect-Request message to the switch, causing it to disconnect the device. This time when the device reconnects and requests network access, ISE does not find a policy match and accepts the device back onto the network, assigning it to its usual, unquarantined VLAN.


