Set up Aruba AirWave for Integration
Table of Contents
Expand all | Collapse all
-
- Integrate IoT Security with AIMS
- Set up AIMS for Integration
- Set up IoT Security and XSOAR for AIMS Integration
- Send Work Orders to AIMS
- Integrate IoT Security with Microsoft SCCM
- Set up Microsoft SCCM for Integration
- Set up IoT Security and XSOAR for SCCM Integration
- Integrate IoT Security with Nuvolo
- Set up Nuvolo for Integration
- Set up IoT Security and XSOAR for Nuvolo Integration
- Send Security Alerts to Nuvolo
- Send Vulnerabilities to Nuvolo
- Integrate IoT Security with ServiceNow
- Set up ServiceNow for Integration
- Set up IoT Security and XSOAR for ServiceNow Integration
- Send Security Alerts to ServiceNow
- Send Vulnerabilities to ServiceNow
-
- Integrate IoT Security with Cortex XDR
- Set up Cortex XDR for Integration
- Set up IoT Security and XSOAR for XDR Integration
- Integrate IoT Security with CrowdStrike
- Set up CrowdStrike for Integration
- Set up IoT Security and XSOAR for CrowdStrike Integration
- Integrate IoT Security with Microsoft Defender XDR
- Set up Microsoft Defender XDR for Integration
- Set up IoT Security and Cortex XSOAR for Microsoft Defender XDR Integration
- Integrate IoT Security with Tanium
- Set up Tanium for Integration
- Set up IoT Security and XSOAR for Tanium Integration
-
- Integrate IoT Security with Aruba AirWave
- Set up Aruba AirWave for Integration
- Set up IoT Security and Cortex XSOAR for Aruba AirWave Integration
- View Device Location Information
- Integrate IoT Security with Aruba Central
- Set up Aruba Central for Integration
- Set up IoT Security and XSOAR for Aruba Central Integration
- Integrate IoT Security with Cisco DNA Center
- Set up Cisco DNA Center to Connect with XSOAR Engines
- Set up IoT Security and XSOAR for DNA Center Integration
- Integrate IoT Security with Cisco Meraki Cloud
- Set up Cisco Meraki Cloud for Integration
- Set up IoT Security and XSOAR for Cisco Meraki Cloud
- Integrate IoT Security with Cisco Prime
- Set up Cisco Prime to Accept Connections from IoT Security
- Set up IoT Security and XSOAR for Cisco Prime Integration
- Integrate IoT Security with Network Switches for SNMP Discovery
- Set up IoT Security and Cortex XSOAR for SNMP Discovery
- Integrate IoT Security with Switches for Network Discovery
- Set up IoT Security and Cortex XSOAR for Network Discovery
-
- Integrate IoT Security with Aruba WLAN Controllers
- Set up Aruba WLAN Controllers for Integration
- Set up IoT Security and XSOAR for Aruba WLAN Controllers
- Integrate IoT Security with Cisco WLAN Controllers
- Set up Cisco WLAN Controllers for Integration
- Set up IoT Security and XSOAR for Cisco WLAN Controllers
-
- Integrate IoT Security with Aruba ClearPass
- Set up Aruba ClearPass for Integration
- Set up IoT Security and XSOAR for ClearPass Integration
- Put a Device in Quarantine Using Aruba ClearPass
- Release a Device from Quarantine Using Aruba ClearPass
- Integrate IoT Security with Cisco ISE
- Set up Cisco ISE to Identify IoT Devices
- Set up Cisco ISE to Identify and Quarantine IoT Devices
- Configure ISE Servers as an HA Pair
- Set up IoT Security and XSOAR for Cisco ISE Integration
- Put a Device in Quarantine Using Cisco ISE
- Release a Device from Quarantine Using Cisco ISE
- Apply Access Control Lists through Cisco ISE
- Integrate IoT Security with Cisco ISE pxGrid
- Set up Integration with Cisco ISE pxGrid
- Put a Device in Quarantine Using Cisco ISE pxGrid
- Release a Device from Quarantine Using Cisco ISE pxGrid
- Integrate IoT Security with Forescout
- Set up Forescout for Integration
- Set up IoT Security and XSOAR for Forescout Integration
- Put a Device in Quarantine Using Forescout
- Release a Device from Quarantine Using Forescout
-
- Integrate IoT Security with Qualys
- Set up QualysGuard Express for Integration
- Set up IoT Security and XSOAR for Qualys Integration
- Perform a Vulnerability Scan Using Qualys
- Get Vulnerability Scan Reports from Qualys
- Integrate IoT Security with Rapid7
- Set up Rapid7 InsightVM for Integration
- Set up IoT Security and XSOAR for Rapid7 Integration
- Perform a Vulnerability Scan Using Rapid7
- Get Vulnerability Scan Reports from Rapid7
- Integrate IoT Security with Tenable
- Set up Tenable for Integration
- Set up IoT Security and XSOAR for Tenable Integration
- Perform a Vulnerability Scan Using Tenable
- Get Vulnerability Scan Reports from Tenable
Set up Aruba AirWave for Integration
Set up Aruba AirWave for integration with IoT Security through
Cortex XSOAR.
To connect Cortex XSOAR to Aruba AirWave,
Cortex XSOAR needs to present the credentials of a user configured in the
Aruba AirWave Management Platform (AMP).
For IoT Security and Cortex XSOAR to receive location information
through the integration, you must also configure Aruba AirWave
VisualRF.
These integration instructions explain how to integrate IoT Security and
Cortex XSOAR with Aruba AirWave v8.3.0.1. However,
you can integrate IoT Security and Cortex XSOAR with any
Aruba AirWave version that has VisualRF. These integration
instructions assume you have already configured your sites, floor plans, and
access points (APs) using VisualRF on Aruba AirWave.
- Log in to your Aruba AirWave management platform.Log in to Aruba AirWave with an account that has administrator privileges. After logging in to the management platform, note the URL. You will need the URL when configuring the Aruba AirWave instance in Cortex XSOAR later.Create a Read-Only Monitoring & Auditing role to have read permissions for VisualRF.
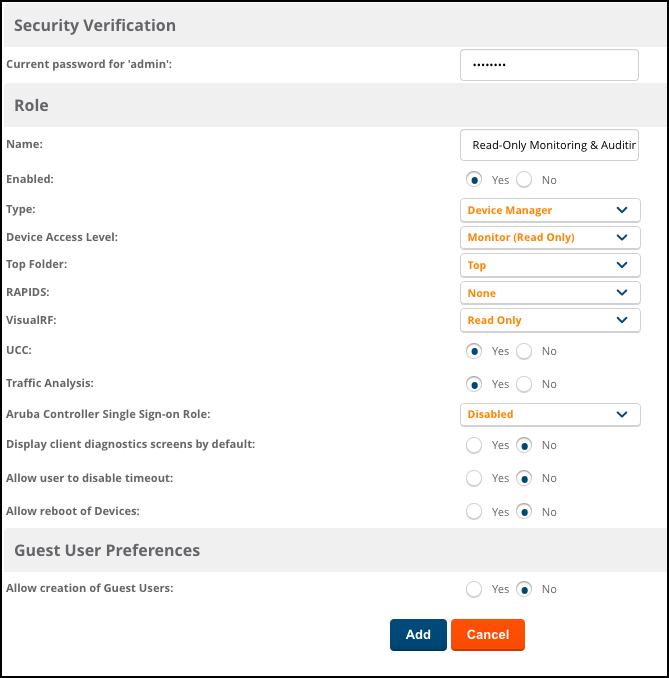
- Click AMP SetupRoles.Add a new role. Configure the following in the page that appears, and leave the other settings at their default values:
- Current password: The password for the Aruba AirWave administrator account
- Name: Read-Only Monitoring & Auditing
- Enabled: Yes
- Device Access Level: Monitor (Read Only)
- VisualRF: Read Only
- Allow creation of Guest Users: No
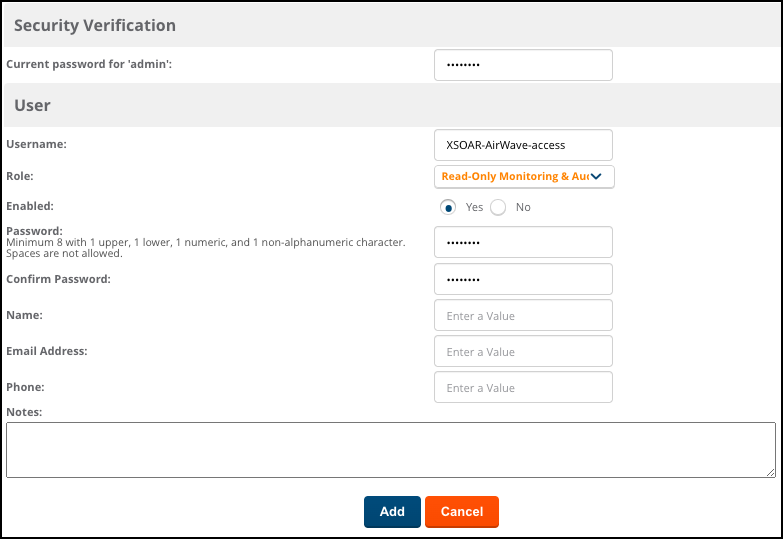
Add the new role.Create a user for the Cortex XSOAR engine to use when connecting to Aruba AirWave.- Click AMP SetupUsersAdd a new user. Configur the following in the page that appears, and leave the other settings at their default values:
- Current password: The password for the Aruba AirWave administrator account
- Username: A username for the user account for Cortex XSOAR
- Role: Read-Only Monitoring & Auditing
- Enabled: Yes
- Password and Confirm Password: A password for the user account
Add the new user account.