Network Security
Create a Security Policy Rule
Table of Contents
Expand All
|
Collapse All
Network Security Docs
Create a Security Policy Rule
Learn how to create a security rule.
Security
security rules allow you to enforce rules and take action, and can be as
general or specific as needed. The security rules are compared against the incoming
traffic in sequence, and because the first rule that matches the traffic is applied,
the more specific rules must precede the more general ones. For example, a rule for
a single application must precede a rule for all applications if all other
traffic-related settings are the same.
For traffic that doesn’t match any user-defined rules, the default rules apply. The
default rules—displayed at the bottom of the security rulebase—are predefined to
allow all intrazone traffic (within the zone) and deny all interzone traffic
(between zones). Although these rules are part of the predefined configuration and
are read-only by default, you can Override them and change a
limited number of settings, including the tags, action (allow or deny), log
settings, and security profiles.
After you create a rule, you can track it in your rulebase and view security rule usage to
determine when and how many times traffic matches the Security rule to
determine its effectiveness. As your rulebase evolves, change and audit information
can get lost over time unless you archived this information at the time the rule is
created or modified. You can Enforce Security Rule Description, Tag, and Audit Comment to ensure that all administrators enter audit
comments so that you can view the audit comment archive and review comments and
configuration log history and can compare rule configuration versions for a selected
rule. Together, you now have more visibility into and control over the rulebase.
Create a Security Policy Rule (Strata Cloud Manager)
Learn how to create a security rule.
To ensure that end users authenticate when they try to access your network
resources, authentication is evaluated before Security policy. For details, see
Authentication.
- Add a rule.
- Select ConfigurationNGFW and Prisma AccessSecurity ServicesSecurity PolicyAdd RuleSecurity Rule and build your rule by configuring the following rulecomponents. Components marked with an asterisk(*) are mandatory.In the General tab, enter a descriptive Name for the rule.Give a Description for your rule's intent.Add Tag to your rules to group them using keywords or phrases.Limit a security rule to specific times using a Schedule.Define the matching criteria for the source fields in the packet.
- In the Source tab, select a Source Zone.Specify a Source IP Address or leave the value set to ny.You can search for specific Usersor User Groups to enforce policy for individual users or a group of users. Specify the match criteria that define which users and user groups.
- Sub string or partial string search is not supported for performance reasons.
- Entire string search is possible when delimiters such as space and hyphen is present.
- When number of users is more than 500 then string search use quotes with exact string
If you're using GlobalProtect™ with host information profile (HIP) enabled, you can also base the policy on information collected by GlobalProtect. For example, the user access level can be determined from the HIP that informs your environment about the user's local configuration. The HIP information can be used for granular access control based on the security programs that are running on the host, registry values, and many other checks such as whether the host has antivirus software installed.If you decide to Negate a region as a source address, ensure that all regions that contain private IP addresses are added to the source address to avoid connectivity loss between those private IP addresses.Define the matching criteria for the destination fields in the packet.- In the Destination tab, set the Zone.Specify a Destination IP Address or leave the value set to any.If you decide to Negate a region as the Destination Address, ensure that all regions that contain private IP addresses are added to the Destination Address to avoid connectivity loss between those private IP addresses.As a best practice, use address objects as the Destination Address to enable access to only specific servers or specific groups of servers especially for commonly exploited services, such as DNS and SMTP. By restricting users to specific destination server addresses, you can prevent data exfiltration and command-and-control traffic from establishing communication through techniques such as DNS tunneling.Specify the Application/Service that the rule will allow or block.As a best practice, always use application-based security rules instead of port-based rules and always set the Service to application-default unless you're using a more restrictive list of ports than the standard ports for an application.
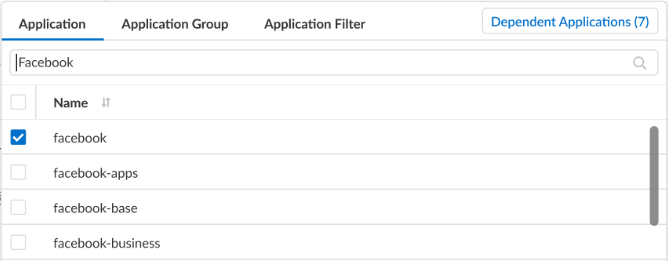
- Under Application, Select any Applications, Application Groups, or Application Filters you want to safely enable. You can select multiple applications or you can use application groups or application filters. Certain applications may possess application dependency (also shown as Depends on when viewing application details), which you will need to consider for inclusion into the security rule.To view application dependency from the security rule:
- Select an application and then click Dependent Applications to display all associated dependent applications and the rules they are used in.
![]()
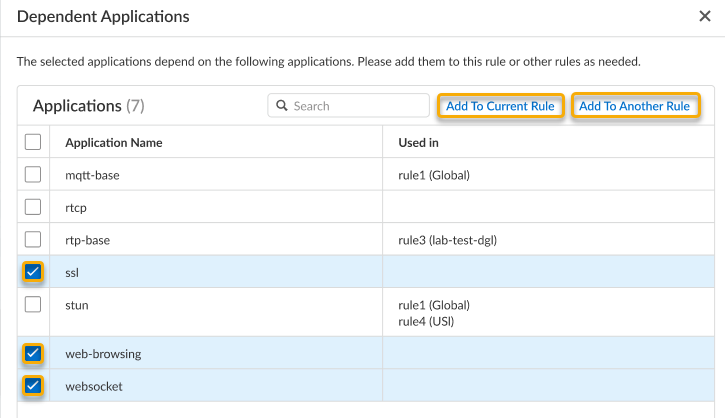
- Additionally, for certain applications, you can select these dependent applications and either Add To Current Rule or Add to Another Rule.
![]()
Under Service, keep the service set to Application Default to ensure that any applications that the rule allows are allowed only on their standard ports. You can also select Any or Select specific Services or Services Groups, as necessary.As a best practice, always use application-based Security policy rules instead of port-based rules and always set the Service to application-default unless you're using a more restrictive list of ports than the standard ports for an application.(Optional) Specify a URL category as match criteria for the rule.Select URL Category or Tenant Restriction to specify a specific TCP and/or UDP port number, a URL category, a tenant restriction as match criteria in the security rule. If you select a URL category, only web traffic will match the rule and only if the traffic is destined for that specified category.Define what action you want the firewall to take for traffic that matches the rule.Configure the log settings.- By default, the rule is set to Log at Session End. You can disable this setting if you don’t want any logs generated when traffic matches this rule or you can select Log at Session Start for more detailed logging.
- Select a Log Forwarding profile.
As a best practice, don't select the check box to Disable Server Response Inspection (DSRI). Selecting this option prevents the inspection of packets from the server to the client. For the best security posture, both the client-to-server flows and the server-to-client flows must be inspected to detect and prevent threats.Attach security profiles to scan all allowed traffic for threats.Make sure you create best practice security profiles that help protect your network from both known and unknown threats.In ActionsProfile Group, select a Profile Group from the drop-down to attach to the rule.Select Save to save the security rule, then Push Config to your devices.When you save the security rule, the rule is validated against the configured security checks. If a security check fails, you can either Override and Save the rule or Close and Fix the issue. You can override and save only if your role includes the Override Security Check Block Action permission.Monitor the security rule usage status and determine the effectiveness of the security rule, and optimize if needed.Create a Security Policy Rule (PAN-OS & Panorama)
Learn how to create a security rule.To ensure that end users authenticate when they try to access your network resources, authentication is evaluated before Security policy. For details, see Authentication Policy.The interface includes components for defining Security rules. Familiarize yourself with them before you get started.- (Optional) Delete the default Security rule.By default, the firewall includes a security rule named rule1 that allows all traffic from Trust zone to Untrust zone. You can either delete the rule or modify the rule to reflect your zone naming conventions.Add a rule.
- Select PoliciesSecurity and Add a new rule.In the General tab, enter a descriptive Name for the rule.Select a Rule Type.Define the matching criteria for the source fields in the packet.
- In the Source tab, select a Source Zone.Specify a Source IP Address or leave the value set to any. You can optionally specify the source as an External Dynamic List with a curated list of IP addresses or a Region using IP addresses that have been mapped to a country code based on a Palo Alto Networks managed internal database.
- If you decide to Negate a region as a Source Address, ensure that all regions that contain private IP addresses are added to the Source Address to avoid connectivity loss between those private IP addresses.
- (Available in PAN-OS 12.1 and later) If your network operates using IPv6 (or a dual stack deployment) and would like to use IPv6 geolocation, you must Enable IPv6 Firewalling as well as Enable IPv6 Geolocation from DeviceSessionsSession Settings.The following platforms configured with less than 9GB do not support IPv6 geolocation:
- Hardware NGFWs: PA-410, PA-410R, PA-410R-5G, PA-415, and PA-415-5G
- VM-Series: Software NGFW Credits and VM-Series models with less than 9GB (e.g. VM-100, VM-50, etc)
Specify a Source User or leave the value set to any.Define the matching criteria for the destination fields in the packet.- In the Destination tab, set the Destination Zone.Specify a Destination IP Address or leave the value set to any. You can optionally specify the destination as an External Dynamic List with a curated list of IP addresses or a Region using IP addresses that have been mapped to a country code based on a Palo Alto Networks managed internal database.
- If you decide to Negate a region as the Destination Address, ensure that all regions that contain private IP addresses are added to the Destination Address to avoid connectivity loss between those private IP addresses.
- (Available in PAN-OS 12.1 and later) If your network operates using IPv6 (or a dual stack deployment) and would like to use IPv6 geolocation, you must Enable IPv6 Firewalling as well as Enable IPv6 Geolocation from DeviceSessionsSession Settings.The following platforms configured with less than 9GB do not support IPv6 geolocation:
- Hardware NGFWs: PA-410, PA-410R, PA-410R-5G, PA-415, and PA-415-5G
- VM-Series: Software NGFW Credits and VM-Series models with less than 9GB (e.g. VM-100, VM-50, etc)
As a best practice, use address objects as the Destination Address to enable access to only specific servers or specific groups of servers especially for commonly exploited services, such as DNS and SMTP. By restricting users to specific destination server addresses, you can prevent data exfiltration and command-and-control traffic from establishing communication through techniques such as DNS tunneling.Specify the application that the rule will allow or block.As a best practice, always use application-based security rules instead of port-based rules and always set the Service to application-default unless you're using a more restrictive list of ports than the standard ports for an application.- In the Applications tab, Add the Application you want to safely enable. You can select multiple applications or you can use application groups or application filters.In the Service/URL Category tab, keep the service set to application-default to ensure that any applications that the rule allows are allowed only on their standard ports.(Optional) Specify a URL category as match criteria for the rule.In the Service/URL Category tab, select the URL Category.If you select a URL category, only web traffic will match the rule and only if the traffic is destined for that specified category.Define what action you want the firewall to take for traffic that matches the rule.Configure the log settings.
- By default, the rule is set to Log at Session End. You can disable this setting if you don’t want any logs generated when traffic matches this rule or you can select Log at Session Start for more detailed logging.
- Select a Log Forwarding profile.
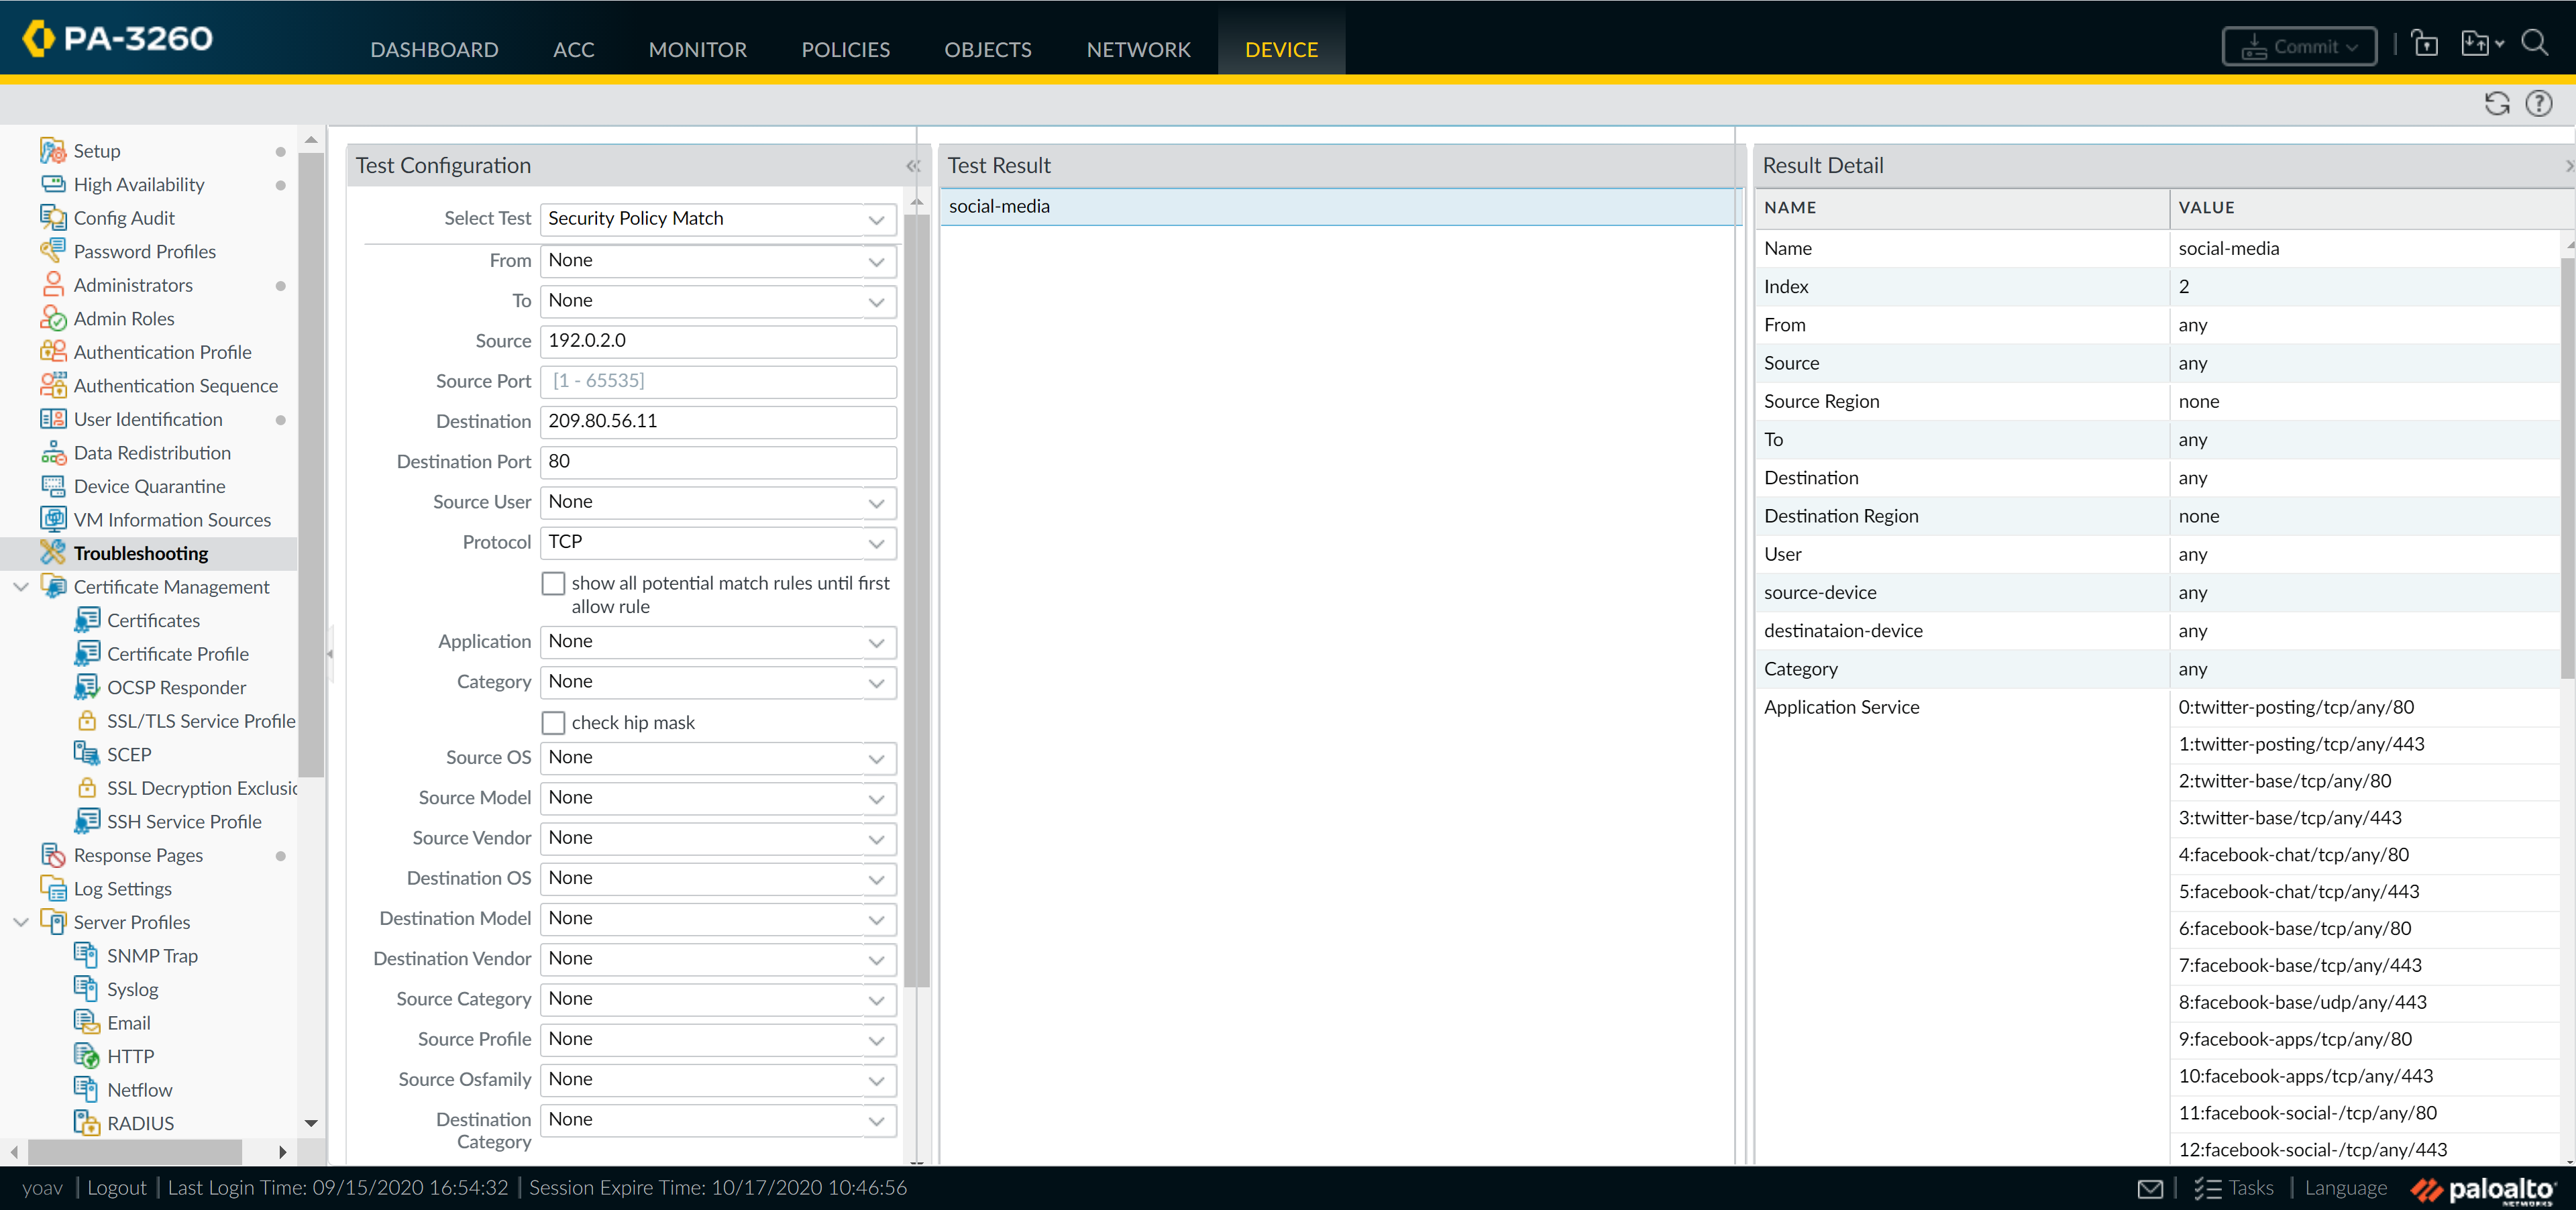
As a best practice, don't select the check box to Disable Server Response Inspection (DSRI). Selecting this option prevents the firewall from inspecting packets from the server to the client. For the best security posture, the firewall must inspect both the client-to-server flows and the server-to-client flows to detect and prevent threats.Attach security profiles to enable the firewall to scan all allowed traffic for threats.Make sure you create best practice security profiles that help protect your network from both known and unknown threats.In the Actions tab, select Profiles from the Profile Type drop-down and then select the individual security profiles to attach to the rule.Alternatively, select Group from the Profile Type drop-down and select a security Group Profile to attach.Click Commit to save the security rule to the running configuration on the firewall.To verify that you have set up your basic Security policies effectively, test whether your security rules are being evaluated and determine which security rule applies to a traffic flow.The output displays the best rule that matches the source and destination IP address specified in the CLI command.For example, to verify the security rule that will be applied for a server in the data center with the IP address 208.90.56.11 when it accesses the Microsoft update server:- Select DeviceTroubleshooting, and select Security Policy Match from the Select Test drop-down.Enter the Source and Destination IP addresses.Enter the Protocol.Execute the Security policy match test.
![]() After waiting long enough to allow traffic to pass through the firewall, View Security Rule Usage to monitor the security rule usage status and determine the effectiveness of the policy rule.
After waiting long enough to allow traffic to pass through the firewall, View Security Rule Usage to monitor the security rule usage status and determine the effectiveness of the policy rule.


