Increase the System Disk for Panorama on an ESXi Server
Table of Contents
Increase the System Disk for Panorama on an ESXi Server
Migrate the existing system 81GB system disk to a 224GB
system disk for Panorama deployed on an ESXI server.
Add a 224GB system disk to replace the default
81GB system disk. For the minimum resource requirements for the
Panorama virtual appliance, see Setup Prerequisites for the Panorama Virtual Appliance.
Decreasing
the Panorama virtual appliance system disk back to 81GB is not supported.
- (Best Practice) Save and Export Panorama and Firewall Configurations. Save and export your Panorama and firewall configuration to ensure you can recover Panorama if you encounter any issues.
- Access the VMware vSphere Client and navigate to your Panorama virtual appliance.
- Right-click the Panorama virtual appliance and select .
- Add the new 224GB system disk.
- Right-click the Panorama virtual appliance and Edit Settings.
- Select New Hard Disk as the New Device and Add the new device.
- Configure the new hard disk with 224GB and click OK.
![]()
- Right-click the Panorama virtual appliance and select .Panorama may take up to 30 minutes to initialize the new system disk. During this time the Panorama web interface and CLI are unavailable.
- Migrate disk data from the old system disk to the new
system disk.In this example, we are migrating to the newly added system disk labeled sdb.
- Log in to the Panorama CLI.
- Enter the following command to view the available
system disks for migration:
admin> request system clone-system-disk target ?
- Migrate the disk data to the new system disk using
the following command:
admin> request system clone-system-disk target sdb
Enter Y when prompted to begin the disk migration.To begin the migration, Panorama reboots and takes at least 20 minutes to complete the disk migration. During this time the Panorama web interface and CLI are unavailable. - Monitor the disk migration from the web Console. Continue
to the next step only after Panorama displays the following message
to indicate the disk migration is complete.
![]()
- Delete the old system disk.
- Access the VMware vSphere Client and navigate to your Panorama virtual appliance.
- Right-click the Panorama virtual appliance and select .
- Right-click the Panorama virtual appliance and Edit Settings.
- Delete the old 81GB system disk and click OK.
- Modify the Virtual Device Node for the new system disk.
- Expand the settings options for the new system disk.
- Select SCSI(0:0) as the Virtual Device Node.
- Click OK to save your configuration
changes.
![]()
- Right-click the Panorama virtual appliance and select .
- Verify that you successfully migrated to the new system
disk.
- Log in to the Panorama CLI.
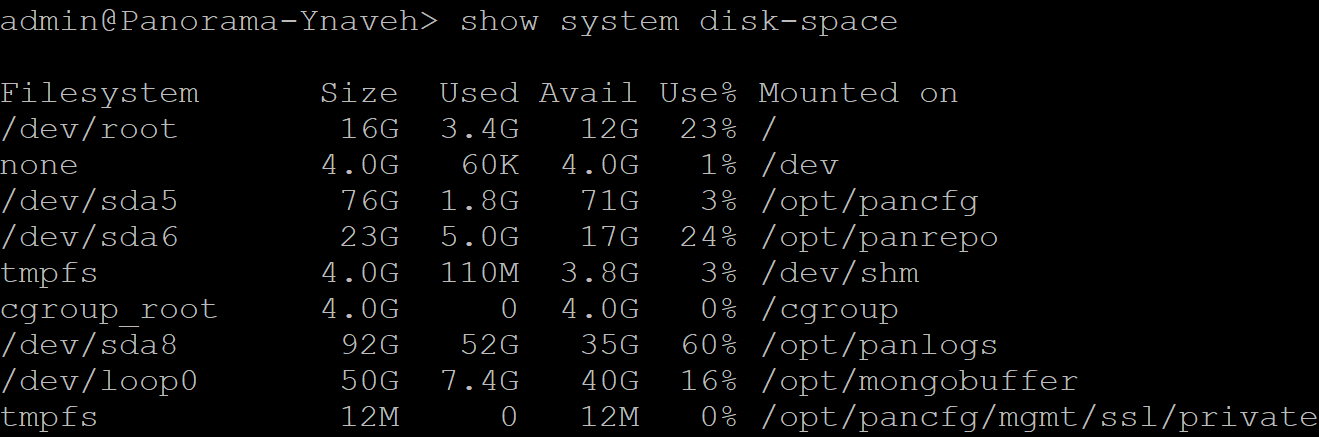
- Enter the following command to view the system disk
partitions. You must add the /dev/root, /dev/sda5, /dev/sda6, and /dev/sda8 partitions to confirm the disk size is increased.
admin> show system disk-space
![]()