Add a Firewall as a Managed Device
Table of Contents
Add a Firewall as a Managed Device
Add a firewall to the Panorama™ management server for centralized configuration
management and monitoring.
To use a Panorama™ management server to manage
your firewalls, you need to enable a connection between the firewall
and the Panorama management server. To strengthen your Security
posture when onboarding a new firewall, you must create a unique
device registration authentication key on the Panorama management server
for mutual authentication between the new firewall and the server
on first connection. A successful first connection requires that
you add the Panorama IP address on each firewall the server will
manage, add the serial number on the server for each firewall, and
specify the device registration authentication key on both the server
and the firewall. When you add a firewall as a managed device, you
can also associate the new firewall with a device group, template
stack, collector group, and Log Collector during the initial deployment.
Additionally, you have the option to automatically push the configuration
to your newly added firewall when the firewall first connects to
the Panorama server, which ensures that firewalls are immediately configured
and ready to secure your network.
If you are adding a firewall to Panorama in a high availability (HA) configuration,
the device registration authentication key is required only to add the firewall to
the primary peer. Panorama in HA configuration synchronize the Certificate Authority
(CA) certificate that allows the secondary peer to manage firewalls in event of HA
failover.
Adding a firewall as a managed device requires that the total count of managed
firewalls not exceed the device management license
activated on Panorama. Select to view the Device Management
License active on Panorama and the maximum number of managed
firewalls supported.
If the firewall you are attempting to add exceeds the device management license
limit, the operation is blocked and you are prompted with a warning indicating
that adding the firewall to Panorama management failed.
The
firewall uses the Panorama management server IP address for registration
with the server. The Panorama server and the firewall authenticate
with each other using 2,048-bit certificates and AES-256 encrypted
SSL connections for configuration management and log collection.
To
configure the device registration authentication key, specify the
key lifetime and the number of times you can use the authentication
key to onboard new firewalls. Additionally, you can specify one
or more firewall serial numbers for which the authentication key
is valid.
The authentication key expires 90 days after the
key lifetime expires. After 90 days, you are prompted to re-certify
the authentication key to maintain its validity. If you do not re-certify,
then the authentication key becomes invalid. A system log is generated
each time a firewall uses the Panorama-generated authentication
key. The firewall uses the authentication key to authenticate the
Panorama server when it delivers the device certificate that is
used for all subsequent communications.
For firewalls running a PAN-OS 10.2 release, Panorama running PAN-OS 10.2 or later release
supports onboarding firewalls running PAN-OS 10.1.3 or later release only. You
cannot add a firewall running PAN-OS 10.1.2 or earlier PAN-OS 10.2 release to
Panorama management if Panorama is running PAN-OS 10.2 or later release.
Panorama
supports onboarding firewalls running the following releases:
- Panorama running PAN-OS 10.2 or later release— Firewalls running PAN-OS 10.1.3 or later release, and firewalls running PAN-OS 10.0 or earlier PAN-OS release.
There is no impact
to firewalls already managed by Panorama on upgrade to PAN-OS 10.2.
If you are experiencing issues adding a firewall to Panorama management, you may
need to recover managed device connectivity
to Panorama.
- Set up the firewall.
- Perform initial configuration on the firewall so that it is accessible and can communicate with the Panorama server over the network.Configure each data interface you plan to use on the firewall and attach it to a security zone so that you can push configuration settings and policy rules from the Panorama server.Create a device registration authentication key.
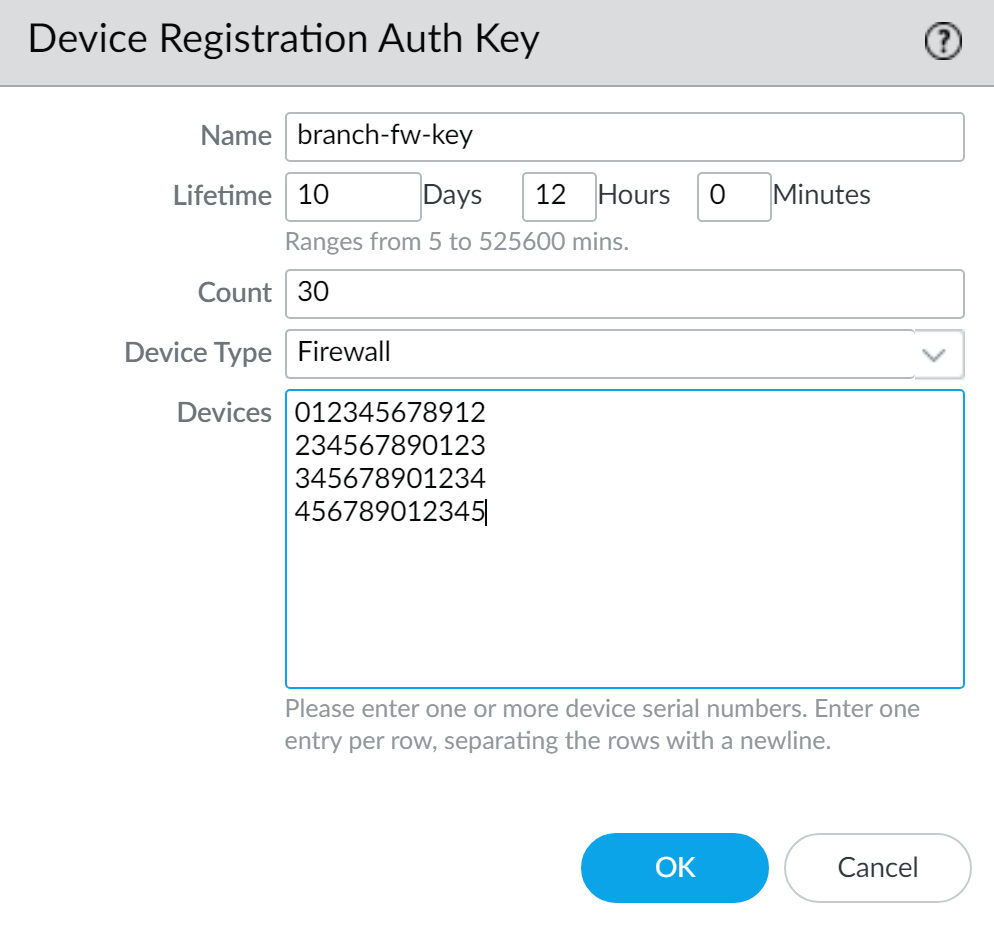
- Log in to the Panorama Web Interface.Select and Add a new authentication key.Configure the authentication key.
- Name—Add a descriptive name for the authentication key.
- Lifetime—Specify the key lifetime to limit how long you can use the authentication key to onboard new firewalls.
- Count—Specify how many times you can use the authentication key to onboard new firewalls.
- Device Type—Specify that this authentication key is used to authenticate only a Firewall.You can select Any to use the device registration authentication key to onboard firewalls, Log Collectors, and WildFire appliances.
- (Optional) Devices—Enter one or more device serial numbers to specify for which firewalls the authentication key is valid.
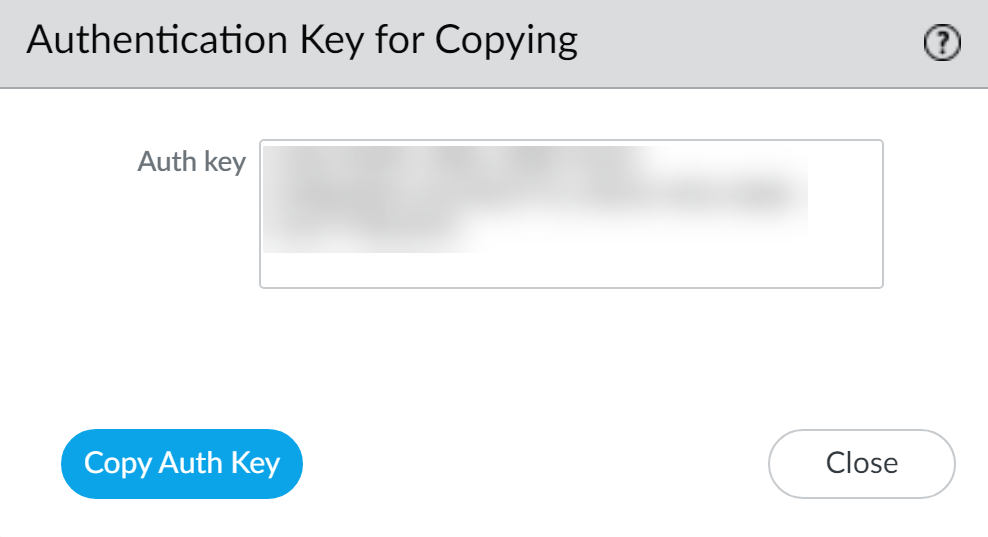
Click OK.![]() Copy Auth Key and Close.
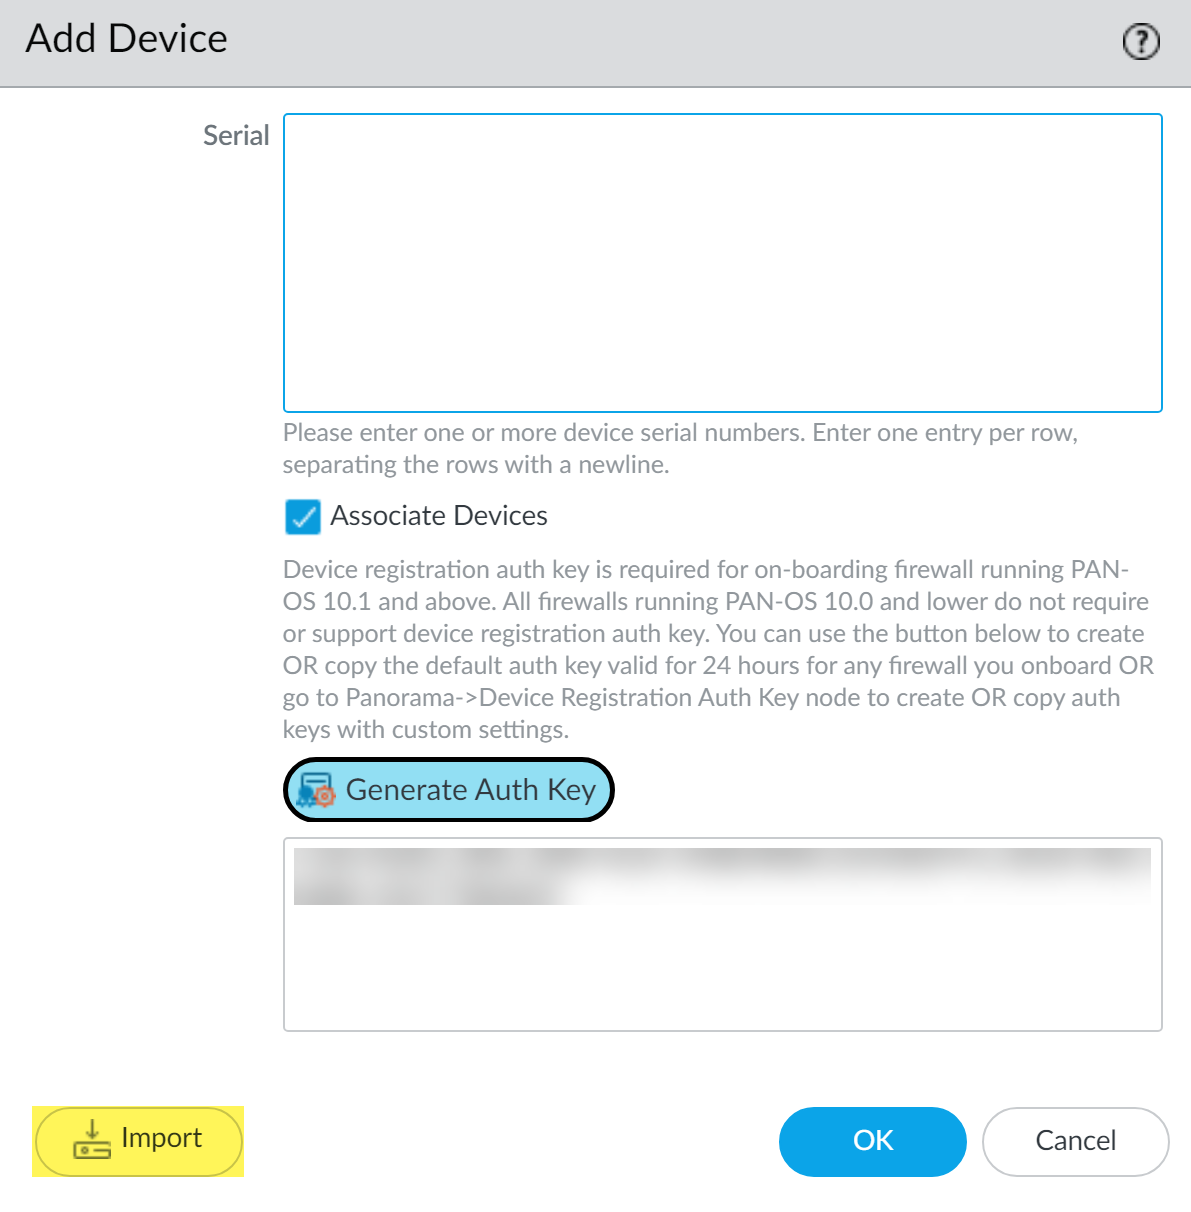
Copy Auth Key and Close.![]() Add firewalls to a Panorama management server. You can manually add one or more firewalls or bulk import firewalls using a CSV file.You can bulk import only single-vsys firewalls to the Panorama management server You cannot bulk import firewalls with more than one virtual system (vsys).
Add firewalls to a Panorama management server. You can manually add one or more firewalls or bulk import firewalls using a CSV file.You can bulk import only single-vsys firewalls to the Panorama management server You cannot bulk import firewalls with more than one virtual system (vsys).- Add one or more firewalls manually.
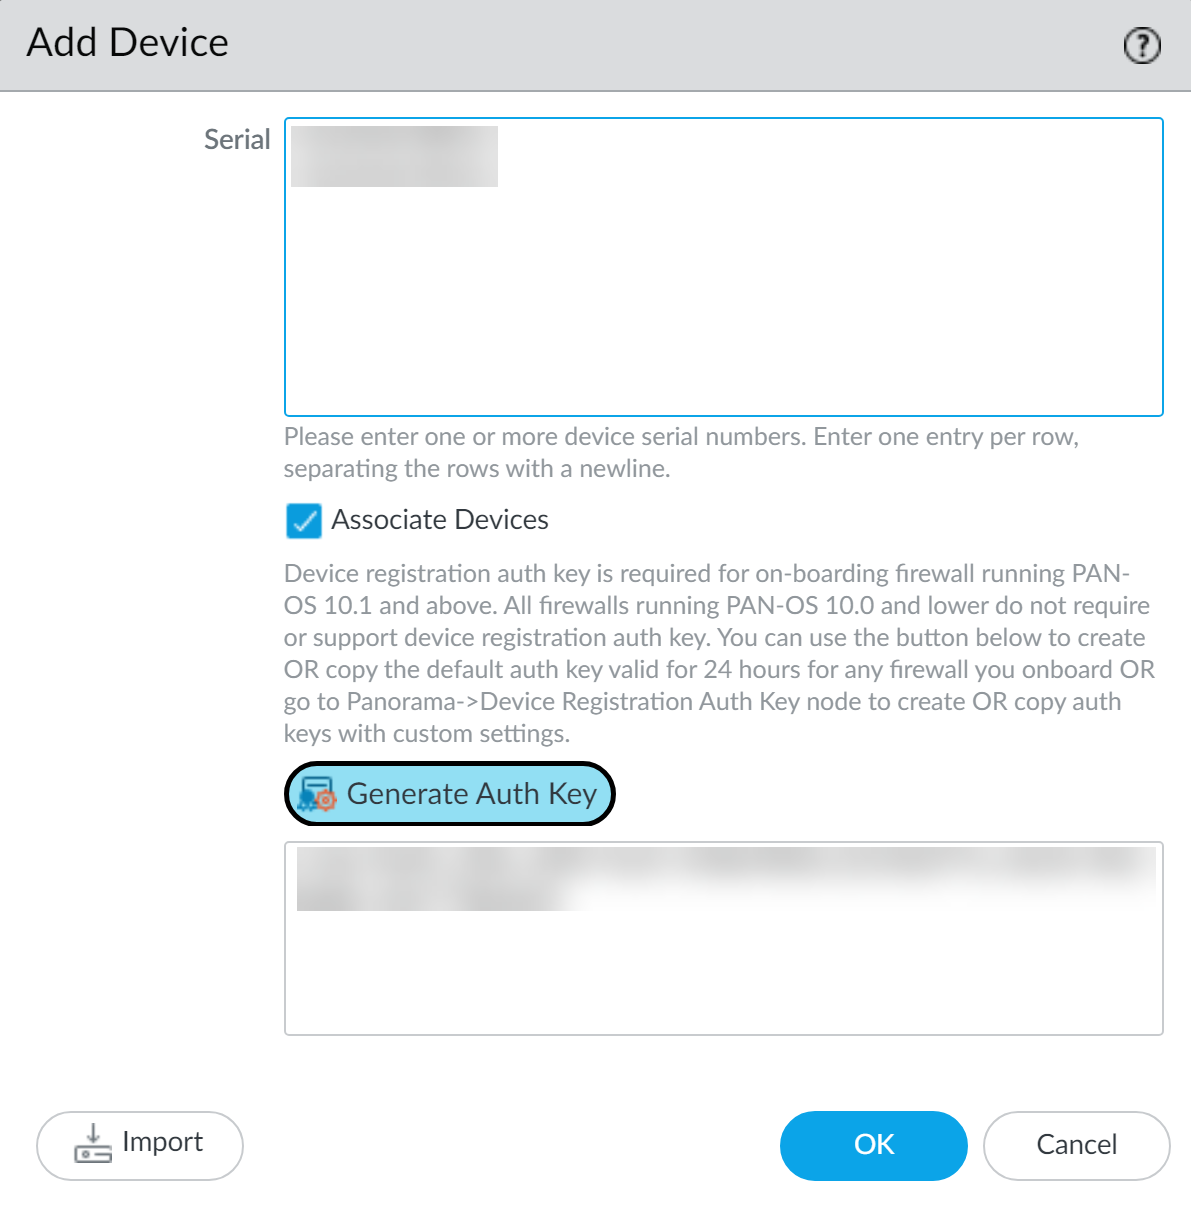
- Select and Add a new firewall.Enter the firewall Serial number. If you are adding multiple firewalls, enter each serial number on a separate line.(Optional) Select Associate Devices to associate the firewall with a device group, template stack, Log Collector, or Collector group when the firewall first connect to the Panorama management server.Enter the device registration authentication key you created.
![]() Click OK.Associate your managed firewalls as needed.If you did not select Associate Devices, skip this step and continue to configure the firewall to communicate with Panorama.
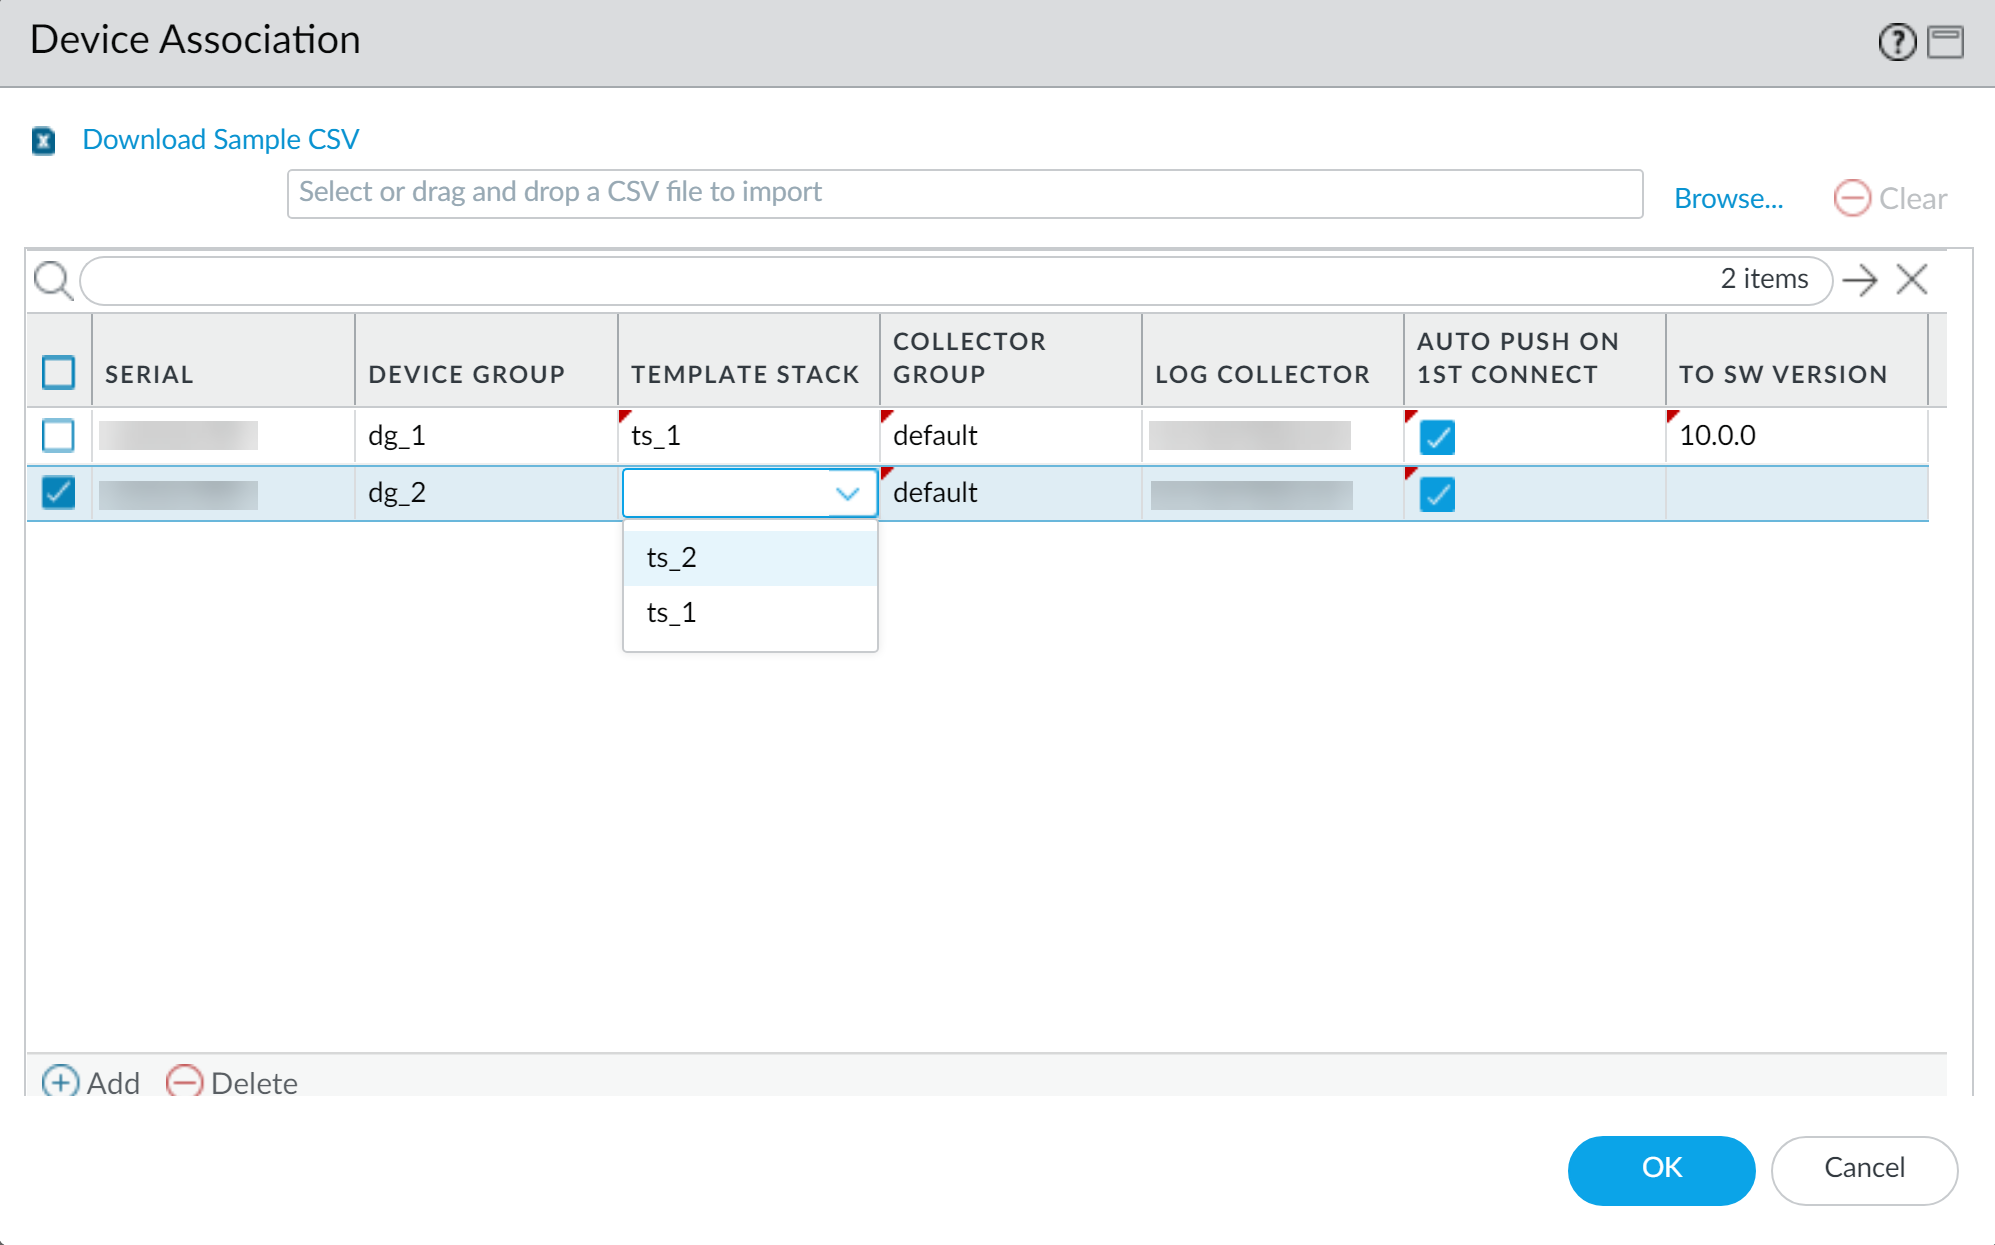
Click OK.Associate your managed firewalls as needed.If you did not select Associate Devices, skip this step and continue to configure the firewall to communicate with Panorama.- Assign the Device Group, Template Stack, Collector Group, and Log Collector as needed from the drop-down in each column.
- Enable Auto Push on 1st connect to automatically push the device group and template stack configuration to the new devices when they first successfully connect to the Panorama server.The Auto Push on 1st Connect option is supported only on firewalls running PAN-OS® 8.1 and later releases. The commit all job executes from Panorama to managed devices running PAN-OS 8.1 and later releases.
- (Optional) Select a PAN-OS release version (To SW Version column) to begin automatically upgrading the managed firewall to the specified PAN-OS version upon successful connection to the Panorama management server.To upgrade a managed firewall to a target PAN-OS release on first connection, you must install the minimum content release version required for that PAN-OS release before adding the firewall as a managed device. To do this, you must register the firewall, activate the support license, and install the content update before adding the firewall to Panorama management.Leave this column empty if you do not want to automatically upgrade the managed firewall.
- Click OK to add the devices.
![]()
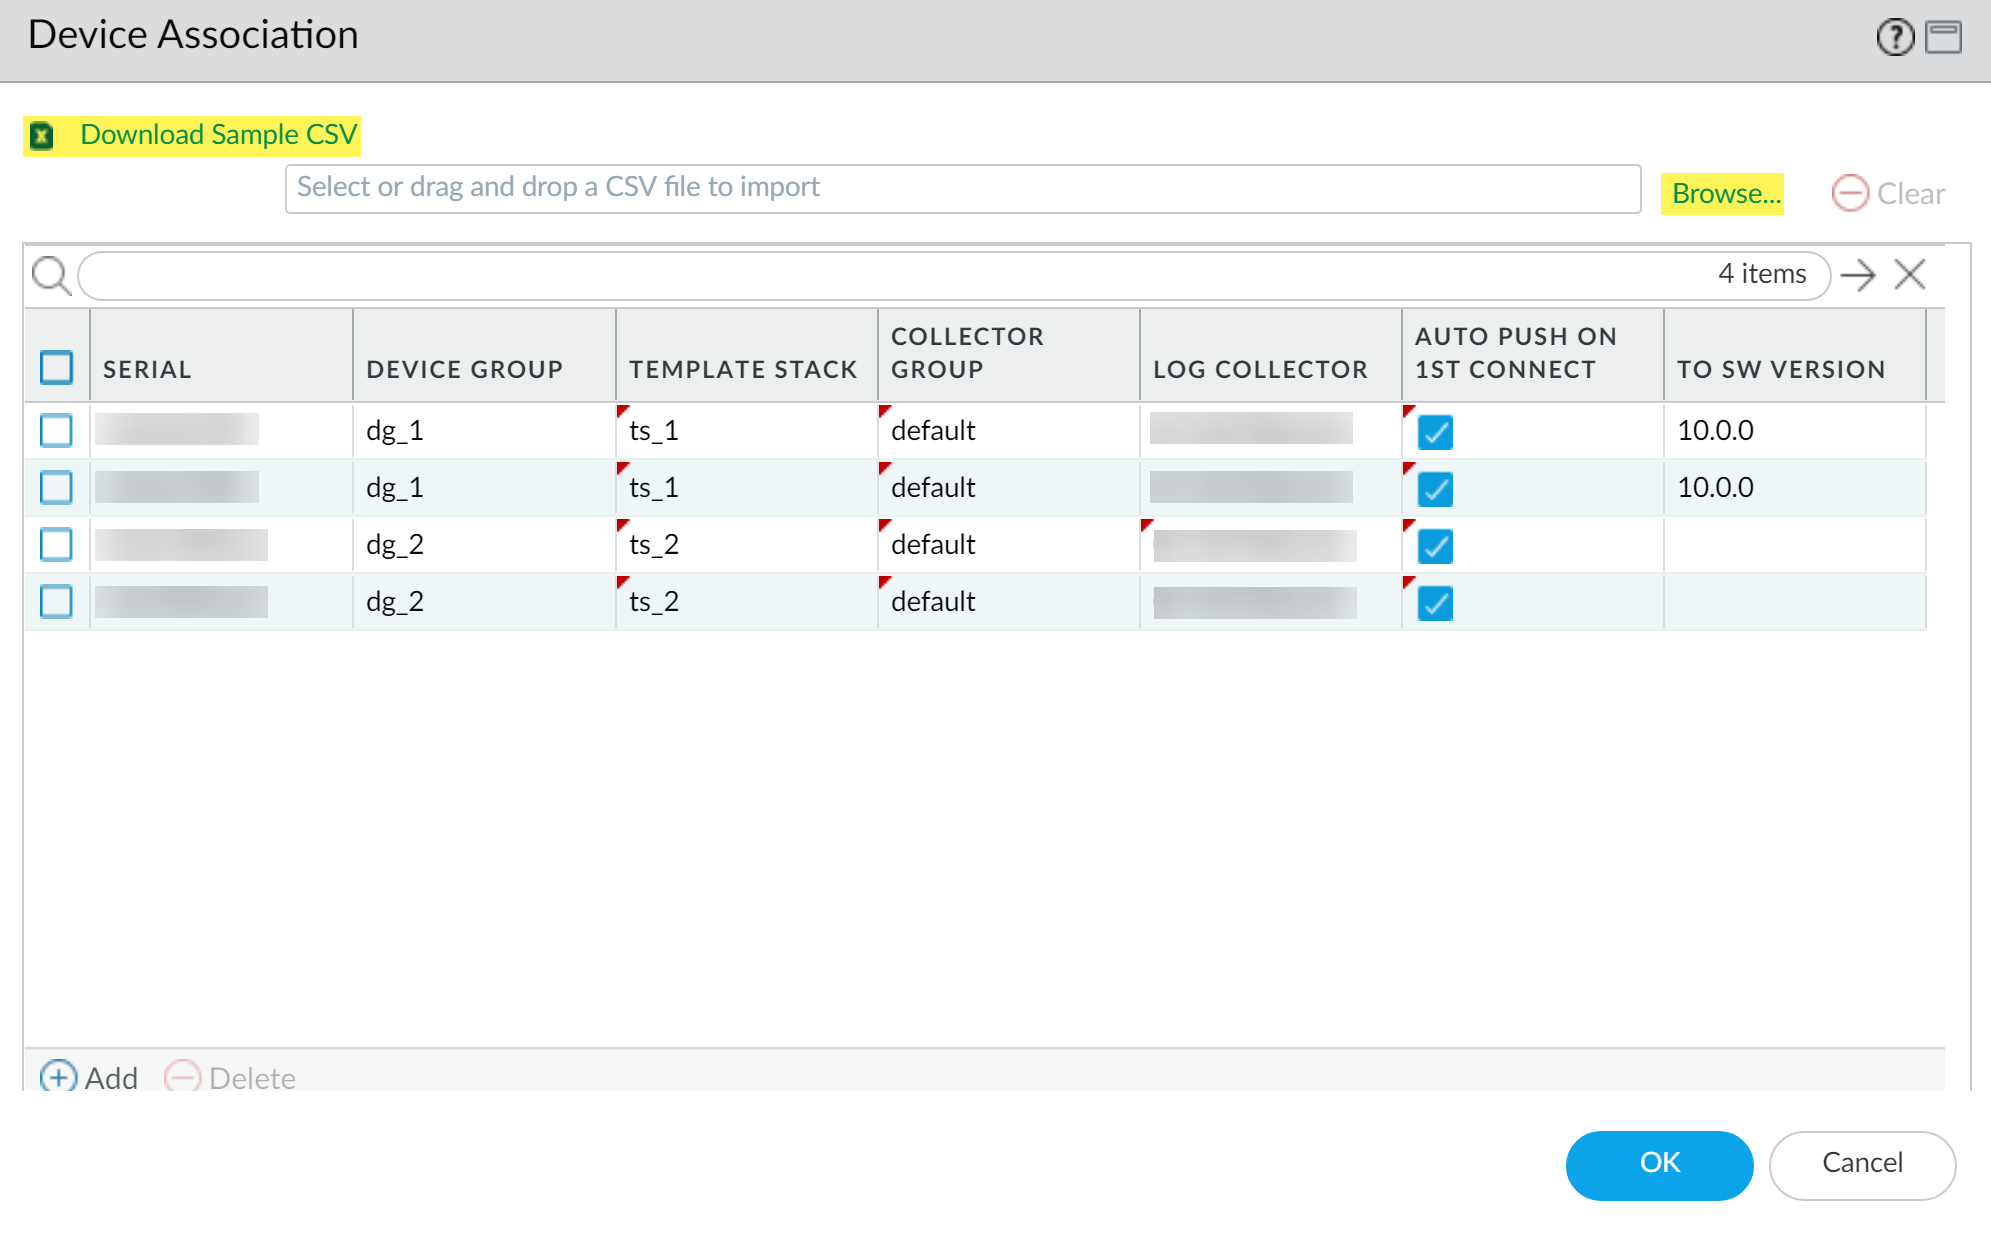
- Bulk import multiple firewalls using a CSV file.
- Select and Add your new firewalls.Add the device registration authentication key you created.Click Import.
![]() Download Sample CSV and edit the downloaded CSV file with the firewalls you are adding. You can choose to assign the firewalls to a device group, template stack, Collector Group, and Log Collector from the CSV or enter only the firewall serial numbers and assign them from the web interface. Save the CSV after you finish editing.Browse to and select the CSV file you edited in the previous step.
Download Sample CSV and edit the downloaded CSV file with the firewalls you are adding. You can choose to assign the firewalls to a device group, template stack, Collector Group, and Log Collector from the CSV or enter only the firewall serial numbers and assign them from the web interface. Save the CSV after you finish editing.Browse to and select the CSV file you edited in the previous step.![]() If not already assigned in the CSV, assign the firewalls a Device Group, Template Stack, Collector Group, and Log Collector as needed from the drop-down in each columnIf not already enabled in the CSV, enable Auto Push on 1st connect to automatically push the device group and template stack configuration to the new devices when they first successfully connect to the Panorama server.(Optional) Select a PAN-OS release version (To SW Version column) to begin automatically upgrading the managed firewall to the specified PAN-OS version upon successful connection to the Panorama server.To upgrade a managed firewall to a target PAN-OS release on first connection, you must install the minimum content release version required for that PAN-OS release before adding the firewall as a managed device. To do this, you must register the firewall, activate the support license, and install the content update before adding the firewall to Panorama management.Leave this column empty if you do not want to automatically upgrade the managed firewall.Click OK to add the firewalls.Configure the firewall to communicate with the Panorama management server.Repeat this step for each firewall the Panorama server will manage.
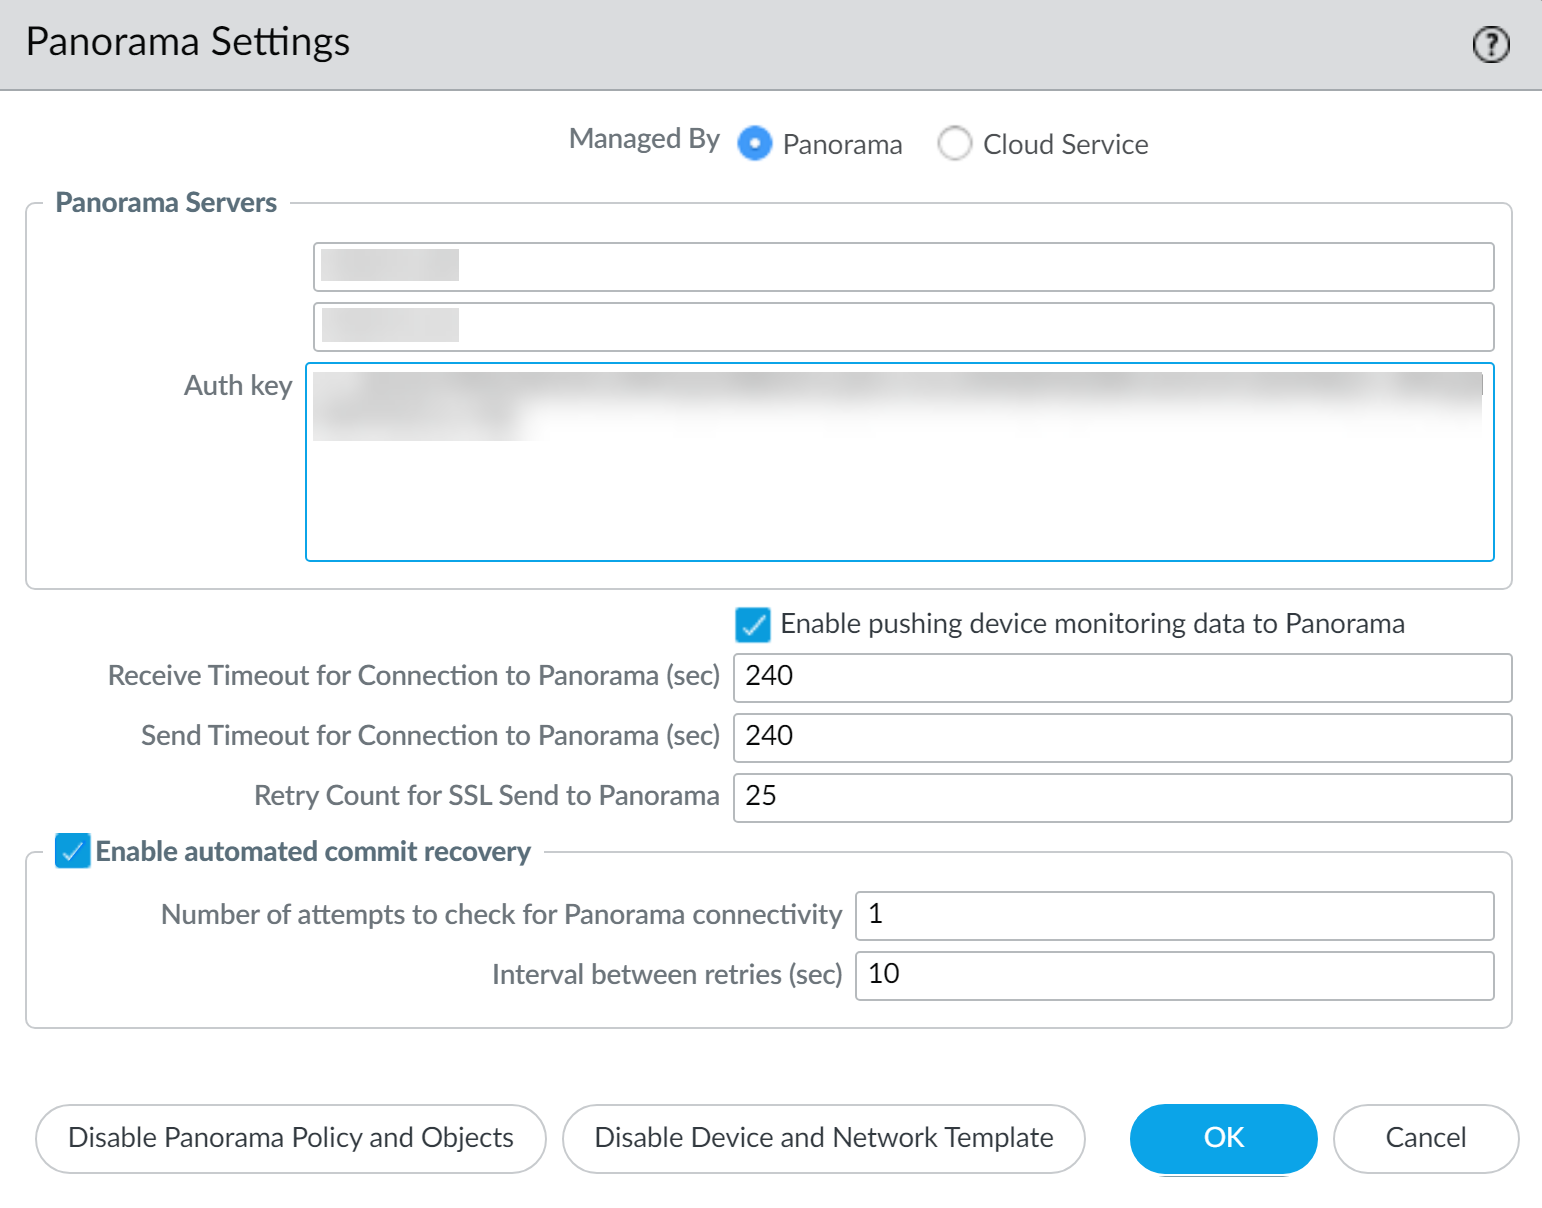
If not already assigned in the CSV, assign the firewalls a Device Group, Template Stack, Collector Group, and Log Collector as needed from the drop-down in each columnIf not already enabled in the CSV, enable Auto Push on 1st connect to automatically push the device group and template stack configuration to the new devices when they first successfully connect to the Panorama server.(Optional) Select a PAN-OS release version (To SW Version column) to begin automatically upgrading the managed firewall to the specified PAN-OS version upon successful connection to the Panorama server.To upgrade a managed firewall to a target PAN-OS release on first connection, you must install the minimum content release version required for that PAN-OS release before adding the firewall as a managed device. To do this, you must register the firewall, activate the support license, and install the content update before adding the firewall to Panorama management.Leave this column empty if you do not want to automatically upgrade the managed firewall.Click OK to add the firewalls.Configure the firewall to communicate with the Panorama management server.Repeat this step for each firewall the Panorama server will manage.- Log in to the firewall web interface.Configure the Panorama Settings for the firewall.
- Select and edit the Panorama Settings.
- (PAN-OS 10.2.3 and later releases only) For Managed By, select Panorama.
- Enter the Panorama IP address in the first field.Panorama issues a single IP address for device management, log collection, reporting, and dynamic updates. Enter the external, Internet-bound IP address to ensure Panorama can successfully access existing and new managed devices and Log Collectors. If an internal Panorama IP address is configured, you may be unable to manage some devices. For example, if you Install Panorama on AWS and enter the internal IP address, Panorama is unable to manage devices or Log Collectors outside of the AWS security group.
- (Optional) If you have configured a high availability (HA) pair in Panorama, enter the IP address of the secondary Panorama in the second field.
- Enter the Auth key you created on Panorama.
- Click OK.
![]()
- Commit your changes.
(Optional) Add a Tag. Tags make it easier for you to find a firewall from a large list; they help you dynamically filter and refine the list of firewalls in your display. For example, if you add a tag called branch office, you can filter for all branch office firewalls across your network.- Select each firewall and click Tag.Click Add, enter a string of up to 31 characters (no empty spaces), and click OK.If your deployment is using custom certificates for authentication between Panorama and managed devices, deploy the custom client device certificate. For more information, see Set Up Authentication Using Custom Certificates and Add New Client Devices.Select and Commit your changes.Verify that the firewall is connected to Panorama.
- Click .Verify that the Device State for the new device shows as Connected.
![]()