Prisma Access Agent
Set Up LDAP Authentication for Prisma Access Agent
Table of Contents
Set Up LDAP Authentication for Prisma Access Agent
Configure LDAP/LDAPS authentication for Prisma Access Agent to enable seamless
authentication using existing directory services and GlobalProtect Portal
infrastructure.
| Where Can I Use This? | What Do I Need? |
|---|---|
|
|
Authentication is a critical aspect of securing remote access to your organization's
resources. Prisma® Access Agent provides multiple authentication methods to verify
user identities before granting access to protected resources. While Prisma Access
Agent has traditionally relied on Cloud Identity Engine (CIE) for authentication
through Security Assertion Markup Language (SAML) and client certificates, many
organizations require Lightweight Directory Access Protocol (LDAP)/LDAPS
authentication support.
The LDAP authentication capability for Prisma Access Agent enables organizations to
use existing directory services infrastructure integrated with the GlobalProtect®
Portal. This integration provides a smooth transition path for you to migrate
existing deployments from GlobalProtect to Prisma Access Agent without having to
reconfigure your authentication methods or adopt new authentication workflows.
When you enable LDAP authentication, Prisma Access Agent communicates with the
GlobalProtect Portal for user validation instead of directly connecting to the Cloud
Identity Engine. The agent receives the GlobalProtect Portal fully qualified domain
name (FQDN) from the Prisma Access Agent management plane, connects to the Portal,
and presents the user with credential prompts. Upon successful authentication
against your LDAP directory, the Portal grants Prisma Access Agent an authentication
override cookie that is validated by the management plane, which then issues the
appropriate access tokens.
By default, LDAP users gets prompted for authentication every 24 hours. You can set
up LDAP authentication for Strata Cloud Manager Managed Prisma Access deployments or Panorama Managed
Prisma Access or
Next-Generation Firewall (NGFW) deployments.
Portal authentication for Panorama Managed
Prisma Access and NGFW deployments requires
Prisma Access infrastructure 6.1 and above.
Set Up LDAP Authentication for Prisma Access Agent (Strata Cloud Manager Managed Deployments)
Configure LDAP/LDAPS authentication for Prisma Access Agent to enable seamless
authentication using existing directory services and GlobalProtect Portal
infrastructure.
- Create an LDAP server profile that defines the connection to your directory server. (Skip this step if you have an existing LDAP server profile.)When you use LDAP to connect to Active Directory (AD), you must create a separate LDAP server profile for every Active Directory (AD) domain.
- From Strata Cloud Manager, select ConfigurationNGFW and Prisma AccessConfiguration ScopeAccess Agent.Select Identity ServicesAuthentication.Select Server ProfilesLDAP.
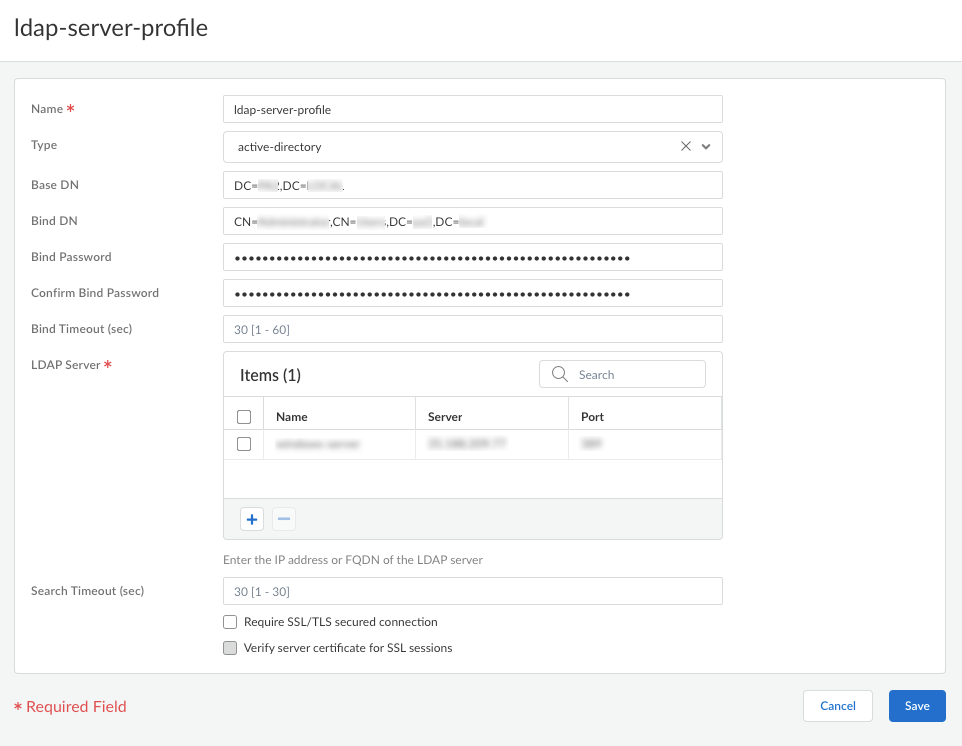
![]() Click Add LDAP Server Profiles.Specify the following options:
Click Add LDAP Server Profiles.Specify the following options:- Name—Enter a name for the profile, such as ldap-server-profile.
- Type—Select active-directory.
- Base DN—Enter the base DN (Distinguished Name) for the LDAP directory.
- Bind DN—Enter the bind DN to enable the authentication service to authenticate the gateway.
- Bind Password and Confirm Bind Password—Enter the authentication credentials.
- LDAP Server—Enter the name and IP address for the LDAP server. You can configure up to four LDAP servers in a single profile.
- Require SSL/TLS Secure Connection—Enable this option if you want the endpoint to use SSL or TLS for a more secure connection with the directory server (enabled by default).
- Verify Server Certificate—Enable this option if you want the endpoint to verify the certificate that the directory server presents for SSL/TLS connections. To enable verification, you must also enable the option to Require SSL/TLS Secure Connection.
For example:![]() Save your LDAP server profile.Create an authentication profile using the LDAP server profile. (Skip this step if you already have an authentication profile for LDAP.)The authentication profile specifies the server profile that the Portal or gateways use when they authenticate users. On a portal or gateway, you can assign one or more authentication profiles to one or more client authentication profiles.
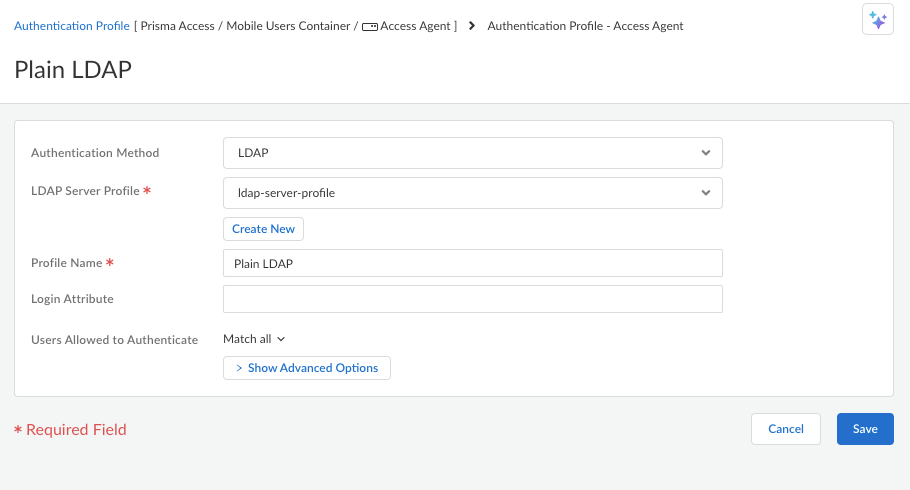
Save your LDAP server profile.Create an authentication profile using the LDAP server profile. (Skip this step if you already have an authentication profile for LDAP.)The authentication profile specifies the server profile that the Portal or gateways use when they authenticate users. On a portal or gateway, you can assign one or more authentication profiles to one or more client authentication profiles.- From Strata Cloud Manager, select ConfigurationNGFW and Prisma AccessConfiguration ScopeAccess Agent.Select Identity ServicesAuthentication.Select Authentication Profiles and Add Profile.
![]() Select Authentication MethodLDAP.Select the LDAP Server Profile that you created.Enter a Profile Name. For example:
Select Authentication MethodLDAP.Select the LDAP Server Profile that you created.Enter a Profile Name. For example:![]() Save your authentication profile and push the configuration.Configure user authentication for the GlobalProtect Portal.
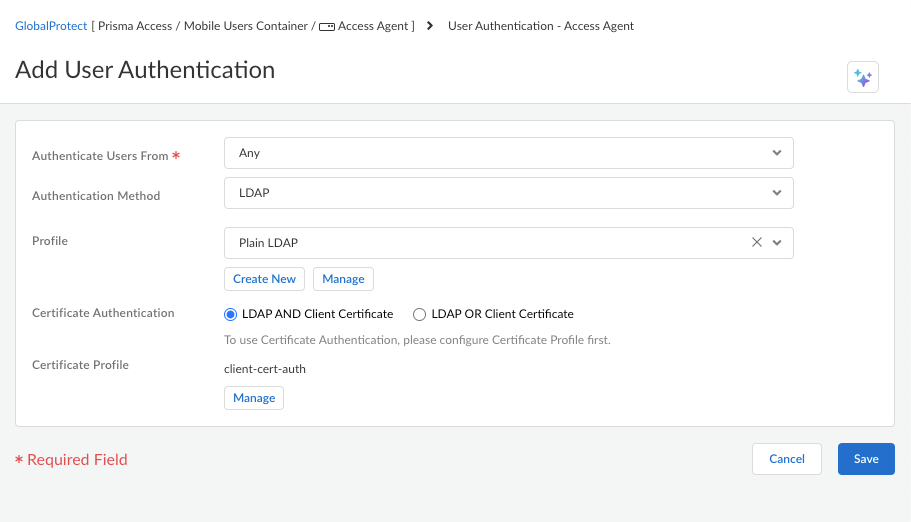
Save your authentication profile and push the configuration.Configure user authentication for the GlobalProtect Portal.- Select ConfigurationNGFW and Prisma AccessConfiguration ScopeAccess AgentSetupGlobalProtect App.Click Add Authentication.Select Authentication MethodLDAP.To enable users to authenticate to the Portal or gateway using their user credentials, select the authentication Profile that you created in the previous step.For Certificate Authentication:
- If you want to require users to authenticate to the Portal using both user credentials AND a client certificate, select LDAP AND Client Certificate.
- If you want to enable users to authenticate to the Portal or gateway using either user credentials OR a client certificate, select LDAP OR Client Certificate.
To use certificate authentication, you need to first create a certificate profile in ConfigurationNGFW and Prisma AccessConfiguration ScopeAccess AgentObjectsCertificate Management.Save your user authentication settings and push the configuration.![]() Configure Prisma Access Agent to use the GlobalProtect Portal for authentication.
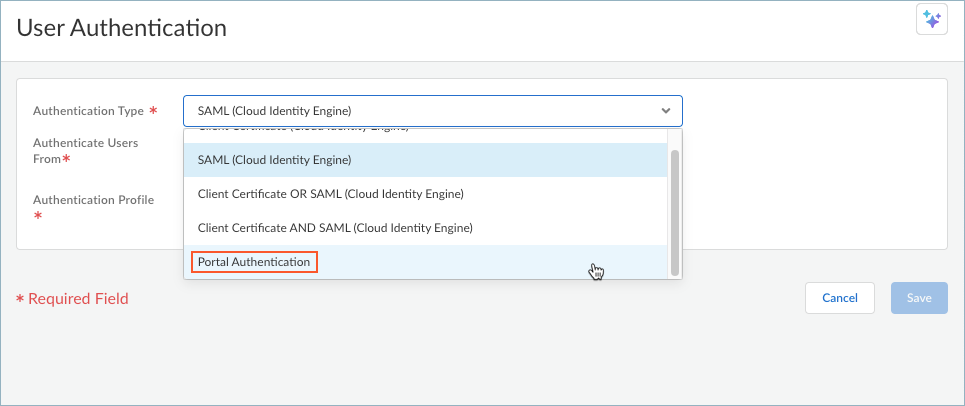
Configure Prisma Access Agent to use the GlobalProtect Portal for authentication.- Select ConfigurationNGFW and Prisma AccessConfiguration ScopeAccess AgentSetupPrisma Access Agent.Click Add User Authentication.Select Authentication TypePortal Authentication.
![]() After you select Portal Authentication, the other authentication fields will no longer appear since authentication will be handled by the GlobalProtect Portal.
After you select Portal Authentication, the other authentication fields will no longer appear since authentication will be handled by the GlobalProtect Portal.![]() Ensure that the certificate used to encrypt and decrypt the authentication override cookie is the same across the Prisma Access Agent global app settings, GlobalProtect Portal, and GlobalProtect gateway.Save your user authentication settings.Enable the Save user credentials option in the Prisma Access Agent settings to provide seamless authentication across device states like sleep-wake cycles, network changes, and system restarts without repeatedly prompting the user for credentials.
Ensure that the certificate used to encrypt and decrypt the authentication override cookie is the same across the Prisma Access Agent global app settings, GlobalProtect Portal, and GlobalProtect gateway.Save your user authentication settings.Enable the Save user credentials option in the Prisma Access Agent settings to provide seamless authentication across device states like sleep-wake cycles, network changes, and system restarts without repeatedly prompting the user for credentials.- Select ConfigurationNGFW and Prisma AccessConfiguration ScopeAccess AgentSetupPrisma Access Agent.Click Add Agent Settings or select an existing agent setting that you want to modify.Configure the agent settings as needed and enable Save user credentials.
![]() Save your user authentication settings.Push the Prisma Access Agent Configuration.Configure the GlobalProtect app settings to generate the cookie for authentication override.
Save your user authentication settings.Push the Prisma Access Agent Configuration.Configure the GlobalProtect app settings to generate the cookie for authentication override.- Select ConfigurationNGFW and Prisma AccessConfiguration ScopeAccess AgentSetupGlobalProtect App.Click Add App Settings or edit an existing app setting.In the Authentication Override section, enable Generate cookie for authentication override.Don’t select any options in the Match Criteria section, such as selecting a Certificate Profile, as Prisma Access Agent does not currently support GlobalProtect Portal requests that involve configuration criteria.Save your settings.Configure the authentication override cookie lifetime in the global agent settings.
- Select ConfigurationNGFW and Prisma AccessConfiguration ScopeAccess AgentSetupPrisma Access Agent.Edit the Global Agent Settings.In Certificate to Encrypt/Decrypt Cookie, ensure that the certificate is the same across the GlobalProtect Portal and GlobalProtect gateway.Configure the Cookie Lifetime to specifies the duration for which the cookie is valid.Save your settings.Push the Prisma Access Agent Configuration.Verify the configuration.
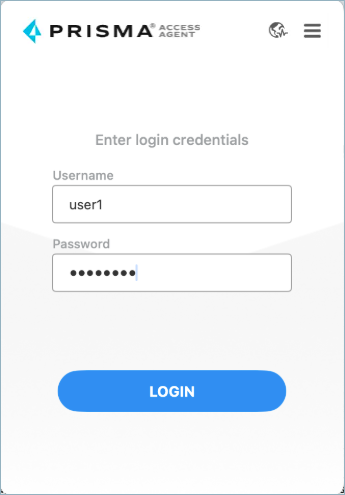
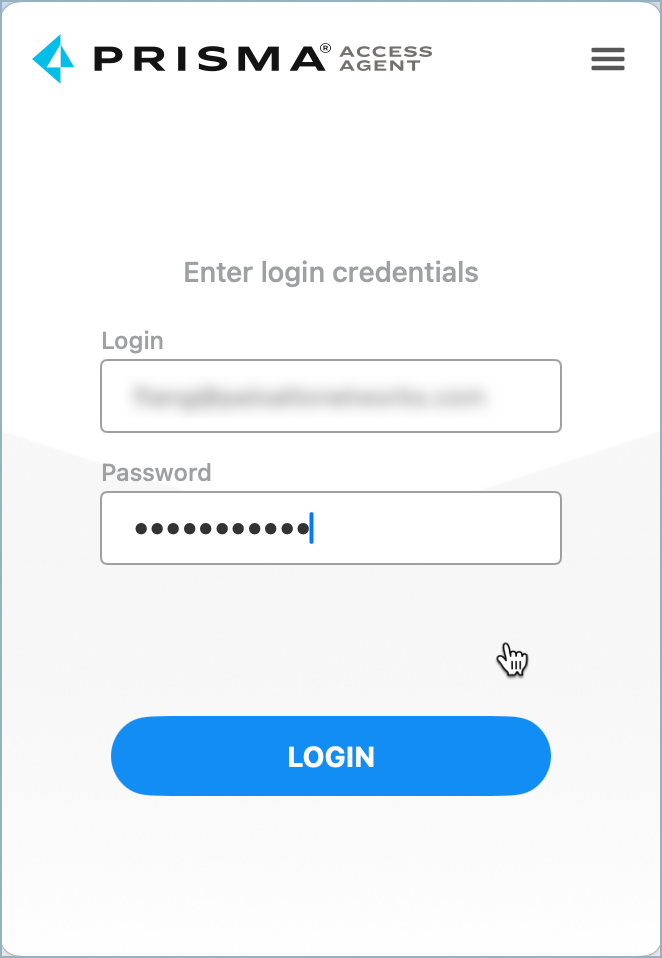
- Test authentication from a client device running Prisma Access Agent.With this configuration, Prisma Access Agent will use the GlobalProtect Portal for LDAP authentication instead of the Cloud Identity Engine (CIE). When a user attempts to connect, the agent will prompt for credentials if needed, authenticate with the LDAP server via the GlobalProtect Portal, and upon successful authentication, receive a session token to secure internet and private application traffic.When the user clicks Connect on the Prisma Access Agent app, the agent will prompt them to enter their credentials:
![]() If the user already entered their LDAP credentials on macOS or the Windows login screen, the agent won’t prompt them to enter their credentials again in the Prisma Access Agent app (provided that the credentials are already saved).Run the pacli epm status command. The Authentication Type should be LDAP.Check the logs in the Log Viewer for successful authentication events.
If the user already entered their LDAP credentials on macOS or the Windows login screen, the agent won’t prompt them to enter their credentials again in the Prisma Access Agent app (provided that the credentials are already saved).Run the pacli epm status command. The Authentication Type should be LDAP.Check the logs in the Log Viewer for successful authentication events.
Set Up LDAP Authentication for Prisma Access Agent (Panorama Managed Deployments)
Configure LDAP/LDAPS authentication for Prisma Access Agent to enable seamless authentication using existing directory services and GlobalProtect Portal infrastructure.- Create an LDAP server profile that defines the connection to your directory server. (Skip this step if you have an existing LDAP server profile.)When you use LDAP to connect to Active Directory (AD), you must create a separate LDAP server profile for every Active Directory (AD) domain.
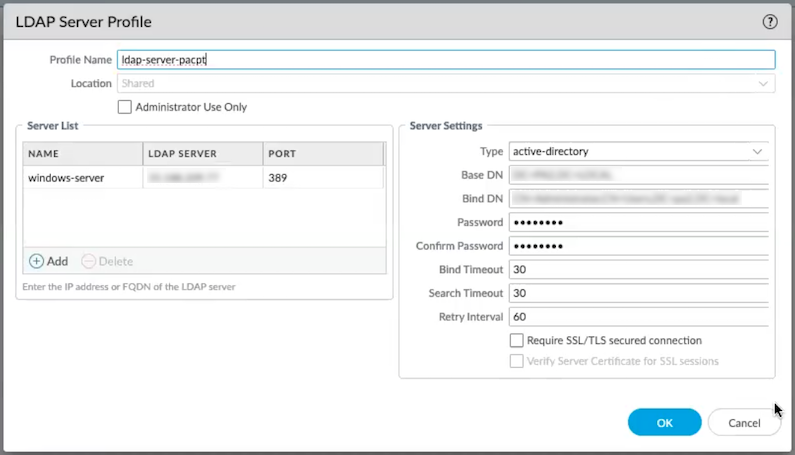
- From Panorama, select DeviceServer ProfilesLDAP, and then Add an LDAP server profile.Enter a Profile Name, such as ldap-server-profile.If this profile is for a firewall with multiple virtual systems capability, select a virtual system or Shared as the Location where the profile is available.Click Add in the Server List area, and then enter the necessary information for connecting to the authentication server, including the server Name, IP address or FQDN of the LDAP Server, and Port.Enter the Base DN for the LDAP directory.To identify the Base DN of your directory, open the Active Directory Domains and Trusts Microsoft Management Console snap-in and use the name of the top-level domain.Enter the Bind DN and Password to enable the authentication service to authenticate the gateway. The Bind DN account must have permission to read the LDAP directory.(Optional) If you want the endpoint to use SSL or TLS for a more secure connection with the directory server, enable the option to Require SSL/TLS secured connection. The protocol that the endpoint uses depends on the server port:
- 389 (default)—TLS (Specifically, the device uses the StartTLS operation, which upgrades the initial plaintext connection to TLS).
- 636—SSL.
- Any other port—The device first attempts to use TLS. If the directory server does not support TLS, the device falls back to SSL.
(Optional) For additional security, enable to the option to Verify Server Certificate for SSL sessions so that the endpoint verifies the certificate that the directory server presents for SSL/TLS connections. To enable verification, you must also enable the option to Require SSL/TLS secured connection. For verification to succeed, the certificate must meet one of the following conditions:- It's in the list of device certificates: DeviceCertificate ManagementCertificatesDevice Certificates. If necessary, import the certificate into the device.
- The certificate signer is in the list of trusted certificate authorities: DeviceCertificate ManagementCertificatesDefault Trusted Certificate Authorities.
Click OK so save your LDAP server profile.![]() Create an authentication profile for LDAP. (Skip this step if you already have an authentication profile for LDAP.)The authentication profile specifies the server profile that the Portal or gateways use when they authenticate users. On a portal or gateway, you can assign one or more authentication profiles to one or more client authentication profiles. For descriptions of how an authentication profile within a client authentication profile supports granular user authentication, see Configure a GlobalProtect Gateway and Set Up Access to the GlobalProtect Portal.
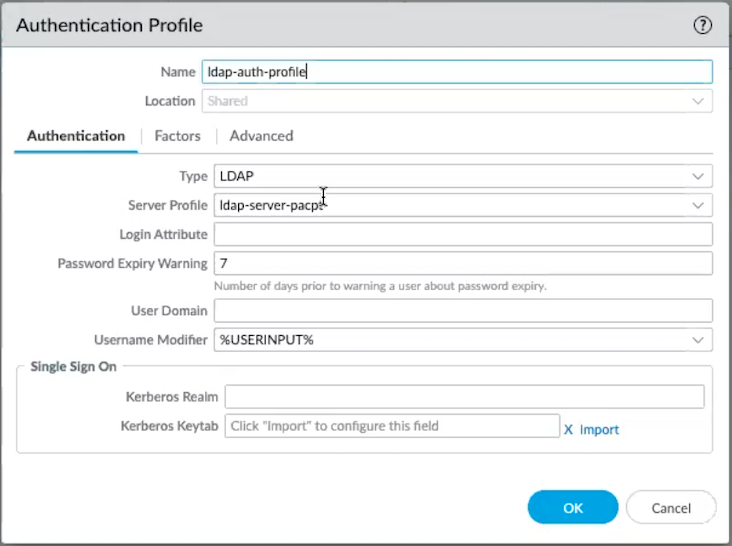
Create an authentication profile for LDAP. (Skip this step if you already have an authentication profile for LDAP.)The authentication profile specifies the server profile that the Portal or gateways use when they authenticate users. On a portal or gateway, you can assign one or more authentication profiles to one or more client authentication profiles. For descriptions of how an authentication profile within a client authentication profile supports granular user authentication, see Configure a GlobalProtect Gateway and Set Up Access to the GlobalProtect Portal.- From Panorama, select DeviceAuthentication Profile, and then Add a new profile.Enter a Name for the authentication profile, such as ldap-auth-profile.In the Authentication tab, select TypeLDAP.Select the LDAP Server Profile that you created in step 1.In the Advanced tab, Add an Allow List to select the users and user groups that are allowed to authenticate with this profile. The all option allows every user to authenticate with this profile. By default, the list has no entries, which means no users can authenticate.Click OK to save your authentication profile.
![]() Attach the LDAP authentication profile to the GlobalProtect Portal.
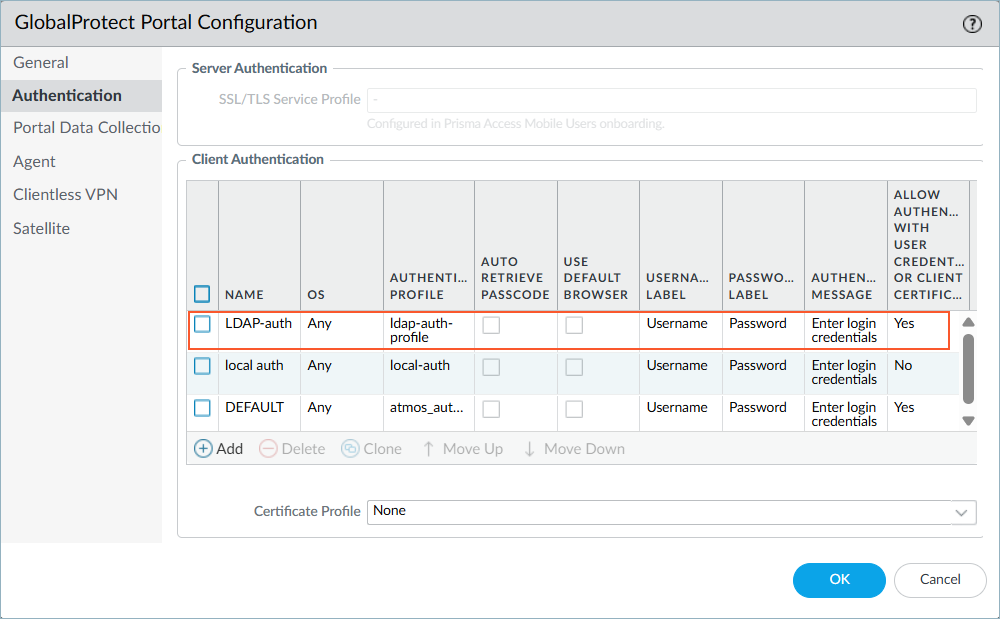
Attach the LDAP authentication profile to the GlobalProtect Portal.- From Panorama, select NetworkGlobalProtectPortals.Select a GlobalProtect Portal or add a portal.Select the Authentication tab.In the Client Authentication section, select the check box corresponding to the Authentication Profile that you created in step 2.Click OK to save the GlobalProtect Portal configuration and Commit the configuration.Make sure to position the LDAP authentication profile at the top of the Client Authentication table, so that the GlobalProtect Portal will prompt the user for their LDAP credentials. To reposition the profile, select the check box corresponding to the profile and select Move Up until the profile is at the top of the list.
![]() Configure Prisma Access Agent to use the GlobalProtect Portal for authentication.
Configure Prisma Access Agent to use the GlobalProtect Portal for authentication.- Navigate to the Prisma Access Agent Setup page.
- For Panorama Managed
Prisma Access deployments:
- From the Cloud Services plugin in Panorama, select PanoramaCloud ServicesPrisma Access AgentLaunch Prisma Access Agent.
- Select ConfigurationPrisma Access AgentSettings.
- For Panorama Managed NGFW deployments:
- Log in to Strata Cloud Manager as the administrator.
- Select ConfigurationPrisma Access AgentSettings.
Select the Prisma Access Agent tab and Add User Authentication.Select Authentication MethodGlobalProtect Portal.![]() After you select Portal Authentication, the other authentication fields will no longer appear since authentication will be handled by the GlobalProtect Portal.Enter the Portal FQDN for the GlobalProtect Portal. For example:
After you select Portal Authentication, the other authentication fields will no longer appear since authentication will be handled by the GlobalProtect Portal.Enter the Portal FQDN for the GlobalProtect Portal. For example:![]() You can find the Portal FQDN in the GlobalProtect Portal configuration in Panorama (NetworkGlobalProtectPortals<portal name>).Save your user authentication settings.(Optional) Enable the Save user credentials option in the Prisma Access Agent settings to provide seamless authentication across device states like sleep-wake cycles, network changes, and system restarts without repeatedly prompting the user for credentials.
You can find the Portal FQDN in the GlobalProtect Portal configuration in Panorama (NetworkGlobalProtectPortals<portal name>).Save your user authentication settings.(Optional) Enable the Save user credentials option in the Prisma Access Agent settings to provide seamless authentication across device states like sleep-wake cycles, network changes, and system restarts without repeatedly prompting the user for credentials.- Select ConfigurationPrisma Access AgentSettingsPrisma Access Agent .Click Add Agent Settings or select an existing agent setting that you want to modify.Configure the agent settings as needed and select Save user credentials.
![]() Create or Update your user authentication settings.Push the Prisma Access Agent Configuration.Configure the GlobalProtect Portal to generate cookies for authentication override and use the cookie for gateway authentication.
Create or Update your user authentication settings.Push the Prisma Access Agent Configuration.Configure the GlobalProtect Portal to generate cookies for authentication override and use the cookie for gateway authentication.- Enable cookie generation on the GlobalProtect Portal.
- Navigate to NetworkGlobalProtectPortals
- Open the Portal Profile.
- Click the Agent and click Agent Config.
- Enable Generate cookie for authentication override.This option configures the Portal to generate encrypted, endpoint-specific cookies after the user first authenticates with the Portal.
- Set the Cookie Lifetime per your requirement (default is 24 hours).
- Select Certificate to Encrypt/Decrypt Cookie.
Enable cookie acceptance in the GlobalProtect gateway.- Navigate to NetworkGlobalProtectGateways.
- Open the Gateway Profile.
- Click the Agent tab.
- Click Client Settings and open Client Config.
- Click the Authentication Override tab and enable Accept cookie for authentication override.
- Set the Cookie Lifetime per your requirement (default is 24 hours).This value can be the same as or different from the Portal's cookie lifetime.
- Select Certificate to Encrypt/Decrypt Cookie.This certificate needs to be the same one that was selected in the GlobalProtect Portal.
Commit these changes.This will enable the GlobalProtect Portal to generate encrypted, endpoint-specific cookies, which the GlobalProtect gateway can then use for authentication override, reducing the frequency with which users are prompted for credentials.Configure the authentication override cookie lifetime in the global agent settings.- Select ConfigurationPrisma Access AgentSettingsPrisma Access Agent.Edit the Global Agent Settings.In Certificate to Encrypt/Decrypt Cookie, select the same certificate that is used across the GlobalProtect Portal and GlobalProtect gateway.Configure the Cookie Lifetime to specifies the duration for which the cookie is valid.Save your settings.Push the Prisma Access Agent Configuration.Verify the configuration.
- Test authentication from a client device running Prisma Access Agent.With this configuration, Prisma Access Agent will use the GlobalProtect Portal for LDAP authentication instead of the Cloud Identity Engine (CIE). When a user attempts to connect, the agent will prompt for credentials if needed, authenticate with the LDAP server via the GlobalProtect Portal, and upon successful authentication, receive a session token to secure internet and private application traffic.When the user clicks Connect on the Prisma Access Agent app, the agent will prompt them to enter their credentials:
![]() If the user already entered their LDAP credentials on macOS or the Windows login screen, the agent won’t prompt them to enter their credentials again in the Prisma Access Agent app (provided that the credentials are already saved).Run the pacli epm status command. The Authentication Type should be GP Portal Auth.Check the logs in the Log Viewer for successful authentication events.
If the user already entered their LDAP credentials on macOS or the Windows login screen, the agent won’t prompt them to enter their credentials again in the Prisma Access Agent app (provided that the credentials are already saved).Run the pacli epm status command. The Authentication Type should be GP Portal Auth.Check the logs in the Log Viewer for successful authentication events.
- For Panorama Managed
Prisma Access deployments:


