Prisma Access
Integrate Prisma Access with Aruba SD-WAN (Strata Cloud Manager)
Table of Contents
Expand All
|
Collapse All
Prisma Access Docs
-
- 6.1 Preferred and Innovation
- 6.0 Preferred and Innovation
- 5.2 Preferred and Innovation
- 5.1 Preferred and Innovation
- 5.0 Preferred and Innovation
- 4.2 Preferred
- 4.1 Preferred
- 4.0 Preferred
- 3.2 Preferred and Innovation
- 3.1 Preferred and Innovation
- 3.0 Preferred and Innovation
- 2.2 Preferred
-
-
- 4.0 & Later
- Prisma Access China
-
-
Integrate Prisma Access with Aruba SD-WAN (Strata Cloud Manager)
Configure the Aruba SD-WAN with Prisma Access by completing the following
workflow.
To configure the remote network connection, complete the following task.
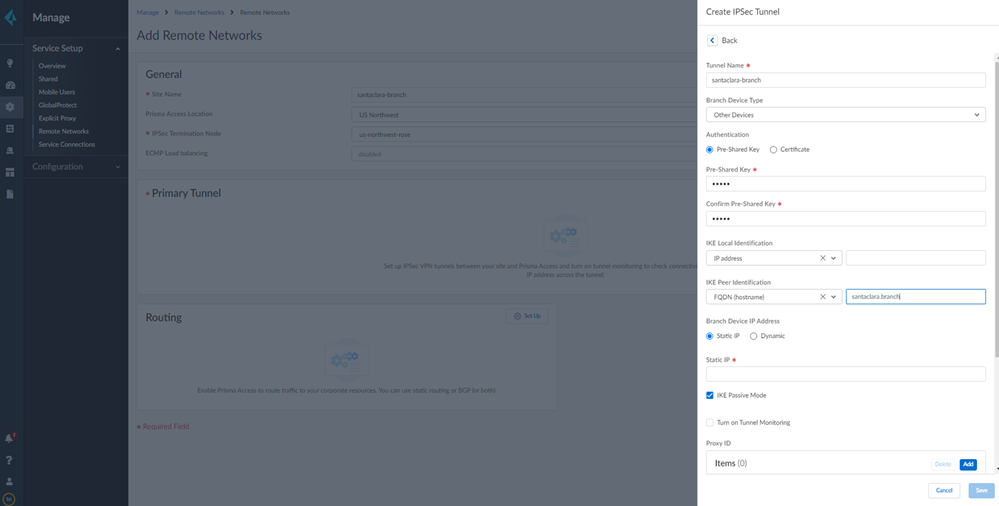
- Connect a remote network to Prisma Access.When configuring the remote network, use the validated settings.Choose a Prisma Access Location that is close to the remote network location that you want to onboard.
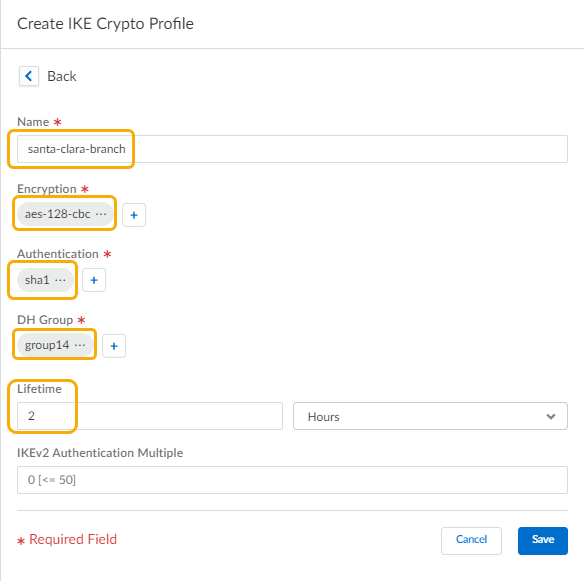
![]() Select IPSec Advanced Options and Create New to create a new IPSec Crypto profile for the remote network tunnel using the recommended settings.Select IKE Advanced Options and Create New to create a new IKE cryptographic profile for the remote network tunnel.Be sure to use the crypto values that are supported with Aruba and make a note of the values you use.
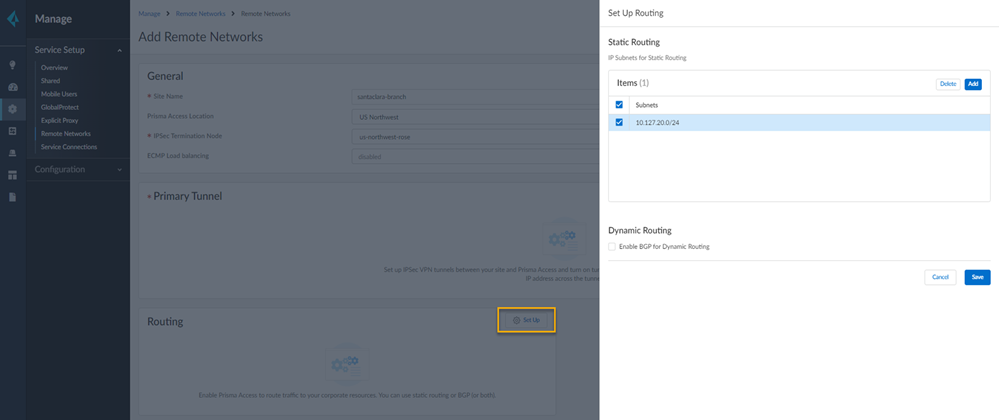
Select IPSec Advanced Options and Create New to create a new IPSec Crypto profile for the remote network tunnel using the recommended settings.Select IKE Advanced Options and Create New to create a new IKE cryptographic profile for the remote network tunnel.Be sure to use the crypto values that are supported with Aruba and make a note of the values you use.![]() Set up routing for the remote network.Set Up Routing and Add the IP subnets for Static Routing.
Set up routing for the remote network.Set Up Routing and Add the IP subnets for Static Routing.![]() Push your configuration changes.
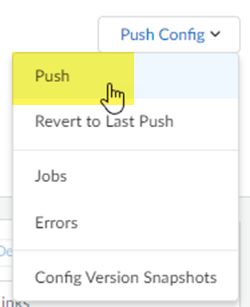
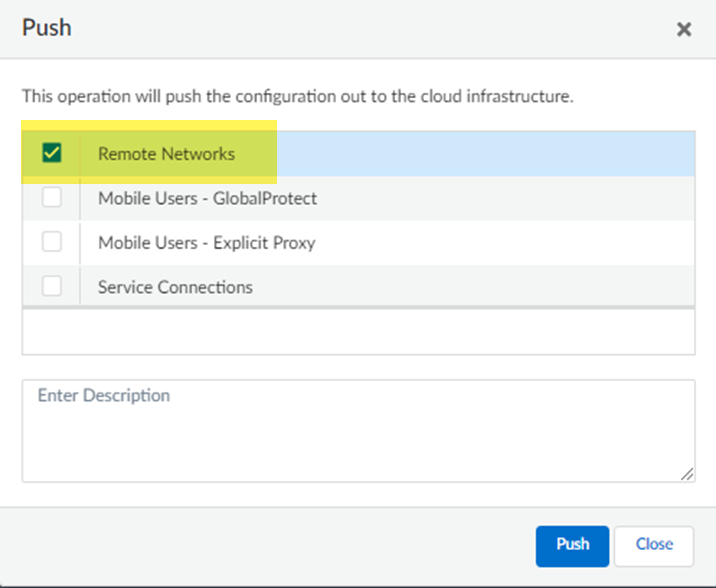
Push your configuration changes.- Return to ConfigurationNGFW and Prisma AccessConfiguration ScopePrisma AccessRemote Networks and select Push ConfigPush.
![]() Select Remote Networks.
Select Remote Networks.![]() Push your changes.Make a note of the Service IP of the Prisma Access side of the tunnel. To find this address in Prisma Access (Managed by Strata Cloud Manager), select ConfigurationNGFW and Prisma AccessConfiguration ScopePrisma AccessRemote Networks, click the Remote Networks. Look for the Service IP field corresponding to the remote network configuration you created.In the Aruba Branch Gateway, set up the tunnel to Prisma Access.
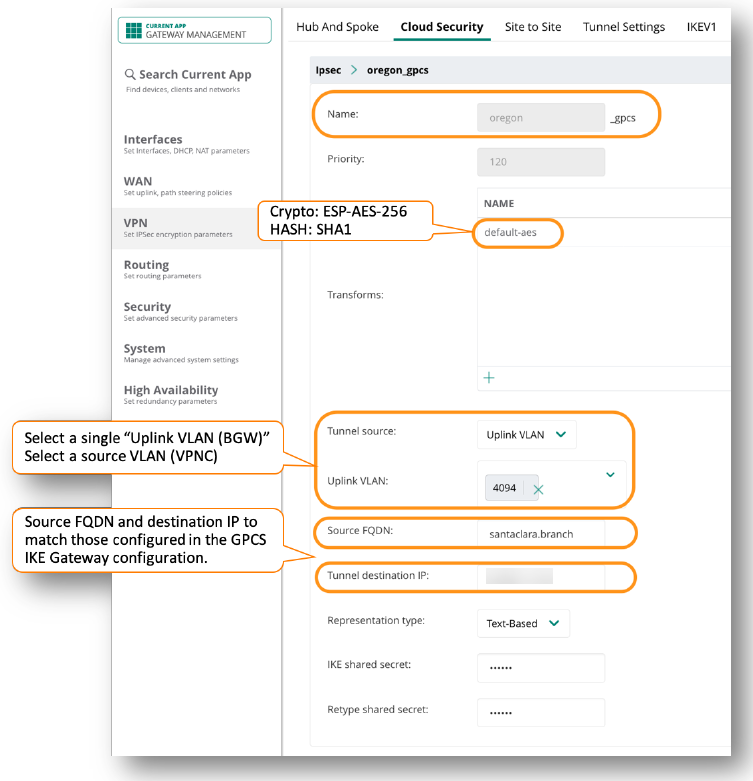
Push your changes.Make a note of the Service IP of the Prisma Access side of the tunnel. To find this address in Prisma Access (Managed by Strata Cloud Manager), select ConfigurationNGFW and Prisma AccessConfiguration ScopePrisma AccessRemote Networks, click the Remote Networks. Look for the Service IP field corresponding to the remote network configuration you created.In the Aruba Branch Gateway, set up the tunnel to Prisma Access.- Select VPNCloud SecurityPalo Alto Networks - GPCS.Enter values in the fields.
- Name—Enter an administrative name for the tunnel. The system will append _gpcs at the end.
- Priority—Enter a numeric identifier for the tunnel.
- Transform—Select default-aes, which uses AES256 encryption with SHA1 Hash.
- Source FQDN—Enter the user ID created in Prisma Access (santaclara.branch in the following screenshot).
- Tunnel destination IP—Enter the Service IP Address from the remote network connection that you got when you configured the remote network connection in Prisma Access
- Uplink VLAN—Select the Uplink VLAN to be used to bring up tunnels to Prisma Access (in the case of BGWs) or the source VLAN in the case of VPNCs.
- IKE Shared Secret—Set the same value created in the Prisma Access configuration.
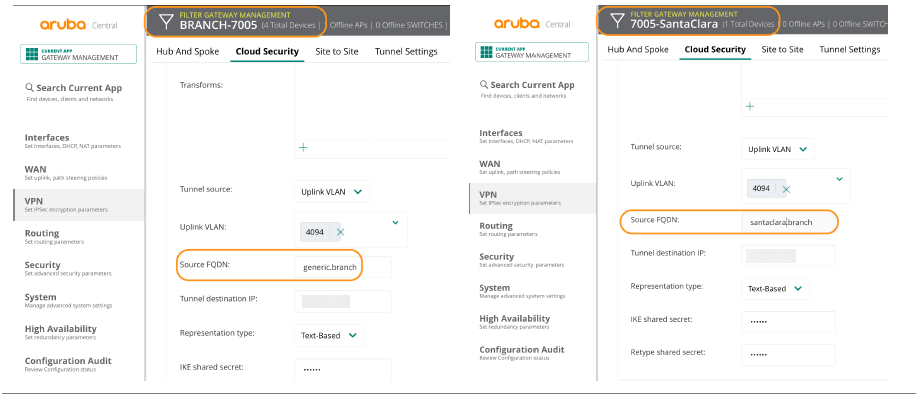
The solution can set up multiple tunnels and determine which traffic is sent through each one using PBR policy rules; therefore, you can configure active-active and active-backup redundancy.![]() Even though the source FQDN has to be unique on a per-branch basis, you should configure the remaining parts of the tunnel configuration at the group level whenever possible. This hierarchical configuration model greatly streamlines configuration efforts. The following screenshot shows a specific Source FQDN configured for the local configuration and a generic Source FQDN specified for the group-level configuration.
Even though the source FQDN has to be unique on a per-branch basis, you should configure the remaining parts of the tunnel configuration at the group level whenever possible. This hierarchical configuration model greatly streamlines configuration efforts. The following screenshot shows a specific Source FQDN configured for the local configuration and a generic Source FQDN specified for the group-level configuration.![]() Create one or more next-hop lists with the tunnels.After you create the tunnels, next-hop lists group them together to be used inside PBR policy rules.
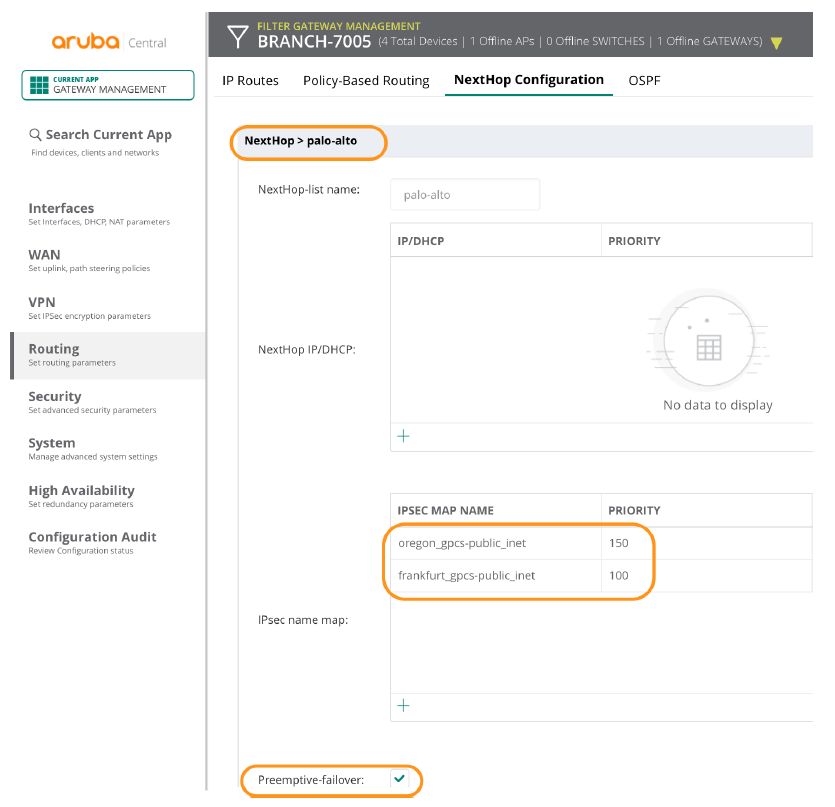
Create one or more next-hop lists with the tunnels.After you create the tunnels, next-hop lists group them together to be used inside PBR policy rules.- Select NextHop ConfigurationRouting.Create a NextHop.Add Site-to-Site IPSec maps.Enter different priorities for the different tunnels.Prisma Access does not support load-balancing.Select Preemptive-failover.
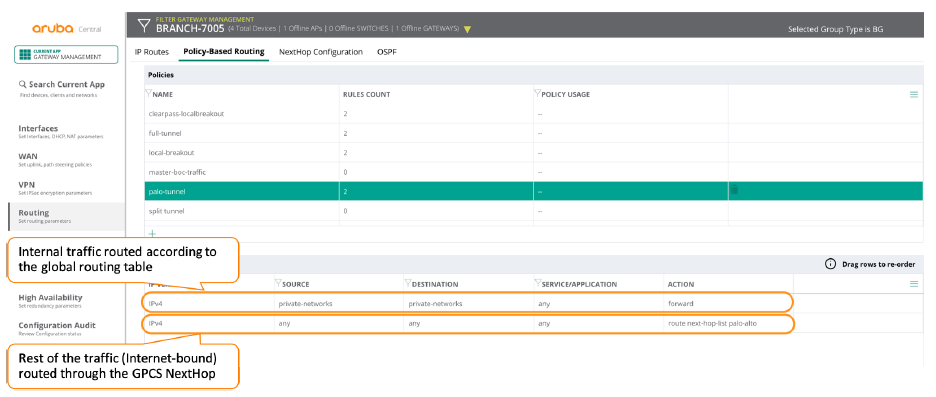
![]() Add the next hop to a routing policy by selecting RoutingPolicy-Based Routing.In the following example, the policy is sending all the traffic to private subnets (an alias representing 10.0.0.0/8 and 172.16.0.0/12) through the regular path, and it’s sending the rest of the traffic through the Prisma Access nodes.
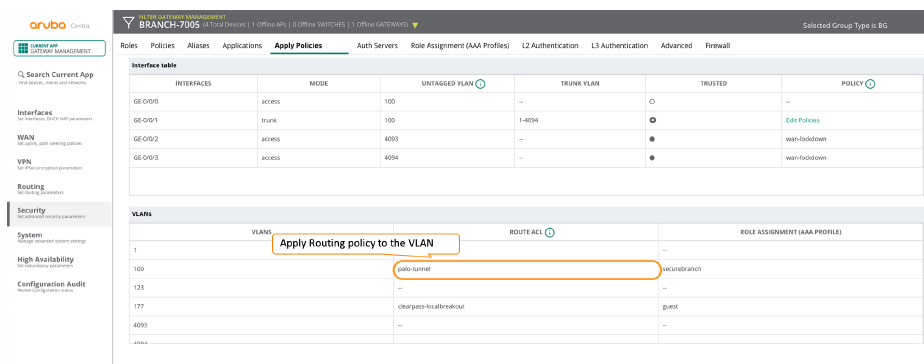
Add the next hop to a routing policy by selecting RoutingPolicy-Based Routing.In the following example, the policy is sending all the traffic to private subnets (an alias representing 10.0.0.0/8 and 172.16.0.0/12) through the regular path, and it’s sending the rest of the traffic through the Prisma Access nodes.![]() Apply policy rules to the roles or VLANs.After you create the routing policy, the last step you perform is to apply it to the role or VLAN that you want to send through Prisma Access.If there is a conflict between PBR policy rules applied to a role and VLAN, policy rules applied to the role take precedence.The following screen shows a PBR policy being applied to a VLAN.
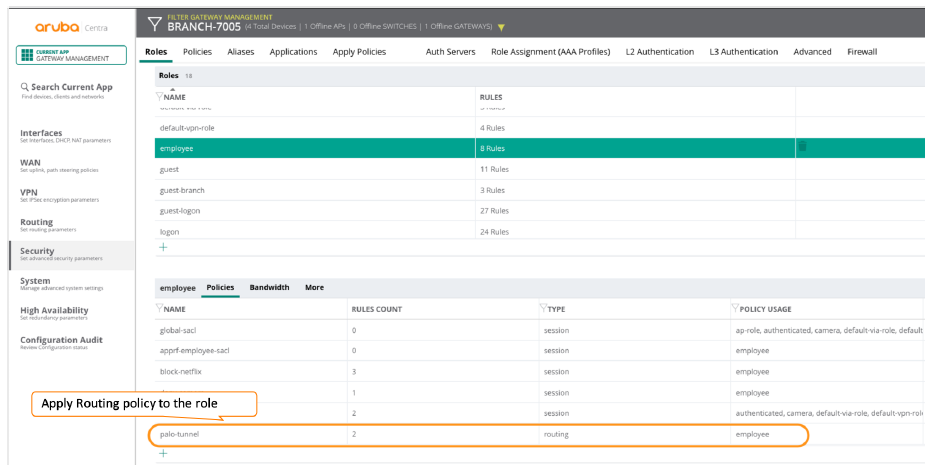
Apply policy rules to the roles or VLANs.After you create the routing policy, the last step you perform is to apply it to the role or VLAN that you want to send through Prisma Access.If there is a conflict between PBR policy rules applied to a role and VLAN, policy rules applied to the role take precedence.The following screen shows a PBR policy being applied to a VLAN.![]() The following screen shows a PBR policy being applied to a role.
The following screen shows a PBR policy being applied to a role.![]() (Optional) Verify the status of the remote network tunnel and troubleshoot when needed.
(Optional) Verify the status of the remote network tunnel and troubleshoot when needed.Verify the Aruba Remote Network
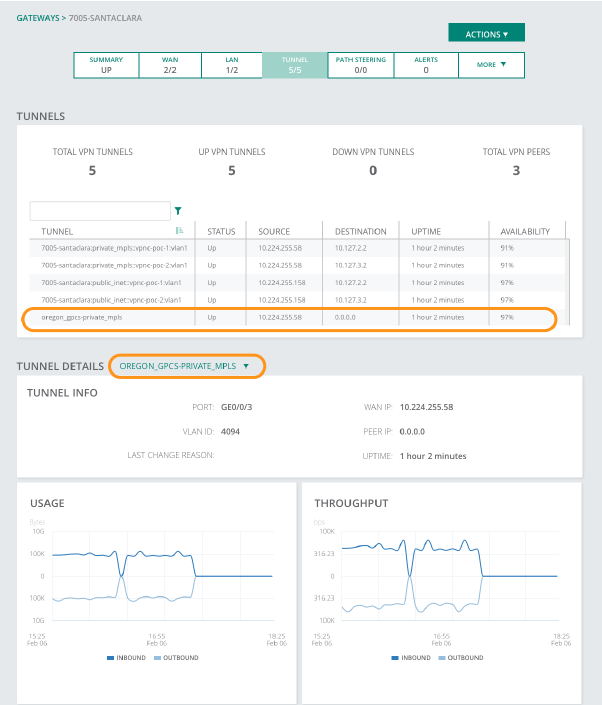
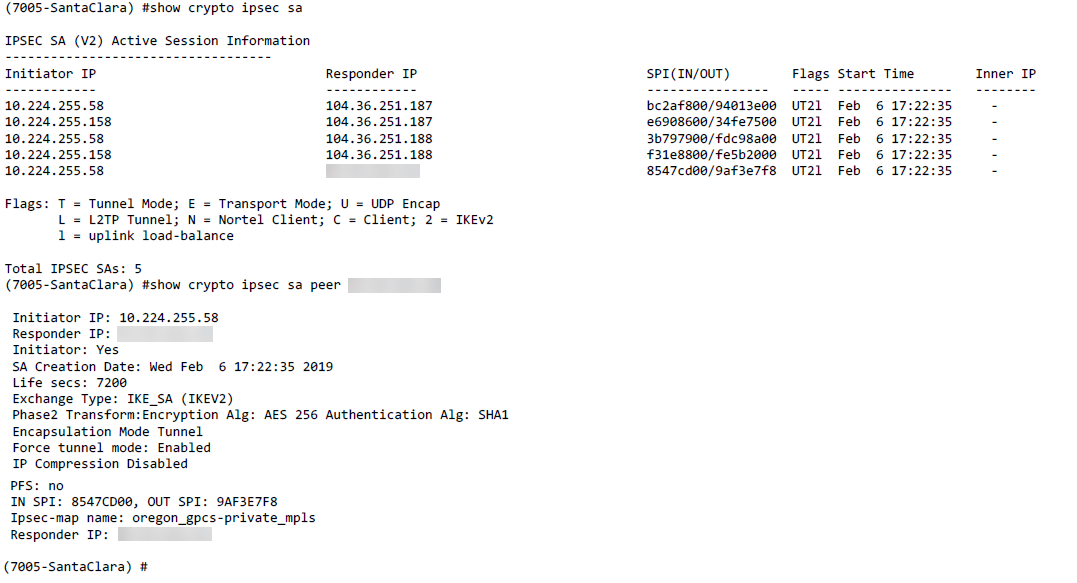
To verify the status of the remote network tunnel, perform one or more of the following steps.- Check the state of the tunnel from the interface of Aruba Central from the gateway monitoring page, in the tunnels section:
![]()
- Use CLI from the BGWs, either through SSH or through the remote console provided in Aruba central.
![]()
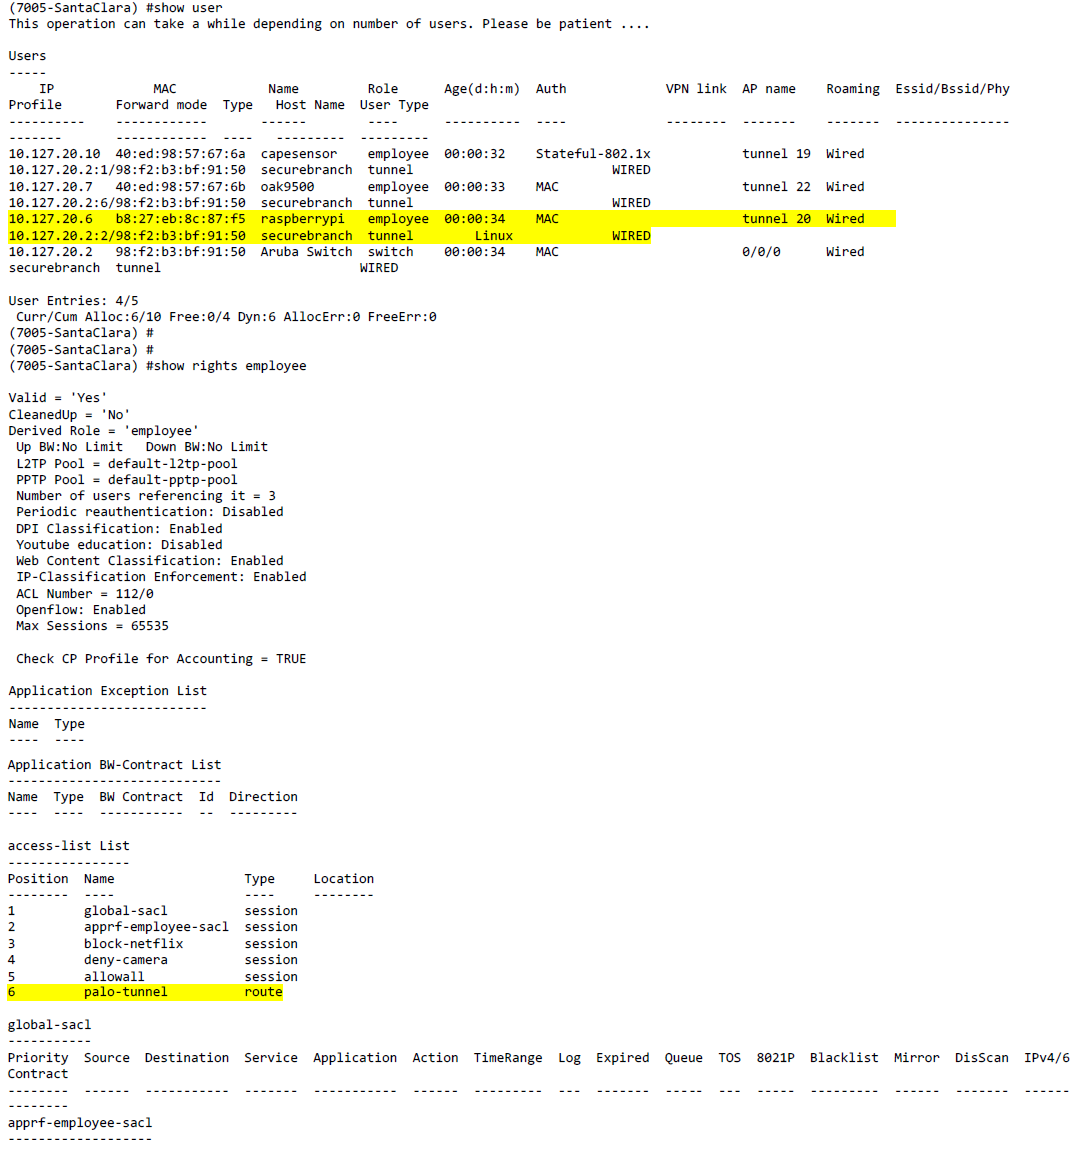
- You can also use CLI to verify if the user is in the correct role.
![]()
Troubleshoot the Aruba Remote Network
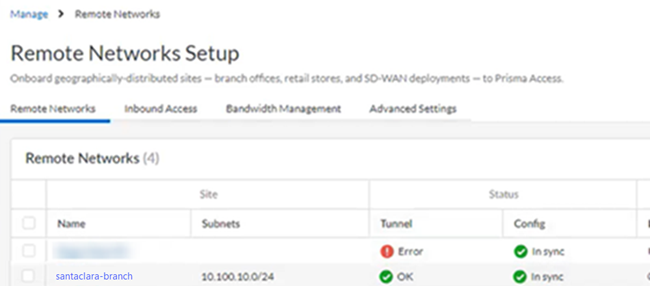
Prisma Access provides logs and widgets that provide you with the status of remote tunnels and the status of each tunnel.- Go to ConfigurationNGFW and Prisma AccessConfiguration ScopePrisma AccessRemote Networks and check the Status of the tunnel.
![]()
- Go to ActivityLog Viewer and check the Common/System logs for IPSec- and IKE-related messages.To view VPN-relates messages, set the filter to sub_type.value = vpn.The message ignoring unauthenticated notify payload indicates that the route has not been added in the crypto map on the other side of the IPSec tunnel after the IPSec negotiation has already occurred.
![]()
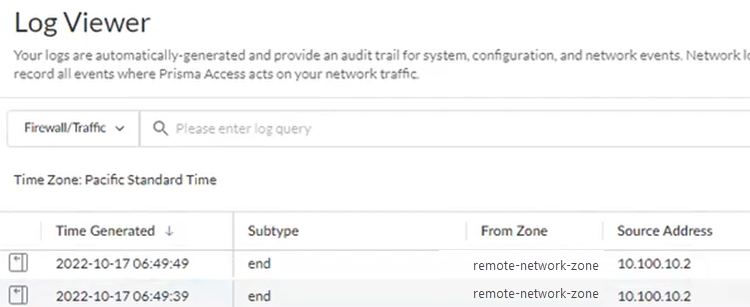
- Check the Firewall/Traffic logs and view the messages that are coming from the zone that has the same name as the remote network.In the logs, the remote network name is used as the source zone.
![]()

