Prisma SD-WAN
Configure Multi-VRFs
Table of Contents
Expand All
|
Collapse All
Prisma SD-WAN Docs
-
-
- Prisma SD-WAN Controller
-
- CloudBlade Integrations
- CloudBlades Integration with Prisma Access
-
-
-
-
- 6.5
- 6.4
- 6.3
- 6.1
- 5.6
- Prisma SD-WAN Controller
- Prisma SD-WAN On-Premises Controller
- Prisma SD-WAN CloudBlades
- Prisma Access CloudBlade Cloud Managed
- Prisma Access CloudBlade Panorama Managed
Configure Multi-VRFs
Learn to configure multi VRFs.
| Where Can I Use This? | What Do I Need? |
|---|---|
|
|
Virtual Routing and Forwarding (VRF) enables segmentation of network traffic. The
configuration and management of multi-VRF involves configurations on both the Prisma
SD-WAN controller and Strata Cloud Manager (SCM).
- Onboard the NGFW and move it from the available list to cloud-managed devices under ConfigurationNGFW and Prisma AccessDevice Management.
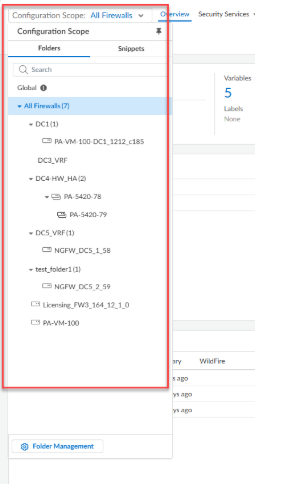
- Create a new folder under All Firewalls and move
the NGFW into this folder.
![]()
- Initially, keep the device scope configuration in a disabled state.
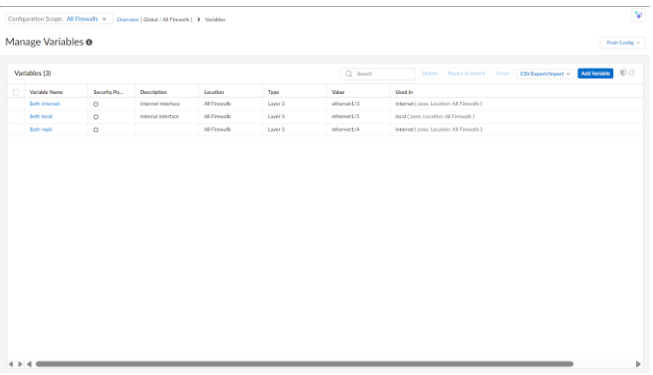
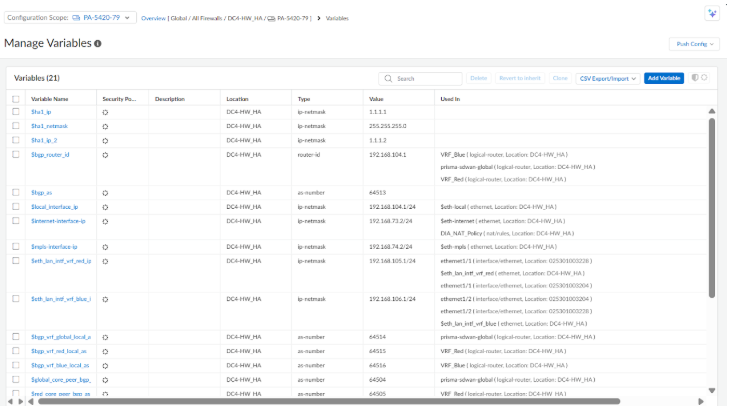
Enable Prisma SD-WAN on the NGFW and push the initial configuration.Create necessary variables at the NGFW folder level for public, private, and LAN interfaces, their IP addresses and gateways, BGP router ID, and local and peer BGP as numbers for Global, Red, and Blue VRFs.- Add variables by accessing Overview Variables.
![]()
- To create Interface variables, go to FolderDevice SettingsInterfaces.Examples of variables include $eth_int_public_ip, $eth_int_private_gw, $eth_lan_intf_vrf_red, $bgp_router_id, $bgp_vrf_global_local_as, $red_core_peer_bgp_as.
![]()
Create a Data Center Site and assign the NGFW device to it.- After the assignment, switch the site to Control mode.
- Verify that a logical router is created at the folder level.
- Push the configuration.
Configure the required LAN and WAN interfaces on the NGFW using the variables created earlier.- Add Ethernet interfaces and assign IP addresses.
![]()
- Push the configuration to the NGFW device after configuring the interfaces and IP addresses.
Create VRF Definitions and Profile.- Navigate to ConfigurationPrisma SDWANResourcesVRF.
- Add new VRF definitions, such as VRF_Blue and VRF_Red. Global VRF is present by default.
- Create a new VRF profile, for example,
csdwan_vrf_profile, including Global,
VRF_Blue, and VRF_Red
definitions.If the VRF profile is Global, a logical router prisma-sdwan-global is created,if there is a custom VRF profile, then logical routers with the same name as VRFs are created.
![]()
- Associate the DC site with this newly created VRF profile. This will
create the new Logical Routers, VRF_Red and
VRF_Blue on SCM.
![]()
Attach the Internet (public) and Private (MPLS) circuits to the DC site using the configured interfaces and variables.Ensure the circuit names are provided in the DC site configuration so they appear when attaching the circuits to the NGFW on SCM.![]() Configure the logical routers (VRF_Red and VRF_Blue) on the NGFW.
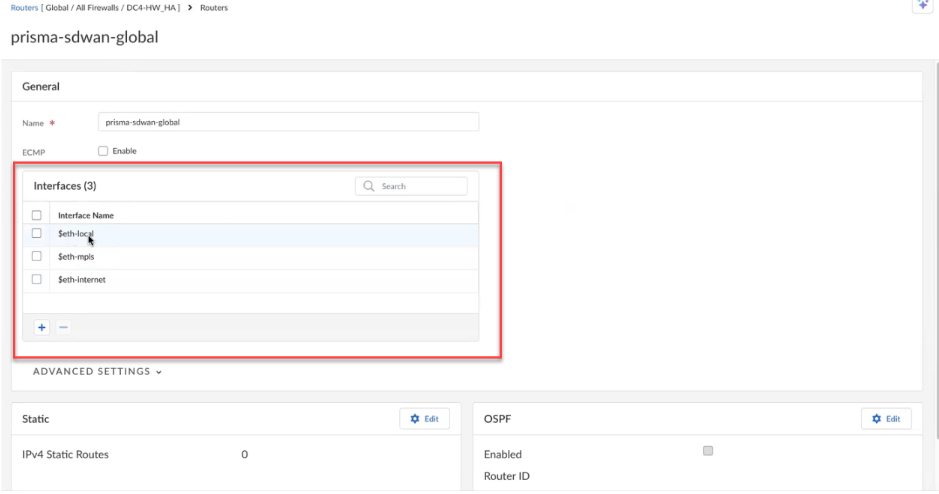
Configure the logical routers (VRF_Red and VRF_Blue) on the NGFW.- Configure these logical routers with core peer details by navigating to NGFW and Prisma AccessOverviewDevice SettingsRouters.
- In the Global VRF prisma-sdwan-global, assign the LAN
and internet interfaces. (for example, eth-local,
eth-internet).
![]()
- Enable BGP. Add the Router ID and Local AS using the defined variables.
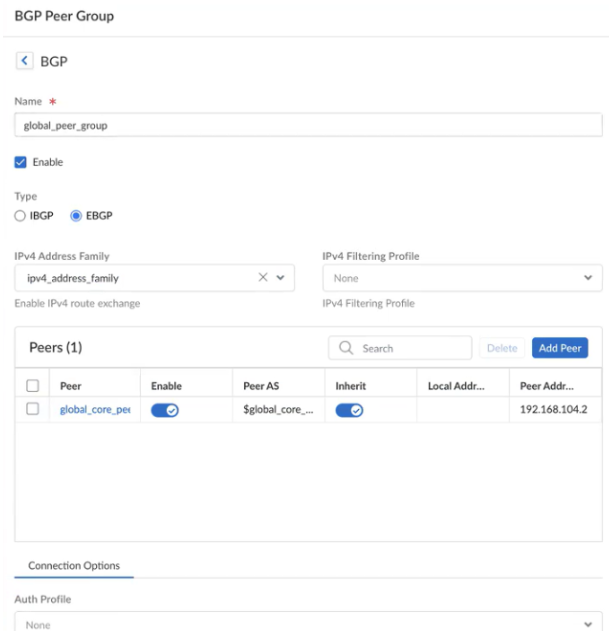
- Make sure the peer group name matches, enable
EBGP, and select IPv4
Family.
![]()
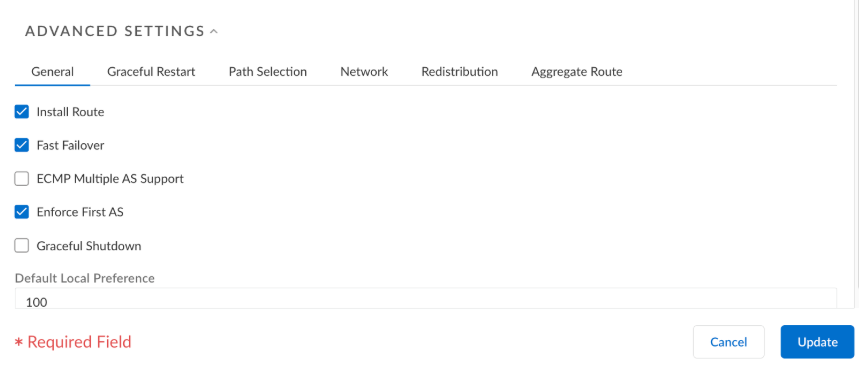
- Under the Advanced settings for BGP, ensure the
Install Route option is checked.
![]()
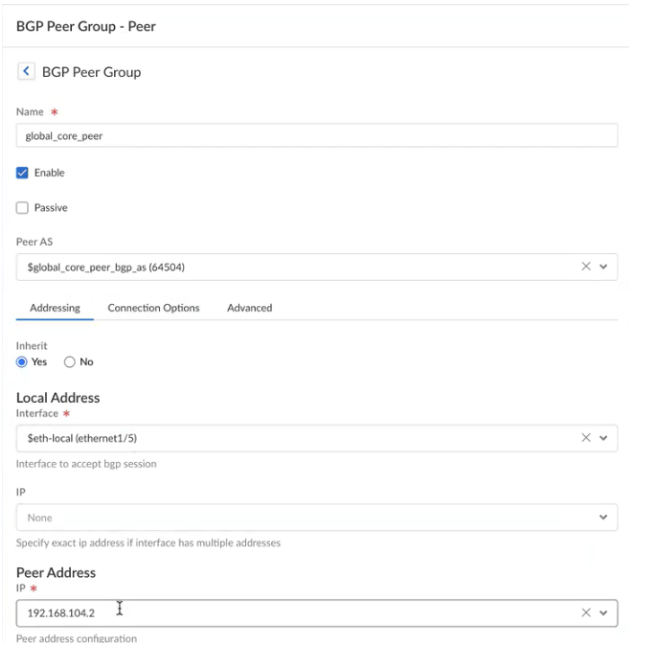
- Configure the global-core-peer with Peer
AS number, Local address, and
Peer address.
![]()
- Similarly, configure the red-peer and blue-peerto interact.
- Click Update and Push the configuration to the NGFW.
Create Security Zones and Traffic Objects.- Create new security zones, red and blue, in the folder level with the interfaces in Device SettingsZones.
- Create Traffic Objects that map the created logical routers (VRF_Red, VRF_Blue) with the corresponding security zones (red, blue).
- Select the Traffic Object ID,
Zone, and Router.
![]()
- Save your changes and push the configuration to the NGFW.
Override variables at the folder level for interfaces so they can be accessed when attaching circuits by navigating to Configuration NGFW and Prisma AccessOverviewPrisma SD-WANCircuits.![]() Create Branch sites and assign the respective ION devices.
Create Branch sites and assign the respective ION devices.- Associate the public and private circuits and change the Global VRF profile to the custom VRF profile csdwan_vrf_profile.
- Switch the Branch sites to Control mode. Configure the LAN and WAN interfaces on the ION devices, specifying the respective VRFs (Global, VRF_Red, VRF_Blue).
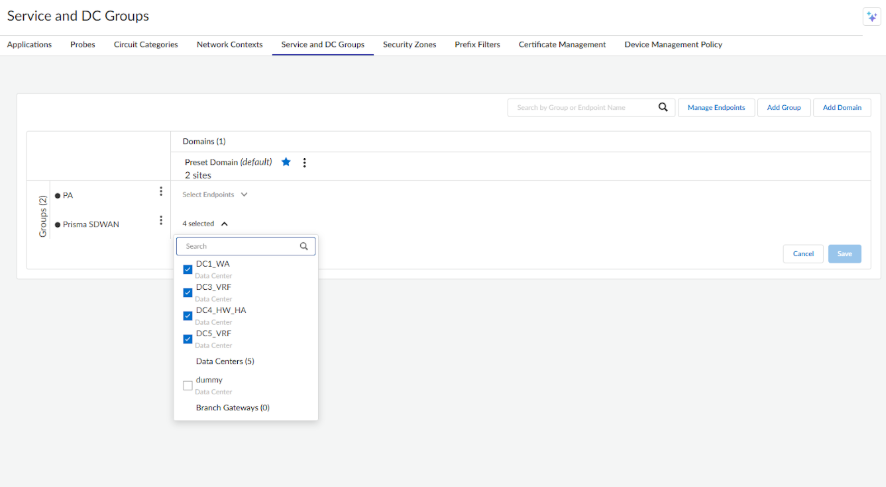
Add the DC Sites in ConfigurationResourcesService and DC Groups.![]() At the NGFW folder level, configure the NAT policy for Direct Internet Access (DIA) traffic originating from specific zones.
At the NGFW folder level, configure the NAT policy for Direct Internet Access (DIA) traffic originating from specific zones.Direct Internet Access Configuration
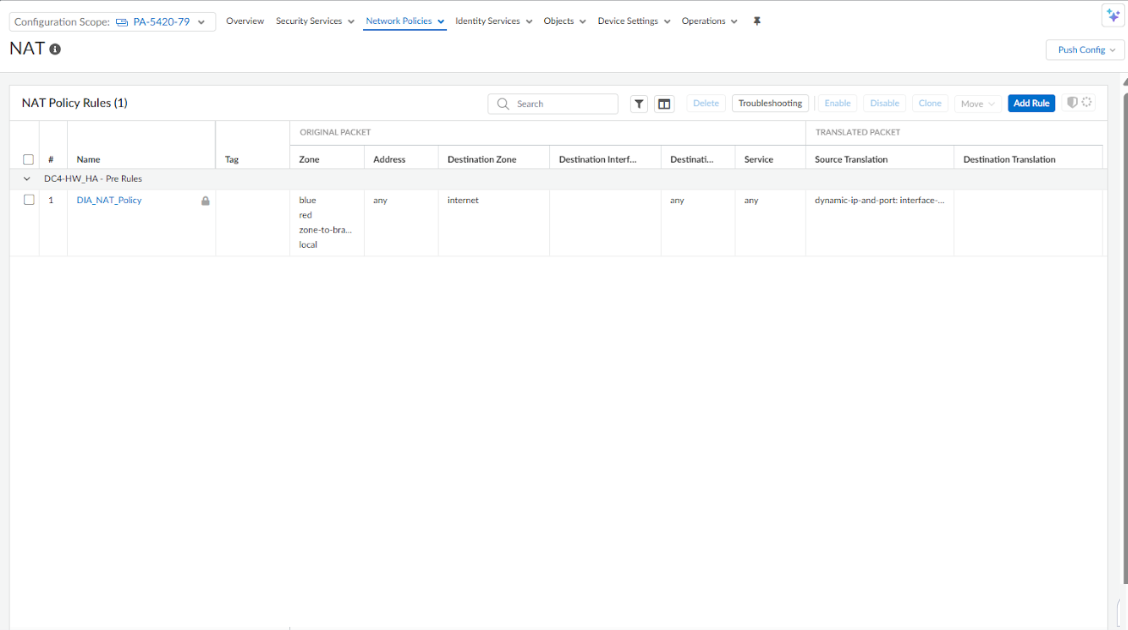
Direct internet access (DIA) enables traffic from clients to reach the internet directly via the NG firewall. Follow these steps to configure Direct Internet Access for clients through the NGFW in the converged SD-WAN deployment. Traffic from clients intended for the internet server uses the tunnel to reach the NGFW. After reaching the NGFW, the traffic uses the underlay path (public internet circuit) to reach the internet server.- To enable this flow, configure a NAT policy so that traffic destined for the Internet takes the public circuit.Navigate to ConfigurationNGFW and Prisma AccessNetwork PoliciesNAT Policy in SCM.
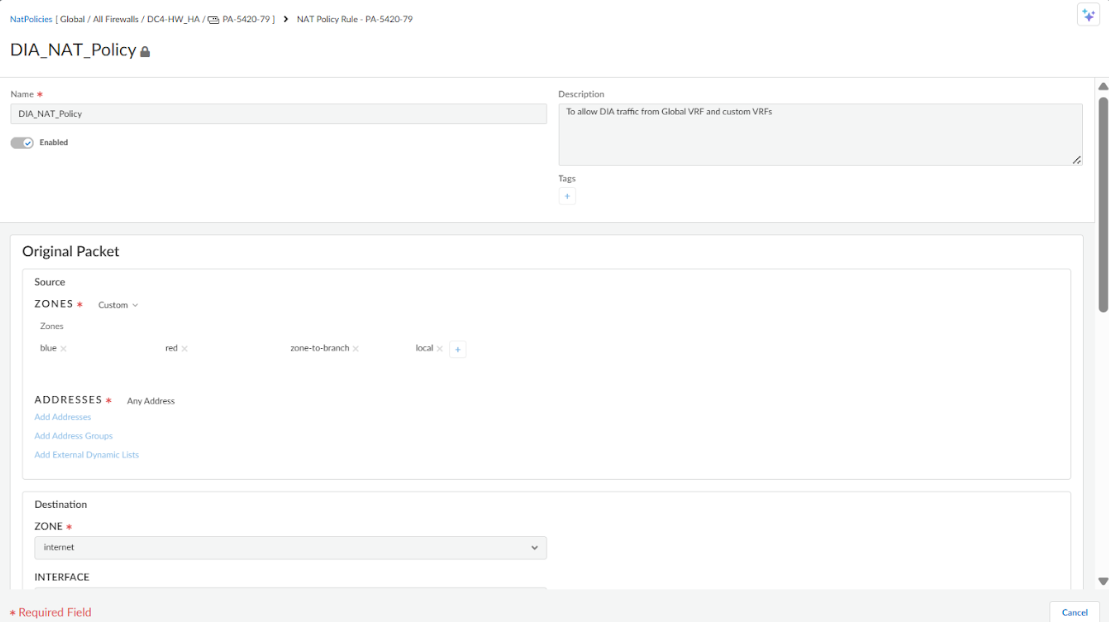
![]() Define a NAT policy that matches traffic coming from the zones associated with clients, for example, blue red zones to the branch zone) destined for any address in the internet zone.
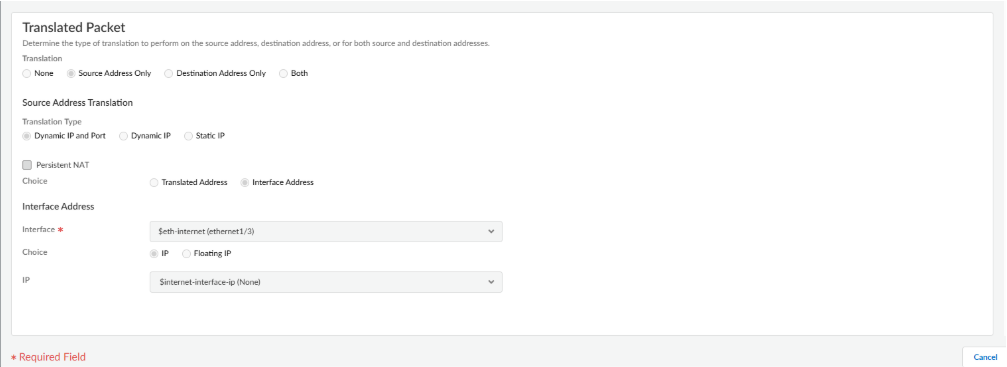
Define a NAT policy that matches traffic coming from the zones associated with clients, for example, blue red zones to the branch zone) destined for any address in the internet zone.![]() Configure Origin Packet Source address translation within the NAT policy.Select the translation type to be Dynamic IP and Port.Specify the Interface and IP address to be used for translation, typically the public-facing interface.
Configure Origin Packet Source address translation within the NAT policy.Select the translation type to be Dynamic IP and Port.Specify the Interface and IP address to be used for translation, typically the public-facing interface.![]() Add this NAT policy in Service and DC Groups.Push the NAT policy configuration to the NGFW.
Add this NAT policy in Service and DC Groups.Push the NAT policy configuration to the NGFW.
- Create a new folder under All Firewalls and move
the NGFW into this folder.

