Prisma Access
Configure the Prisma Access Service Infrastructure
Table of Contents
Expand All
|
Collapse All
Prisma Access Docs
-
- 6.1 Preferred and Innovation
- 6.0 Preferred and Innovation
- 5.2 Preferred and Innovation
- 5.1 Preferred and Innovation
- 5.0 Preferred and Innovation
- 4.2 Preferred
- 4.1 Preferred
- 4.0 Preferred
- 3.2 Preferred and Innovation
- 3.1 Preferred and Innovation
- 3.0 Preferred and Innovation
- 2.2 Preferred
-
-
- 4.0 & Later
- Prisma Access China
-
-
Configure the Prisma Access Service Infrastructure
Set up the Prisma Access service infrastructure.
| Where Can I Use This? | What Do I Need? |
|---|---|
|
|
Prisma Access uses this subnet to create the network
backbone for communication between your branch networks, mobile
users and the Prisma Access security infrastructure, as well as
with the HQ and data center networks you plan to connect to Prisma
Access over service connections.
Carefully select the infrastructure subnet you use. Changing it
requires that you reach out to your Palo Alto Networks account representative, who will
contact the Site Reliability Engineering (SRE) team and submit a request for the change.
A maintenance window is required. Changing the infrastructure subnet without a
maintenance window can result in a Prisma Access outage and inconsistent feature
behavior.
To enable communication between your remote network locations, mobile users, and the HQ
or data centers that you plan on connecting to Prisma Access over service connections,
set up the service infrastructure subnet. Prisma Access uses this subnet to create the
network backbone for communication between your branch networks, mobile users and the
Prisma Access security infrastructure, as well as with the HQ and data center networks
you plan to connect to Prisma Access over service connections.
Configure the Prisma Access Service Infrastructure (Strata Cloud Manager)
Learn how to set up service infrastructure in Prisma Access (Managed by Strata Cloud Manager).
Use the following recommendations and requirements when you add an infrastructure
subnet for Prisma Access:
- Use an RFC 1918-compliant subnet. While the use of non-RFC 1918-compliant (public) IP addresses is supported, we don't recommend it because of possible conflicts with the internet public IP address space.
- Do not specify any subnets that overlap with the 169.254.0.0/16 and 100.64.0.0/10 subnet range because Prisma Access reserves those IP addresses and subnets for its internal use.
- This subnetwork is an extension to your existing network and therefore, cannot overlap with any IP subnets that you use within your corporate network or with the IP address pools that you assign for Prisma Access for users or Prisma Access for networks.
- Because the service infrastructure requires a large number of IP addresses, you must designate a /24 subnetwork (for example, 172.16.55.0/24).
- If you use dynamic routing for your remote networks or service connections, you must also configure an RFC 6996-compliant BGP Private AS number.
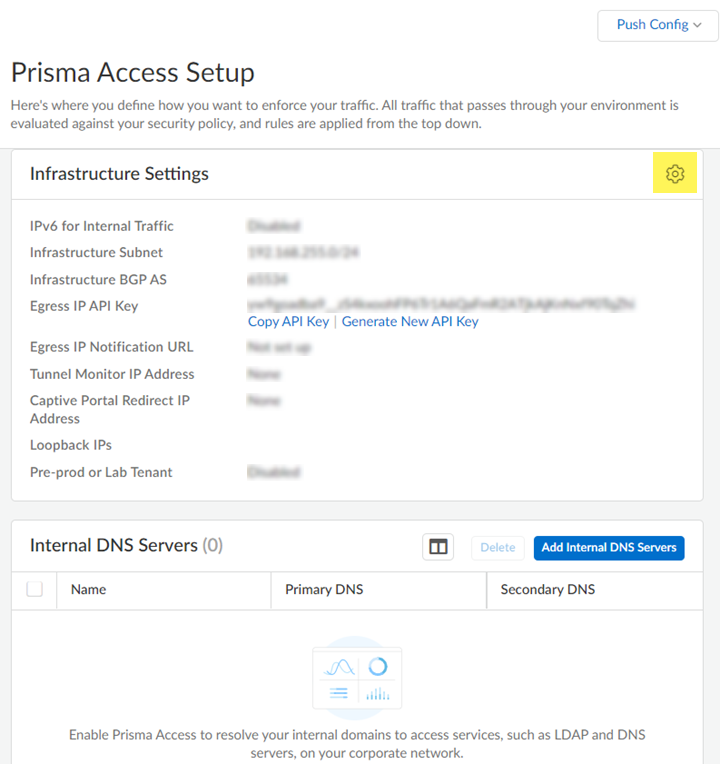
- Launch Prisma Access.Go to ConfigurationNGFW and Prisma AccessConfiguration ScopePrisma Access InfrastructureInfrastructure Settings and click the gear to edit the settings.
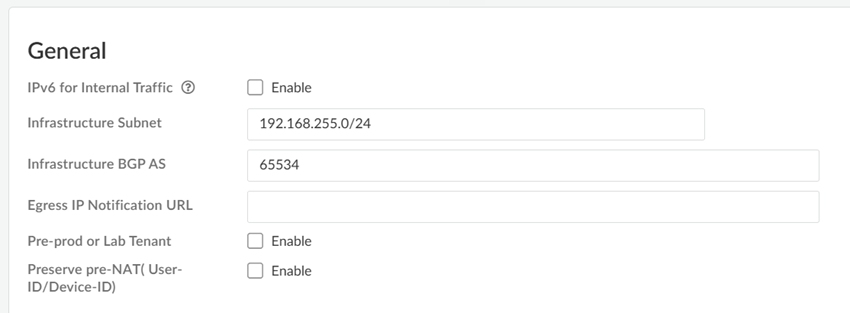
![]() Enter an Infrastructure Subnet that Prisma Access can use to enable communication between your remote network locations, mobile users, and the HQ or data centers that you plan on connecting to Prisma Access over service connections.Use an RFC 1918-compliant subnet for the infrastructure subnet. While the use of non-RFC 1918-compliant (public) IP addresses is supported, we don't recommend it because of possible conflicts with the internet public IP address space.(Optional) If you are configuring IPv6, select IPv6 for Internal Traffic and select an IPv6 subnet.Enter the Infrastructure BGP AS you want to use within the Prisma Access infrastructure.If you want to enable dynamic routing so that Prisma Access can dynamically discover routes to resources in your remote networks and HQ or data center locations, you must use the Border Gateway Protocol (BGP). The Infrastructure BGP AS is the autonomous system (AS) number that identifies the routes through which BGP can send traffic. If you do not supply an AS number, Prisma Access uses the default AS number (65534).If you want to specify your own AS number, you must use an RFC 6996-compliant private AS number. Accepted formats are 4-Byte AS Plain [64512-65534],[4200000000-4294967294] or AS Dot [0.64512-0.65534], [64086.59904-65535.65534] notation.If you enable your users to access applications based on source IP address, you will need to get the list of IP addresses that traffic from Prisma Access uses as the source address so that you can allow them in your application access policies.Copy the Egress IP API Key to enable use of the Prisma Access Egress IP Address API. Also, because the IP addresses that Prisma Access uses change periodically—for example when you add a new location, when Prisma Access needs to scale resources in an existing location, or when there is an infrastructure upgrade—you need to know when the IP addresses change so that you can update your policy rules, or automate these updates by defining a Egress IP Notification URL. See Retrieve the IP Addresses for Prisma Access for more details.(Optional) Enable the tenant as a pre-production or lab tenant.
Enter an Infrastructure Subnet that Prisma Access can use to enable communication between your remote network locations, mobile users, and the HQ or data centers that you plan on connecting to Prisma Access over service connections.Use an RFC 1918-compliant subnet for the infrastructure subnet. While the use of non-RFC 1918-compliant (public) IP addresses is supported, we don't recommend it because of possible conflicts with the internet public IP address space.(Optional) If you are configuring IPv6, select IPv6 for Internal Traffic and select an IPv6 subnet.Enter the Infrastructure BGP AS you want to use within the Prisma Access infrastructure.If you want to enable dynamic routing so that Prisma Access can dynamically discover routes to resources in your remote networks and HQ or data center locations, you must use the Border Gateway Protocol (BGP). The Infrastructure BGP AS is the autonomous system (AS) number that identifies the routes through which BGP can send traffic. If you do not supply an AS number, Prisma Access uses the default AS number (65534).If you want to specify your own AS number, you must use an RFC 6996-compliant private AS number. Accepted formats are 4-Byte AS Plain [64512-65534],[4200000000-4294967294] or AS Dot [0.64512-0.65534], [64086.59904-65535.65534] notation.If you enable your users to access applications based on source IP address, you will need to get the list of IP addresses that traffic from Prisma Access uses as the source address so that you can allow them in your application access policies.Copy the Egress IP API Key to enable use of the Prisma Access Egress IP Address API. Also, because the IP addresses that Prisma Access uses change periodically—for example when you add a new location, when Prisma Access needs to scale resources in an existing location, or when there is an infrastructure upgrade—you need to know when the IP addresses change so that you can update your policy rules, or automate these updates by defining a Egress IP Notification URL. See Retrieve the IP Addresses for Prisma Access for more details.(Optional) Enable the tenant as a pre-production or lab tenant.- Enable the tenant as Pre-prod or Lab Tenant.
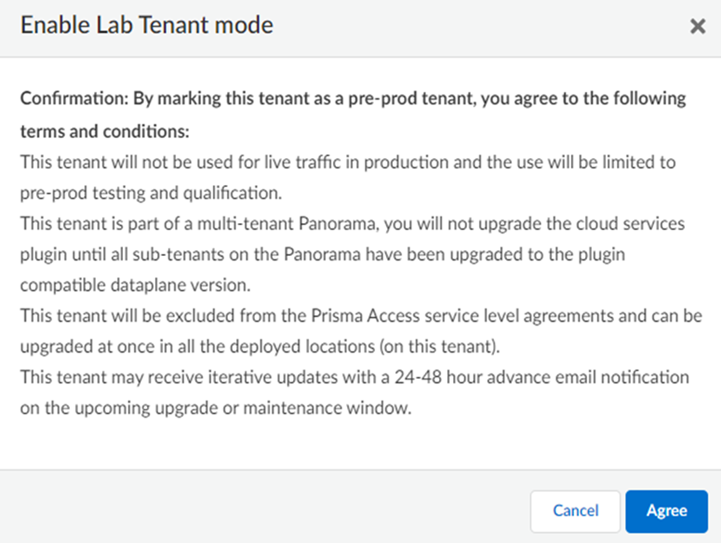
![]() Agree to confirm.
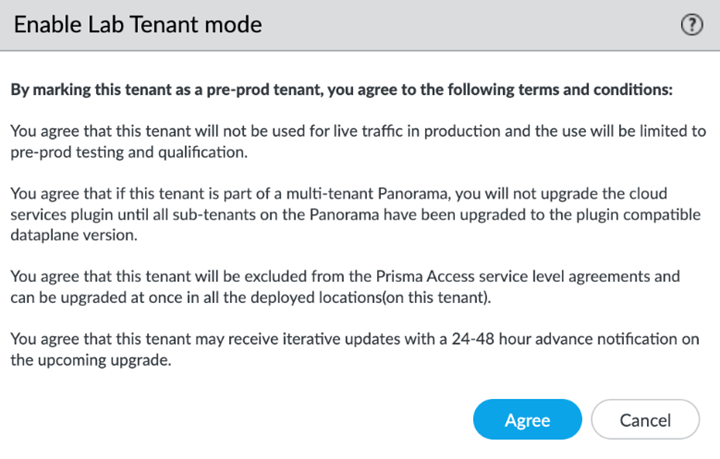
Agree to confirm.![]() When you enable a tenant as a pre-production or lab tenant, you can schedule upgrades for this tenant alone before upgrading other production tenants. The tenant receives notifications 24 to 48 hours before an upcoming upgrade. When you disable the tenant from pre-production or lab tenant, it is considered as a production tenant.(Optional) Select Preserve Pre-NAT to preserve user and device-ID mapping for service connections with a next-generation firewall that use Source NAT.(ZTNA Connector Deployments Only) Set up the ZTNA Connnector Application IP Blocks and Connector IP Blocks.(Optional) To enable Fast-Session delete for Remote Networks, Service Connections, or Mobile Users —GlobalProtect deployments, select the check boxes for Mobile Users—GlobalProtect or Service Connections.Fast-Session Delete allows Prisma Access to reuse TCP port numbers before the TCP TIME_WAIT period expires, and can be useful for SSL decrypted sessions that may be short-lived.For Mobile Users—Explicit Proxy deployments, Fast-Session delete is a key part of its functionality and you cannot disable it.
When you enable a tenant as a pre-production or lab tenant, you can schedule upgrades for this tenant alone before upgrading other production tenants. The tenant receives notifications 24 to 48 hours before an upcoming upgrade. When you disable the tenant from pre-production or lab tenant, it is considered as a production tenant.(Optional) Select Preserve Pre-NAT to preserve user and device-ID mapping for service connections with a next-generation firewall that use Source NAT.(ZTNA Connector Deployments Only) Set up the ZTNA Connnector Application IP Blocks and Connector IP Blocks.(Optional) To enable Fast-Session delete for Remote Networks, Service Connections, or Mobile Users —GlobalProtect deployments, select the check boxes for Mobile Users—GlobalProtect or Service Connections.Fast-Session Delete allows Prisma Access to reuse TCP port numbers before the TCP TIME_WAIT period expires, and can be useful for SSL decrypted sessions that may be short-lived.For Mobile Users—Explicit Proxy deployments, Fast-Session delete is a key part of its functionality and you cannot disable it.![]() Save your changes when complete to return to the main infrastructure page.To enable Prisma Access to resolve your internal domains, Add Internal DNS Servers.If you plan on configuring service connections to enable access to resources in your corporate network and you also need Prisma Access to resolve your internal domains, you must define the list of internal domains. DNS queries for domains in the internal domain list are sent to your local DNS servers to ensure that resources are available to Prisma Access remote network users and mobile users.
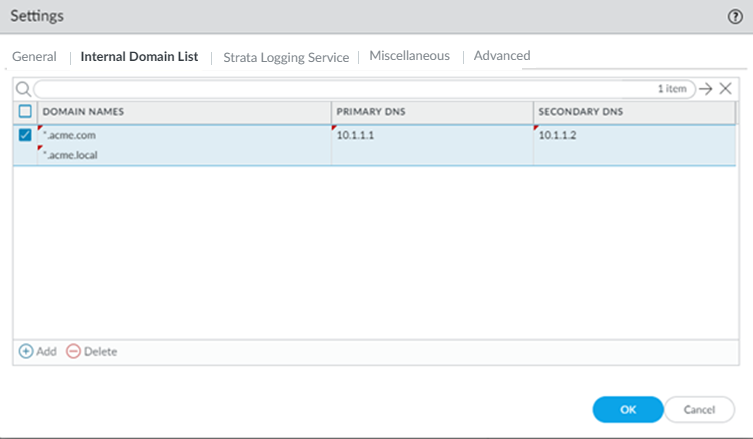
Save your changes when complete to return to the main infrastructure page.To enable Prisma Access to resolve your internal domains, Add Internal DNS Servers.If you plan on configuring service connections to enable access to resources in your corporate network and you also need Prisma Access to resolve your internal domains, you must define the list of internal domains. DNS queries for domains in the internal domain list are sent to your local DNS servers to ensure that resources are available to Prisma Access remote network users and mobile users.- Enter the Primary DNS server and Secondary DNS server that Prisma Access should use to resolve the internal domain names.Add the internal Domain Names that you want Prisma Access to resolve.You can use a wildcard (*) in front of the domains in the domain list, for example *.acme.local or *.acme.com.Push Config to save your service infrastructure settings to Prisma Access.
Configure the Prisma Access Service Infrastructure (Panorama)
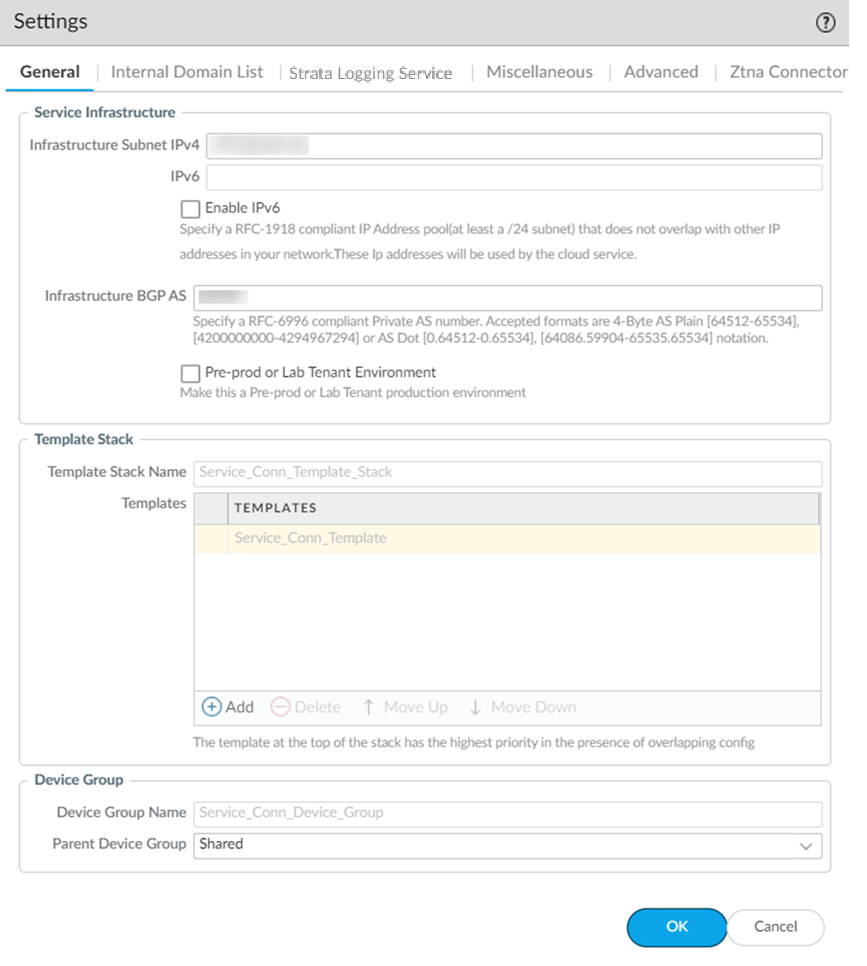
Before you can begin setting up Prisma Access to secure your remote networks and/or mobile users, you must configure an infrastructure subnet, which Prisma Access will use to create the network backbone for communication between your service connections, remote networks, and mobile users, as well as with the corporate networks you plan to connect to Prisma Access over service connections. Because a large number of IP addresses will be required to set up the infrastructure, you must use a /24 subnet (for example, 172.16.55.0/24) at a minimum. Be sure you follow all guidelines and requirements.- Select PanoramaCloud ServicesConfigurationService Setup and click the gear icon to edit the Settings.
![]() On the General tab, specify an Infrastructure Subnet that meets the requirements, for example, 172.16.55.0/24.(Optional) If you are configuring IPv6, select IPv6 for Internal Traffic and select an IPv6 subnet.(Optional) If you want to enable Prisma Access to use BGP to dynamically discover routes to resources on your remote networks and HQ/data center locations, enter the Infrastructure BGP AS you want to use within the Prisma Access infrastructure.If you do not supply an AS number, the default AS number 65534 will be used.(Optional) Enable a tenant as Pre-prod or Lab Tenant Environment.When you enable a tenant as a pre-production or lab tenant, you can schedule upgrades for this tenant alone before upgrading other production tenants. The tenant receives notifications 24 to 48 hours before an upcoming upgrade.
On the General tab, specify an Infrastructure Subnet that meets the requirements, for example, 172.16.55.0/24.(Optional) If you are configuring IPv6, select IPv6 for Internal Traffic and select an IPv6 subnet.(Optional) If you want to enable Prisma Access to use BGP to dynamically discover routes to resources on your remote networks and HQ/data center locations, enter the Infrastructure BGP AS you want to use within the Prisma Access infrastructure.If you do not supply an AS number, the default AS number 65534 will be used.(Optional) Enable a tenant as Pre-prod or Lab Tenant Environment.When you enable a tenant as a pre-production or lab tenant, you can schedule upgrades for this tenant alone before upgrading other production tenants. The tenant receives notifications 24 to 48 hours before an upcoming upgrade.![]() When you disable the tenant from pre-production or lab tenant, it is considered as a production tenant.Prisma Access for Clean Pipe does not support this functionality.(Optional) Enable Prisma Access to resolve your internal domains using your corporate DNS servers.Use this step if you need Prisma Access to be able to resolve your internal domains to access services, such as LDAP servers, on your corporate network via service connections. For example, if you want a DNS lookup for your corporate domain to go exclusively to the corporate DNS server, specify the corporate domain and the corporate DNS servers here.
When you disable the tenant from pre-production or lab tenant, it is considered as a production tenant.Prisma Access for Clean Pipe does not support this functionality.(Optional) Enable Prisma Access to resolve your internal domains using your corporate DNS servers.Use this step if you need Prisma Access to be able to resolve your internal domains to access services, such as LDAP servers, on your corporate network via service connections. For example, if you want a DNS lookup for your corporate domain to go exclusively to the corporate DNS server, specify the corporate domain and the corporate DNS servers here.- Select the Internal Domain List tab.Add the Domain Names, Primary DNS, and Secondary DNS servers that you want Prisma Access to use to resolve your internal domain names.You can use a wildcard (*) in front of the domains in the domain list, for example *.acme.local or *.acme.com.Do not enter a 127.0.0.1 address as it can cause Prisma Access internal routing issues.
![]() Enable Strata Logging Service.
Enable Strata Logging Service.- Select the Strata Logging Service tab.Select a Strata Logging Service Theater and click OK.
![]() Configure the device groups you are using to push settings to Prisma Access with a Log Forwarding profile that forwards the desired log types to Panorama/Strata Logging Service.The Cloud Services plugin automatically adds the following Log Settings (DeviceLog Settings) after a new installation or when removing non-Prisma Access templates from a Prisma Access template stack:
Configure the device groups you are using to push settings to Prisma Access with a Log Forwarding profile that forwards the desired log types to Panorama/Strata Logging Service.The Cloud Services plugin automatically adds the following Log Settings (DeviceLog Settings) after a new installation or when removing non-Prisma Access templates from a Prisma Access template stack:- Log Settings for System logs (system-gpcs-default), User-ID logs (userid-gpcs-default), HIP Match logs (hipmatch-gpcs-default), and GlobalProtect logs (gp-prismaaccess-default) are added to the Mobile_User_Template.
- Log Settings for System logs (system-gpcs-default), User-ID logs (userid-gpcs-default), and GlobalProtect logs (gp-prismaaccess-default) are added to the Remote_Network_Template.
- Log Settings for System logs (system-gpcs-default) and GlobalProtect logs (gp-prismaaccess-default) are added to the Service_Conn_Template.
These Log Setting configurations automatically forward System, User-ID, HIP Match, and GlobalProtect logs to Strata Logging Service.To apply log setting changes, perform the following steps, then commit and push your changes:- To apply the log setting to the mobile user template, select PanoramaCloud ServicesConfigurationMobile Users, click the gear icon to edit the settings, and click OK.
- To apply the log setting to the remote network template, select PanoramaCloud ServicesConfigurationRemote Networks, click the gear icon to edit the settings, and click OK.
- To apply the log setting to the service connection template, select PanoramaCloud ServicesConfigurationService Setup, click the gear icon to edit the settings, and click OK.
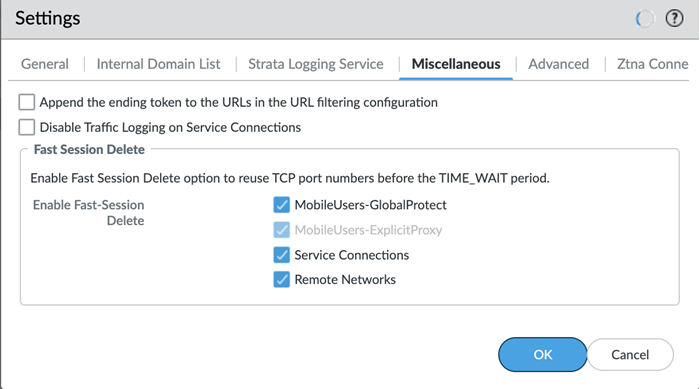
The way you enable log forwarding for other log types depends on the type. For logs that are generated based on a policy match, use a log forwarding profile. See the Strata Logging Service Getting Started Guide for more information.(Optional) Configure Miscellaneous settings.- (Optional) Append the ending token for URLs in external dynamic lists (EDLs) or custom URL categories by selecting Append the ending token to the URLs in the URL filtering configuration.If you use URLs in EDLs or custom URL categories and do not append a forward slash (/) to the URL, it is possible to allow more URLs than you intended. For example, entering example.com as a matching URL instead of example.com/ would also match example.com.website.info or example.com.br.By selecting Append the ending token to the URLs in the URL filtering configuration, Prisma Access sets an ending token to URLs in EDLs or custom URL categories so that, if you enter example.com, Prisma Access treats it as it would treat example.com/ and only matches that URL.(Optional) Disable Traffic Logging on Service Connections to disable logging on the service connections for your Prisma Access deployment.If the majority of the traffic flows logged by the service connections are asymmetric, disabling service connection logging might be required to reduce the consumption of Strata Logging Service logging storage. If your deployment does not have asymmetric flows via the service connections, you do not need to disable logging.(Optional) To enable Fast-Session delete for Remote Networks, Service Connections, or Mobile Users —GlobalProtect deployments, select the check boxes for Mobile Users—GlobalProtect, Service Connections, or Remote Networks.Fast-Session Delete allows Prisma Access to reuse TCP port numbers before the TCP TIME_WAIT period expires, and can be useful for SSL decrypted sessions that may be short-lived.For Mobile Users—Explicit Proxy deployments, Fast-Session delete is a key part of its functionality and you cannot disable it.
![]() (Optional) Configure Advanced settings (routing preferences, symmetric network path options for service connections, and HIP redistribution).
(Optional) Configure Advanced settings (routing preferences, symmetric network path options for service connections, and HIP redistribution).- Specify the Routing Preference to use with service connections.You can specify network preferences to use either your organization’s network, or the Prisma Access network, to process the service connection traffic.
- Default—Prisma Access uses default routing in its internal network.
- Hot potato routing—Prisma Access hands off service connection traffic to your organization’s WAN as quickly as possible.
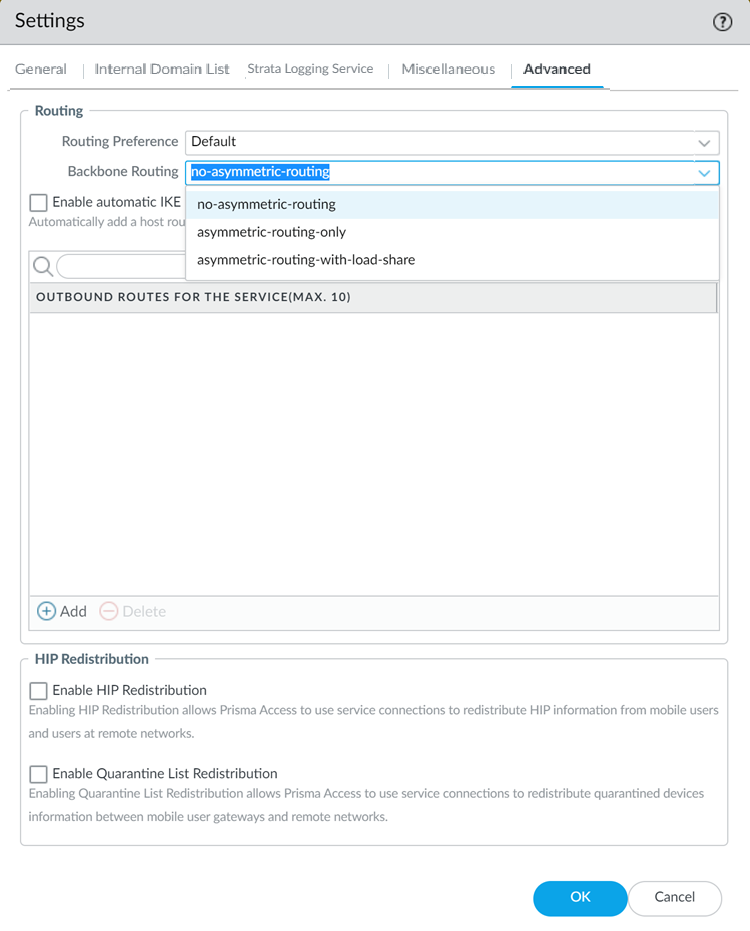
Changing the Prisma Access service connection routing method requires a thorough understanding of your organization’s topology and routing devices, along with an understanding of how Prisma Access routing works. We recommend that you read Routing for Service Connection Traffic carefully before changing the routing method from default.Configure the Backbone Routing to use for the service connections.By default, the Prisma Access backbone requires that you have a symmetric network path for the traffic returning from the data center or headquarters location by way of a service connection. If you want to use ECMP or another load balancing mechanism for service connections from your CPE, you can enable asymmetric flows through the Prisma Access backbone.- Select no-asymmetric-routing to require symmetric flows across the service connection backbone.
- Select asymmetric-routing-only to allow Prisma Access to use asymmetric flows across the service connection backbone.
- If you have multiple service connections to a location, you can take advantage of load balancing in your Prisma Access deployment by selecting asymmetric-routing-with-load-share (the default setting). However, load balancing is done on a best-effort basis, and load balancing will fail if one of the service connections goes down.
Redistribute HIP Information with Prisma Access to use service connections to redistribute HIP information from mobile users and users at remote networks.Identification and Quarantine of Compromised Devices in a Prisma Access GlobalProtect Deployment to have Prisma Access identify and quarantine compromised devices that are connected with the GlobalProtect app.Withdraw Static Routes if Service Connection or Remote Network IPSec tunnel is down if you want Prisma Access to remove static routes when a tunnel goes down without a backup tunnel.This functionality is enabled by default for Prisma Access (Managed by Strata Cloud Manager) deployments.Prisma Access removes the route in the following situations:- The primary tunnel goes down and there is no secondary tunnel.
- If a primary and secondary tunnel are configured, but both go down.
You cannot apply this change if tunnel monitoring is not enabled.Note the behavior of tunnels if this feature is enabled or disabled and that the behavior for dual tunnel deployments is unchanged.Withdraw Static Routes Enabled Withdraw Static Routes Disabled Single tunnel deployments: The static route is withdrawn.Dual tunnel deployments: The static route is withdrawn for failover purposes between the primary and secondary Tunnel.Single tunnel deployments: The static route is not withdrawn.Dual tunnel deployments: The static route is withdrawn for failover purposes between the primary and secondary Tunnel.(Optional) If you want to route remote network and service connection IPSec tunnel packets to the static IKE gateways over the internet, Enable automatic IKE peer host routes for Remote Networks and Service Connections.(Optional) Specify Outbound Routes for the Service (Max 10) by adding up to 10 prefixes for which Prisma Access adds static routes on all service connections and remote network connections. Prisma Access then routes traffic to these prefixes over the internet.![]() Click OK to save the Service Setup settings.Commit all your changes to Panorama and push the configuration changes to Prisma Access.
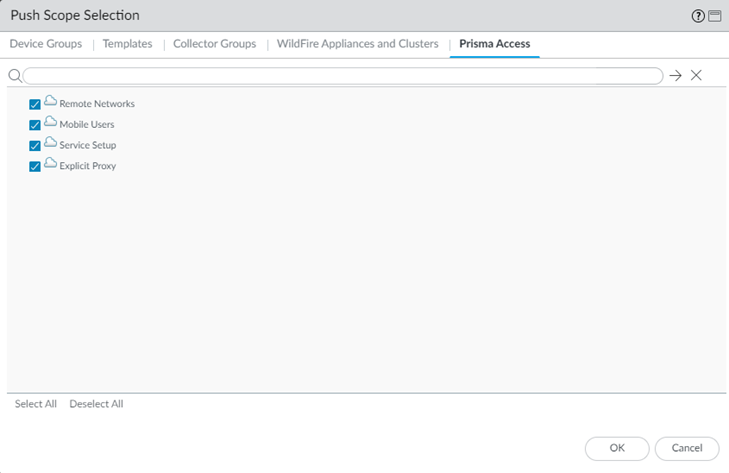
Click OK to save the Service Setup settings.Commit all your changes to Panorama and push the configuration changes to Prisma Access.- Click CommitCommit to Panorama.Click CommitPush to Devices and click Edit Selections.On the Prisma Access tab, make sure Service setup is selected and then click OK.Prisma Access should automatically select the components that need to be committed.
![]() Click Push.Verify that Prisma Access is successfully connected to Strata Logging Service.
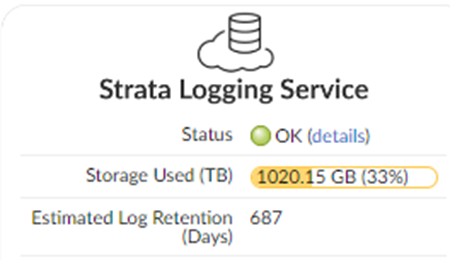
Click Push.Verify that Prisma Access is successfully connected to Strata Logging Service.- Select PanoramaCloud ServicesStatusStatusStrata Logging Service and verify that the Status is OK.
![]() If the status is Error, click the details link to view any errors.Continue setting up Prisma Access:
If the status is Error, click the details link to view any errors.Continue setting up Prisma Access:

