Enterprise DLP
Set Up Cloud Storage on Microsoft Azure to Save Evidence
Table of Contents
Set Up Cloud Storage on Microsoft Azure to Save Evidence
Configure cloud storage on Microsoft Azure to save evidence for investigative
analysis with Enterprise Data Loss Prevention (E-DLP).
On May 7, 2025, Palo Alto Networks is introducing new Evidence Storage and Syslog Forwarding service IP
addresses to improve performance and expand availability for these services
globally.
You must allow these new service IP addresses on your network
to avoid disruptions for these services. Review the Enterprise DLP
Release Notes for more
information.
| Where Can I Use This? | What Do I Need? |
|---|---|
|
Or any of the following licenses that include the Enterprise DLP license
|
Microsoft Azure users can configure a blog storage bucket to automatically upload all
files that match an Enterprise Data Loss Prevention (E-DLP) data profile for Enterprise DLP.
To store your files scanned by Enterprise DLP, you must create a storage account
and Identity and Access Management (IAM) role that allows Enterprise DLP access
to automatically store files. Files uploaded to your storage account are
automatically named using a unique Report ID for each file. The Report ID is used to
search and download specific files for more in-depth investigation.
Enterprise DLP automatically sends email alerts to the data security
administrator who originally connected Enterprise DLP to the storage bucket and
to the data security admin who last modified the storage bucket settings in case of
connection issues. Enterprise DLP sends the email alert every 48 hours until
you restore the connection between Enterprise DLP and the storage bucket.
Files not scanned while Enterprise DLP is disconnected from your storage
bucket can’t be stored and are lost. This means that all impacted files are not
available for download. However, your data security administrator can still view
all snippet data associated with the DLP incident.
Enterprise DLP automatically resumes forwarding files to your storage bucket
after you restore the connection.
- Review the setup prerequisites for Enterprise DLP and enable the required ports, full qualified domain names (FQDN), and IP addresses on your network.Log in to the Microsoft Azure portal as an administrator.Administrator level privileges are required to successfully add the Enterprise DLP evidence storage application using Cloud Shell and to configure access to the storage account to enable file uploads by Enterprise DLP to save files for evidence analysis.(Optional) From the portal menu, select Storage groups and Create a new storage group.You can also search for storage groups.The storage group is required to associate the storage account you create next for storing matched files.Skip this step if you have an existing resource group that you want to associate with the storage account.From the portal menu, select Storage accounts and Create a new storage account.You can also search for storage accounts.Obtain the App-ID, Tenant ID, and blob service endpoint URL.This information is required to add the Palo Alto Networks Enterprise DLP application to your Microsoft Azure tenant and to configure connectivity to Enterprise DLP.
- Palo Alto Networks Enterprise DLP App ID - 65def4b7-bae6-4bff-ab73-63fe8c9a3c8d
- Obtain your Tenant ID.
- From the portal menu, select Azure Active Directory.You can also search for azure active directory.
- In the Basic Information section, copy the Tenant ID.
Obtain the blob service endpoint URL.- From the portal menu, select Storage accounts and select the storage account you will use to save files for evidence analysis.
- Select and copy the Blob service endpoint URL.
Add the Palo Alto Networks Enterprise DLP application.- Open Cloud Shell.Click the Cloud Shell icon located in the top-right corner of the Microsoft Azure portal.Add the Palo Alto Networks Enterprise DLP application.Connect-AzureAD -TenantID <Your_Tenant_ID>New-AzureADServicePrincipal -AppId 65def4b7-bae6-4bff-ab73-63fe8c9a3c8dIt might take a few minutes for Microsoft Azure to add a new application to your Azure tenant.Close the Cloud Shell.Search for and select Enterprise applications.For the Application type, select All applications.Search for the Palo Alto Networks Enterprise DLP application name to verify you successfully added the application.Configure permissions for the Palo Alto Networks Enterprise DLP application.
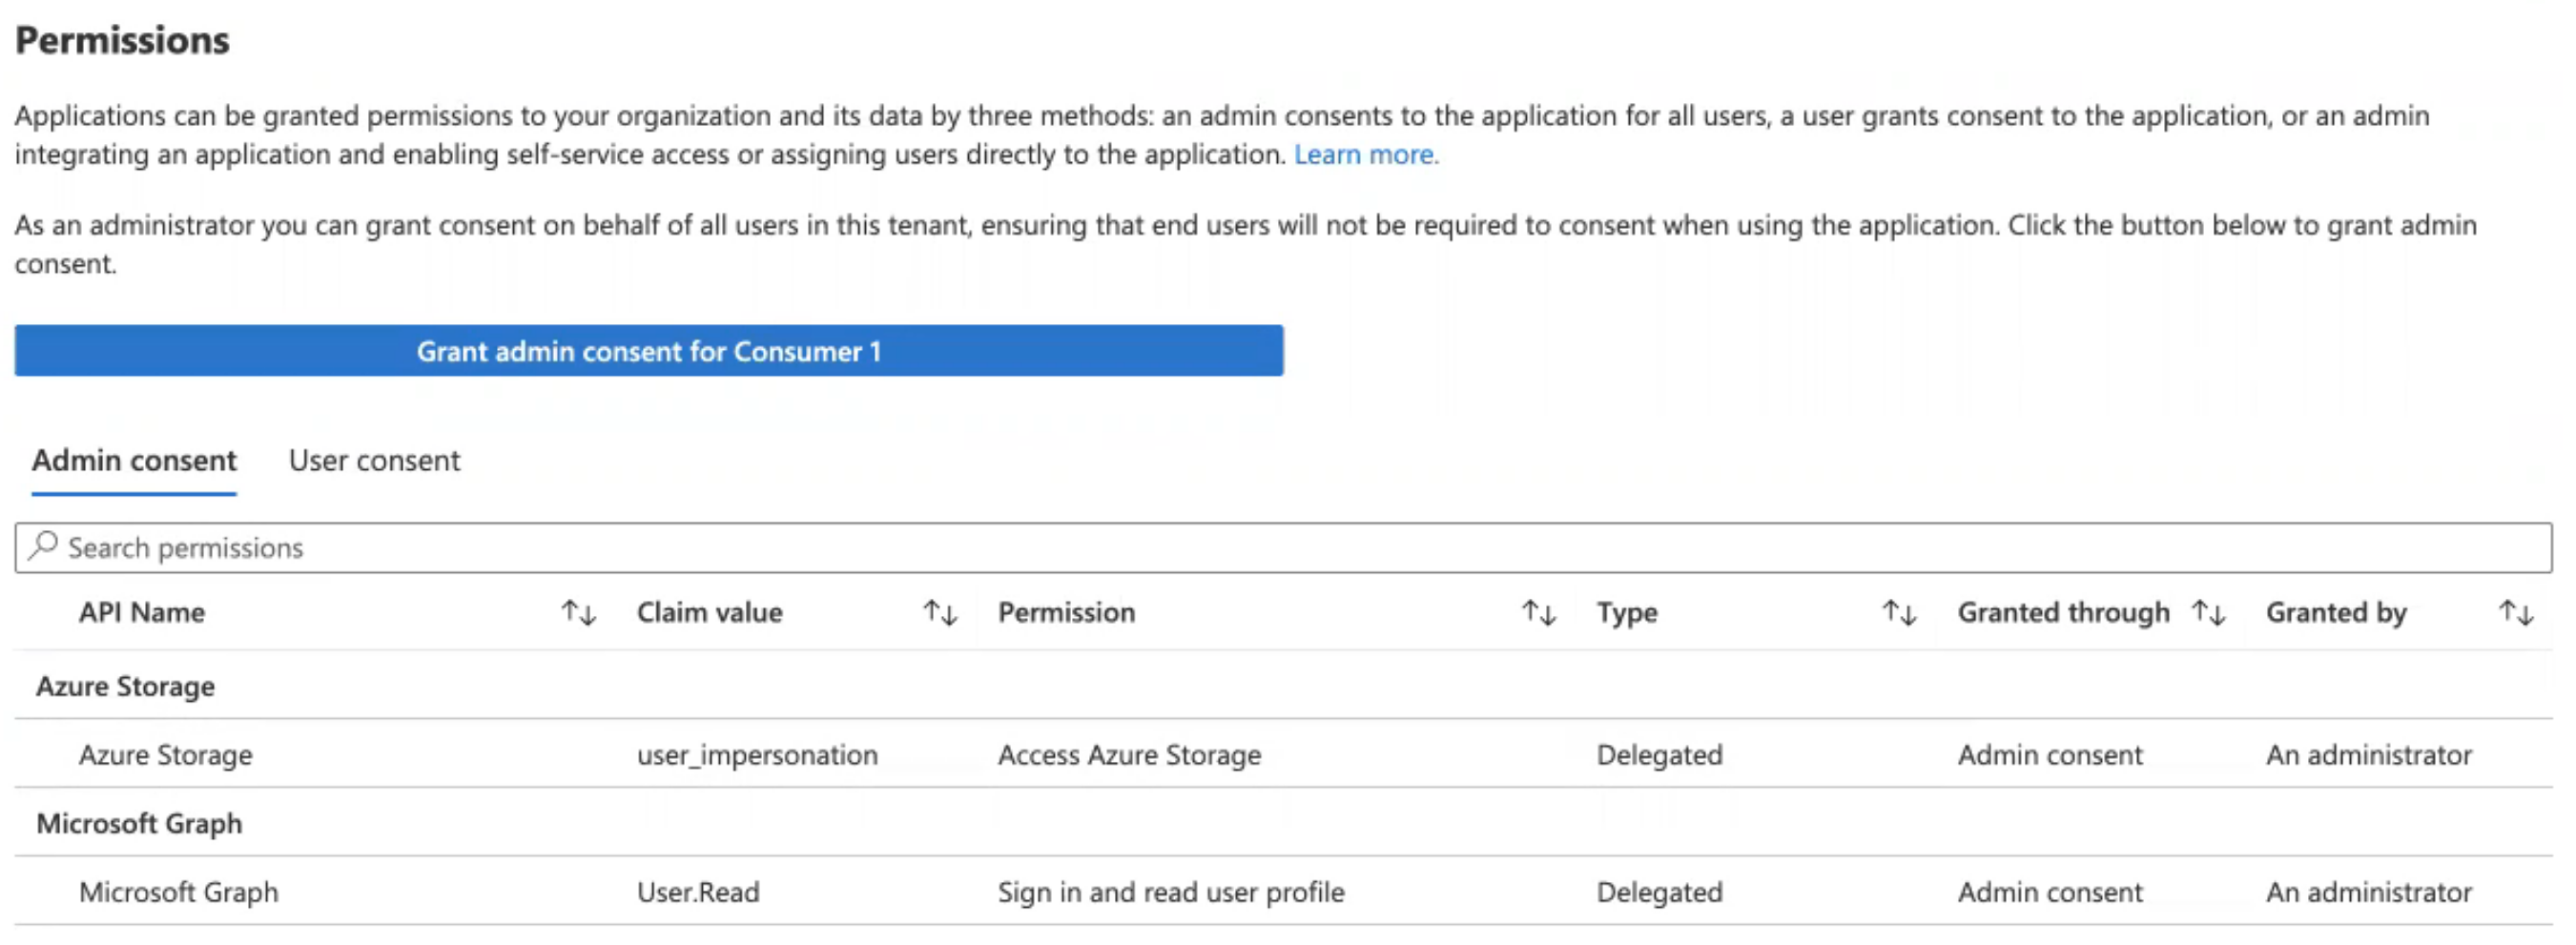
- Select the Palo Alto Networks Enterprise DLP application name.Select and Grant Admin consent.Select the administrator email in the Microsoft login prompt that is displayed.Accept the permissions request to allow Enterprise DLP to view your Azure storage accounts.It might take a few minutes for the permissions to be successfully granted to Enterprise DLP.You still need to grant Enterprise DLP permission to write to a specific storage account.Verify that the Azure Storage and Microsoft Graph API names are displayed in the Admin consent section.
![]() From the portal menu, select Storage accounts and select the storage account you want to use to save files for evidence analysis.Select and click Next.Select to assign access to User, group, or service principle and select members.Search and select the Palo Alto Networks Enterprise DLP application and Select the application.Review + assign to allow Enterprise DLP to write to the storage account.It can take up to 10 minutes for the write permissions to be successfully granted to Enterprise DLP.Configure the storage bucket for evidence file storage.
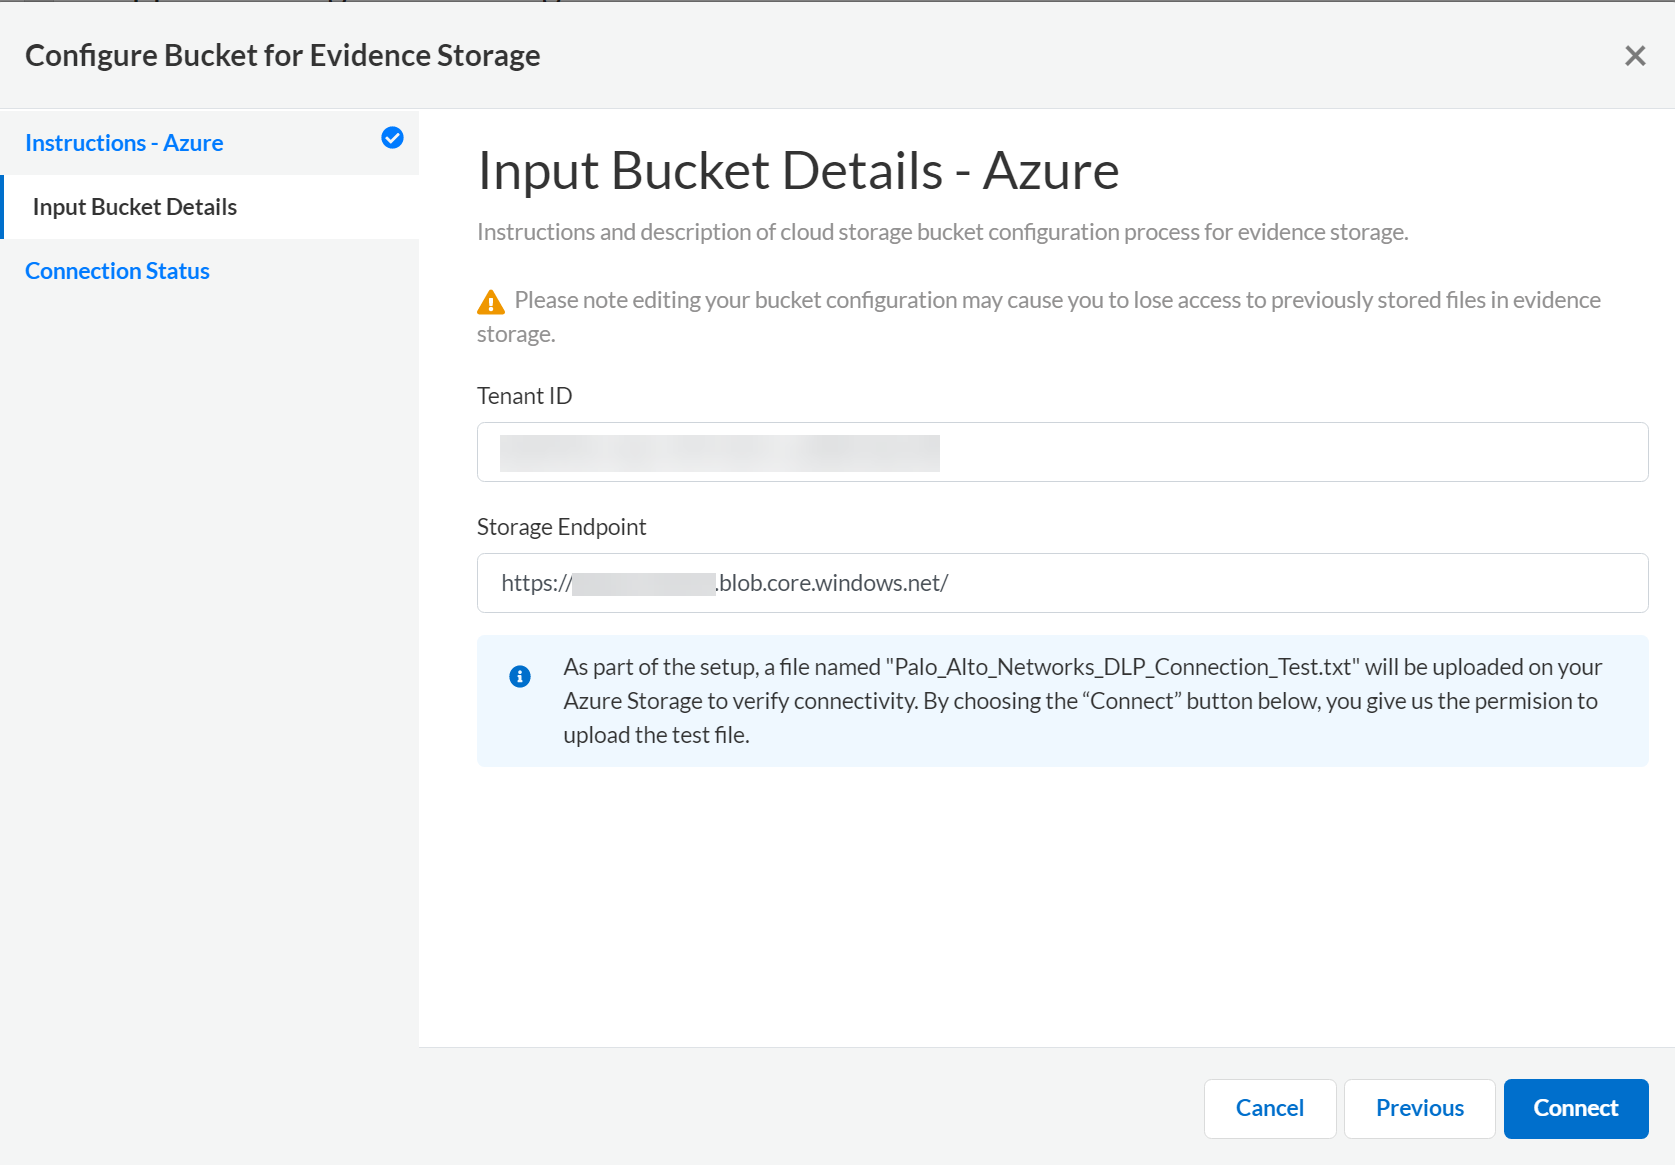
From the portal menu, select Storage accounts and select the storage account you want to use to save files for evidence analysis.Select and click Next.Select to assign access to User, group, or service principle and select members.Search and select the Palo Alto Networks Enterprise DLP application and Select the application.Review + assign to allow Enterprise DLP to write to the storage account.It can take up to 10 minutes for the write permissions to be successfully granted to Enterprise DLP.Configure the storage bucket for evidence file storage.- Log in to Strata Cloud Manager.Access to evidence storage settings and files on Strata Cloud Manager is allowed only for an account administrator or app administrator role with Enterprise DLP read and write privileges. This is to ensure that only the appropriate users have access to report data and evidence.Select and select Azure as the Public Cloud Storage Bucket.Review the Instructions - Azure and click Next.Select Input Bucket Details.Enter Microsoft Azure Tenant ID.Enter the Storage Endpoint.This is the blob service endpoint URL that you gathered for the storage account.Connect Enterprise DLP to your storage bucket.
![]() Review the Connection Status to verify Enterprise DLP successfully connected to your storage bucket.As part of the setup process, Enterprise DLP uploads a Palo_Alto_Networks_DLP_Connection_Test.txt file to your storage bucket to test and verify connectivity.Save the storage bucket settings if Enterprise DLP successfully connected.Select Previous and edit the bucket connection settings if Enterprise DLP can’t successfully connect to your storage bucket.Enable Sensitive Files for your enforcement points.You can enable evidence storage of sensitive files for Prisma Access, NGFW, and Endpoint DLP. Enable evidence storage when prompted to confirm.
Review the Connection Status to verify Enterprise DLP successfully connected to your storage bucket.As part of the setup process, Enterprise DLP uploads a Palo_Alto_Networks_DLP_Connection_Test.txt file to your storage bucket to test and verify connectivity.Save the storage bucket settings if Enterprise DLP successfully connected.Select Previous and edit the bucket connection settings if Enterprise DLP can’t successfully connect to your storage bucket.Enable Sensitive Files for your enforcement points.You can enable evidence storage of sensitive files for Prisma Access, NGFW, and Endpoint DLP. Enable evidence storage when prompted to confirm.