Enterprise DLP
Enable Enterprise DLP
Table of Contents
Enable Enterprise DLP
Create policy rules to enable firewalls to forward traffic to Enterprise Data Loss Prevention (E-DLP) to prevent exfiltration of sensitive data.
On May 7, 2025, Palo Alto Networks is introducing new Evidence Storage and Syslog Forwarding service IP
addresses to improve performance and expand availability for these services
globally.
You must allow these new service IP addresses on your network
to avoid disruptions for these services. Review the Enterprise DLP
Release Notes for more
information.
| Where Can I Use This? | What Do I Need? |
|---|---|
|
Or any of the following licenses that include the Enterprise DLP license
|
Some apps, such as SharePoint and OneDrive, use HTTP/2 by default. For NGFW, Prisma Access tenants, and VM-Series
firewalls managed by a Panorama® management server or by Strata Cloud Manager running
PAN-OS 10.2.2 and earlier releases, you must create a decryption
profile and a Security policy rule to strip out the application-layer protocol
negotiation (ALPN) extension in headers. Complete these steps to successfully
forward traffic to Enterprise Data Loss Prevention (E-DLP).
Enable Enterprise DLP on Strata Cloud Manager
Enable Enterprise Data Loss Prevention (E-DLP) for Prisma Access (Managed by Strata Cloud Manager) and NGFW (Managed by Strata Cloud Manager).
- Activate the Enterprise DLP license.
- Activate a standalone Enterprise DLP license.
- Activate a Next-Generation CASB for Prisma Access and NGFW (CASB-X) license.The CASB-X license includes the Enterprise DLP license by default. To activate Enterprise DLP for your CASB-X tenants, you only need to activate CASB-X. There is no individual Enterprise DLP license you need to activate when using CASB-X.
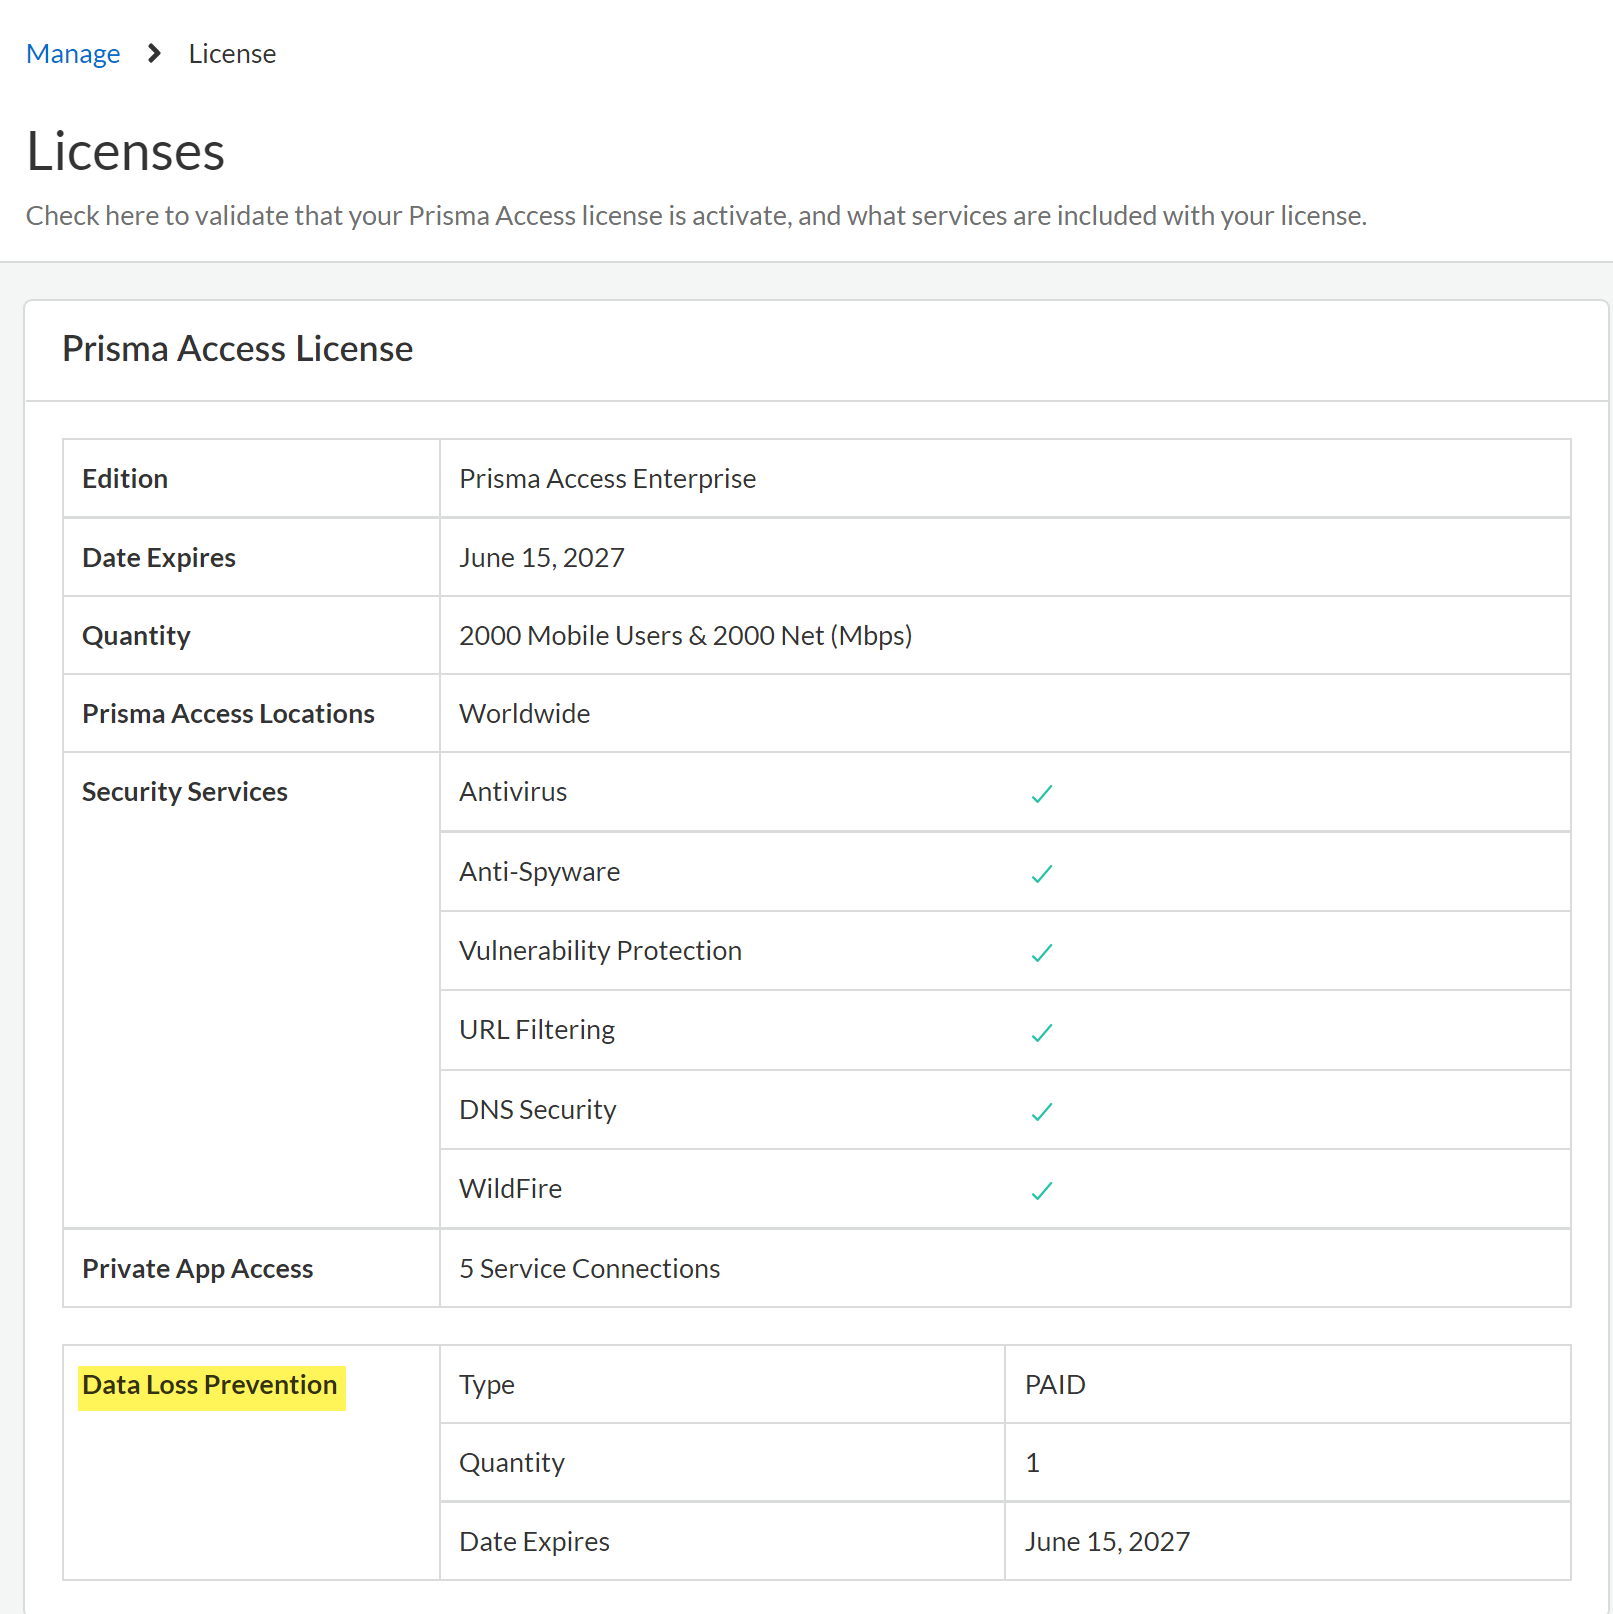
Review the Setup Prerequisites for Enterprise DLP and enable the required ports, Fully Qualified Domain Names (FQDN), and IP addresses on your network.This is required to forward traffic to Enterprise DLP for inspection and verdict rendering.Log in to Strata Cloud Manager.Verify that the Enterprise DLP license is active.- Select and navigate to the Licenses widget.Click the license Quantity and confirm that the Data Loss Prevention license is active.Confirm the Data Loss Prevention license Type displays PAID and that an expiration date is displayed.
![]() Select and verify that Data Loss Prevention is displayed.Create a Security policy rule to drop the Quick UDP Internet Connection (QUIC) protocol.Many supported web applications, such as Gmail, require that you disable the QUIC protocol for Enterprise DLP to function correctly.
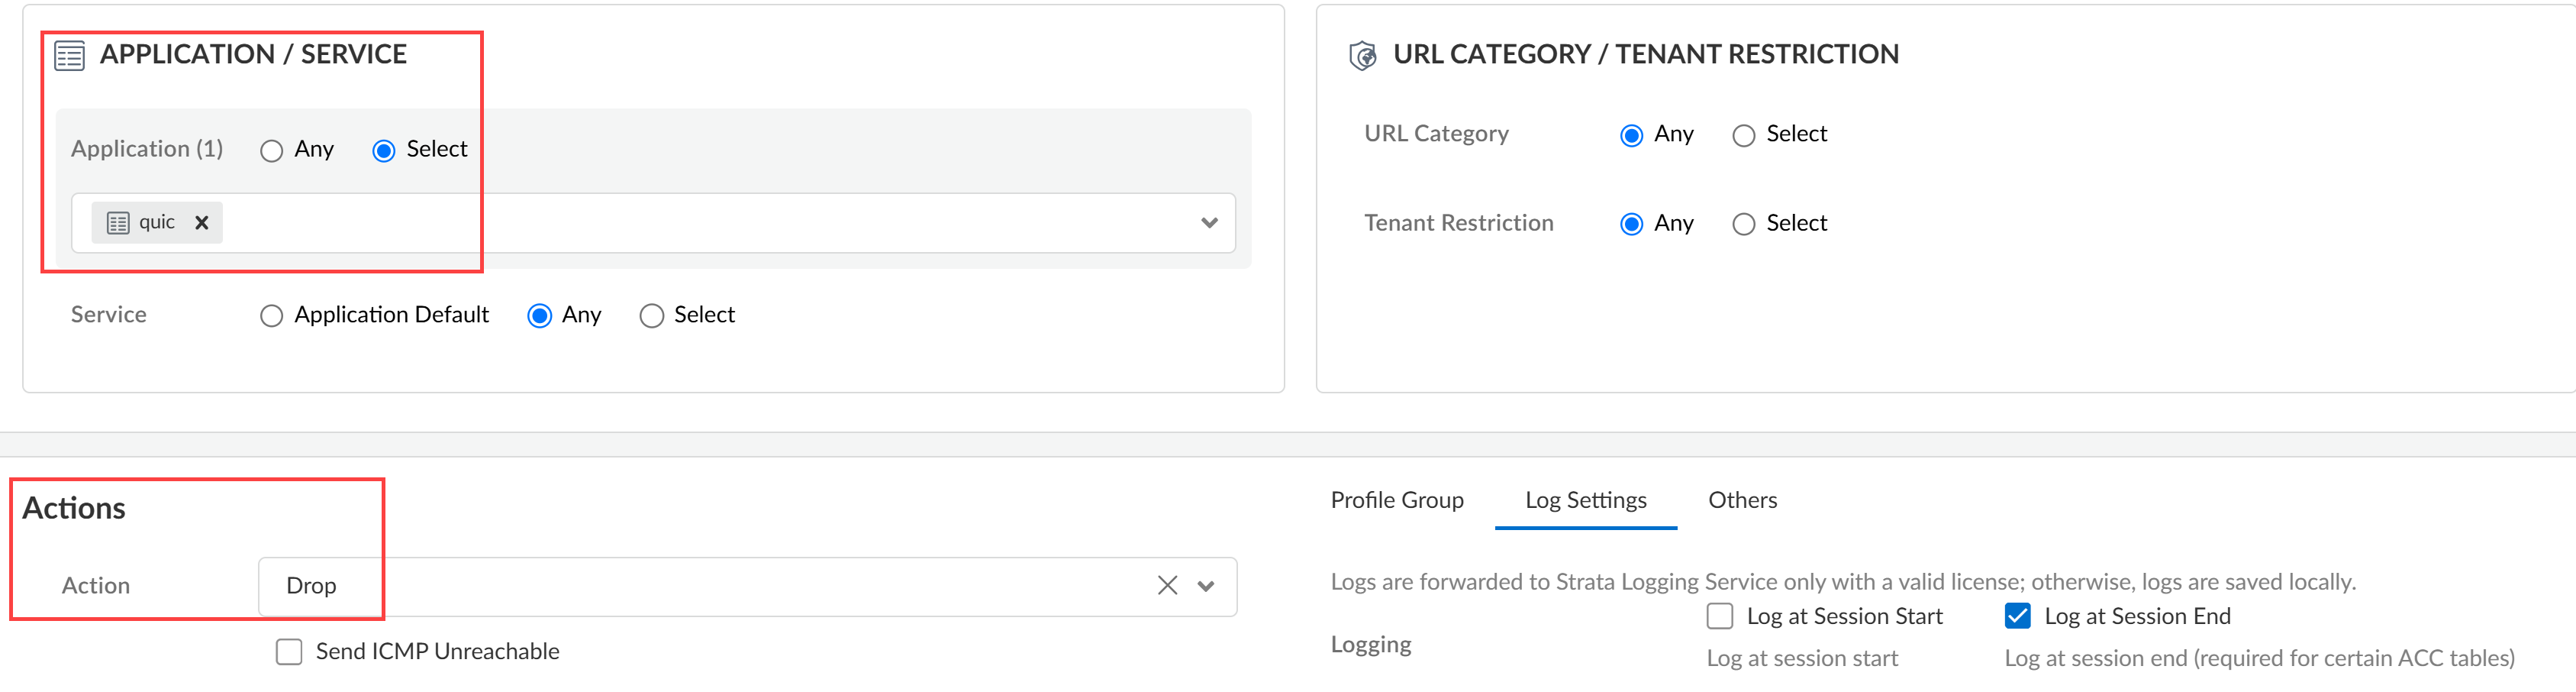
Select and verify that Data Loss Prevention is displayed.Create a Security policy rule to drop the Quick UDP Internet Connection (QUIC) protocol.Many supported web applications, such as Gmail, require that you disable the QUIC protocol for Enterprise DLP to function correctly.- Select .Select the Configuration Scope where you want to create the Security policy rule.Select .This Security policy rule should precede all Security policy rules that forward traffic to Enterprise DLP.Enter a descriptive Name for the Security policy rule.Configure the Source and Destination match criteria as needed.Configure the Security policy rule to drop the QUIC protocol.
- In the Application/Service section, click Select for the Application field. Search for and select quic.
- In the Actions section, select Drop for the Action field.
- (Best Practices) Click Log Settings and configure logging for impacted traffic.
![]() Save the Security policy rule.Create the decryption profile required for Enterprise DLP to inspect traffic.
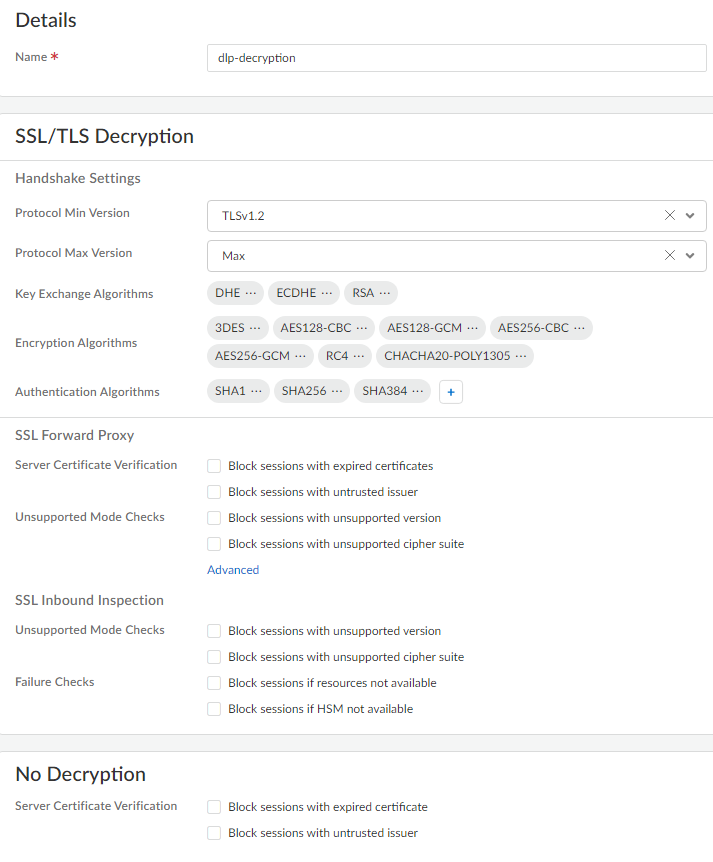
Save the Security policy rule.Create the decryption profile required for Enterprise DLP to inspect traffic.- Select and Add Profile.Enter a descriptive Name for the decryption profile.Review the predefined decryption profile settings.The predefined decryption profile settings enable Enterprise DLP to inspect traffic. Modifying the predefined decryption profile settings isn’t required unless you need to enable Strip ALPN.
![]() (Software Version 10.2.2 or earlier versions) Configure the decryption profile to remove Application-Layer Protocol Negotiation (ALPN) headers from uploaded files.Remove the ALPN headers from files if any Strata Cloud Manager deployment is running software version 10.2.2 or earlier version. If your entire Strata Cloud Manager deployment is running software version 10.2.3 or later version, stripping ALPN headers isn’t required.A Security admin can also strip ALPN headers in the Internet Security decryption settings. Security admins don’t need to create a decryption policy rule and can push the setting to Remote Networks and Mobile Users.
(Software Version 10.2.2 or earlier versions) Configure the decryption profile to remove Application-Layer Protocol Negotiation (ALPN) headers from uploaded files.Remove the ALPN headers from files if any Strata Cloud Manager deployment is running software version 10.2.2 or earlier version. If your entire Strata Cloud Manager deployment is running software version 10.2.3 or later version, stripping ALPN headers isn’t required.A Security admin can also strip ALPN headers in the Internet Security decryption settings. Security admins don’t need to create a decryption policy rule and can push the setting to Remote Networks and Mobile Users.- In the SSL Forward Proxy, click Advanced.
- Check (enable) Strip ALPN and Save.
![]()
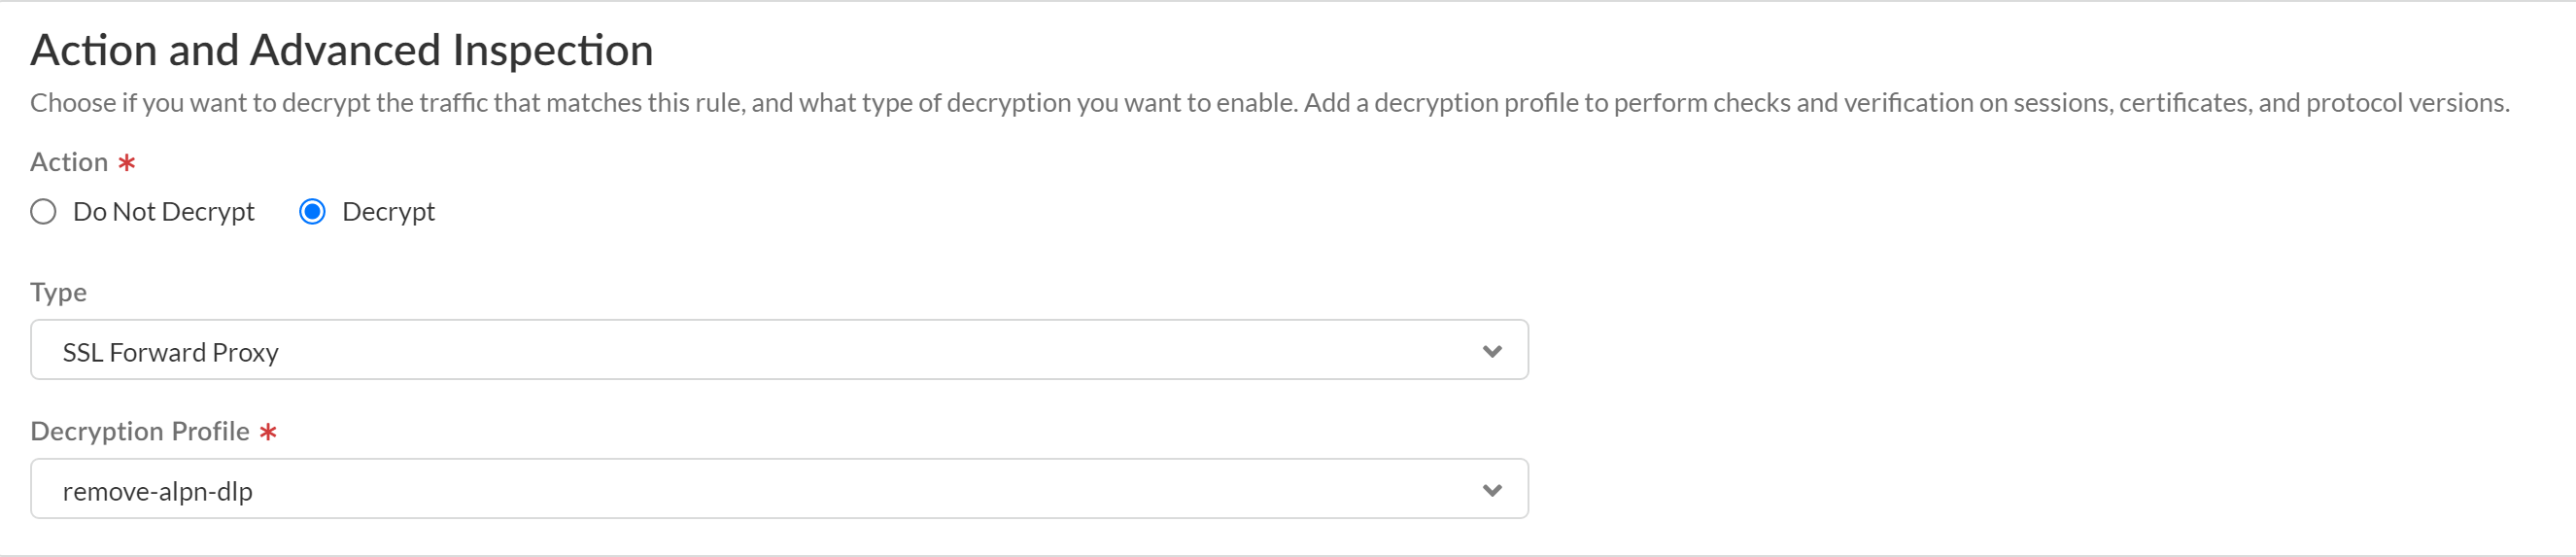
Save the decryption profile group.Create a decryption policy rule to decrypt traffic for Enterprise DLP inspection.Strata Cloud Manager includes the predefined Exclude Microsoft O365 Optimized Endpoints - IPs and Exclude Microsoft O365 Optimized Endpoints - URLs decryption rules that exclude Microsoft Office 365 from decryption.For Enterprise DLP to successfully inspect traffic for Microsoft Office 365, you must position this new decryption rule before the predefined decryption exclusion rules. Alternatively, you can Disable these rules or Delete them.- Select and Add Rule.Enter a descriptive Name and configure the decryption policy rule as needed.In the Action and Advanced Inspection section, configure the policy rule to Decrypt traffic that matches this rule.For the Type, select SSL Forward Proxy.Select the Decryption Profile you created to strip ALPN headers.
![]() Save the decryption policy rule.Create a decryption policy rule to exclude decrypting traffic for apps that use pinned certificates and mutual authentication.Decrypting app traffic when the app uses pinned certificates or mutual authentication causes user connectivity and app functionality issues. Create this decryption policy rule to exclude these apps from decryption.Order the decryption policy rule after the decryption policy rule to decrypt traffic for Enterprise DLP inspection. This ensures that app traffic that can be decrypted is decrypted before being forwarded to Enterprise DLP while excluding apps where decrypting its traffic causes access or usage issues.
Save the decryption policy rule.Create a decryption policy rule to exclude decrypting traffic for apps that use pinned certificates and mutual authentication.Decrypting app traffic when the app uses pinned certificates or mutual authentication causes user connectivity and app functionality issues. Create this decryption policy rule to exclude these apps from decryption.Order the decryption policy rule after the decryption policy rule to decrypt traffic for Enterprise DLP inspection. This ensures that app traffic that can be decrypted is decrypted before being forwarded to Enterprise DLP while excluding apps where decrypting its traffic causes access or usage issues.Enable Enterprise DLP on Panorama
Create policy rules to enable NGFW (Managed by Panorama) and Prisma Access (Managed by Panorama) to successfully use Enterprise Data Loss Prevention (E-DLP).- Activate the Enterprise DLP LicenseReview the Setup Prerequisites for Enterprise DLP and enable the required ports, Fully Qualified Domain Names (FQDN), and IP addresses on your network.This is required to forward traffic to Enterprise DLP for inspection and verdict rendering.Log in to the Panorama web interface.Configure the proxy server settings to enable the Panorama to successfully communicate with Enterprise DLP.Required if using a proxy server for PanoramaContinue to the next step if you're not using a proxy server or have already configured your Panorama proxy server settings.
- Select and edit the Services settings.Configure the proxy server settings.
- Server—IP address or hostname of the proxy server.
- Port—Port for the proxy server.
- User—Administrator username to access the proxy server.
- Password—Password for the user to access the proxy server. Reenter the password why you Confirm Password.The proxy server password must contain a minimum of seven characters.
- Enable proxy for cloud services—If you’re using Strata Logging Service for log storage, enable this setting.
- Enable proxy for Inline Cloud Services (Network DLP)—(Required when the firewall is deployed with an explicit proxy server | Available on PAN-OS 10.2.3 and later) Enables the configured proxy server to access the servers that facilitate requests generated by all configured inline cloud analysis features, including Network DLP. A single proxy server can be specified and applies to all Palo Alto Networks update services, including all configured inline cloud and logging services.(PAN-OS 10.2.11 and later) Configure the proxy server through the firewall CLI.
- Configure the base proxy server settings using the following CLI commands:
set deviceconfig system secure-proxy-server <FQDN_or_IP>
set deviceconfig system secure-proxy-port <1-65535>
set deviceconfig system secure-proxy-user <value>
set deviceconfig system secure-proxy-password <value>
The proxy server password must contain a minimum of seven characters. - Enable the proxy server to send requests to the inline cloud service servers using the following CLI command:
debug dataplane mica set inline-cloud-proxy enable
- View the current operational status of proxy support for inline cloud services using the following CLI command:
debug dataplane mica show inline-cloud-proxy
For example:debug dataplane mica show inline-cloud-proxy Proxy for Advanced Services is Disabled
Click OK.![]() (Optional; Best Practices) Create a service route to enable firewalls to connect to the internet.By default, matched traffic is sent to Enterprise DLP through the management interface. Configuring a service route allows you to dedicate a specific Ethernet interface from which to send matched traffic to Enterprise DLP and for Enterprise DLP to return a verdict.Palo Alto Networkss recommends configuring a service route to ensure a high level of performance for enforcement points forwarding traffic to Enterprise DLP. While recommended, Enterprise DLP doesn't require a service route for traffic forwarding.For a multi-vsys firewall, the service route is a global configuration and is applied to all vsys of a multi-vsys firewall regardless of which vsys the service route belongs to.Create a service route for all supported firewall models running PAN-OS 10.1 or a later release.
(Optional; Best Practices) Create a service route to enable firewalls to connect to the internet.By default, matched traffic is sent to Enterprise DLP through the management interface. Configuring a service route allows you to dedicate a specific Ethernet interface from which to send matched traffic to Enterprise DLP and for Enterprise DLP to return a verdict.Palo Alto Networkss recommends configuring a service route to ensure a high level of performance for enforcement points forwarding traffic to Enterprise DLP. While recommended, Enterprise DLP doesn't require a service route for traffic forwarding.For a multi-vsys firewall, the service route is a global configuration and is applied to all vsys of a multi-vsys firewall regardless of which vsys the service route belongs to.Create a service route for all supported firewall models running PAN-OS 10.1 or a later release.- Select and select the template that contains the Enterprise DLP configuration.Select Service Route Configuration in the Service Features and select Customize.Select Data Services and configure the Source Interface and Source Address.The source interface must have internet connectivity. See Configure Interfaces and Create an Address Object for more information on creating the source interface and address.Enable Data Services and click OK.Select and copy the Content Cloud Settings FQDN in the Service URL section.Select and Add a Security policy rule that allows addresses to the Content Cloud Settings FQDN.Add a Security policy rule for dataplane service route traffic from the 127.168.0.0/16 source address to allow traffic originating from the firewall dataplane.You’re required to create this Security policy rule to enable Enterprise DLP to successfully scan files in specific scenarios. You can skip this step if these two scenarios below regarding the intrazone-default Security policy rule don’t apply to your configuration.
- If you created a cleanup Deny Security policy rule that precedes the intrazone-default Security policy rule. In this scenario, the intrazone-default action is set to Allow.
- If you modified the intrazone-default Security policy rule action from Allow to Deny.
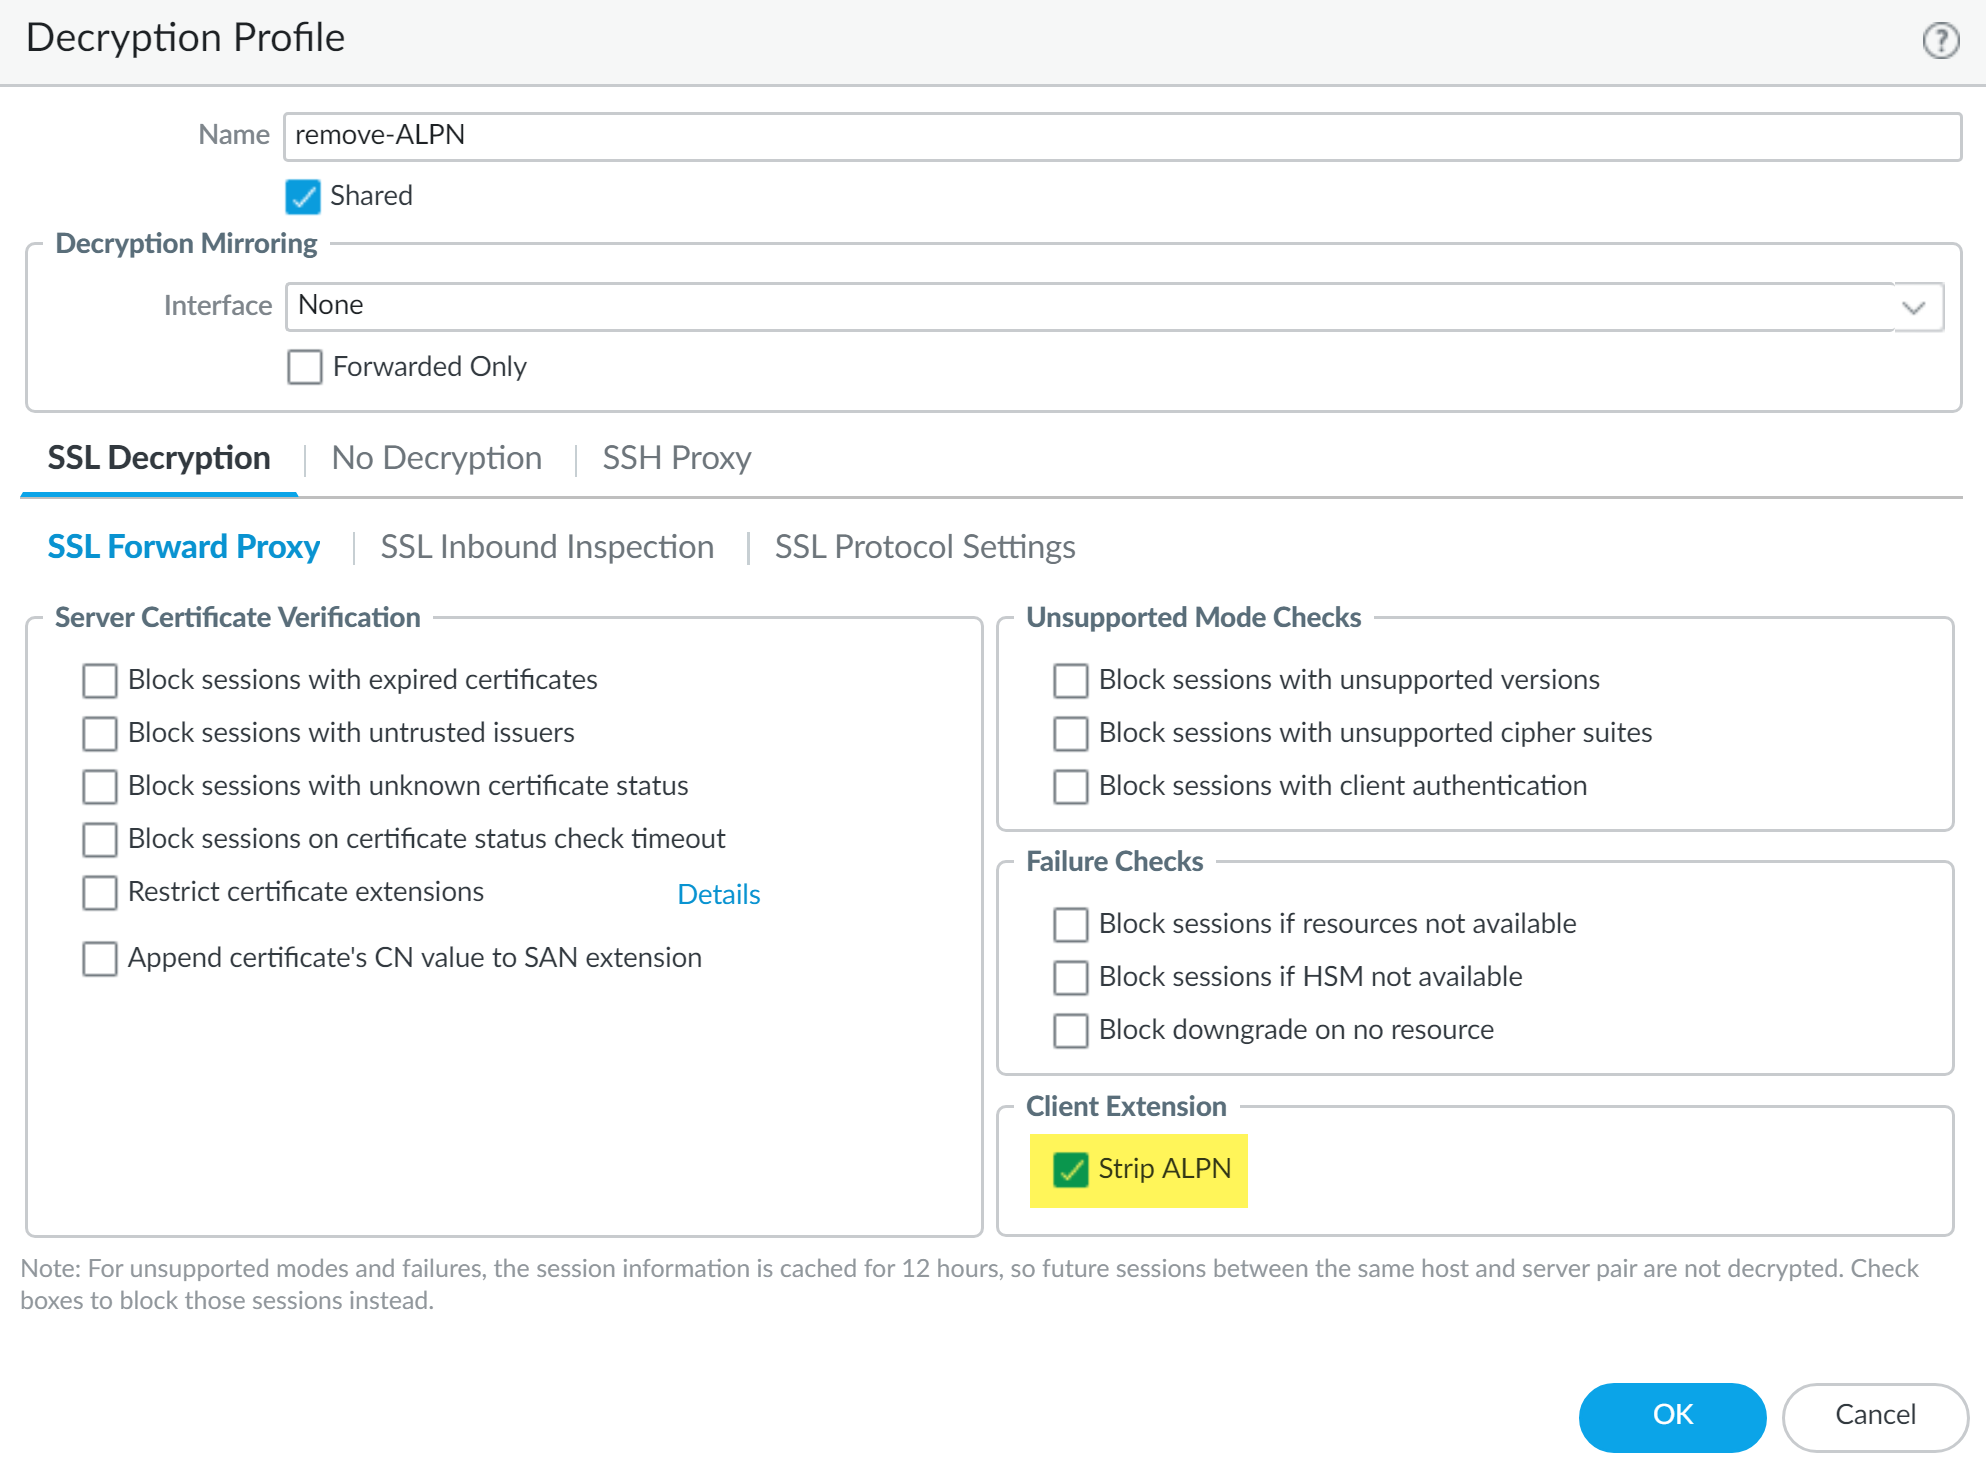
(Required for DLP 3.0.1 and earlier releases only) Create a decryption profile to remove application-layer protocol negotiation (ALPN) headers from uploaded files.Enterprise DLP supports HTTP/1.1. Some applications, such as SharePoint and OneDrive, support HTTP/2 for uploads by default. Strip ALPN is required to force applications using HTTP/2 to use HTTP/1.1 to make them compatible with Enterprise DLP.- Select and specify the Device Group.Add a new decryption profile.Specify a descriptive Name.(Optional) Enable the Shared option to make this decryption profile available across all device groups.Select and enable Strip ALPN in the Client Extension.Click OK.
![]() (Required for Enterprise DLP Plugin 3.0.1 and earlier releases only) Create a policy rule to remove ALPN headers from uploaded files.
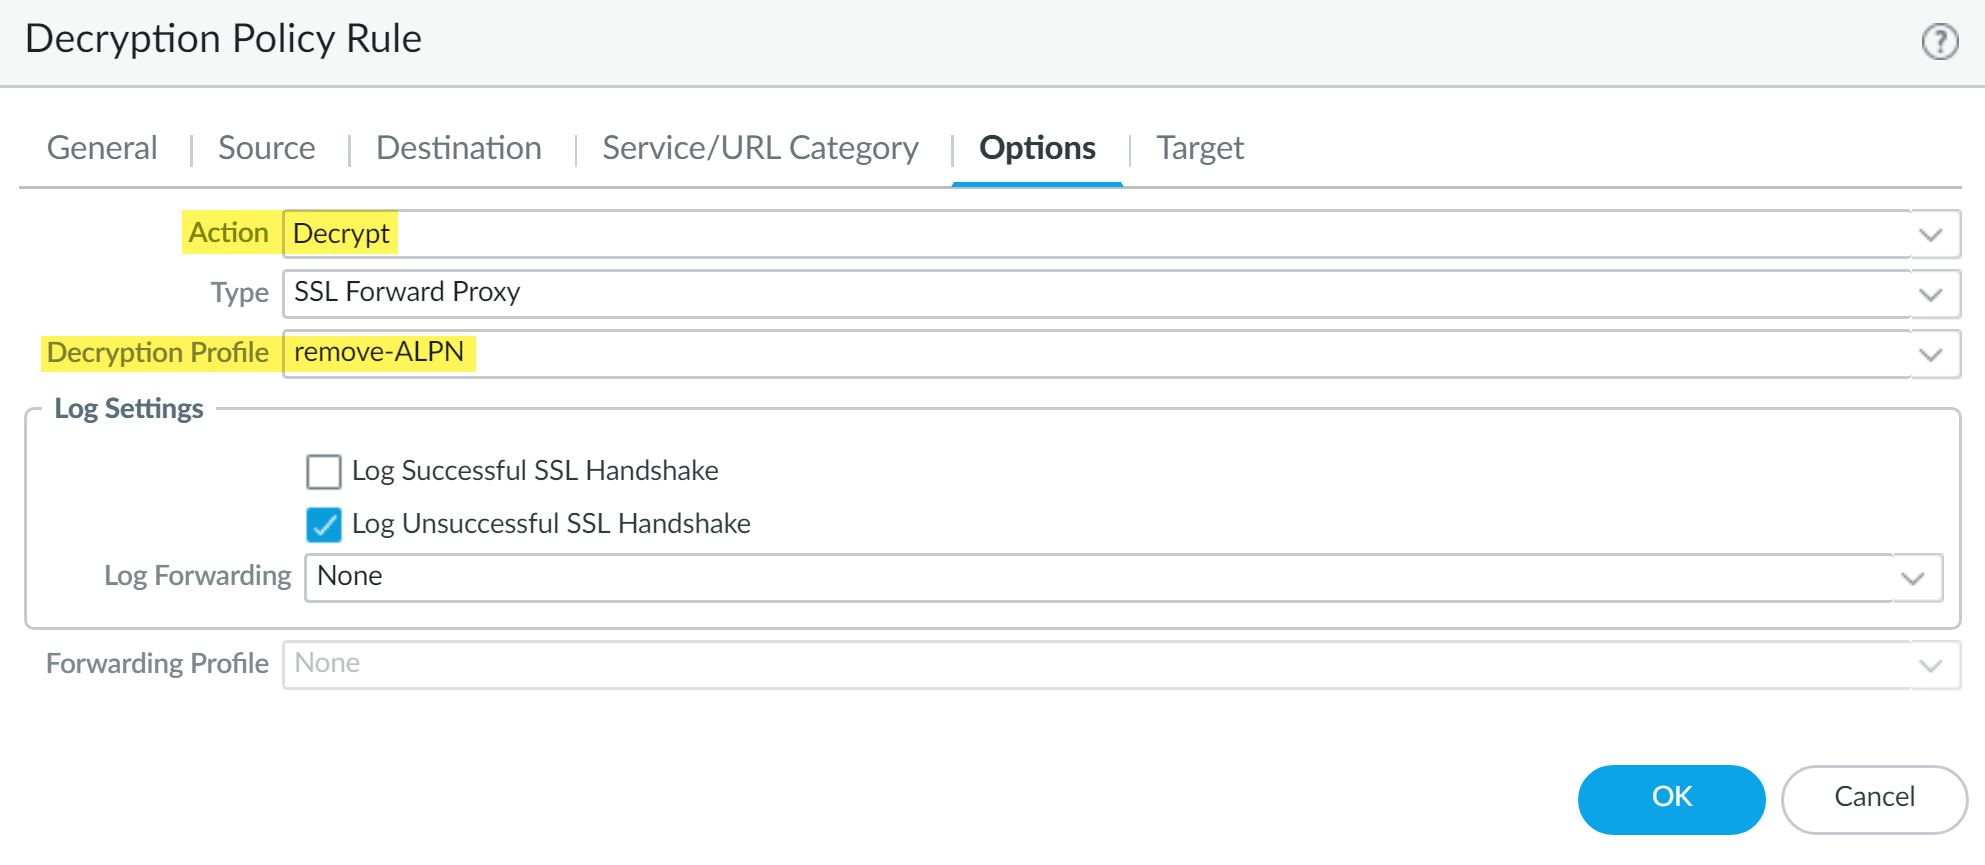
(Required for Enterprise DLP Plugin 3.0.1 and earlier releases only) Create a policy rule to remove ALPN headers from uploaded files.- Select and specify the Device Group.Add a new decryption policy rule and configure as appropriate.Select Options.For the Action, select Decrypt.Select the Decryption Profile you created.Click OK.
![]() Create a decryption policy rule to exclude decrypting traffic for apps that use pinned certificates and mutual authentication.Decrypting app traffic when the app uses pinned certificates or mutual authentication causes user connectivity and app functionality issues. Create this decryption policy rule to exclude these apps from decryption.(Enterprise DLP Plugin 3.0.1 and earlier releases only) Order the decryption policy rule after the decryption policy rule to decrypt traffic for Enterprise DLP inspection. This ensures that app traffic that can be decrypted is decrypted before being forwarded to Enterprise DLP while excluding apps where decrypting its traffic causes access or usage issues.Disable the Quick UDP Internet Connection (QUIC) protocol to deny traffic on ports 80 and 443.Many supported web applications, such as Gmail, require that you disable the QUIC protocol for Enterprise DLP to function correctly.
Create a decryption policy rule to exclude decrypting traffic for apps that use pinned certificates and mutual authentication.Decrypting app traffic when the app uses pinned certificates or mutual authentication causes user connectivity and app functionality issues. Create this decryption policy rule to exclude these apps from decryption.(Enterprise DLP Plugin 3.0.1 and earlier releases only) Order the decryption policy rule after the decryption policy rule to decrypt traffic for Enterprise DLP inspection. This ensures that app traffic that can be decrypted is decrypted before being forwarded to Enterprise DLP while excluding apps where decrypting its traffic causes access or usage issues.Disable the Quick UDP Internet Connection (QUIC) protocol to deny traffic on ports 80 and 443.Many supported web applications, such as Gmail, require that you disable the QUIC protocol for Enterprise DLP to function correctly.- Select and specify the Device Group.Add a Security policy rule that denies traffic that uses the quic application.Select and specify the Device Group.Add two services: one for UDP on port 80 and one for UDP on port 443.Newer versions of QUIC might be misidentified as unknown-udp. To account for this, Palo Alto Networks recommends that you add an additional Security policy rule to deny UDP traffic on those ports.Select and specify the Device Group.Add a Security policy rule that includes the services you created to deny traffic to UDP ports 80 and 443.When complete, you will have two Security policy rules; one that blocks the QUIC protocol and one that blocks UDP traffic on ports 80 and 443.Create a data pattern.Create a data profile.Attach the data filtering profile to a Security policy rule or create a Security policy rule if needed.To downgrade Panorama to an earlier PAN-OS version that does not support Enterprise DLP, you must remove all Enterprise DLP data patterns and data filtering profiles referenced in your Security policy rules. Consider this when creating and organizing your policy rules that reference Enterprise DLP data patterns and filtering profiles.For example, create a device group to contain all your Security policy rules that contain references to Enterprise DLP data patterns and filtering profiles. This enables you to quickly modify relevant policy rules should you need to downgrade Panorama to PAN-OS 10.0.1 or an earlier PAN-OS version.
- Select and specify the Device Group.Select the Security policy rule to which you want to add the data filtering profile.Select Actions and set the Profile Type to Profiles.Select the Data Filtering profile you created.Click OK.Commit and push the new configuration to your managed firewalls to complete the Enterprise DLP plugin installation.This step is required for Enterprise DLP data filtering profile names to appear in Data Filtering logs.The Commit and Push command isn’t recommended for Enterprise DLP configuration changes. Using the Commit and Push command requires the additional and unnecessary overheard of manually selecting the impacted templates and managed firewalls in the Push Scope Selection.
- Full configuration push from Panorama
- Select and Commit.
- Select and Edit Selections.
- Select Device Groups and Include Device and Network Templates.
- Click OK.
- Push your configuration changes to your managed firewalls that are using Enterprise DLP.
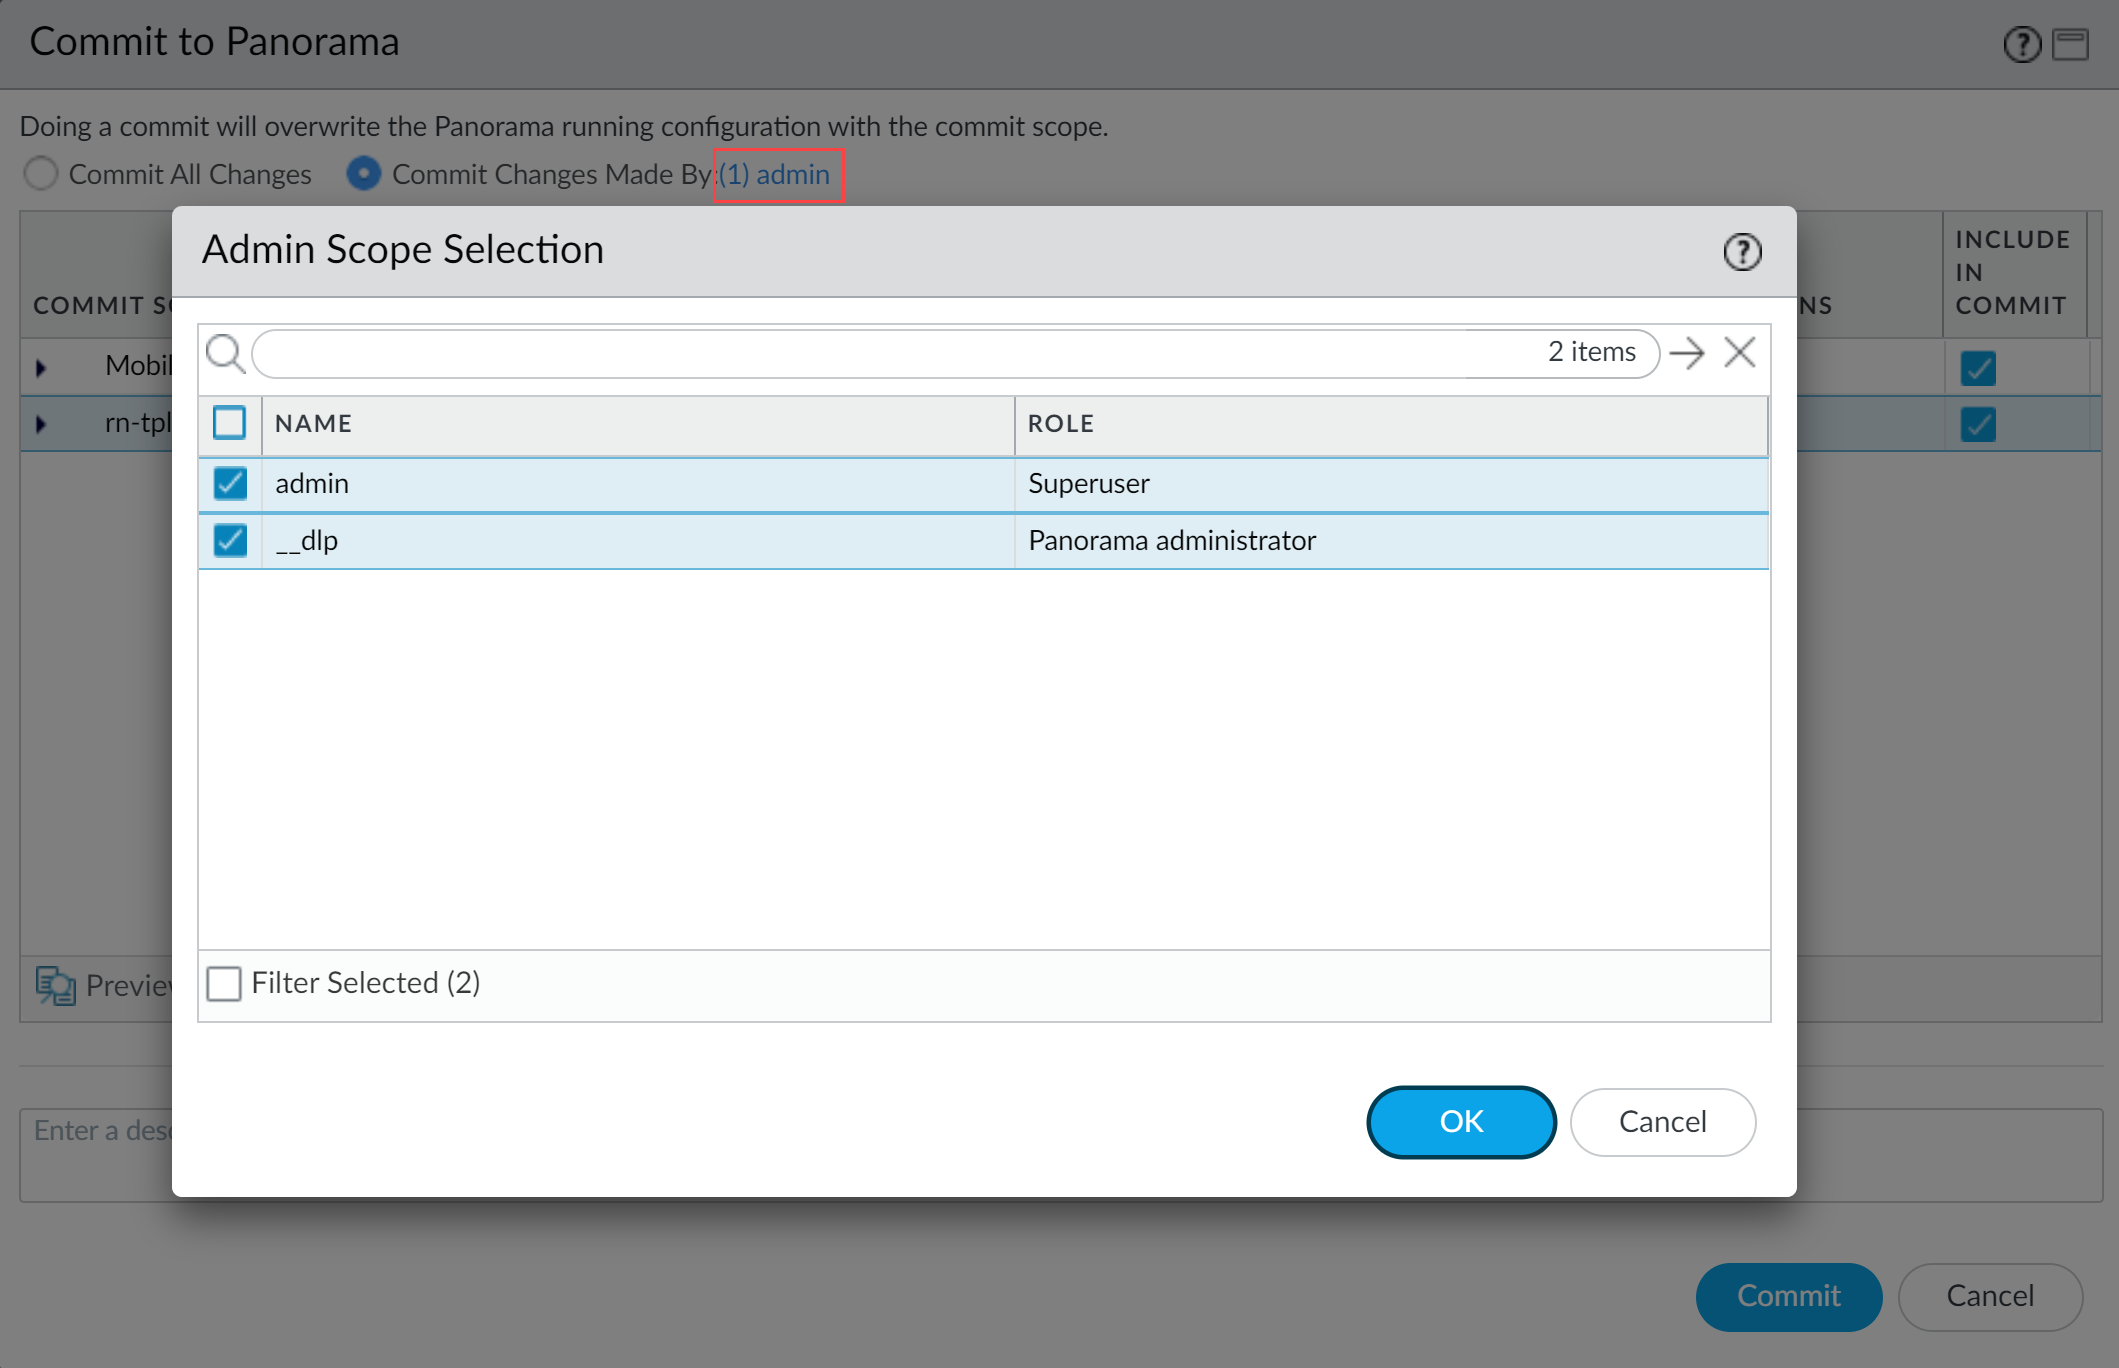
- Partial configuration push from PanoramaAlways include the temporary __dlp administrator when performing a partial configuration push. This is required to keep Panorama and Enterprise DLP in sync.For example, you have an admin Panorama admin user who is allowed to commit and push configuration changes. The admin user made changes to the Enterprise DLP configuration and only wants to commit and push these changes to managed firewalls. In this case, the admin user is required to also select the __dlp user in the partial commit and push operations.
- Select .
- Select Commit Changes Made By and then click the current Panorama admin user to select additional admins to include in the partial commit.In this example, the admin user is currently logged in and performing the commit operation. The admin user must click admin and then select the __dlp user. If there are additional configuration changes made by other Panorama admins they can be selected here as well.Click OK to continue.
![]()
- Commit.
- Select .
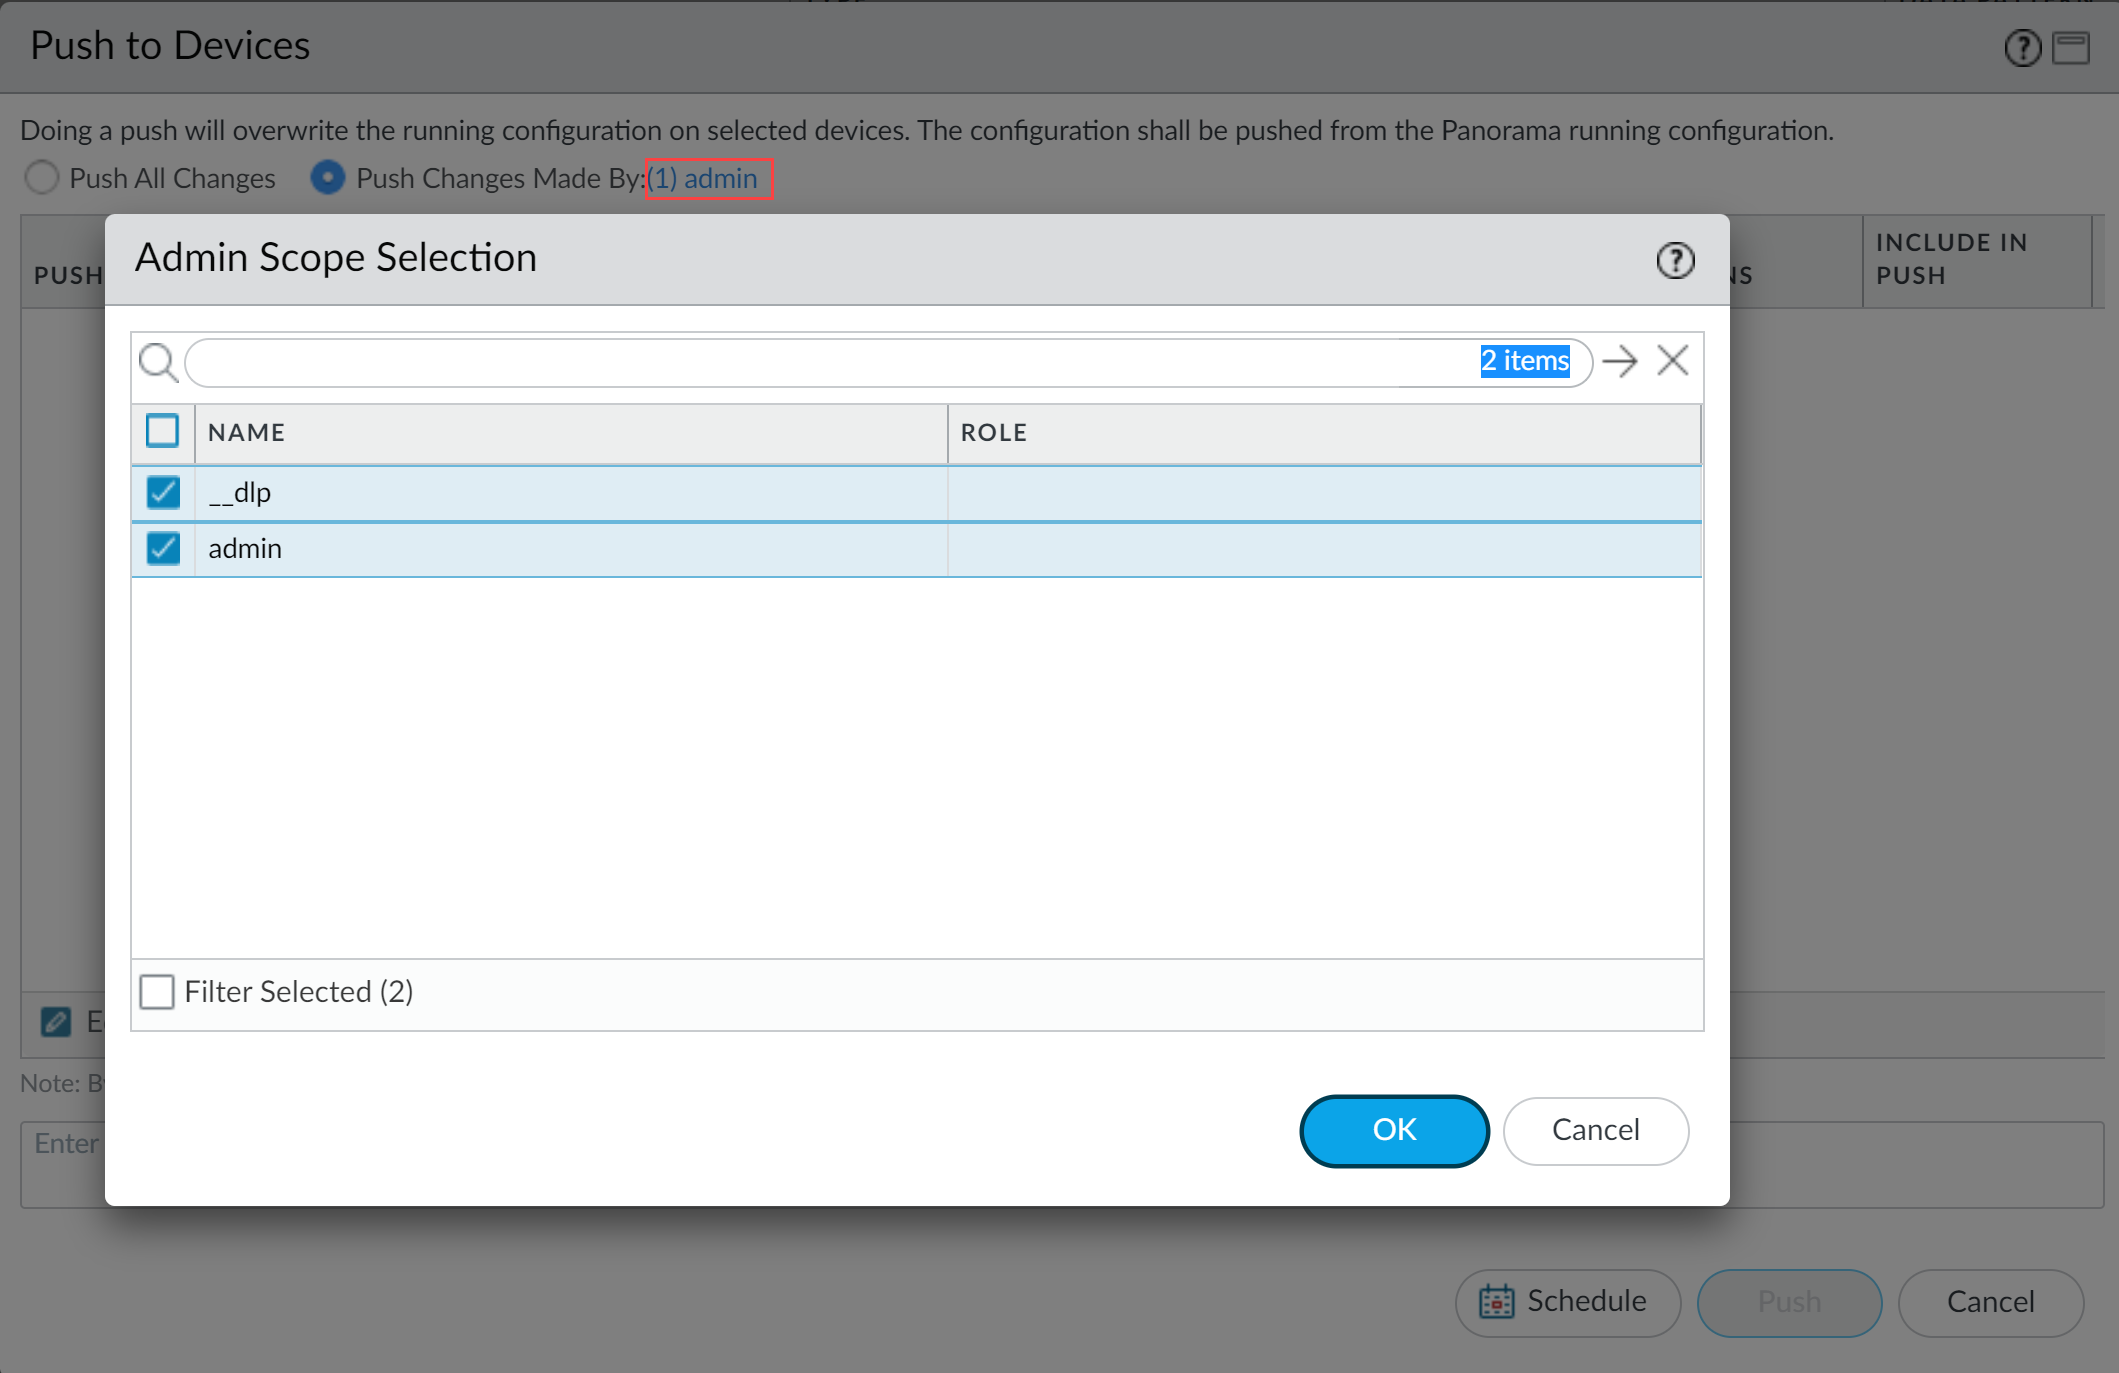
- Select Push Changes Made By and then click the current Panorama admin user to select additional admins to include in the partial push.In this example, the admin user is currently logged in and performing the push operation. The admin user must click admin and then select the __dlp user. If there are additional configuration changes made by other Panorama admins they can be selected here as well.Click OK to continue.
![]()
- Select Device Groups and Include Device and Network Templates.
- Click OK.
- Push your configuration changes to your managed firewalls that are using Enterprise DLP.
Enable Role Based Access for Enterprise DLP.