GlobalProtect
Configure Clientless VPN
Table of Contents
Configure Clientless VPN
To configure GlobalProtect
Clientless VPN:
- Before you begin:
- Install a GlobalProtect subscription on the firewall that hosts the Clientless VPN from the GlobalProtect portal. Refer to Active Licenses and Subscriptions.
- Install the latest GlobalProtect Clientless VPN dynamic update (see Install Content and Software Updates) and set a schedule for installing new dynamic content updates. As a best practice, it is recommended to always install the latest content updates for GlobalProtect Clientless VPN.
![]()
- As a best practice, configure a separate FQDN for the GlobalProtect portal that hosts Clientless VPN. Do not use the same FQDN as the PAN-OS Web Interface.
- Host the GlobalProtect portal on the standard SSL port (TCP port 443). Non-standard ports are not supported.
- Configure the applications that are available using GlobalProtect Clientless
VPN. The GlobalProtect portal displays these applications on the landing
page that users see when they log in (the applications landing page).
- Select and Add one
or more applications. For each application, specify the following:
- Name—A descriptive name for the application (up to 31 characters). The name is case-sensitive and must be unique. Use only letters, numbers, spaces, hyphens, and underscores.
- Location (for a firewall that is in multiple virtual system mode)—the virtual system (vsys) where the Clientless VPN applications are available. For a firewall that is not in multi-vsys mode, the Location field does not display.
- Application Home URL—The URL where the web application is located (up to 4,095 characters).
- Application Description (Optional)—A brief description of the application (up to 255 characters).
- Application Icon (Optional)—An icon to identify the application on the published application page. You can browse to upload the icon.
- Click OK.
- Select and Add one
or more applications. For each application, specify the following:
- (Optional) Create groups to manage sets of web
applications.Clientless App Groups are useful if you want to manage multiple collections of applications and provide access based on user groups. For example, financial applications for the G&A team or developer applications for the Engineering team.
- Select . Add a
new Clientless VPN application group, and specify the following:
- Name—A descriptive name for the application group (up to 31 characters). The name is case-sensitive and must be unique. Use only letters, numbers, spaces, hyphens, and underscores.
- Location (for a firewall that is in multiple virtual system mode)—the virtual system (vsys) where the Clientless VPN application group is available. For a firewall that is not in multi-vsys mode, the Location field does not display.
- In the Applications section, Add applications to the group. You can select from the list of existing Clientless VPN applications or define a New Clientless App.
- Click OK.
- Select . Add a
new Clientless VPN application group, and specify the following:
- Configure the GlobalProtect portal to provide the Clientless
VPN service.
- Select and select an existing portal configuration or Add a new one. Refer to Set Up Access to the GlobalProtect Portal.
- In the Authentication tab,
you can:
- (Optional) Create a new client authentication specifically for Clientless VPN. In this case, choose Browser as the OS for Client Authentication.
- Use an existing client authentication.
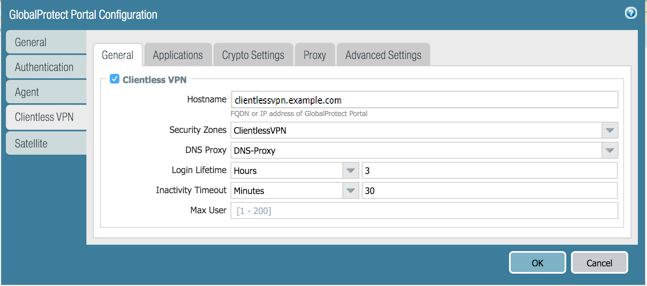
- In , select Clientless
VPN to enable the portal service and configure the following:
- Specify a Hostname (IP address or FQDN) for the GlobalProtect portal that hosts the applications landing page. This hostname is used for rewriting application URLs. (For more information on URL rewriting, refer to step 8).
If you use Network Address Translation (NAT) to provide access to the GlobalProtect portal, the IP address or FQDN you enter must match (or resolve to) the NAT IP address for the GlobalProtect portal (the public IP address). Because users cannot access the GlobalProtect portal on a custom port, the pre-NAT port must also be TCP port 443.- Specify a Security Zone. This zone is used as a source zone for the traffic between the firewall and the applications. Security rules defined from this zone to the application zone determine which applications users can access.
- Select a DNS Proxy server or configure a New DNS Proxy. GlobalProtect will use this proxy to resolve application names. Refer to DNS Proxy Object.
- Login Lifetime—Specify the maximum length of time (in hours or minutes) that a Clientless VPN session is valid. The typical session time is 3 hours. The range for hours is 1 to 24; the range for minutes is 60 to 1,440. After the session expires, users must re-authenticate and start a new Clientless VPN session.
- Inactivity Timeout—Specify the length of time (in hours or minutes) that a Clientless VPN session can remain idle. The typical inactivity timeout is 30 minutes. The range for hours is 1 to 24; the range for minutes is 5 to 1,440. If there is no user activity during the specified length of time, users must re-authenticate and start a new Clientless VPN session.
- Max User—Specify the maximum number of users who can be logged in to the portal at the same time. If no value is specified, then endpoint capacity is assumed. If the endpoint capacity is unknown, then a capacity of 50 users is assumed. When the maximum number of users is reached, additional Clientless VPN users cannot log in to the portal.
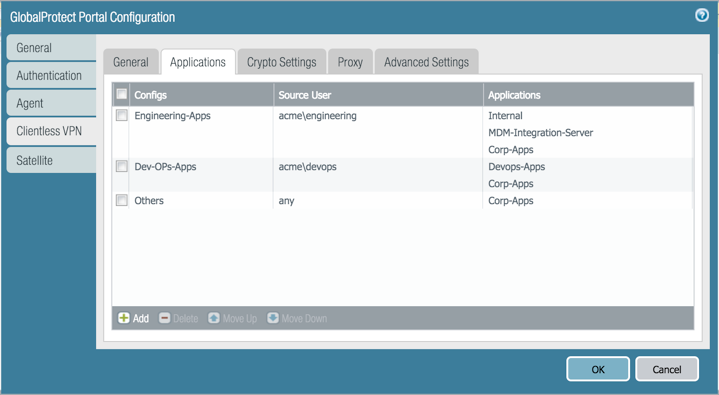
- Map users and user groups to applications.This mapping controls which applications users or user groups can launch from a GlobalProtect Clientless VPN session.The GlobalProtect portal uses the user/user group settings that you specify to determine which configuration to deliver to the GlobalProtect Clientless VPN user that connects. If you have multiple configurations, make sure they are ordered correctly and map to all of the required applications; the portal looks for a configuration match starting from the top of the list. As soon as the portal finds a match, it delivers the associated configuration to the GlobalProtect Clientless VPN user.
![]() Publishing an application to a user/user group or allowing them to launch unpublished applications does not imply that they can access those applications. You use security policies to control access to applications (published or not).You must configure group mapping () before you can select the groups.
Publishing an application to a user/user group or allowing them to launch unpublished applications does not imply that they can access those applications. You use security policies to control access to applications (published or not).You must configure group mapping () before you can select the groups.- On the Applications tab, Add an Applications
to User Mapping to match users with published applications.
- Name—Enter a name for the mapping (up to 31 characters). The name is case-sensitive and must be unique. Use only letters, numbers, spaces, hyphens, and underscores.
- Display application URL address bar—Select this option to display an application URL address bar from which users can launch applications that are not published on the applications landing page. When enabled, users can select the Application URL
- Specify the Source Users. You
can Add individual users or user groups to
which the current application configuration applies. These users
have permission to launch the configured applications using a GlobalProtect
Clientless VPN. In addition to users and groups, you can specify
when these settings apply to the users or groups:
- any—The application configuration applies to all users (no need to Add users or user groups).
- select—The application configuration applies only to users and user groups you Add to this list.
- Add individual applications or application groups to the mapping. The Source Users you included in the configuration can use GlobalProtect Clientless VPN to link to the applications you add.
- On the Applications tab, Add an Applications
to User Mapping to match users with published applications.
- Specify the security settings for a Clientless VPN session.
- On the Crypto Settings tab,
specify the authentication and encryption algorithms for the SSL
sessions between the firewall and the published applications.
- Protocol Versions—Select the required minimum and maximum TLS/SSL versions. The higher the TLS version, the more secure the connection. Choices include SSLv3, TLSv1.0, TLSv1.1, or TLSv1.2.
- Key Exchange Algorithms—Select the supported algorithm types for key exchange. Choices are: RSA, Diffie-Hellman (DHE), or Elliptic Curve Ephemeral Diffie-Hellman (ECDHE).
- Encryption Algorithms—Select the supported encryption algorithms. We recommend AES128 or higher.
- Authentication Algorithms—Select the supported authentication algorithms. Choices are: MD5, SHA1, SHA256, or SHA384. We recommend SHA256 or higher.
- Select the action to take when the following issues
occur with a server certificate presented by an application:
- Block sessions with expired certificate—If the server certificate has expired, block access to the application.
- Block sessions with untrusted issuers—If the server certificate is issued from an untrusted certificate authority, block access to the application.
- Block sessions with unknown certificate status—If the OCSP or CRL service returns a certificate revocation status of unknown, block access to the application.
- Block sessions on certificate status check timeout—If the certificate status check times out before receiving a response from any certificate status service, block access to the application.
- On the Crypto Settings tab,
specify the authentication and encryption algorithms for the SSL
sessions between the firewall and the published applications.
- (Optional) Specify one or more proxy server
configurations to access the applications.Only basic authentication to the proxy is supported (username and password).If users need to reach the applications through a proxy server, specify a Proxy Server. You can add multiple proxy server configurations, one for each set of domains.
- Name—A label (up to 31 characters) to identify the proxy server configuration. The name is case-sensitive and must be unique. Use only letters, numbers, spaces, hyphens, and underscores.
- Domains—Add the domains served by the proxy server. You can use a wild card character (*) at the beginning of the domain name to indicate multiple domains.
- Use Proxy—Select to assign a proxy server to provide access to the domains.
- Server—Specify the IP address or hostname of the proxy server.
- Port—Specify a port for communication with the proxy server.
- User and Password—Specify the User and Password credentials needed to log in to the proxy server. Specify the password again for verification.
- (Optional)
Specify any special treatment for application domains.The Clientless VPN acts as a reverse proxy and modifies web pages returned by the published web applications. It rewrites all URLs and presents a rewritten page to remote users such that when they access any of those URLs, the requests go through the GlobalProtect portal.In some cases, the application may have pages that do not need to be accessed through the portal (for example, the application may include a stock ticker from yahoo.finance.com). You can exclude these pages.On the Advanced Settings tab, Add domain names, hostnames, or IP addresses to the Rewrite Exclude Domain List. These domains are excluded from rewrite rules and cannot be rewritten.Paths are not supported in hostnames and domain names. The wildcard character (*) for hostnames and domain names can appear only at the beginning of the name (for example, *.etrade.com).
- Save the portal configuration.
- Click OK twice.
- Commit your changes.
- Configure a Security policy rule to
enable users to access the published applications.You need security policies for the following:
- Make the GlobalProtect portal that hosts Clientless VPN reachable from the internet. This is traffic from the Untrust or Internet Zone to the zone where you host the Clientless VPN portal.
- Allow Clientless VPN users to reach the internet. This is traffic from the Clientless VPN zone to the Untrust or Internet Zone.
![]()
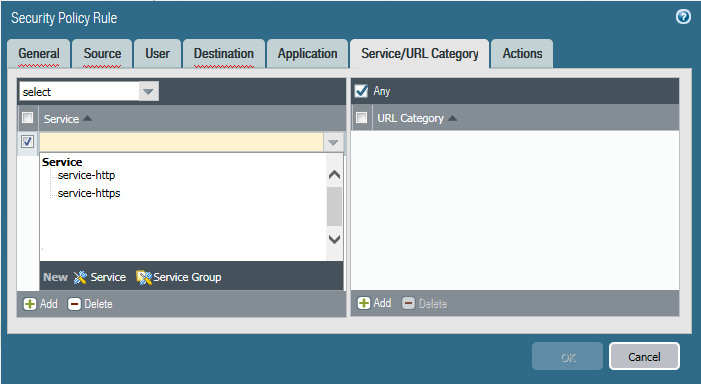
- Allow Clientless VPN users to reach corporate resources. This is traffic from the Clientless VPN zone to the Trust or Corp Zone. The security policies you define control which users have permission to use each published application. For the security zone where the published application servers are hosted, make sure to Enable User IdentificationBy default, Service/URL in Security Policy Rule is set to application-default. Clientless VPN will not work for HTTPS sites with this default setting. Change Service/URL to include both service-http and service-https.
![]()
- When you configure a proxy server to access Clientless VPN applications, make sure you include the proxy IP address and port in the security policy definition. When applications are accessed through a proxy server, only Security policies defined for the proxy IP address and port are applied.
- (Optional) To configure the Clientless VPN portal landing
page to display the location of the portal to which Clientless VPN
users are connected, specify the physical location of the firewall
on which you configured the portal.When Clientless VPN users experience unusual behavior, such as poor network performance, they can provide this location information to their support or Help Desk professionals to assist with troubleshooting. They can also use this location information to determine their proximity to the portal. Based on their proximity, they can evaluate whether they need to switch to a closer portal.If you do not specify a portal location, the Clientless VPN portal landing page displays an empty location field.
- In the CLI—Use the following CLI command to specify the physical location of the firewall on which you configured the portal:
<username@hostname> set deviceconfig setting global-protect location <location> - In the XML API—Use the following XML API to specify the physical location of the firewall on which you configured the portal:
- devices—name of the firewall on which you configured the portal
- location—location of the firewall on which you configured the portal
curl -k -F file=@filename.txt -g 'https://<firewall>/api/?key=<apikey>&type=config&action=set&xpath=/config/devices/entry[@name='<device-name>']/deviceconfig/setting/global-protect&element=<location>location-string</location>'

The source IP address of Clientless
VPN traffic (as seen by the application) will be either the IP address
of the egress interface through which the portal can reach the application
or the translated IP address when source NAT is in use.