Device Security
Legacy IoT Security
Table of Contents
Expand All
|
Collapse All
Device Security Docs
Legacy IoT Security
Set up a full-featured Cortex XSOAR server for
Device Security integration with third-party solutions, from the
Device Security portal.
- Choose a Cortex XSOAR server for Device Security to use for third-party integrations.
- Log in to the legacy IoT Security portal, select IntegrationsThird-party Integrations, and ensure that you have the full-featured Cortex XSOAR set as your integration method.
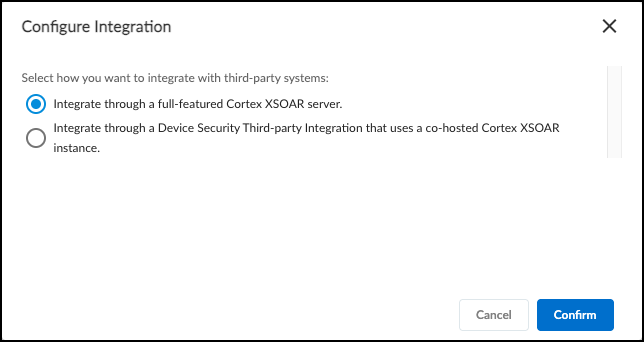
- Optional If you're currently using the cohosted cloud Cortex XSOAR, then in the Third-party Integrations section, select 3-dots menuSwitch Integration Methods.In the Configure Integration pop-up, select Integrate through a full-featured Cortex XSOAR server. and then Confirm.
![]() If you have both a full-featured Cortex XSOAR server and the cohosted, cloud-based Cortex XSOAR server, you can switch between the two, but you can only use one method at a time for third-party integrations.
If you have both a full-featured Cortex XSOAR server and the cohosted, cloud-based Cortex XSOAR server, you can switch between the two, but you can only use one method at a time for third-party integrations.
Download the Device Security Content Pack.On the Third-party Integrations page, download the Device Security content pack as a .zip file from the XSOAR Installation section.Don't download and attempt to use the Device Security content pack from the Cortex XSOAR marketplace. It isn't current and does not support all the third-party integrations that the content pack available from Device Security on Strata Cloud Manager or the legacy IoT Security portal does. Only download and use the content pack from Device Security in Strata Cloud Manager or the legacy IoT Security portal.Create an API access key and then download the key and key ID.If you have the text file for a currently active API access key, you can use that instead of creating a new API access key.- On the Integrations page in Device Security, click Create under API Access Key.
- In the Create Access Key dialog, click Create again.
- In the Access Key Created dialog, Download the access key and key ID as a text file.
Copy the Device Security tenant URL.Configure the Cortex XSOAR server.Log in to the Cortex XSOAR server, upload the content pack, and use your Device Security tenant URL, API access key, and key ID to configure the "Palo Alto Networks IoT 3rd Party" integration instance.- Log in to the XSOAR server using credentials for a user account with administrator privileges, which let you upload the Device Security content pack.
![]()
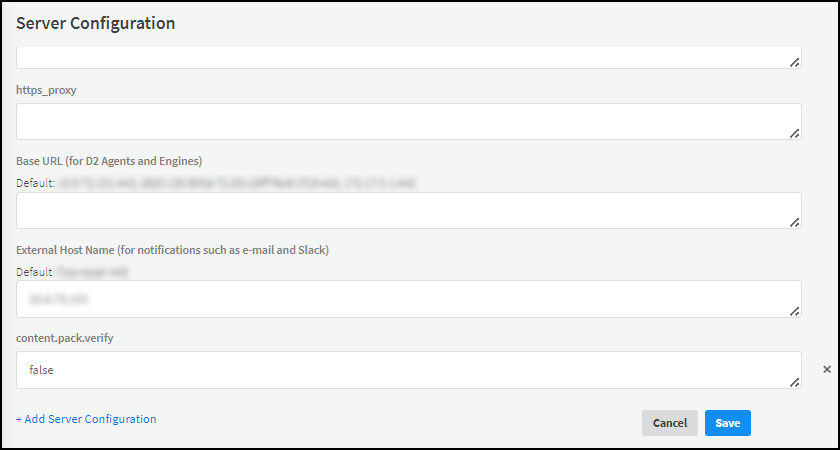
- Because the Device Security content pack isn't provided by Cortex XSOAR, set content pack verification to false.Cortex XSOAR version 6.8-6.12 Select SettingsAboutTroubleshooting, enter false in the content.pack.verify field in the Server Configuration section, and then Save.
![]() Cortex XSOAR version 8.x Cortex XSOAR version 8.x hides the content pack verify option, so you need to enable it before you can set the value. Select SettingsServer Settings Server Configuration + Add Server Configuration . On a macOS device, press the Option key on your keyboard to see all the hidden fields. On a Windows or Linux device, press the Alt key on your keyboard to see all the hidden fields. Select the content.pack.verify option, and set the field to false. Save your changes.
Cortex XSOAR version 8.x Cortex XSOAR version 8.x hides the content pack verify option, so you need to enable it before you can set the value. Select SettingsServer Settings Server Configuration + Add Server Configuration . On a macOS device, press the Option key on your keyboard to see all the hidden fields. On a Windows or Linux device, press the Alt key on your keyboard to see all the hidden fields. Select the content.pack.verify option, and set the field to false. Save your changes.![]()
![]()
- On the Cortex XSOAR server, navigate to the Marketplace, and then Upload Content Packs .
![]()
- Select the Device Security content pack for XSOAR to upload and install.
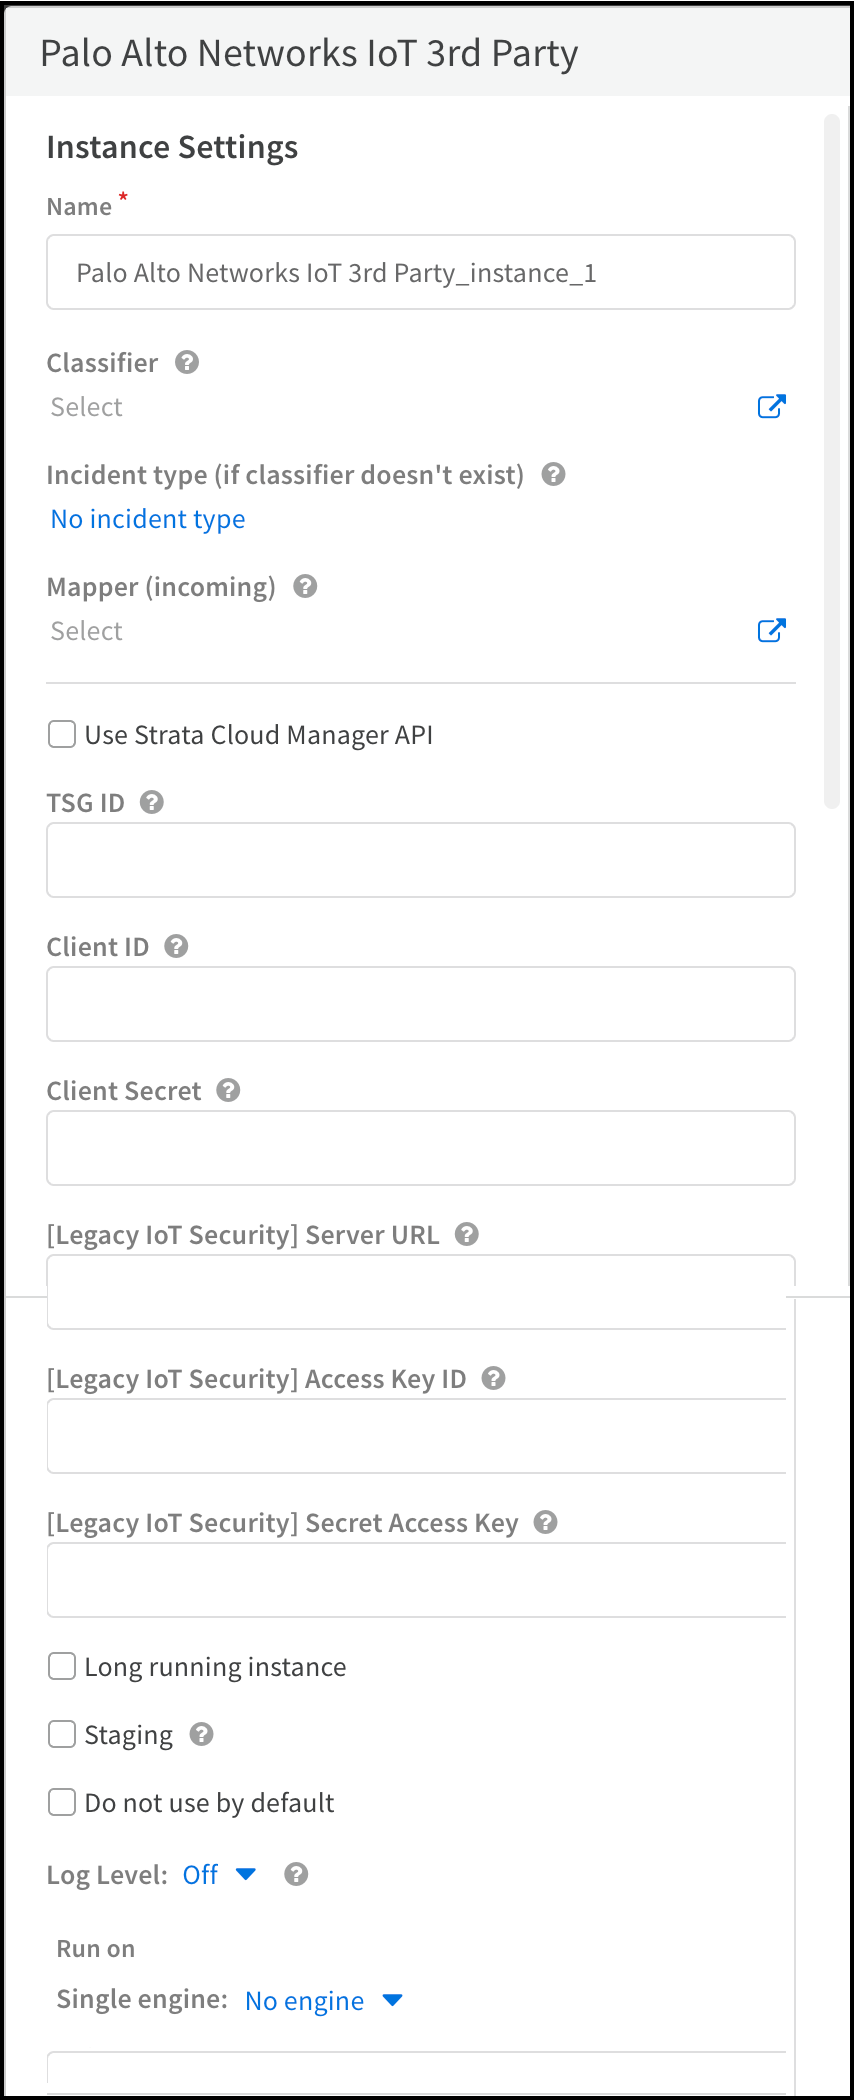
- Select Settings, search for palo alto networks iot 3rd party , and then click Add instance to open the settings panel.
- Enter the following and leave other settings at their default values:Name: Use the default name ( Palo Alto Networks IoT 3rd Party_instance_1 ) or enter a new one.[Legacy IoT Security] Server URL : Copy this from the Integrations page in Device Security and paste it here.[Legacy IoT Security] Access Key ID: Copy this from the API access key file you downloaded and paste it here.[Legacy IoT Security] Secret Access Key: Copy this from the API access key file you downloaded and paste it here.Long running instance : (select; this maintains a session between the XSOAR server and Device Security, using a regular heartbeat mechanism to monitor connectivity)Single engine: Choose No engine.
![]()
- When finished, click Run test or Test.If the test is successful, a Success message appears. If not, check that the settings were entered correctly and then test the configuration again.
![]()
- After the test succeeds, click Save & exit to save your changes and close the settings panel.
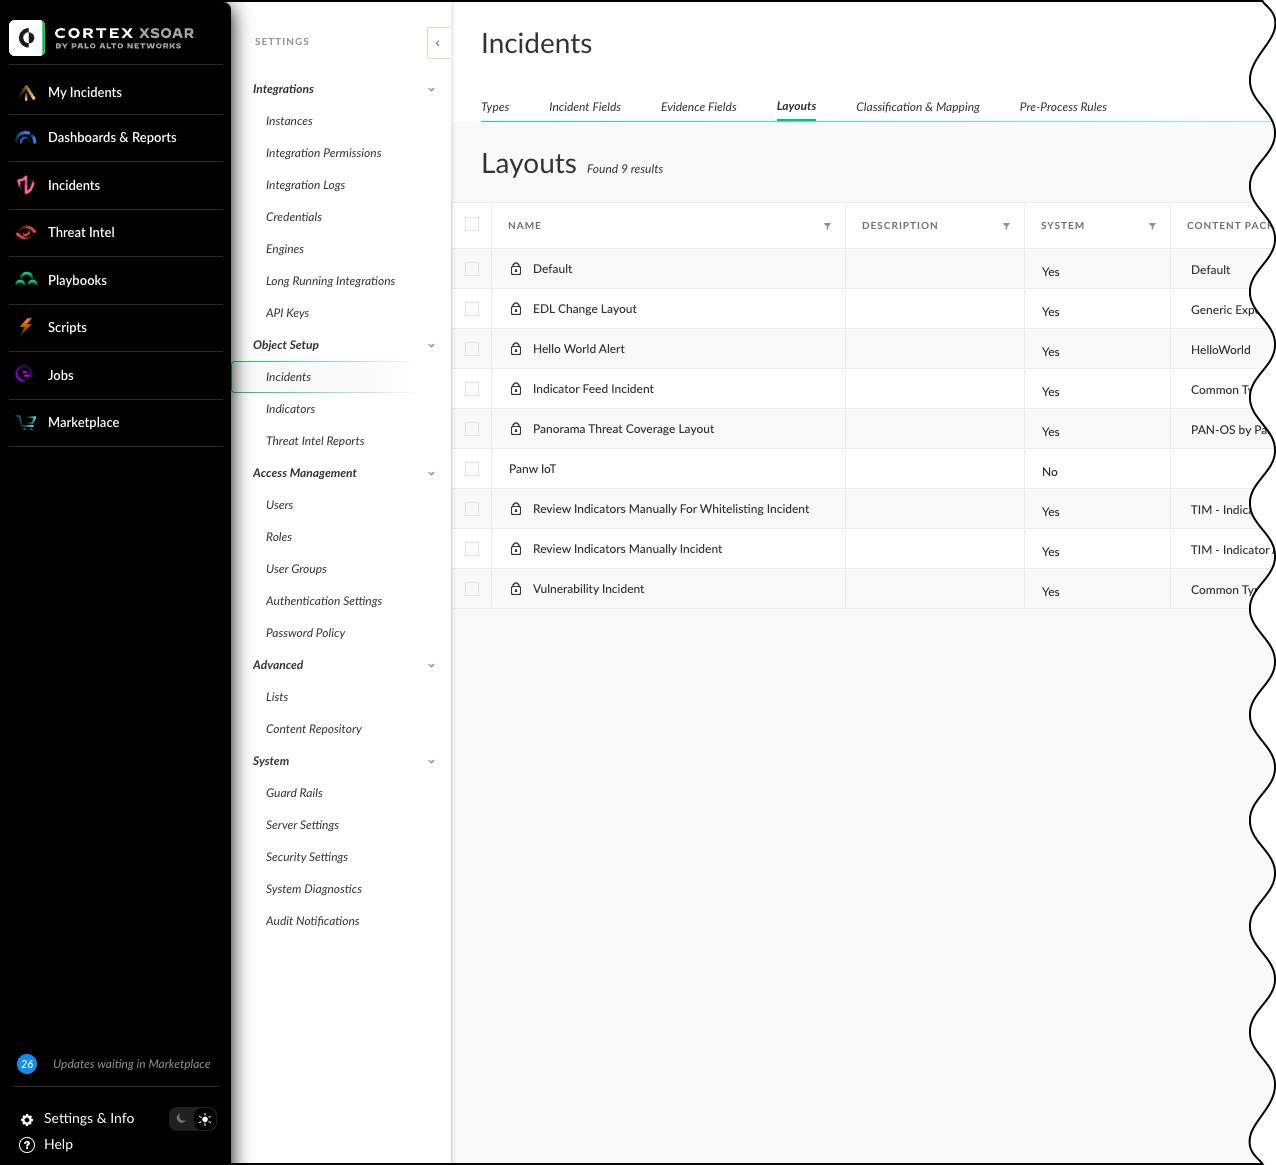
Cortex XSOAR version 8.0 and later If the Device Security content pack incident fields don't appear in the job creation page, create a customized incident layout in Cortex XSOAR.When running Cortex XSOAR version 8.0 and later, the Device Security third-party content pack custom fields might not appear in the job creation page. Create an incident layout, assign it to a custom incident type for third-party integrations, and add the customized incident type to all Device Security third-party integration jobs that you create.- Navigate to Settings & Info SettingsObject SetupIncidentsLayouts. This brings up the table of incident layouts.
![]()
- Select + New Layout"New"/"Edit" Form to create a new layout.
- Enter a descriptive name for the layout for Device Security third-party integrations.
- From the Library in the left-side panel, add fields into the Custom Fields box in the right-side panel by dragging and dropping. Drag and drop the following fields.
- Asset Attribute Polling IP/Subnet
- Automatically Synchronize Scanners with IoT Security
- Bulk Export Interval (Days)
- Cisco Meraki Networks
- Cisco Meraki Organizations
- Custom IPAM Data List Name
- ExtremeCloud IQ SE End-System Custom Attributes
- Import Aruba Central wired client details to IoT Security
- Import IPAM site definitions to IoT Security
- Import vulnerabilities by CVE severity levels
- Integration Instance Name
- ip
- IPAM subnet Data Overwrite
- jobid
- Network Discovery Skip Neighbor Discovery Patterns
- PANW IoT Device Custom Attributes
- PANW IoT In Scope Tag Enforcement
- PANW-ServiceNow-Category-Map
- Playbook Poll Interval
- Polling Duration in days
- Primary Active Instance Name
- Primary Instance Name(s)
- Primary Standby Instance Name
- profileid
- Rockwell AssetCentre Asset Property UUIDs
- Rockwell AssetCentre Asset Type UUIDs
- Run Once
- scannerid
- Secondary Active Instance Name
- Secondary Instance Name(s)
- Secondary Standby Instance Name
- ServiceNow Discovered IoT Device Table Name
- ServiceNow-IoT Device Category
- ServiceNow-IoT Device Model
- ServiceNow-IoT Device OS
- ServiceNow-IoT Device Profile
- ServiceNow-IoT Device Site
- ServiceNow-IoT Device SSID
- ServiceNow-IoT Device Supported OS
- ServiceNow-IoT Device Tag
- ServiceNow-IoT Device Vendor
- ServiceNow-IoT Device VLAN
- ServiceNow-IoT Wired/Wireless Device
- Site Names
- siteid
- Splunk Index
- Splunk Source Type
- Use IPAM non-site data if the same block or subnet is in IoT Security
- Use IPAM site data if the same root block is in IoT Security
- Select Save Version. This takes you back to the Layouts table.
- Navigate to Types and then select + New Incident Type. This brings up the New Incident Type dialog.
- Enter a Name, and then under Layout select the layout you created. Save the new incident type to close the dialog.
![]()
- Make note of the name of your incident type. You will need to assign the incident type to all Device Security third-party integration jobs that you create.
Configure Device Security third-party integrations.After you've installed a content pack for IoT 3rd party integrations, you can begin configuring integrations with third-party systems. For Device Security and Cortex XSOAR to integrate with a third-party system, you must configure XSOAR with an integration instance specifying the connection settings and a job running a playbook over the connection.Although the integration instructions later in this guide assume that you're using a cohosted XSOAR module, the configuration instructions for the integration instances and jobs are similar for both cohosted deployments and full-featured Cortex XSOAR server deployments.


