Network Security
Policy Object: HIP Objects
Table of Contents
Expand All
|
Collapse All
Network Security Docs
Policy Object: HIP Objects
HIP objects provide the matching criteria for filtering the raw data reported by an app
that you want to use to enforce policy.
HIP Objects are used to define objects for a host
information profile (HIP). HIP objects provide the matching criteria
for filtering the raw data reported by an app that you want to use
to enforce policy. For example, if the raw host data includes information
about several antivirus packages on an endpoint, you might be interested
in a particular application because your organization requires that
package. For this scenario, you create a HIP object to match the
specific application you want to enforce.
The best way to determine the HIP objects you need is to determine
how you will use the host information to enforce policy. Keep in
mind that the HIP objects are merely building blocks that allow
you to create the HIP profiles that your Security policies can use.
Therefore, you may want to keep your objects simple, matching on
one thing, such as the presence of a particular type of required
software, membership in a specific domain, or the presence of a
specific endpoint OS. With this approach, you have the flexibility to
create a very granular, HIP-augmented policy.
Add a HIP Object
Add a HIP Object (Strata Cloud Manager)
Define objects for a host information profile (HIP).
Select to define objects for a host information profile (HIP). HIP objects
provide the matching criteria for filtering the raw data reported by an app that you
want to use to enforce policy. For example, if the raw host data includes
information about several antivirus packages on an endpoint, you might be interested
in a particular application because your organization requires that package. For
this scenario, you create a HIP object to match the specific application you want to
enforce.
The best way to determine the HIP objects you need is to determine how you will use
the host information to enforce the policy. Keep in mind that the HIP objects are
merely building blocks that allow you to create the HIP Profiles that your security
rules can use. Therefore, you may want to keep your objects simple, matching on one
thing, such as the presence of a particular type of required software, membership in
a specific domain, or the presence of a specific endpoint OS. With this approach,
you have the flexibility to create a very granular, HIP-augmented policy.
To create a HIP object, select Add HIP Object to open the HIP
object dialog. For a description of what to enter in a specific field, see the
tables that follow.
- HIP Objects General Tab
- HIP Objects Mobile Device Tab
- HIP Objects Patch Management Tab
- HIP Objects Firewall Tab
- HIP Objects Anti-Malware Tab
- HIP Objects Disk Backup Tab
- HIP Objects Disk Encryption Tab
- HIP Objects Data Loss Prevention Tab
- HIP Objects Certificate Tab
- HIP Objects Custom Checks Tab
For more detailed information on creating HIP-augmented security rules, refer
to Configure HIP-Based Policy Enforcement in
the GlobalProtect Administrator’s Guide.
Create a HIP Profile
HIP Profile is a collection of HIP objects to be evaluated together
either for monitoring or for Security policy enforcement that you use to set up
HIP-enabled security rules. When creating HIP Profiles, you can combine
the HIP objects you previously created (as well as other HIP Profiles) by using
Boolean logic, so that when a traffic flow is evaluated against the resulting
HIP Profile, it will either match or not match. Upon a match, the corresponding
security rule is enforced; if there is no match, the flow is evaluated against the
next rule (as with any other policy matching criteria).
- Go to ConfigurationNGFW and Prisma AccessObjectsHIPHIP Profiles.Add HIP Profile.Configure the settings in this table:HIP Profile SettingsDescriptionNameEnter a name for the profile (up to 31 characters). The name is case-sensitive and must be unique. Use only letters, numbers, spaces, hyphens, and underscores.Description(Optional) Enter a description.MatchClick Add Match Criteria to open the HIP Objects/Profiles Builder.Select the first HIP object or profile you want to use as match criteria and then add it to the Match text box on the HIP Objects or Profiles Builder dialog. Keep in mind that if you want the HIP Profile to evaluate the object as a match only when the criteria in the object are not true for a flow, select NOT before adding the object.Continue adding match criteria as appropriate for the profile you're building, and ensure you select the appropriate Boolean operator (AND or OR) between each addition (and using the NOT operator when appropriate).To create a complex Boolean expression, you must manually add the parenthesis in the proper places in the Match text box to ensure that the HIP Profile is evaluated using the intended logic. For example, the following expression indicates that the HIP Profile will match traffic from a host that has either FileVault disk encryption (Mac OS systems) or TrueCrypt disk encryption (Windows systems) and also belongs to the required Domain and has a Symantec antivirus client installed:
((“MacOS” and “FileVault”) or (“Windows” and “TrueCrypt”)) and “Domain” and “SymantecAV”
When you have finished adding the objects and profiles to the new HIP Profile, click OK.Save your configuration.Select Push Config to save your configuration and deploy it to your network.Disable Default HIP Profiles
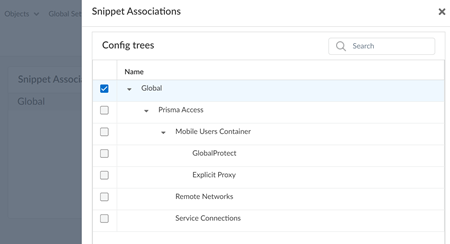
In Strata Cloud Manager, the default HIP objects and HIP profiles are moved from the Global-Default snippet to the HIP-Default snippet. This gives you more flexibility in managing the default HIP profiles. You have the option to disable these default HIP profiles by disassociating the HIP Default snippet from the global folder.- Log into Strata Cloud Manager.Select ConfigurationNGFW and Prisma AccessOverview Scope and expand the Configuration Scope to view the Snippets.Select HIP-Default.You’re redirected to the snippet Overview.
![]() Edit the Snippet Associations to disassociate HIP profiles from the Global folder.
Edit the Snippet Associations to disassociate HIP profiles from the Global folder.![]() Exit the snippet association screen to apply the changes.Follow these steps to selectively enable the default HIP profiles.
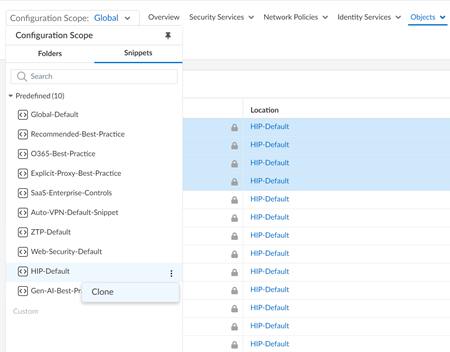
Exit the snippet association screen to apply the changes.Follow these steps to selectively enable the default HIP profiles.- Go to ObjectsHIPHIP Profiles and select the HIP Profiles.
- Expand the Configuration Scope to view the Snippets.
- Click the three vertical dots of the
HIP-Default snippet and
Clone the HIP profile as a custom snippet.
![]()
- Give the cloned snippet a new name.
- Select the cloned snippet under Custom.
- Select the HIP Profiles that you want to Delete.
- Go to HIP-DefaultOverview, and edit the Snippet Associations to associate the cloned snippet to the global folder.
Add a HIP Object (PAN-OS & Panorama)
Define objects for a host information profile (HIP).Select ObjectsGlobalProtectHIP Objects to define objects for a host information profile (HIP). HIP objects provide the matching criteria for filtering the raw data reported by an app that you want to use to enforce policy. For example, if the raw host data includes information about several antivirus packages on an endpoint, you might be interested in a particular application because your organization requires that package. For this scenario, you create a HIP object to match the specific application you want to enforce.The best way to determine the HIP objects you need is to determine how you will use the host information to enforce policy. Keep in mind that the HIP objects are merely building blocks that allow you to create the HIP Profiles that your security rules can use. Therefore, you may want to keep your objects simple, matching on one thing, such as the presence of a particular type of required software, membership in a specific domain, or the presence of a specific endpoint OS. With this approach, you have the flexibility to create a very granular, HIP-augmented policy.To create a HIP object, select Add to open the HIP object dialog. For a description of what to enter in a specific field, see the tables that follow.- HIP Objects General Tab
- HIP Objects Mobile Device Tab
- HIP Objects Patch Management Tab
- HIP Objects Firewall Tab
- HIP Objects Anti-Malware Tab
- HIP Objects Disk Backup Tab
- HIP Objects Disk Encryption Tab
- HIP Objects Data Loss Prevention Tab
- HIP Objects Certificate Tab
- HIP Objects Custom Checks Tab
For more detailed information on creating HIP-augmented security rules, refer to Configure HIP-Based Policy Enforcement in the GlobalProtect Administrator’s Guide.Create a HIP Profile
HIP Profile is a collection of HIP objects to be evaluated together either for monitoring or for Security policy enforcement that you use to set up HIP-enabled security rules. When creating HIP Profiles, you can combine the HIP objects you previously created (as well as other HIP Profiles) by using Boolean logic, so that when a traffic flow is evaluated against the resulting HIP Profile, it will either match or not match. Upon a match, the corresponding security rule is enforced; if there is no match, the flow is evaluated against the next rule (as with any other policy matching criteria).- Go to ObjectsGlobalProtectHIP Profiles.Add a new HIP Profile.Configure the settings in this table:HIP Profile SettingsDescriptionNameEnter a name for the profile (up to 31 characters). The name is case-sensitive and must be unique. Use only letters, numbers, spaces, hyphens, and underscores.Description(Optional) Enter a description.SharedSelect Shared to make the current HIP Profile available to:
- Every virtual system (vsys), if you are logged in to multiple virtual system mode. If you clear this selection, the profile is available only to the vsys selected in the Virtual System drop-down on the Objects tab. For a non-multi-vsys mode, this option does not appear in the HIP Profile dialog.
- All device groups on Panorama. If you clear this selection, the profile is available only to the device group selected in the Device Group drop-down on the Objects tab.
After you save the profile, you can't change its Shared setting. Select ObjectsGlobalProtectHIP Profiles to view the current Location.Disable override (Panorama only)Controls override access to the HIP Profile in device groups that are descendants of the Device Group selected in the Objects tab. Select this option if you want to prevent administrators from creating local copies of the profile in descendant device groups by overriding its inherited values. This option is cleared by default (override is enabled).MatchClick Add Match Criteria to open the HIP Objects/Profiles Builder.Select the first HIP object or profile you want to use as match criteria and then add it to the Match text box on the HIP Objects/Profiles Builder dialog. Keep in mind that if you want the HIP Profile to evaluate the object as a match only when the criteria in the object are not true for a flow, select NOT before adding the object.Continue adding match criteria as appropriate for the profile you're building, and ensure you select the appropriate Boolean operator (AND or OR) between each addition (and using the NOT operator when appropriate).To create a complex Boolean expression, you must manually add the parenthesis in the proper places in the Match text box to ensure that the HIP Profile is evaluated using the intended logic. For example, the following expression indicates that the HIP Profile will match traffic from a host that has either FileVault disk encryption (Mac OS systems) or TrueCrypt disk encryption (Windows systems) and also belongs to the required Domain and has a Symantec antivirus client installed:((“MacOS” and “FileVault”) or (“Windows” and “TrueCrypt”)) and “Domain” and “SymantecAV”
When you have finished adding the objects and profiles to the new HIP Profile, select OK.Commit the configuration.


