Prisma Access Agent
Set Up Transparent Proxy Support for Prisma Access Agent
Table of Contents
Set Up Transparent Proxy Support for Prisma Access Agent
Set up transparent proxy support for the Prisma Access Agent to provide always-on
internet security for your mobile users.
| Where Can I Use This? | What Do I Need? |
|---|---|
|
|
Transparent proxy support for Prisma Access Agent enhances your organization's
security posture by providing always-on internet security for mobile users. This
feature integrates with your existing infrastructure and simplifies management of
internet traffic across diverse network environments.
When you configure transparent proxy support, you enable your mobile users to connect
securely to the internet regardless of their location or connection method. The
Prisma Access Agent uses a local proxy to route outgoing connections to Prisma
Access explicit proxy servers based on customizable forwarding profiles. This
enables you to include proxy capabilities alongside other connectivity methods in
both custom and predefined forwarding rules. The explicit proxy server processes the
redirected traffic, while the management plane ensures secure communication by
providing necessary configuration and authentication mechanisms. Transparent proxy
supports TCP communications only. UDP traffic, such as DNS, are not supported at
this time.
You can get a more in-depth
understanding of how the local proxy component works in How Traffic Management Works in Prisma Access Agent.
Complete the following steps to set up transparent proxy support for Prisma Access
Agents from Strata Cloud Manager.
- Set up an explicit proxy connection in Prisma Access.Skip this step if you have already configured a GlobalProtect™ agent proxy on your Prisma Access tenant.
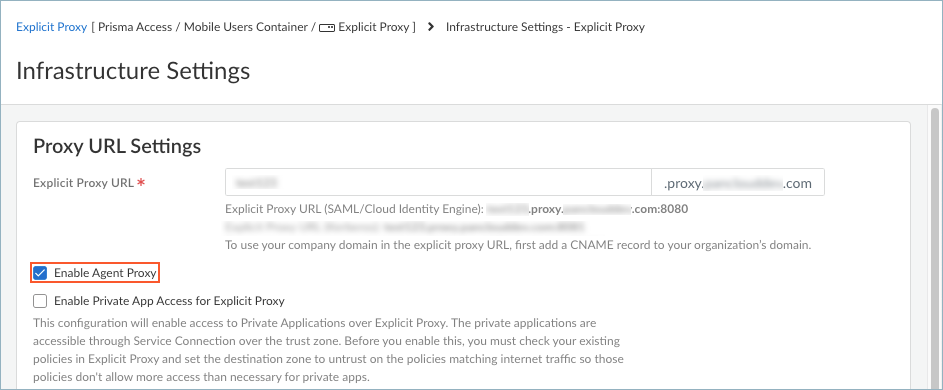
- Select ConfigurationNGFW and Prisma AccessConfiguration ScopeMobile Users ContainerMobile Users.Click Explicit Proxy Setup.If this is the first time you're setting up the proxy, click EnableExplicit Proxy Setup.Edit the infrastructure settings.If you're performing this setup for the first time, click Set Up Proxy Settings.
- Enter the Explicit Proxy URL. This is the
URL for the explicit proxy server where browser traffic is
directed for Prisma Access Agent transparent proxy connections.
By default, the name is proxyname.proxy.prismaaccess.com, where proxyname is the subdomain you specify, and uses port 8080. To use your company domain in the explicit proxy URL, add a CNAME record to your organization’s domain.All browser traffic is directed to the explicit proxy URL. Prisma Access Agent does not support PAC files at this time.
- Select Enable Agent Proxy to enable the
agent-based proxy functionality. This step is required.
![]()
- Save your infrastructure settings.
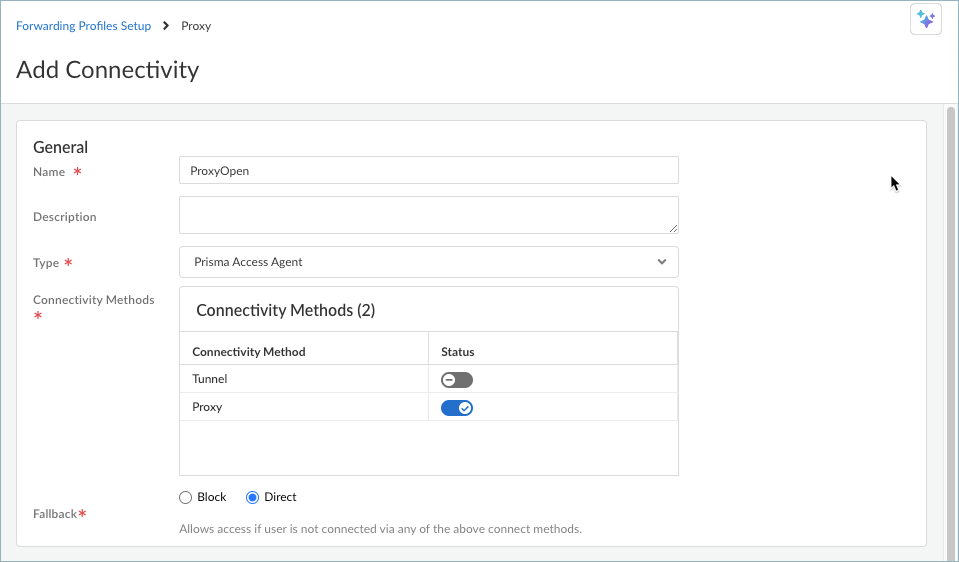
Add the Prisma Access explicit proxy locations where you want to support mobile users.For the best user experience, if you're limiting the number of locations, choose locations that are closest to your end users. If a location isn't available in the country where your mobile users reside, choose a location that’s closest to the mobile users.Set up a connectivity object for the transparent proxy connection.- Select ConfigurationNGFW and Prisma AccessConfiguration ScopeMobile Users Container and edit the forwarding profiles setup.In the Forwarding Profiles Setup page, select Connectivity.Add Connectivity or select an existing connectivity object.Enter a name for the connectivity object and select the Prisma Access Agent connectivity type.By default, the Tunnel connectivity method is enabled. If you want to direct internet traffic only to the proxy, disable Tunnel and enable Proxy. If you want to direct internet traffic to the proxy only when the tunnel is disconnected, enable both Tunnel and Proxy.
![]() The proxy traffic is directed to the global explicit proxy URL. Prisma Access Agent does not support PAC files or regional and custom proxies at this time.Select the Fallback connectivity behavior when both the Tunnel or Proxy methods are unavailable or the traffic type is unsupported. The default behavior is to Block access.For Proxy connectivity, UDP traffic won’t be blocked even if you choose to block access.Save your connectivity settings.You can also enable the Proxy connectivity method within the Best Available - Fail Safe and Best Available - Fail Open connectivity objects. This enables intelligent traffic steering based on various criteria like destination and connectivity method.The Best Available options are predefined connectivity objects that work as follows:
The proxy traffic is directed to the global explicit proxy URL. Prisma Access Agent does not support PAC files or regional and custom proxies at this time.Select the Fallback connectivity behavior when both the Tunnel or Proxy methods are unavailable or the traffic type is unsupported. The default behavior is to Block access.For Proxy connectivity, UDP traffic won’t be blocked even if you choose to block access.Save your connectivity settings.You can also enable the Proxy connectivity method within the Best Available - Fail Safe and Best Available - Fail Open connectivity objects. This enables intelligent traffic steering based on various criteria like destination and connectivity method.The Best Available options are predefined connectivity objects that work as follows:- Best Available - Fail Safe—Steers traffic to the nearest gateway or Prisma Access location but blocks access if the user can’t connect to the tunnel and proxy (when enabled) or the traffic type is unsupported.
- Best Available - Fail Open—Steers traffic to the nearest gateway or Prisma Access location but allows access even if the user can’t connect to the tunnel and proxy (when enabled) or the traffic type is unsupported.
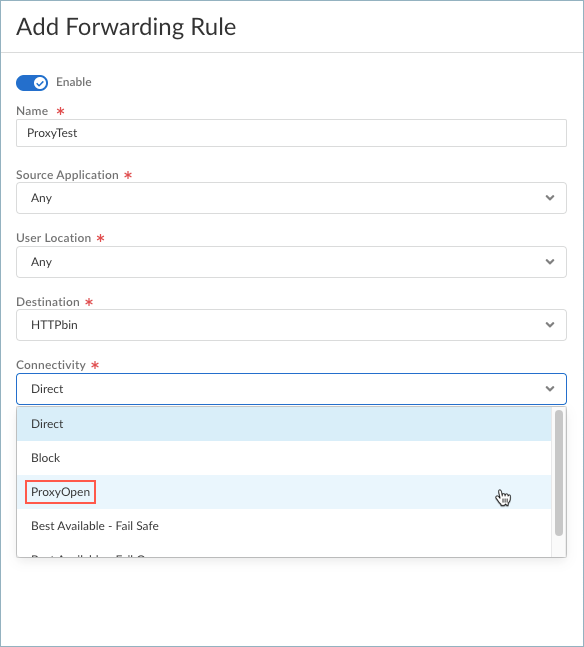
You will not be able to modify the Fallback option in the Best Available connectivity objects.Create a forwarding profile to define the traffic you want to send through the transparent proxy connection.When setting up the forwarding rules for the profile, you can choose to send traffic to the proxy Connectivity object that you set up based on the application or source destination. Be sure to configure the source application and source destination before setting up the forwarding rule.![]() Configure the Prisma Access Agent app in Agent Settings. Configure the local proxy port and associate the forwarding profile your created to the agent configuration.
Configure the Prisma Access Agent app in Agent Settings. Configure the local proxy port and associate the forwarding profile your created to the agent configuration.- Select ConfigurationNGFW and Prisma AccessConfiguration ScopeAccess AgentSetupPrisma Access Agent.Add Agent Setting or select an existing agent setting.(Optional) Configure the Local Proxy Port. The range is 1024-65534 and the default is 9999. If the default port isn't available, Prisma Access Agent will try 50 other ports in the range of 9999-10009 and use the port that’s available. If none is available, Prisma Access Agent will use a random port assigned by the operating system. You can also enter your own port number within the range.Select the Forwarding Profile that you set up to send traffic to the Prisma Access Agent transparent proxy.Save your agent settings.Push the Prisma Access Agent Configuration.Verify the transparent proxy configuration on an endpoint.
- Issue the following command to show the status of the local proxy:On macOS:
/Applications/Prisma\ Access\ Agent.app/Contents/Helpers/pacli proxy status
On Windows:"C:\Program Files\Palo Alto Networks\Prisma Access Agent\pacli" proxy status
If you set up an environment variable for the PACli tool (pacli), you can just enter pacli traffic proxy.The following is an example of the output:State: Local Proxy enabled Listening port: 9999 Current proxied connections: 0
Show the forwarding profile rules that are in effect by issuing the following command:pacli traffic show
In the following example, rule #2 (ProxyTest) says that data-only traffic from the httpbin.org site should connect using the ProxyOpen connectivity object:Forwarding Profile: ------------------------------------------------------------------------------------------------------------------------------------------ | Priority | Rule Name | Enabled | Source Apps | Destinations | Connection Type | Connect Through | Hits | ------------------------------------------------------------------------------------------------------------------------------------------ | 0 | ImplicitForwardingRule | Yes | Any | Domain: "*.rbi.panclou... | Data and DNS | Direct | 30 | ------------------------------------------------------------------------------------------------------------------------------------------ | 1 | Video Streaming | Yes | Any | Domain: "*.zoom.us*,Do... | Data only | Direct | 185 | ------------------------------------------------------------------------------------------------------------------------------------------ | 2 | ProxyTest | Yes | Any | Domain: "httpbin.org" | Data only | ProxyOpen | 11 | ------------------------------------------------------------------------------------------------------------------------------------------ | 3 | Default | Yes | Any | Any | Data and DNS | Tunnel | 6194 | ------------------------------------------------------------------------------------------------------------------------------------------ X - Block outbound LAN when connected to tunnel X - Block inbound connections when connected to tunnel
To see the details of rule #2, enter the following command:pacli traffic show 2
The following example output shows the details of the ProxyTest rule, which sends data-only traffic (no DNS resolutions) from httpbin.org to the proxy using the ProxyOpen connectivity:Printing forwarding profile rule #2 Priority : 2 Rule Name : ProxyTest Enabled : Yes Source Apps : Any Destinations : Domain: "httpbin.org" Connection Type : Data only Connect Through : ProxyOpen Nodes: Proxy Fallback: fail-open Hits : 11To verify that the traffic from httpbin.org goes to the proxy, you can try the following test:- Run the curl ifconfig.net command to
display your IP address, such
as:
192.0.2.1
- Run the curl httpbin.org/ip command. You
should see a different IP address than the first
curl command, such
as:
{ "origin": "198.51.100.3" } - Show the traffic log by running the following command:
pacli traffic log
Add the pipe command | grep proxy to show only the log entries that contain the string "proxy."Locate the log entry with the curl source app, such as:------------------------------------------------------------------------------------------------------------------------------------------ | 108981 | 2025-02-21 01:32:08 | /usr/bin/curl | 34.205.201.49:80 (httpbin.org) | Data | Rule priority 2 matched, se... | Proxy | ------------------------------------------------------------------------------------------------------------------------------------------
- Show the details of the log entry by running the
pacli traffic log <n> command,
such as:
pacli traffic log 108981
The following example output shows the details for log entry 108981:Index: Time: 2025-02-21 01:32:08 Source App: /usr/bin/curl Destination: 34.205.201.49:80 (httpbin.org) Traffic Type: Data Reason: Rule priority 2 matched, setting verdict to ProxyOpen Verdict: Proxy


