Prisma Browser
Manage Prisma Browser Access and Data Control Rules
Table of Contents
Expand All
|
Collapse All
Prisma Browser Docs
Manage Prisma Browser Access and Data Control Rules
Learn how to manage access and Data Control rules for Prisma Access Secure Enterprise Browser (Prisma Browser).
| Where Can I Use This? | What Do I Need? |
|---|---|
|
|
Access & Data Control rules are designed to create the environment to keep the
data safe per application, website classification, or URL. You can create rules that
help make enforcement effective.
View the Rules
The last
rule on the list is the Access & Data - baseline, also known as the
Default rule.
The Default rule is the policy rule that is used when no other
policy rule is applicable. Since this rule must be available for any given
user or device, only certain controls can be edited.
- From Strata Cloud Manager, select .ConfigurationPrisma Browser PolicyRulesSelect the Access & Data Control tab.
![]() The Access & Data Control displays the following information for each Rule:The information displays changes based on the policy rule type selected.
The Access & Data Control displays the following information for each Rule:The information displays changes based on the policy rule type selected.- Priority - Access & Data Control rules are enforced based on the Zero Trust Access scope, the applications in the rule, and the enabled controls. The result of this is to enforce least-privileged access (the most restrictive context) for users and the applications that they are accessing.Rules are inspected from top to bottom based on the priority. But all rules are inspected which can result in multiple rules being matched to a user's session.The resulting access policy that is applied is a merge of all controls that are applicable to the user's context. If there is a conflict between the controls, the control in a higher priority rule supersedes a control in a lower priority rule.
- Select the cog icon to the left of Change priorities to modify which of the following fields you want to display.
- Select Change priorities to reorder the rules in the list. The rules are processed in order, and once a rule is matched, the processing stops.
- Mode - The behavior of the Rule applied on the end users. The options are:
- Active - The Rule will be applied and enforced on all end users.
- Monitoring - The Rule will only create logging events without affecting the end users.
- Disabled - The Rule won't be applied on end users.
- Name - The name of the Rule.
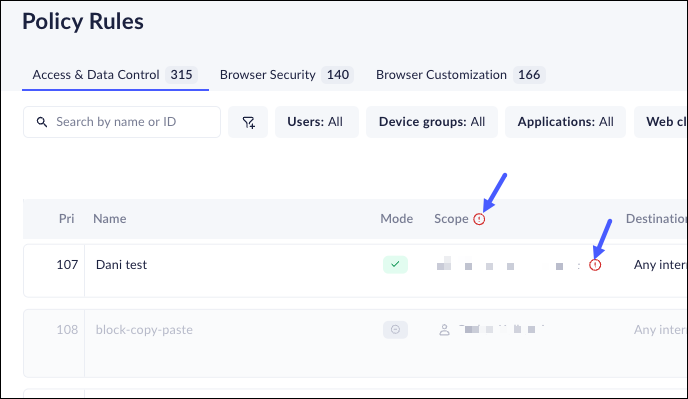
- Scope - A combination of the Users, User Groups, Device Groups, Networks, and Locations that will be included in the rule.If a rule references deleted users or user groups, an icon will be displayed in the header and the Scope field, suggesting that the user/user group be removed.
![]() Location scope is not supported using Linux.
Location scope is not supported using Linux. - Destinations - The specific applications, website classifications, and URLs that this Rule covers.The Rule will match if any one application, classification, or URL is matched.If a rule references a deleted app, the rule will stay in the same mode, but the application's FQDNs will not be enforced in the browser/PABx/Mobile.An alert icon will be displayed in the header and in the application field, suggesting that the application be removed.
![]()
- Web Access - Defines the behavior of the ability to access the websites defined in the Rule.
- Data controls - The Data controls that are used as part of the Rule. This can include either inline data controls set per Rule or preexisting Profiles that can be reused in different rules. If the Rule uses a profile, the name of the Profile is highlighted in the display.
- Hits - The number of times the Rule was applied in the past 7 days. This feature is especially useful when examining rules before implementation.
- Updated - The date and name of the person who made the most recent update. Hover over the entry to see the full timestamp.
- Log level - The type of logging that is applied to the Rule.
Search and Filter
You have the opportunity to search and filter for particular rules. This helps you investigate rules that have common components. This makes it easier to check for rules that might be duplicated or to find rules that might be operating improperly.- From Strata Cloud Manager, select ConfigurationPrisma Browser PolicyRules.Select the Access & Data Control tab.Search for rules by the rule name.Filter on rules based on specific criteria:
- Users – The Users and User Groups that are included in a Rule.
- Device group - The Device groups that are included in a Rule.
- Applications - Web applications that are included in the Rule.
- Web classifications - The categories of applications that are covered by the Rule.
- Web access- The access options that will be enforced for this Rule. The options are:
- Prompt - Web access is restricted, but there is an option to proceed.
- Allow - Web access is permitted.
- Block - Web access isn't permitted.
- Controls - The Data controls that are used in the Rule.
- Mode (available in Add Filter) - The filter can include the following options:
- Monitoring - Rules that only write an entry to the Events Log. See below for more information.
- Active - Rules that are active and are used by the Policy Engine.
- Disabled – Inactive rules are skipped by the Policy Engine.
- Content configured- The filter can include rules that have configured content in the "When contains" section of the rule configuration. The options are:
- Yes - Select rules that contain configured content.
- No – Select rules that don't contain configured content.
- Log level- Select the level of logging that will be performed on the Rule. The options are:
- Enhanced - All user actions involving this Rule are fully logged with the Prisma Browser creating a session recording of the activity. This can assist with compliance and regulation requirements, or to carefully monitor actions within sensitive applications.
- On - All user actions involving this Rule are logged.
- Anonymized - Actions involving this Rule are logged without personal details.
- Off - User actions involving this Rule are not logged.
- Profile - If the Rule uses External Controls (Profiles) as part of the Policy Rules, then you can use this filter to assist the search.
For example, if you want to see the way that downloads work across different sites for a particular user, do the following:- Filter the list by the username.
- Filter the resulting list by the Control - File Download.
- Manually review the list. The first rule to match the website is the behavior for the file download.
Create New Access & Data Control Rules
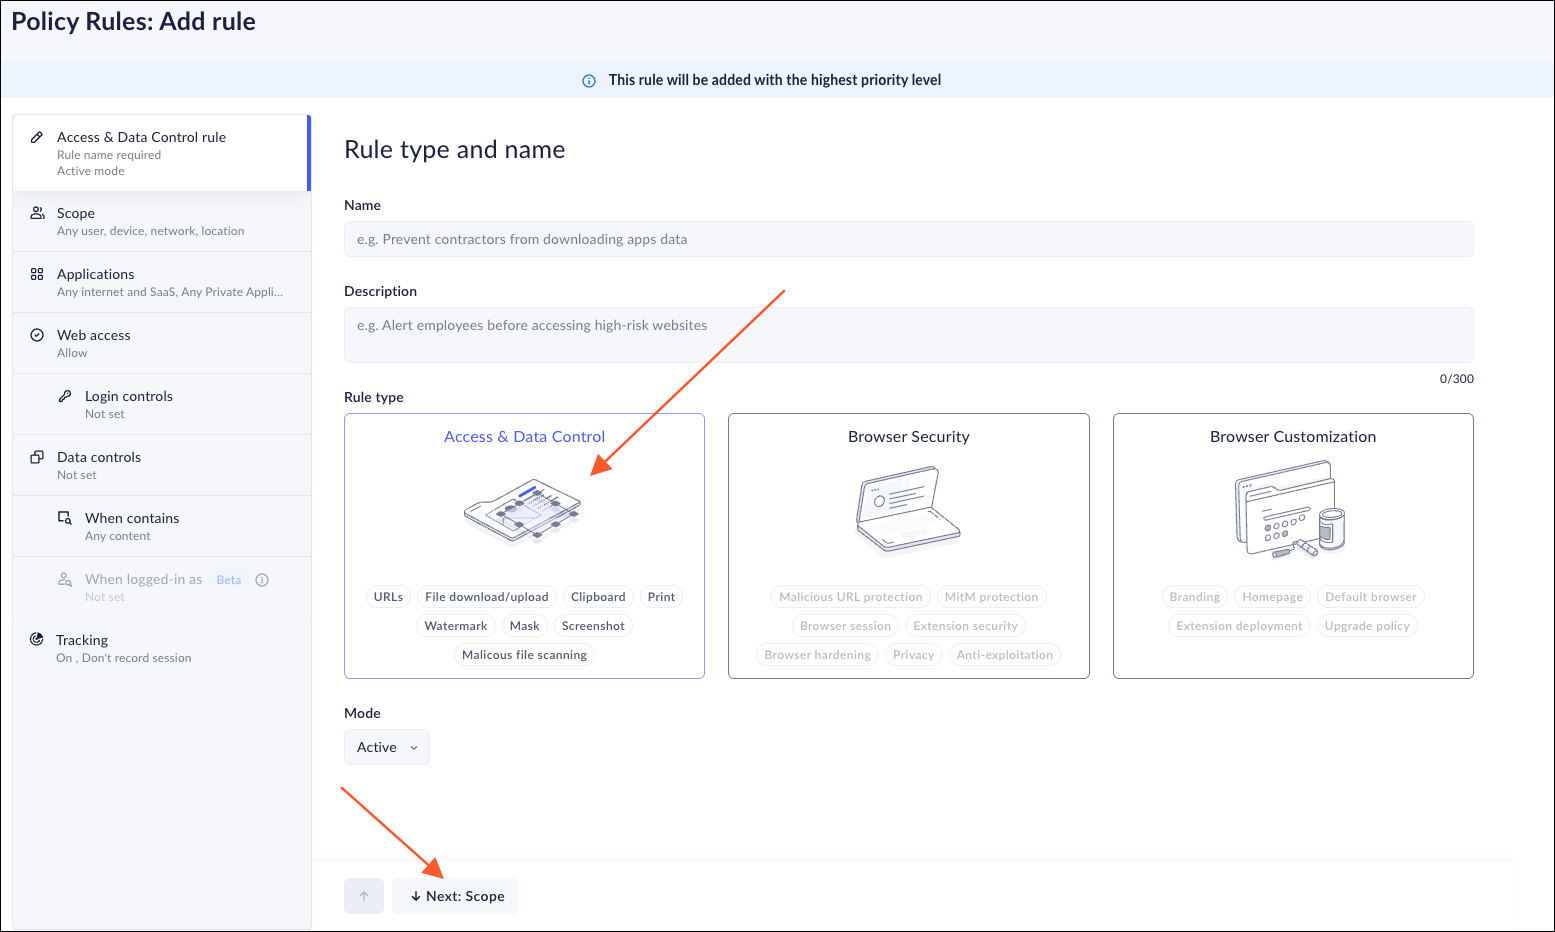
Adding a new Access & Data Control Rule can be done easily with an understanding of the way that the rule is going to be used and enforced. Each Rule needs to be planned carefully, taking into consideration the way that each element will be configured. This will make sure that the enforcement can be done effectively.You can create rules using a wizard interface. This allows you to have full control over the entire policy.When you set up a Rule, you can click on the Wizard controls on the left side, or the Next button at the bottom of the page.- From Strata Cloud Manager, select ConfigurationPrisma Browser PolicyRules.Select the Access & Data Control tab and CreateNew RuleAdd Rule.
![]()
- Enter a Name for the rule.Enter a Description for the rule.Select the Mode.
- Monitoring - Rules that only write an entry to the Events Log. A Rule set to monitoring can be used for testing new rules.
- Active - Rules that are active and are used by the Policy Engine. This is the default action.
- Disabled – These are inactive rules that are skipped by the Policy Engine.
Select Next: Scope.![]() On the Scope page, enter the following information:The Scope combines the selections in Users, User Groups, Device Groups, Networks, and Location. This means that the rule scope requires that all conditions be met for a match to occur.
On the Scope page, enter the following information:The Scope combines the selections in Users, User Groups, Device Groups, Networks, and Location. This means that the rule scope requires that all conditions be met for a match to occur.- Users/User Groups - Select the Users and User Groups that will be covered by the Rule. It's possible to select multiple Users and User Groups. The default is Any user.
- Device groups - Select the Device groups that will be covered by this Rule. It's possible to select multiple device groups. The default is Any device group.
- Networks - Enter a Public IP address with a subnet, if needed, or a CIDR.
- Location – Select the geolocation from which to enable the Prisma Browser rule. If the OS Location services are not enabled on the device, the PAB will use the GeoIP. For more information, refer to Location-based Policy
- Select Next: Applications.
![]()
On the Applications page, choose the Destination types for this rule. Select from the following options:You can select any combination of Internet & SaaS applications, Private applications, and Application Groups.- Internet & SaaS applications - For applications
stored on Public websites and SaaS applications.
- Any internet & SaaS - Allows you to include any Web and SaaS application.
- Custom - Allows you to:
- Choose Web or SaaS applications directly from a list.
- Select any website falling within specific
classifications.
- Select any website/URL falling within a specific classification. For example, you can select News to block access to all news sites.
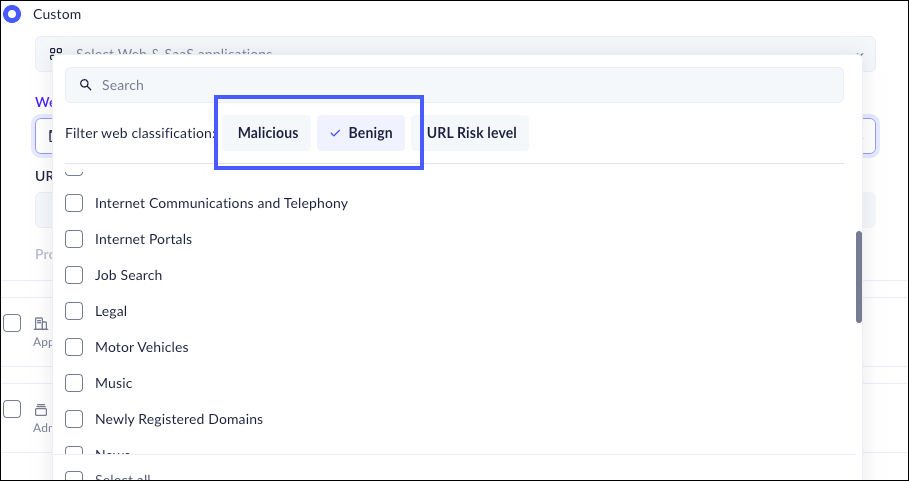
- The categories can be divided into
Malicious (for example, Phishing sites,
Ransomware, Grayware) and Benign (for
example, News and Media, Dating, Shopping). Select
one of these two categories to properly filter the
list.
![]()
- You can choose to select benign categories
based on the URL Risk level; High, Medium, Low.
When you select this option, all URLs that meet
the criteria will be filtered.
![]()
For more information, refer to Risk Categories - Enter a specific URL. You can select specific
domains, subdomains, ports, and paths to provide
custom setups to the application. The URL can contain punycode and character substitution.
- Private applications - Allows you to include applications
that are privately maintained within the data center and are not
publicly accessible. Tenants with the Private Application feature will be able to create a second default rule to manage access to Private apps (under access and data).For more information, refer to Private Applications.
- Any private application - Allows you to include any
application that is hosted on your internal network. This feature only works with:
- Prisma Browser versions after 1.199.0
- Prisma Browser Extension versions after 1.244.0
- Specific private application - Choose private applications directly from a list.
- Any private application - Allows you to include any
application that is hosted on your internal network.
- Non-web apps - Allows you to select non-web apps, either Admin-defined or any manually connected non-web app.
- Application Groups - Allows you to select Application groups that you created.
- Select Next: Web access
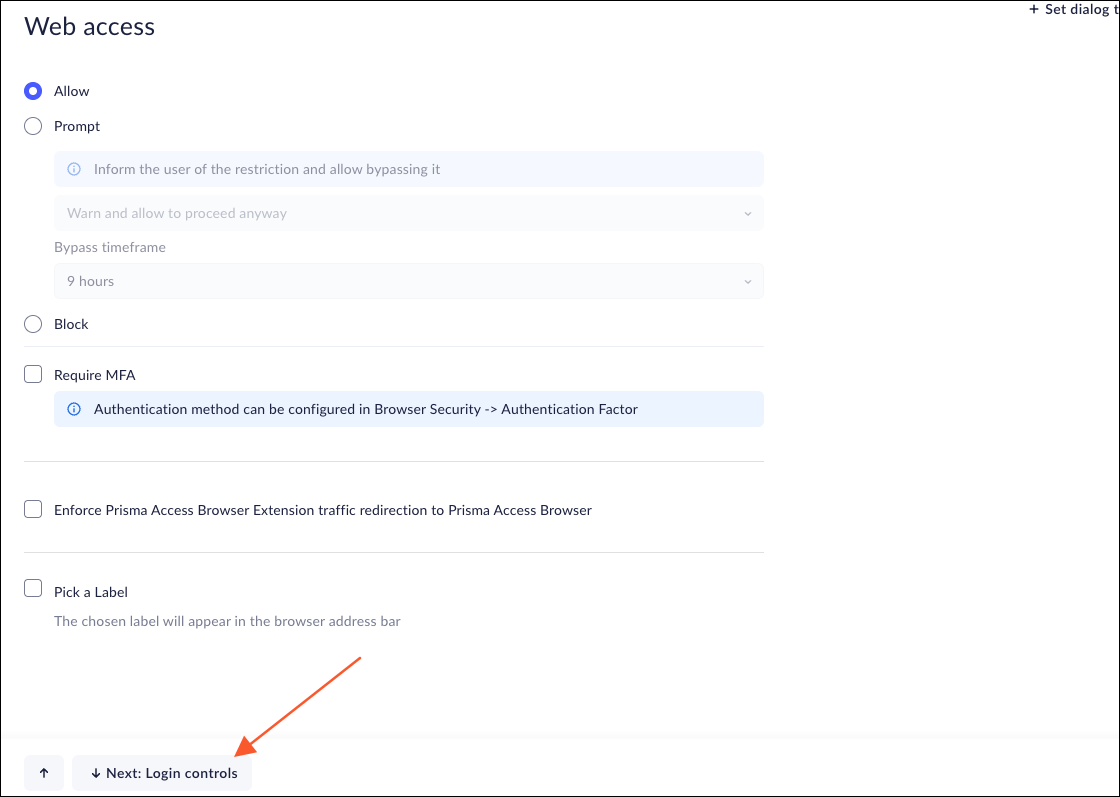
![]() On the Web Access page, choose the access options that will be enforced for this Rule. The options are:
On the Web Access page, choose the access options that will be enforced for this Rule. The options are:- Allow - allow users to access the applications, websites, and URLs.
- Prompt - inform the user that the access is restricted, but allow the user the option of continuing. When a user selects an option that allows them to Proceed anyway or use any option that requires Admin Approval, an event will be written to the log.Using Prompt grants limited access permission depending on how you configure the setting. You can set it to be once (one-time access for the account) or unlimited access for a limited time frame.
- Warn and allow to proceed anyway - Users will receive a warning, but will be allowed to proceed anyway.Warn and allow to proceed anyway with a reason - Users will receive a warning, but will be allowed to proceed anyway if they provide a reason.Permission request - Users will be required to provide a reason that you must approve before they are allowed to proceed. For more information, see Requests.Mobile rules with this option will result in a Block.Block - Block users from accessing the applications, websites, and URLs.Require MFA - Require users to complete an additional authentication factor (such as a PIN code, Passkey, or IdP authentication) before accessing the scoped websites. Configure the authentication factor used under Browser Security > Browser Hardening > Authentication Factor.You can configure the length of time between MFA requests so that your users don't have to enter their authentication every time. The options are:
- Every time.
- A configured time between 10 minutes and 90 days.
Enforce Prisma Browser Extension traffic redirection to Prisma Browser - Access to web apps from the Prisma Browser Extension will trigger an “Open in Prisma Browser” dialog. The access is still subject to the options selected above. If you select this option, you can use your own dialog text to replace the default. To set the text, click Set dialog text. This option will be ignored for mobile rules.- If you want the redirection to automatically open the Prisma Browser, select the Redirection will
automatically open Prisma Browser checkbox.
When you access web applications through the Prisma Browser, you'll see an 'Open in Prisma Browser' message. Using the Prisma Browser will still follow the Allow/Prompt/Block rules mentioned earlier.
Pick a Label - Select the label to appear in the browser address bar. This will display the basic information on the site policy. Note: This option will be ignored in the mobile rules.Select Next: Login controls.![]() The Login Controls sub-page allows you to control logging into the applications and websites using the Prisma Browser. For more information, please refer to Login Controls.On the Data controls page, select the controls that the rule will use.
The Login Controls sub-page allows you to control logging into the applications and websites using the Prisma Browser. For more information, please refer to Login Controls.On the Data controls page, select the controls that the rule will use.- The following search and filter options are available:
- Active only - Display controls that are already in use in the Rule.
- Enterprise browser - Display only those controls that are available for the Enterprise browser.
- Mobile browser - Display only the available controls for the Prisma Browser for Mobile.
- Extension – Display only the available controls for the browser extension.
Select and configure the Data controls for the rule. The rule can contain multiple controls. For information on configuring the individual controls, refer to:- Data Leak Prevention
- Malware Protection
You can add Controls that you manage outside of the rule. Click Saved Profiles to select a preconfigured profile in place of the Data controls.![]() The When Contains (Content Settings) page allows you to condition the configured Data controls. This allows you to create rules that trigger only if specific data types occur. You can also create custom data types that can condition the rules.You can create data pattern combinations (from either the predefined values, or the custom values).For example, you can set File Download control to Block, and add an email content detector to the rule. This means that if a file includes an email address, the file download control in the rule will activate and block the download. The content types can be incorporated into rules containing the following Data control types:
The When Contains (Content Settings) page allows you to condition the configured Data controls. This allows you to create rules that trigger only if specific data types occur. You can also create custom data types that can condition the rules.You can create data pattern combinations (from either the predefined values, or the custom values).For example, you can set File Download control to Block, and add an email content detector to the rule. This means that if a file includes an email address, the file download control in the rule will activate and block the download. The content types can be incorporated into rules containing the following Data control types:- File Download
- File Upload
- Clipboard
- Webpage data masking
- Typing Guard
- Screen Sharing
- Webpage Watermarking
- Print
You need to be aware of the following limitations to the When contains...involving DLP scanning for file upload and downloads:- If the file size is more than 1GB, File Scanning will not occur.
- If the file size is less than 1GB, and the file type is supported, thee first 5MB of text is extracted and scanned.
- If the file size is less than 1GB, and the file type is not supported, the first 5MB of the file is extracted as text, and a "best effort" is made to scan it.
Supported File Types File Type File Extension File Type File Extension ASM .s matlab/obj-c .m c_cpp-hdr .h PDF .pdf c_cpp-src .c PL - .pl
- .pm
cpp-hdr - .pl
- .pm
Powershell - .ps1
- .ps2
- .pcs1
- .psd1
- .psm1
- .ps1xml
- .ps2xml
- .clixml
cpp-src - .cpp
- .c++
- .cxx
PPT - .pptx
- .pptm
- ,ppex
- .ppsm
csharp - .cs
- .css
py .py csv csv r .r docs - .docx
- .docm
RTF .rtf* go .go Ruby .rb html .html txt .txt jsva-src .java vbe .vbs js .js xlsx - .xlsx
- .xlsm
- .xlsb
* Partial support - RTF is a text format, but applying formatting to parts of text changes the underlying HTML code. For example, if you set a specific color to some of the digits of a credit card, there would not be a match.- On the Content Settings page, select Specific content.Select Select in the Content detectors field.Select the preconfigured content detectors from the list.In addition, you can create custom content detectors to add to the list, based on regular expressions.Select Next: Tracking.Canvas-based applications do not support data masking, content-based screenshot control, or content-based watermarking. These features rely on the Prisma masking engine, which cannot operate on Canvas-rendered content.As a result, the following applications—and others that use similar rendering methods—may show inconsistent or unavailable protection:
- Google Docs and Google Sheets(Google Slides is supported)
- Figma
- Miro
- Notion
- Mural
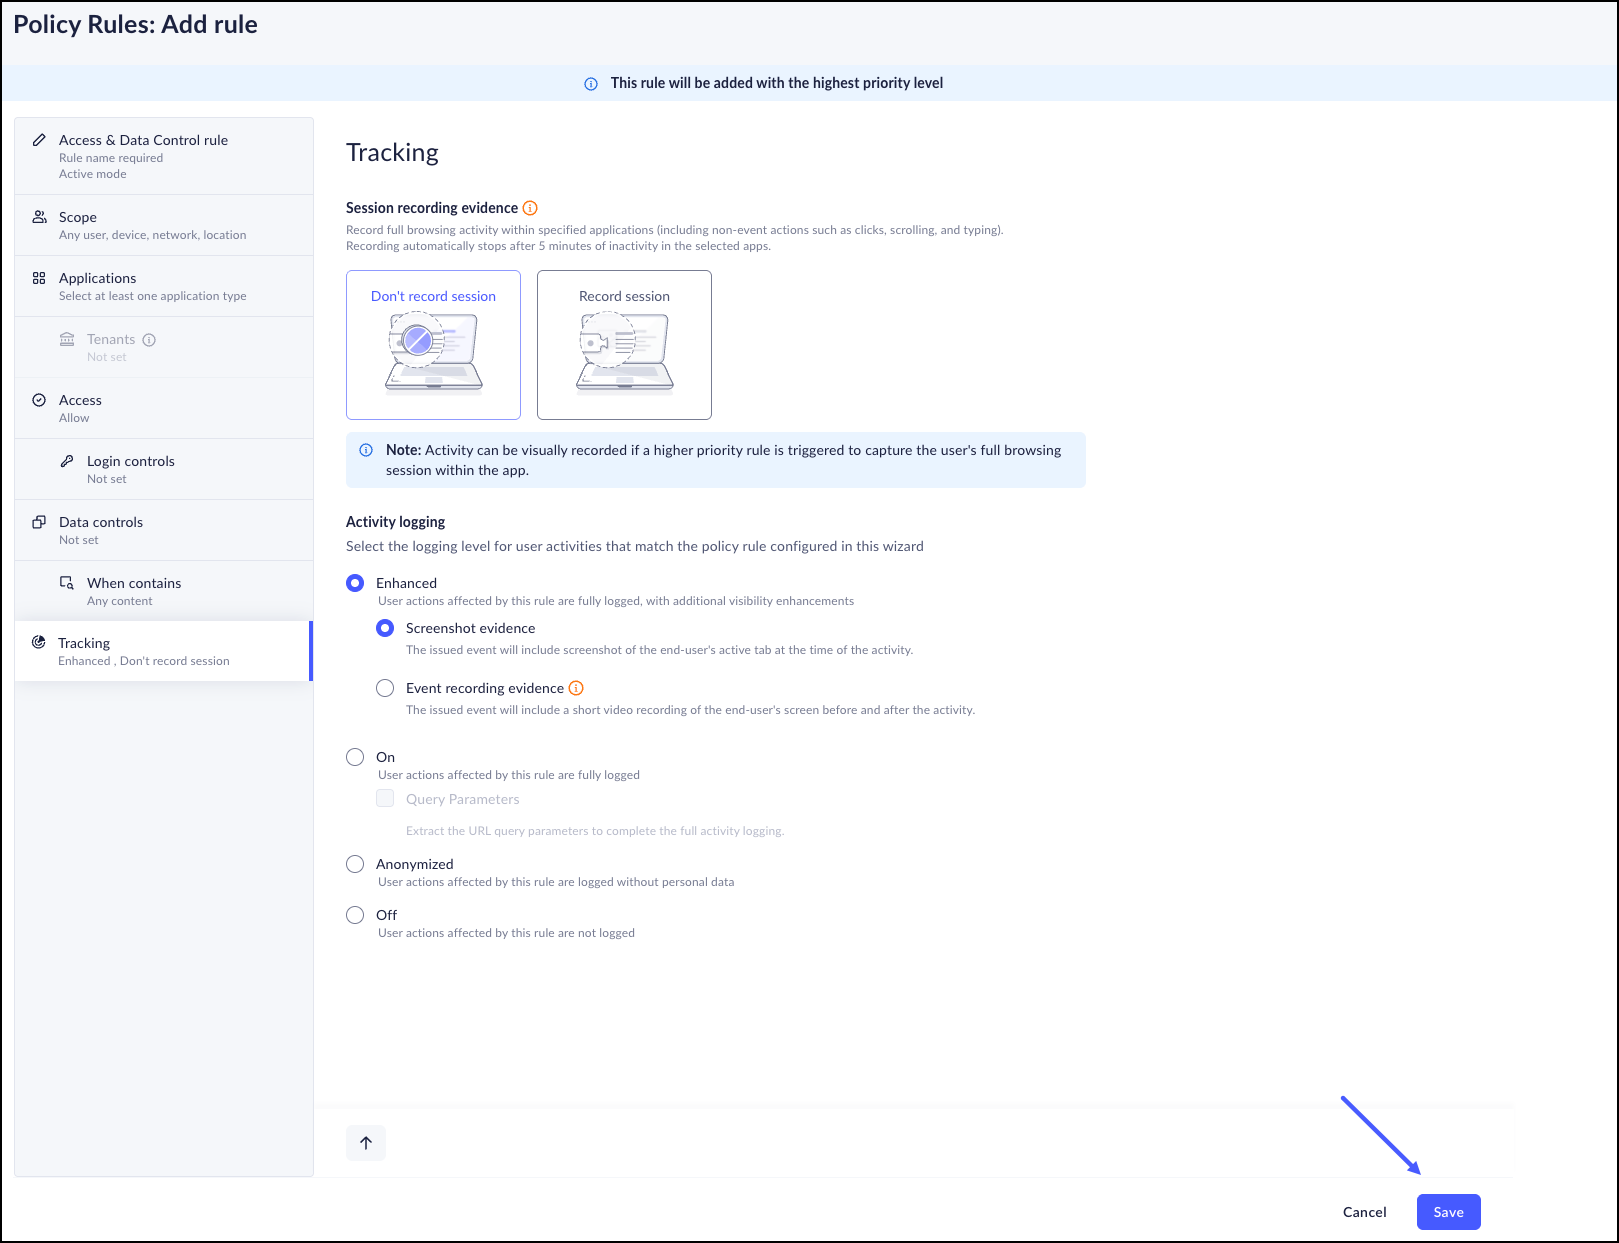
To avoid misconfiguration, you need to ensure that you do not enable data masking, content-based screenshot control, or content-based watermarking for any Canvas-based application.The Tracking page contains 2 sections. In the first section, Session Recording evidence, select whether or not to record all of the user's browsing activity in the applications specified and, choose whether or not to record the user's full browsing activityIn the second section, select the level of Activity Logging you need.- Enhanced – The Browser fully logs all user actions involving this rule. The Browser fully logs the actions with additional visibility enhancements.:
- Screenshot evidence - The issued event will include a screenshot of the user's active tab at the time of the activity.
- Event Recording evidence - The issued event will
include a short video recording of the user's screen
starting before the event until after the activity. If there is a detected endpoint performance issue, Prisma Browser will capture a Screenshot.
- On – This Rule logs all user actions. You can optionally choose to extract the URL query parameters to the Activity log.
- Anonymized – This Rule logs all user actions without personal details.
- Off – There is no logging for this rule.
Click Save.![]()
Set Rule Monitoring
You can choose to configure some rules for Monitoring purposes only. Monitoring only writes an entry to the Event Log. This allows you to test how the Rule affects the browser usage before actually putting it into regular production. By using Monitoring, you can apply multiple rules to a single action - one for monitoring purposes and another for executing the action.- From Strata Cloud Manager, select ConfigurationPrisma Browser PolicyRules.Select the Access & Data Control tab.Create a new Access & Data Control Rule.Save the rule.On the Rule List, click the ellipse, and select Set to Monitoring. This can also be done in the first step of the wizard, in the Mode option.The rule will be available, but whenever it comes into effect, it will ignore actions, and merely write to the Events log.
Use Predefined Content Types
The Prisma Browser has some predefined content items included. These predefined content types can be used when you need to add a specific content item that isn't included in the database.The Content Types are divided into two categories - Data Profiles and Data Patterns. With these features, you now have more control over the data that you can add.The content types are grouped into categories. You have the ability to filter the Patterns to see the information that relates directly to your requirements.- Privacy
- Finance
- Healthcare
- Other
- Custom
To select preconfigured Content items:- From Strata Cloud Manager, select ConfigurationPrisma Browser PolicyRules.Select the Access & Data Control tab.Create a new Access & Data Control Rule.
- Be sure to configure the When contains information.Click Specific content.Click the tab for Data Profiles or Data Patterns.If you have any questions regarding a particular data item, click the (i) on the side of the list. This will open a page containing more information regarding the item.Select the required Content Detectors - either Data Profiles or Data Patterns.Select the Content types, then click the appropriate content item. The rule can contain any combination of items.Save.
Create Custom Content Types for the Prisma Browser Rules
You can define additional Data Patterns to meet your specific organizational-related needs. The file definitions are based on ECMAScript (JavaScript) Syntax.- From Strata Cloud Manager, select ConfigurationPrisma Browser PolicyRules.When you're configuring your rule, in the When Contains (Content Settings), select Specific content.Select the content detectors from the list, either Data Profiles or Data Patterns. You can create custom content detectors to add to the list, based on regular expressions.To add a custom data type:
- Select the Data Patterns tab. Go to the bottom of the list and click Manage custom content types.
- In the Custom content types window, click Add type.
- In the Add Custom Content Type window, add the appropriate pattern for the content.
- “Custom data types” support ECMAScript (JavaScript) Syntax.
- Advanced flags (https://developer.mozilla.org/en-US/docs/Web/JavaScript/Guide/Regular_expressions#advanced_searching_with_flags) are currently not supported.
The configured custom content types will be matched against the configured data controls that support content inspection.Configured Data Controls that don't support content inspection (e.g. screenshot) will ignore the specific content condition and will be applied according to all other rule conditions (scope, web application).The content types can be incorporated into rules containing the following Data control types:- File Download
- File Upload
- Clipboard
- Webpage data masking
Configure External Controls (Profiles)
Inline profiles should be configured within the rules in the Controls sections. This allows you to create specialized rules containing different combinations and configurations of controls.The Profiles feature is used when you want to use legacy profiles and add them to the rules.Rules can contain either inline data controls or external controls.The Controls for the Prisma Browser rules are configured internally, within the body of the individual rule. This means that each rule contains its own unique set of controls.There are some use cases when you might want to create multiple rules using the same list of controls. To accomplish this task, Prisma Browser has a mechanism to create external controls that are not built into a rule but exist separately. Each control defines a particular use case containing configurations for the policy control types.- ConfigurationPrisma Browser RulesData Access & ControlAdd rule.Data controlsThese controls access to websites and data, preventing organizational data from being accidentally (or maliciously) released. For information on configuring the individual controls, refer to Configure Data Controls.


