Prisma Browser
Manage Prisma Browser Applications
Table of Contents
Expand All
|
Collapse All
Prisma Browser Docs
Manage Prisma Browser Applications
Learn how to view and manage applications and application groups for Prisma Access Secure Enterprise Browser (Prisma Browser).
| Where Can I Use This? | What Do I Need? |
|---|---|
|
|
The Prisma Browser comes equipped with a predefined list of Verified
applications. The Verified applications list references the Palo Alto Networks
App-ID™ catalog of applications, and is regularly synced with the cloud database.
The full application list is located in the Applipedia (https://applipedia.paloaltonetworks.com/), and more applications are
added to the Prisma Browser every day.
Additionally, you can create your custom applications if it is not included in the
cloud database.
While the Prisma Browser uses the same application list generated
by the App-ID classification system as other Palo Alto Networks products, the
verified applications list might use a different naming schema compared to other
platforms. As a result, the application list found in the Prisma Browser
might differ in its naming conventions.
Applications have dynamic lifecycles. New applications
consistently join our catalog, while we remove others as they reach end-of-life,
face acquisition, or cease to exist. If a policy rule references an application we
deprecate, the UI immediately generates an alert, notifying you of the
change.
The application screens serve several purposes:
- They generate statistics, allowing you to understand how workflows operate in the company.
- You can incorporate the applications into Rules, allowing you to create workflows using only predefined applications and services.
- Use of the Applications Directory provides information that can be sent to the Dashboards.
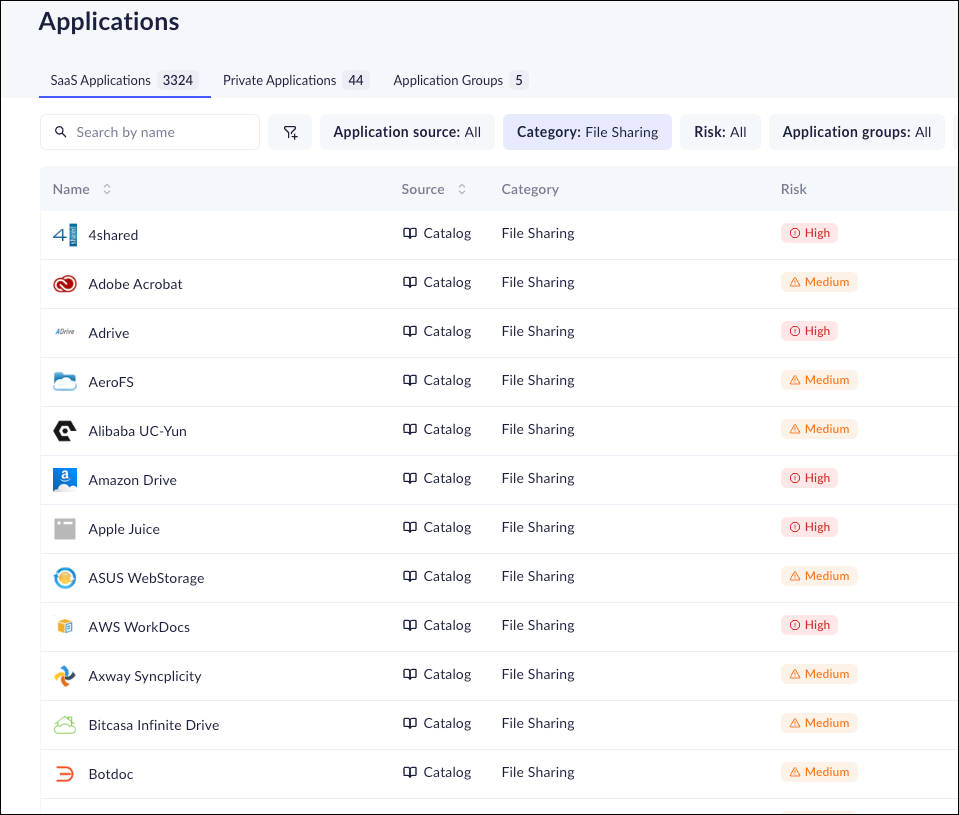
The application list displays the details of each application, and includes
the following information:
- Name - The application name.
- Source – The source of the application; either from the catalog or customized.
- Category - The optionally configured category for the application. If the application isn't categorized, it will be listed as Uncategorized.
- Risk -The site reputation: Ok, Moderate, or Danger. Hover over the value to see the Risk Score.
- Rules - The number of policy rules where the application is included. This also includes rules that include “any” application.
- Updated - The date when the application information was last updated. Hover over the field to see the full timestamp.

- From Strata Cloud Manager, ConfigurationPrisma Browser DirectoryApplications.Search for specific applications.Filter the applications based on specific options:
- Application Source - Filter by the application source - either Catalog - from the App-ID catalog, or Custom - a private application stored at the data center.
- Category - The optionally configured category that can be selected for each application.
- Risk - The reputation of the application - OK, Medium, or Danger.
- Application groups - The groups that you can use to help manage the groups.
- Is GenAI - Applications from the catalog that contain AI functionality.
- Last updated – The date and time the application was last updated.
Select an application to open the application drawer. The drawer contains some additional information regarding the application.- Time Frame - Allows viewing of the graphs for specific periods. This allows you to see how the selected application is used over time. Select from the following time frames:
- Last 24 hours
- Last 3 days
- Last 7 days
- Last 14 days
- Last 30 days
Graphs - display specific information that can be useful for examining application usage. Click on See more for additional information. The following information is displayed in the graphs:- Total active users
- Total access events
- Total data events
- Total volume size
Add a Custom Application
You have a considerable amount of flexibility when it comes to creating new application entries on the Applications Directory. Whenever you need an application that isn't one of the verified applications included with the Prisma Browser, you can create a new, custom application.- From Strata Cloud Manager, ConfigurationPrisma Browser DirectoryApplications.On the Application screen, click Add custom app.On the Add custom application window, enter the following information:
- Name - The name of the application. You can enter any name, and are not restricted to any application name.
- URLs - The URLs for the application. For more information on using the URL builder, click here. After you enter the URL, Add.
- Categories - You select entire classifications (categories) to add to the rule. The classification is divided into two categories - Malicious (for example, Phishing sites, Ransomware, Grayware) and Benign (for example, News and Media, Dating, Shopping).
For more information, refer to Advanced URL Filtering.Add.The application will be added to the list of applications.Edit a Custom Application
After you add a custom application, you can edit it. - From Strata Cloud Manager, ConfigurationPrisma Browser DirectoryApplications.Click the pencil icon on the right side.Make the required changes.Save changes.
Delete a Custom Application
If you no longer need a custom application, you can delete it. - From Strata Cloud Manager, ConfigurationPrisma Browser DirectoryApplications.Locate the custom application that you no longer need and hover on the entry.Select the trash bin icon on the right side.Delete at the prompt to confirm.If the custom application is linked to an existing rule, you need to disconnect it from the rule before deleting it.
Add a Private Application
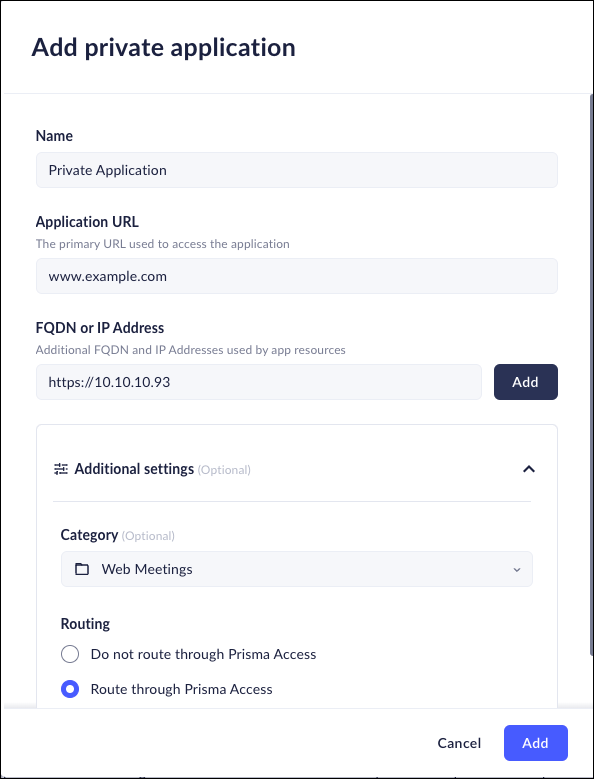
Private applications are applications that your enterprise manages internally. The application remains in your data center, and is only accessible by internal users who have the appropriate permissions.The Prisma Browser handles these applications separately from custom applications. Private applications require that you configure the FQDN and additional IP addresses that are required for using the application.You can configure access to a wider set of private apps by using wildcards.Wildcards are supported only at the beginning of subdomains.For example: *.example.com or *.shop.example.com- From Strata Cloud Manager, ConfigurationPrisma Browser DirectoryApplications.On the Application screen, click Private Applications and then Add private app.
![]() On the Add private application window, enter the following information:
On the Add private application window, enter the following information:- Name - The name of the application. You can enter any name, and are not restricted to any application name.
- Application URL - The URLs for the application.
- FQDN or IP Address for the application.
- Once the URL and its associated FQDN is entered, click Add.
- Categories - If needed, you can manually assign a category for this application from a predefined list.
ClickAdd.The application will be added to the list of applications.![]()
Edit a Private Application
After you create private applications, you can modify them by adding or removing URLs or FQDN, or changing the category. - From Strata Cloud Manager, ConfigurationPrisma Browser DirectoryApplications.Locate the application that you need to edit and hover on the entry.Select the pencil icon on the right side.Make the required changes.Save.
Delete a Private Application
If you no longer need a custom application, you can delete it. - From Strata Cloud Manager, ConfigurationPrisma Browser DirectoryApplications.Locate the custom application that you no longer need and hover on the entry.Select the trash bin icon on the right side.Delete at the prompt to confirm.If the private application is linked to an existing rule, you need to disconnect it from the rule before deleting it.
Add an Application Group
After you create your applications, you can now create Application Groups and assign policies to these groups. Any changes to the content of an Application Group will automatically update the list of apps in the assigned policy. Application Groups can contain a mix of any app type (from catalog, custom, and private). You can use application groups for scenarios such as:- Manage Policy at Scale: You can organize your apps into different groups and set basic rules for each group. This way, you can add or remove apps from the groups without needing to change the rules themselves.
- Management Tool: When you are managing hundreds of applications, you can use groups to better organize and contextualize applications. For example, you can create groups for internal QA/Staging vs. Production environments, internal productivity apps, or apps containing PII or sensitive information, even if you do not want to assign a rule to them.
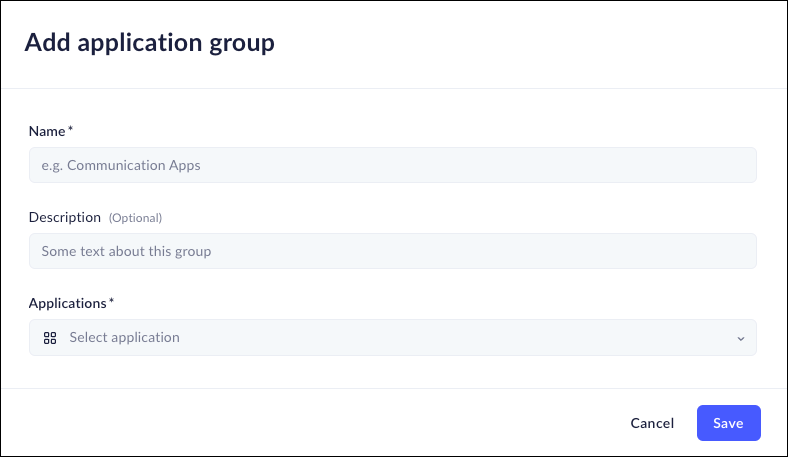
- From Strata Cloud Manager, ConfigurationPrisma Browser DirectoryApplications, select the Application Group tab.Select + Add application group.On the Add application group window, enter a Name for the group, an optional Description for the group.Select the down arrow and select the applications to add to the group. You can filter the applications by the application Catalog, Private applications, or Custom applications. Additionally, you can search for specific apps.After you have chosen the applications to add to your group, Save, and the group will be added to the list.
![]()
Edit an Application Group
After you create the Application Groups, you can modify them by adding or removing applications. - From Strata Cloud Manager, ConfigurationPrisma Browser DirectoryApplications.Locate the application group that you need to edit and hover on the entry.Select the pencil icon on the right side.Make the required changes.Save.
Delete an Application Group
If you no longer need an application group, you can delete it. If the Application Group is linked to an existing Rule, you need to disconnect the group from the rule before deleting it.- From Strata Cloud Manager, ConfigurationPrisma Browser DirectoryApplications.Locate the application group that you no longer need and hover on the entry.Select the trash bin icon on the right side.Delete at the prompt to confirm.


