Prisma Access
Install the Prisma Access Agent
Table of Contents
Expand All
|
Collapse All
Prisma Access Docs
-
- 6.1 Preferred and Innovation
- 6.0 Preferred and Innovation
- 5.2 Preferred and Innovation
- 5.1 Preferred and Innovation
- 5.0 Preferred and Innovation
- 4.2 Preferred
- 4.1 Preferred
- 4.0 Preferred
- 3.2 Preferred and Innovation
- 3.1 Preferred and Innovation
- 3.0 Preferred and Innovation
- 2.2 Preferred
-
-
- 4.0 & Later
- Prisma Access China
-
-
Install the Prisma Access Agent
Learn how to manually install the Prisma Access Agent on your
device.
| Where Can I Use This? | What Do I Need? |
|---|---|
|
|
If your administrator did not push the Prisma Access Agent to your device, you
can manually install the Prisma Access Agent on your macOS or Windows
device.
The Prisma Access Agent and GlobalProtect app can coexist on the same
device, but only one of them can connect to Prisma Access. If the
GlobalProtect app is also installed and enabled on your device, the Prisma Access Agent installation will automatically disable the
GlobalProtect app. To use the GlobalProtect app after installing the Prisma Access Agent, you will need to switch to the GlobalProtect app.
Install the Prisma Access Agent (macOS)
Learn how to manually install the Prisma Access Agent on a macOS
device. You can also learn how to manually uninstall the Prisma Access Agent on
macOS.
To manually install the Prisma Access Agent on your macOS device:
- Obtain the Prisma Access Agent package that your administrator provided to you. The package name is in the following format:PrismaAccessAgentInstaller_<version>.pkgIn your Downloads folder (or wherever you placed the installation package), open the installation package and follow the prompts to install the Prisma Access Agent.
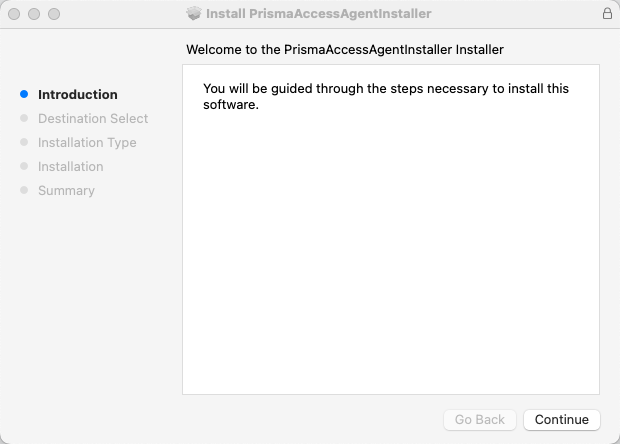
- From the installer, click Continue.
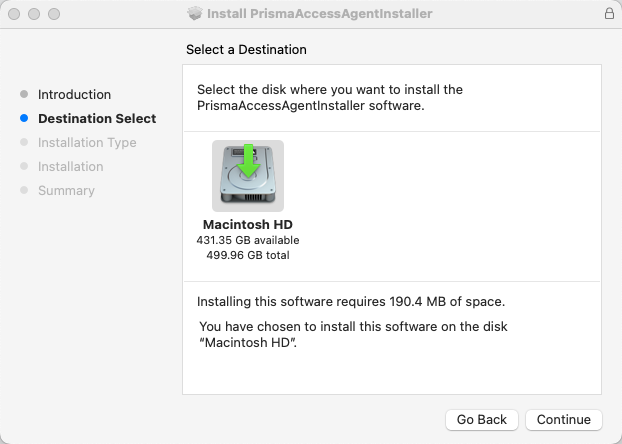
![]() Select the folder for the installation of the Prisma Access Agent and click Continue.
Select the folder for the installation of the Prisma Access Agent and click Continue.![]() Review the information in the Installation Type page and click Install.
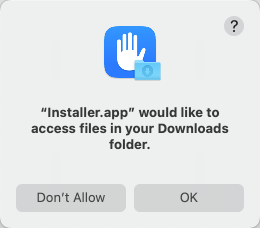
Review the information in the Installation Type page and click Install.![]() When prompted, enter your User Name and Password, and then click Install Software to begin the installation.Alternatively, you can use Touch ID (if it's enabled) to complete this step.When prompted to allow the installer to access files in the folder where you downloaded the installation package, click OK.
When prompted, enter your User Name and Password, and then click Install Software to begin the installation.Alternatively, you can use Touch ID (if it's enabled) to complete this step.When prompted to allow the installer to access files in the folder where you downloaded the installation package, click OK.![]() By default, macOS blocks the Prisma Access Agent system extensions. The system or network extensions appear if your administrator configured the Prisma Access Agent with traffic forwarding rules for:
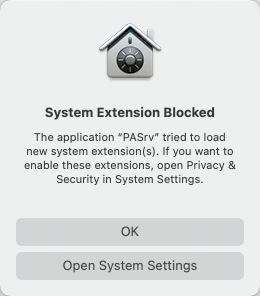
By default, macOS blocks the Prisma Access Agent system extensions. The system or network extensions appear if your administrator configured the Prisma Access Agent with traffic forwarding rules for:- Split tunneling—Directs network traffic through or outside of the Prisma Access connection.
- Split DNS—Directs DNS queries for applications and resources through Prisma Access or outside of Prisma Access in addition to network traffic.
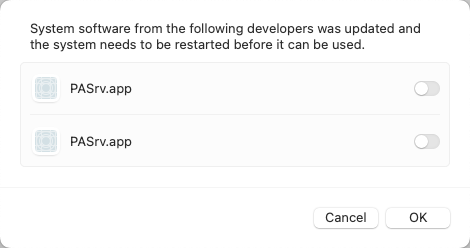
For the Prisma Access Agent to work, you need to enable the system extensions:- Click Open System Settings.
![]()
- In the Privacy & Security window, click Details for Some system software requires your attention before it can be used.
- Enable both PASrv.app apps and click OK.
![]()
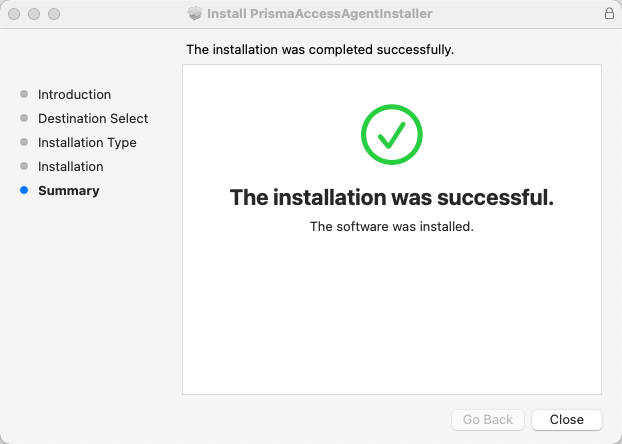
If your administrator enabled the feature to enforce Prisma Access connections for network access, you will be prompted to add a configuration to filter network content. To proceed, click Allow.![]() After you allow this, the Prisma Access Agent will filter and monitor your network connections for security purposes.When the installation is complete, Close the installer.
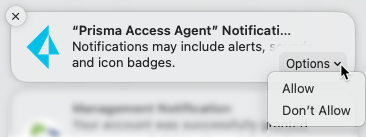
After you allow this, the Prisma Access Agent will filter and monitor your network connections for security purposes.When the installation is complete, Close the installer.![]() If your administrator configured the agent to install the Access Experience app along with the Prisma Access Agent, click OK so that you won't be prompted again.Click the Prisma Access Agent notifications pop-up to open the Notifications preferences window.If prompted, enable Prisma Access Agent notifications.When the Prisma Access Agent notifications pop-up appears on your desktop, move your cursor over the pop-up and select OptionsAllow.
If your administrator configured the agent to install the Access Experience app along with the Prisma Access Agent, click OK so that you won't be prompted again.Click the Prisma Access Agent notifications pop-up to open the Notifications preferences window.If prompted, enable Prisma Access Agent notifications.When the Prisma Access Agent notifications pop-up appears on your desktop, move your cursor over the pop-up and select OptionsAllow.![]() For the Prisma Access Agent to access data in the Safari browser, you must grant full disk access to the Security Extension and the Prisma Access Agent.
For the Prisma Access Agent to access data in the Safari browser, you must grant full disk access to the Security Extension and the Prisma Access Agent.- From macOS, select System SettingsPrivacy & SecurityFull Disk Access. Enable Prisma Access Agent and securityExtension from the list of apps.
![]() When prompted, Quit & Reopen the Prisma Access Agent for the changes to take effect.
When prompted, Quit & Reopen the Prisma Access Agent for the changes to take effect.Uninstall the Prisma Access Agent (macOS)
You can uninstall the Prisma Access Agent manually if you no longer need to use it. Keep in mind that by uninstalling the agent, you will no longer have access to your corporate network, and your endpoint won't be protected by your organization's security policies.Before you begin, if the administrator enabled the anti-tamper feature for the Prisma Access Agent, you must obtain the anti-tamper unlock password from the administrator. To uninstall the agent, you must have elevated administrative rights.Complete the following steps to uninstall the Prisma Access Agent from the command-line interface.- Disable the Prisma Access Agent by running the following command:
sudo /Applications/Prisma\ Access\ Agent.app/Contents/Helpers/pacli protect disable
- Enter your sudo password (user account password) when prompted.If prompted for the supervisor password, enter the anti-tamper unlock password.Run the following command to uninstall the agent:
/Applications/Prisma\ Access\ Agent.app/Contents/Helpers/uninstaller
Enter your sudo password (user account password) when prompted.If prompted for the supervisor password, enter the anti-tamper unlock password. Press Enter to begin the uninstallation of the agent and its extensions.
Install the Prisma Access Agent (Windows)
Learn how to manually install the Prisma Access Agent on your Windows device. You can also learn how to manually uninstall the Prisma Access Agent on Windows.To manually install the Prisma Access Agent on your Windows device.- Obtain the Prisma Access Agent package that your administrator provided to you. The package name is in the following format:PrismaAccessAgent_x64_<version>.msiIn your Downloads folder (or wherever you placed the installation package), double-click the installation package icon and follow the prompts to install the Prisma Access Agent.
- When the setup wizard appears, click Next to continue.
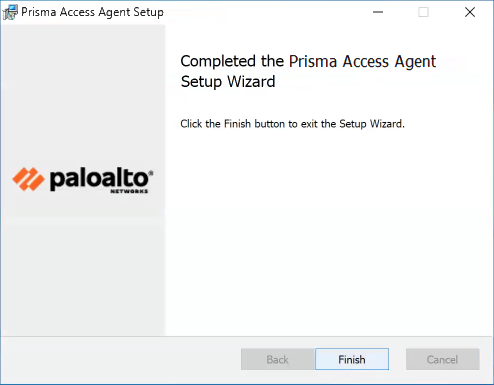
![]() Review the end-user license agreement, select I accept the terms in the License Agreement, and click Next.Click Install to begin the installation.When prompted to allow this app to make changes to your device, click Yes.When the installation is complete, click Finish.
Review the end-user license agreement, select I accept the terms in the License Agreement, and click Next.Click Install to begin the installation.When prompted to allow this app to make changes to your device, click Yes.When the installation is complete, click Finish.![]() If your administrator configured the agent to install the Access Experience app along with the Prisma Access Agent, click OK so that you won't be prompted again.
If your administrator configured the agent to install the Access Experience app along with the Prisma Access Agent, click OK so that you won't be prompted again.Uninstall the Prisma Access Agent (Windows)
You can uninstall the Prisma Access Agent manually if you no longer need to use it. Keep in mind that by uninstalling the agent, you will no longer have access to your corporate network, and your endpoint won't be protected by your organization's security policies.Before you begin, if the administrator enabled the anti-tamper feature for the Prisma Access Agent, you must obtain the anti-tamper unlock password from the administrator. To uninstall the agent, you must have elevated administrative rights.Complete the following steps to uninstall the Prisma Access Agent:- Disable the Prisma Access Agent.
- Run the following command in a Command Prompt window:
C:/Program Files/Palo Alto\ Networks/Prisma Access Agent/PACli.exe" protect disable
If prompted for the supervisor password, enter the anti-tamper unlock password.Uninstall the Prisma Access Agent.- On Windows 11:
- Open the Start menu.
- Select SettingsAppsInstalled Apps.
- Scroll to Prisma Access Agent.
- Select More OptionsUninstall.
- When prompted to continue with the uninstall, click Yes.
- On Windows 10:
- Open the Start menu.
- Select SettingsAppsApps & Features.
- Scroll to Prisma Access Agent.
- Select MoreUninstall.
- When prompted to continue with the uninstall, click Yes.

