Prisma Access
QoS for Remote Networks
Table of Contents
QoS for Remote Networks
Learn how to configure QoS for remote networks.
| Where Can I Use This? | What Do I Need? |
|---|---|
|
|
New Prisma Access deployments onboard bandwidth for remote networks by compute location.
To use QoS with remote networks, you enable or disable QoS and specify the guaranteed
bandwidth at the compute location level. However, you can still tailor QoS and
guaranteed bandwidth at a per-location level by customizing bandwidth per site.
Prisma Access divides compute location bandwidth using IPSec Termination Nodes.
Each IPSec termination node can provide you with a maxmum of 1,000 Mbps of bandwidth. If
you allocate more than 1,000 Mbps of bandwidth to a compute location, Prisma Access
provides you with additional IPSec termination nodes.
QoS for Remote Networks (Strata Cloud Manager)
Configure QoS to prioritize business-critical traffic or traffic that requires low
latency.
Use QoS to prioritize the critical traffic in your remote networks, and to set
maximum and guaranteed bandwidths for remote network sites in a compute location.
- Mark traffic that you want to receive QoS treatment.
- Select .Ensure that you are creating the policy for remote networks.Add Rule.
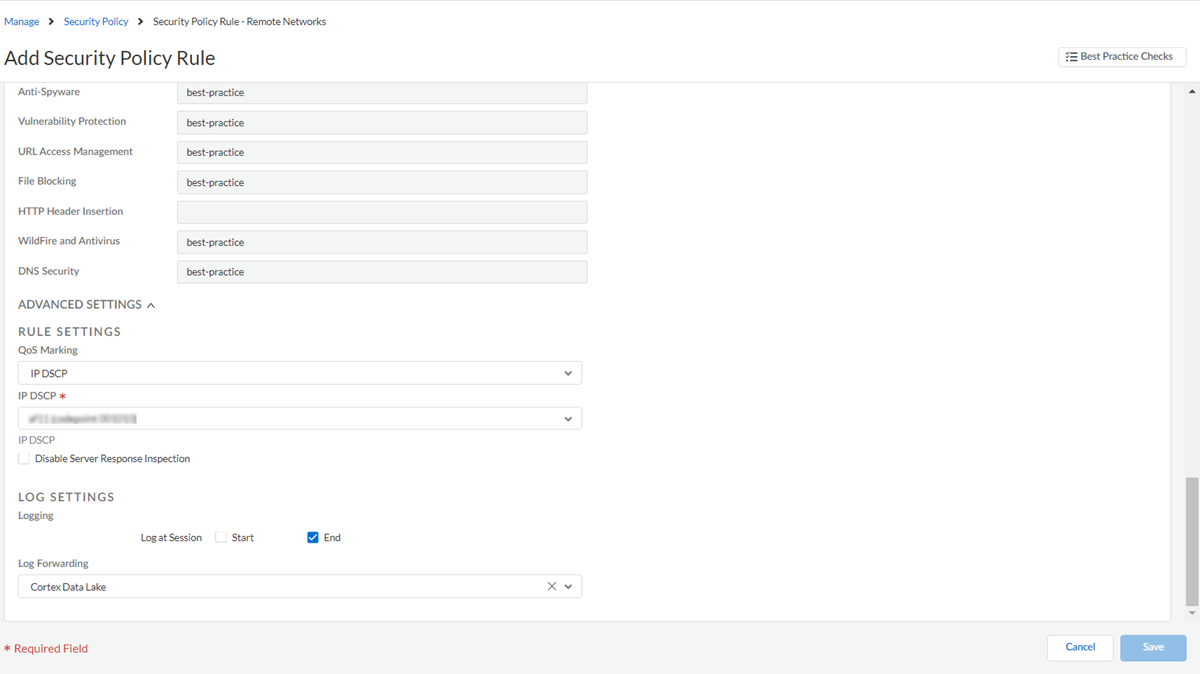
![]() Mark the incoming traffic by assigning a DSCP value in Advanced Settings and save the policy.
Mark the incoming traffic by assigning a DSCP value in Advanced Settings and save the policy.![]() Add one or more QoS policy rules.You use QoS policies to bind DSCP marking to one of eight available classes. You'll define the treatment a QoS class receives in the next steps. The QoS class determines the priority and bandwidth for traffic matching the QoS Policy rule.
Add one or more QoS policy rules.You use QoS policies to bind DSCP marking to one of eight available classes. You'll define the treatment a QoS class receives in the next steps. The QoS class determines the priority and bandwidth for traffic matching the QoS Policy rule.- Select .Add Rule.
![]() Enter values and save the policy.
Enter values and save the policy.![]() Enable QoS for your remote network locations.
Enable QoS for your remote network locations.- Select .Determine the Prisma Access locations where you want to deploy QoS; then find the compute location that corresponds to each Prisma Access location.Each Prisma Access location is allocated bandwidth from its compute location, and you must know the name of the compute location for the locations where you want to allocate QoS.Enable QoS at a compute location level in the QoS column.Whatever settings you enter apply to all locations that correspond to this compute location.
![]() Edit the QoS settings for the compute location.
Edit the QoS settings for the compute location.![]()
- Select the guaranteed bandwidth ratio, which is a ratio based on the entire allocated bandwidth for the compute location.For example, if you have allocated bandwidth of 1001 Mbps for the US Southwest compute location, and you enter a Guaranteed Bandwidth Ratio of 82%, the guaranteed bandwidth for that compute location is 820.82 Mbps.By default, each remote network is given a percentage that is equal to the number of connections. For example, given 4 connections in a compute location and a total guaranteed bandwidth of 820.82 Mbps, each location receives 25% of that bandwidth, which is 205.2 Mbps.If the AIOps-Powered ADEM license is enabled, then the license is auto-enabled for all the compute locations.Create New QoS profile or Manage an existing QoS profile.You use QoS profiles to shape the traffic at egress point.(Optional) Customize QoS settings for remote network sites in a compute location. If you have multiple remote networks per compute location and want to change either the bandwidth ratio or QoS profile for each remote network, select Customize and change the bandwidth allocation ratio, QoS profile, or both.
![]() If you select Customize and then onboard additional remote networks in the same IPSec termination node, the newly-onboarded sites receive an allocation ratio of 0, and you must manually rebalance the allocation ratio between existing sites and the newly-onboarded site.Save the changes.Push the configurations.
If you select Customize and then onboard additional remote networks in the same IPSec termination node, the newly-onboarded sites receive an allocation ratio of 0, and you must manually rebalance the allocation ratio between existing sites and the newly-onboarded site.Save the changes.Push the configurations.QoS for Remote Networks (Panorama)
Learn how to configure QoS in Prisma Access (Managed by Panorama).Configure Quality of Service in Prisma Access by completing the following task.- Add one or more security policy rules for remote networks and mobile users to mark the ingress traffic for QoS.You use these policies to match a traffic flow and assign it a selected DSCP value.
- Select .Alternatively, select to add a rule at the bottom of the rule order that is evaluated after a pre-rule.Be sure that you select the correct Device Group. To create a security rule for a remote network, select the device group for the remote network (for example, Remote_Network_Device_Group); for mobile users, select the device group for the mobile users (for example, Mobile_User_Device_Group).Add a security policy rule.Enter a Name for the rule.Define the matching criteria for the source or destination fields in the packet.See Create a Security Policy Rule for details.Click Actions, then select a QoS Marking of either IP DSCP or IP Precedence.Enter the QoS value in binary form, or select the value from the drop-down.The following screenshot shows a security policy rule that matches traffic marked with an IP DSCP value of af11.
![]() Add one or more QoS policy rules.You use QoS policies to bind DSCP marking to one of eight available classes. You use these classes later when you create one or more QoS profiles.
Add one or more QoS policy rules.You use QoS policies to bind DSCP marking to one of eight available classes. You use these classes later when you create one or more QoS profiles.- Select .Alternatively, use Post Rules () to add a rule at the bottom of the rule order that is evaluated after a pre-rule.Service connections do not support QoS Post Rules; use Pre Rules only with Service Connections.Be sure that you select the correct Device Group for the service connection (for example, Service_Conn_Device_Group) or remote network connection (for example, Remote_Network_Device_Group). If a rule in a Shared device group has defined values other than the values in the General, DSCP/ToS, and Other settings areas, Prisma Access does not apply the rule on the remote network and service connection.Add a QoS policy rule.Click General and enter a name for the policy rule.Click the DSCP/ToS tab, then click Codepoints and Add one or more new codepoints.For Clean Pipe deployments, you can specify additional QoS settings in policy, such as source, destination, or application.Specify a Name for the DSCP/ToS rule, then select a Type and Codepoint.
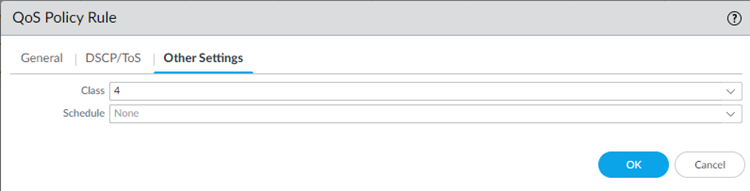
![]() Alternatively, keep the default value (Any) to allow the policy to match to traffic regardless of the Differentiated Services Code Point (DSCP) value or the IP Precedence/Type of Service (ToS) defined for the traffic.Click the Other Settings tab, then Choose the QoS Class to assign to the rule.You define class characteristics in the QoS profile.Click OK.
Alternatively, keep the default value (Any) to allow the policy to match to traffic regardless of the Differentiated Services Code Point (DSCP) value or the IP Precedence/Type of Service (ToS) defined for the traffic.Click the Other Settings tab, then Choose the QoS Class to assign to the rule.You define class characteristics in the QoS profile.Click OK.![]() Create one or more QoS profiles to shape QoS traffic on egress for service connections and remote network connections.You use profiles to shape the traffic at egress point by defining QoS classes and assigning a bandwidth to them. You must select either an existing QoS profile or create a new QoS profile when you enable QoS for Prisma Access.
Create one or more QoS profiles to shape QoS traffic on egress for service connections and remote network connections.You use profiles to shape the traffic at egress point by defining QoS classes and assigning a bandwidth to them. You must select either an existing QoS profile or create a new QoS profile when you enable QoS for Prisma Access.- Select the correct template the profile you want to create (Remote_Network_Template or Service_Conn_Template); then, select andAdd a profile.Enter a profile Name.Set the overall bandwidth limits for the QoS profile rule.
- Enter an Egress Max that represents the maximum throughput (in Mbps) for traffic leaving the service connection or remote network connection.
- For service connections, specify a number of up to 1 Gbps (1,000 Mbps).Do not enter a number greater than 1 Gbps; Prisma Access calculates service connection bandwidth per service connection IPSec tunnel and not cumulatively across multiple tunnels.
- For remote network connections, enter a value of 0.
- Enter an Egress Guaranteed value. bandwidth that is the guaranteed bandwidth for this profile (in Mbps).
- For service connections, enter an Egress Guaranteed bandwidth that is the guaranteed bandwidth for this profile (in Mbps).Any traffic that exceeds the Egress Guaranteed value is best effort and not guaranteed. Bandwidth that is guaranteed but is unused continues to remain available for all traffic.
- For remote network connections, enter a value of 0.
In the Classes section, Add one or more classes and specify how to mark up to eight individual QoS classes.- For QoS profiles used by site-based remote networks and remote networks that allocate bandwidth by compute location, change the Class Bandwidth Type to Percentage and enter percentages for the Egress Max and Egress Guaranteed values you enter in this area.
- For QoS profiles used by service connections or by remote networks that allocate bandwidth by location, specify a type of Mbps. If you use a Class Bandwidth Type of Mbps, be sure that you specify an Egress Guaranteed value that is less than the Egress Max value.
- Select the Priority for the class (either real-time, high, medium, or low).
- Enter the Egress Max for traffic assigned to each QoS class you create.
- For remote networks that allocate bandwidth by compute location, enter 0.
- For bandwidth-based QoS profiles (used by service connections or remote networks that allocate bandwidth by location), enter a value in Mbps. The Egress Max for a QoS class must be less than or equal to the Egress Max for the QoS profile.
- Enter the Egress Guaranteed percentage or bandwidth in Mbps for each QoS class. For QoS profiles for remote networks, enter a percentage.Guaranteed bandwidth assigned to a class is not reserved for that class—bandwidth that is unused continues to remain available to all traffic. When a class of traffic exceeds the egress guaranteed bandwidth, Prisma Access passes that traffic on a best-effort basis.
- Enter a Class Bandwidth Type for the profile.
![]() Click OK.(Service Connections Only) Enable QoS for the service connection and apply the QoS profile to the connection.
Click OK.(Service Connections Only) Enable QoS for the service connection and apply the QoS profile to the connection.- Enable QoS by selecting , selecting a Connection Name, clicking the QoS tab; then Enable QoS.If you allocate your remote network bandwidth by Prisma Access Remote Networks instead of by compute location, configure QoS in the same way as you do service connections. Select , select the hypertext for a remote network connection Name, click the QoS tab, and Enable QoS. If you allocate bandwidth by compute location (the default method), continue to Step 5 to configure QoS for remote networks.Select a QoS profile and click OK.
![]() (Remote network deployments that allocate bandwidth by compute location only) Enable QoS for your remote network locations.
(Remote network deployments that allocate bandwidth by compute location only) Enable QoS for your remote network locations.- Determine the Prisma Access locations where you want to deploy QoS; then find the compute location that corresponds to each location.Each location is allocated bandwidth from its compute location, and you must know the name of the compute location for the locations where you want to allocate QoS. For a list of compute location-to-location mapping, see Prisma Access Locations, or select and click the gear icon; the mappings display in the Compute Location and Prisma Access Location columns.Select , click the gear to edit the settings, and select QoS.Enable QoS at a compute location level.Whatever settings you enter apply to all locations that correspond to this compute location.Enter the QoS Profile, Guaranteed Bandwidth Ratio, and Reserved for Guaranteed Bandwidth (Mbps).
- Enter the QoS Profile to use with this compute location.If you want to use different QoS Profiles per remote networks, use Customize Per Site as described in a later step.
- Enter the Guaranteed Bandwidth Ratio, which is a ratio based on the entire allocated bandwidth for the compute location.For example, If you have allocated bandwidth of 800 Mbps for the Canada Central compute location, and you enter a Guaranteed Bandwidth Ratio of 60%, the guaranteed bandwidth for that compute location is 480 Mbps.
- Enter the amount of bandwidth that is Reserved for Guaranteed Bandwidth (Mbps) for the QoS profile and compute location you selected.
The following screenshot shows QoS enabled for the Canada Central, Ireland, and South Korea compute locations.![]() (Optional) if you have multiple remote network connections per compute location and want to change either the bandwidth ratio or QoS profile for each location, onboard your remote network locations; then, select Customize Per Site and change the bandwidth allocation ratio, QoS profile, or both.
(Optional) if you have multiple remote network connections per compute location and want to change either the bandwidth ratio or QoS profile for each location, onboard your remote network locations; then, select Customize Per Site and change the bandwidth allocation ratio, QoS profile, or both.- To customize the guaranteed bandwidth, click the number in the Customize Per Site area, select Customize Per Site, and change the Allocation Ratio.By default, each remote connection is given a percentage that is equal to the number of connections. For example, given 4 connections in a compute location and a total guaranteed bandwidth of 100 Mbps, each location receives 25% of that bandwidth or 25 Mbps.If you select Customize Per Site and then onboard additional remote networks in the same IPSec termination node, the newly-onboarded sites receive an allocation ratio of 0, and you must manually rebalance the allocation ratio between existing sites and the newly-onboarded site.If you do not Customize Per Site, the bandwidth percentage automatically rebalances when you add remote networks. For example, if you did not select Customize Per Site and have four remote networks onboarded, each of those remote networks have an allocation ratio of 25%. If you add a fifth remote network, all five sites rebalance and receive a guaranteed bandwidth of 20%.
- If you want to specify a QoS profile at a per-remote network level, select a different QoS Profile for the remote network.
![]() Check the QoS status.
Check the QoS status.-
For remote networks, select , select a region from the map, select QoS, then select a location.
![]() Remote network statistics display for the 10 IPSec termination nodes that have the highest throughput. Prisma Access uses the 95th percentile standard to gather statistics, which tracks bandwidth at peak utilization and ignores the top 5 percent of utilization peaks and large bursts.Select the time range (Last hour, Last 24 hours, Last 7 days, or Last 30 days) to view statistics for that time period.
Remote network statistics display for the 10 IPSec termination nodes that have the highest throughput. Prisma Access uses the 95th percentile standard to gather statistics, which tracks bandwidth at peak utilization and ignores the top 5 percent of utilization peaks and large bursts.Select the time range (Last hour, Last 24 hours, Last 7 days, or Last 30 days) to view statistics for that time period.![]() The remote networks with the highest egress bandwidth usage displays in the Site area, along with the remote networks locations’ statistics for Guaranteed Bandwidth, Average Throughput, Average Packet Loss, and the IPSec Termination Node and QoS Profile used by the remote network. You can also Search for a location.To view the remote networks associated with a specific IPSec termination node, change the drop-down at the top of the page from All to a specific IPSec termination node to view statistics for that IPSec termination node and the remote networks for that site.
The remote networks with the highest egress bandwidth usage displays in the Site area, along with the remote networks locations’ statistics for Guaranteed Bandwidth, Average Throughput, Average Packet Loss, and the IPSec Termination Node and QoS Profile used by the remote network. You can also Search for a location.To view the remote networks associated with a specific IPSec termination node, change the drop-down at the top of the page from All to a specific IPSec termination node to view statistics for that IPSec termination node and the remote networks for that site.![]() To view specific traffic for a site sorted by QoS class, slick the Site Name. The guaranteed bandwidth, egress throughput, and throughput over time displays for the remote network site. You can also sort this information over the last hour, last 24 hours, last 7 days, or last 30 days.
To view specific traffic for a site sorted by QoS class, slick the Site Name. The guaranteed bandwidth, egress throughput, and throughput over time displays for the remote network site. You can also sort this information over the last hour, last 24 hours, last 7 days, or last 30 days.![]() Hover over the graph on the right to get detailed information for a specific period of time.
Hover over the graph on the right to get detailed information for a specific period of time.![]()
-
For service connections, select , select a region, then Monitor the Statistics.
Click QoS to view a page with QoS statistics.![]() This page displays a chart with real-time and historical QoS statistics, including the number of dropped packets per class. This chart displays only for service connections or remote network connections that have QoS enabled, shows the last five minutes of the connection’s network activity, and refreshes every 10 seconds.The following figure shows traffic being passed for classes 1,2,3, and 4. The data below the figure shows the number of packets dropped based on the QoS configuration for classes 2, 3, and 4.
This page displays a chart with real-time and historical QoS statistics, including the number of dropped packets per class. This chart displays only for service connections or remote network connections that have QoS enabled, shows the last five minutes of the connection’s network activity, and refreshes every 10 seconds.The following figure shows traffic being passed for classes 1,2,3, and 4. The data below the figure shows the number of packets dropped based on the QoS configuration for classes 2, 3, and 4.![]()
Change the Guaranteed Bandwidth