Prisma Access
Configure Mobile Users without Cloud Identity Engine
Table of Contents
Configure Mobile Users without Cloud Identity Engine
| Where Can I Use This? | What Do I Need? |
|---|---|
|
|
To configure SAML authentication in Microsoft Entra ID
(formerly Microsoft Azure Active Directory (Azure AD)), you
must register your Prisma Access deployment with Microsoft Entra ID. Microsoft Entra ID authentication is
supported with Prisma Access GlobalProtect and Explicit Proxy deployments.
You first configure SAML in Microsoft Entra ID, then import the metadata XML file (the file that
contains SAML registration information) from Microsoft Entra ID and upload it to a SAML
Identity Provider you create in Prisma Access. You then create an
Authentication Profile that references the IdP server
profile, add the authentication profile into the Explicit Proxy or GlobalProtect
configuration, and commit and push your changes.
Configure Mobile Users without Cloud Identity Engine (Strata Cloud Manager)
This procedure assumes that you have a Microsoft Entra ID (formerly Azure Active Directory (Azure AD)) account, can create and
modify enterprise applications, can set up a SAML Service Provider in Microsoft Entra ID, and
can download SAML metadata XML files in Azure.
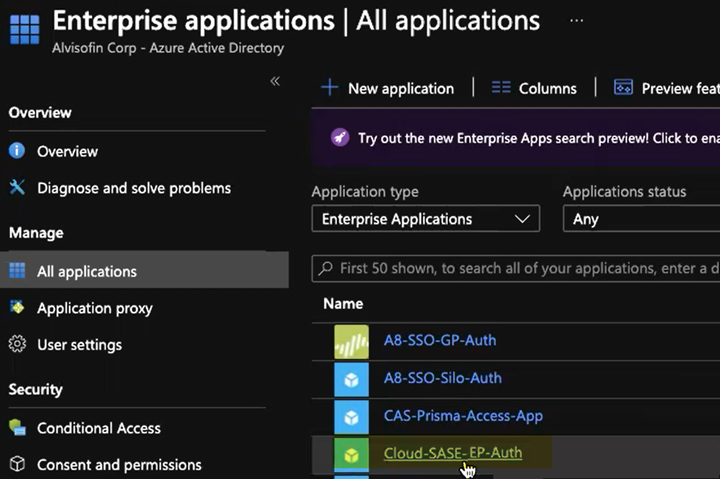
- Log in to Microsoft Entra ID and open the enterprise application for either GlobalProtect or Explicit Proxy, depending on the deployment type.GlobalProtect has its own app in Microsoft Entra ID; for Explicit Proxy, Palo Alto Networks does not have an existing enterprise application for Explicit Proxy and you must create one.Palo Alto Networks does not control your Microsoft Entra ID setup and the UI might be different than these examples. For more information, refer to the Microsoft Azure documentation.
-
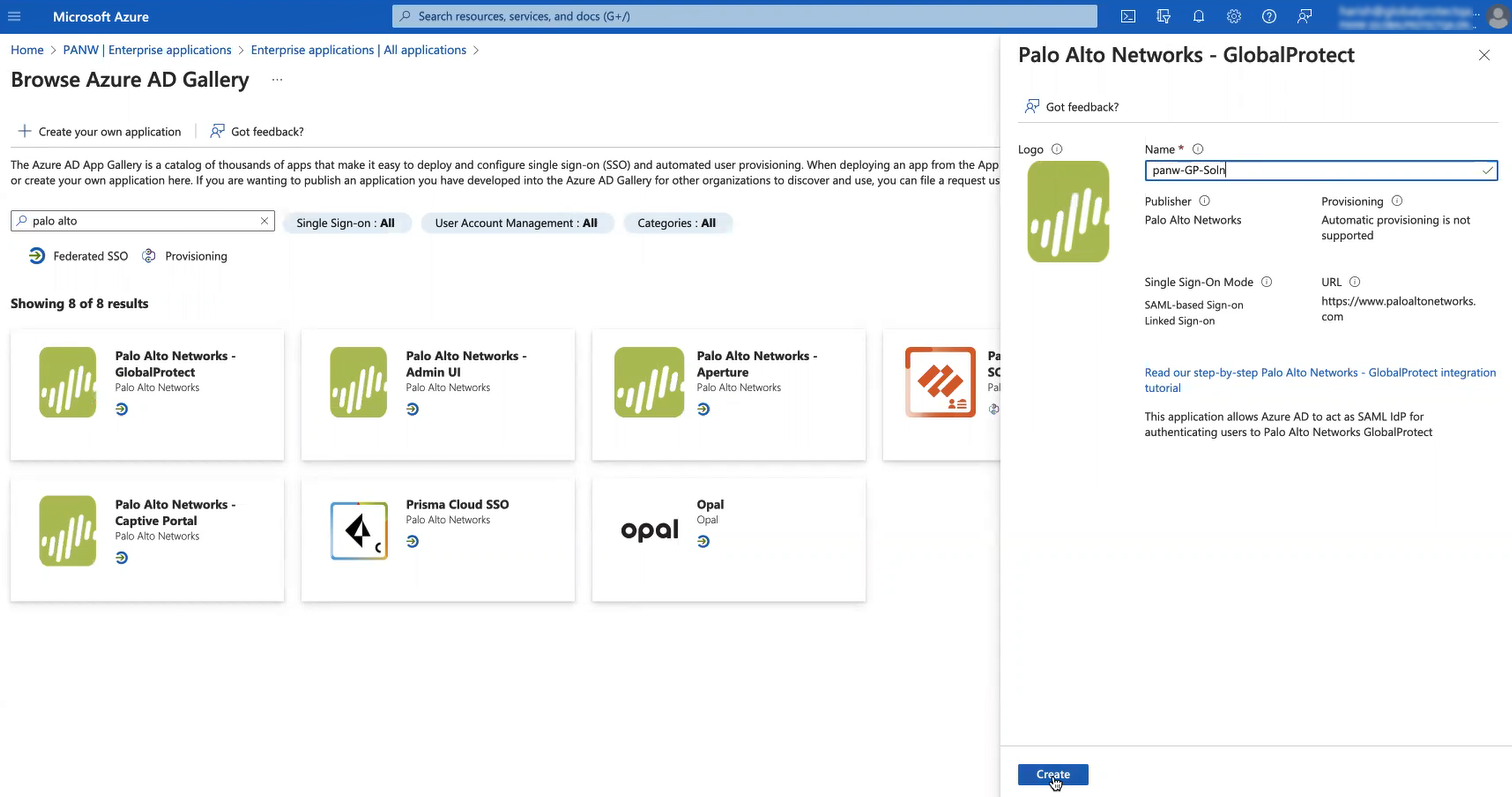
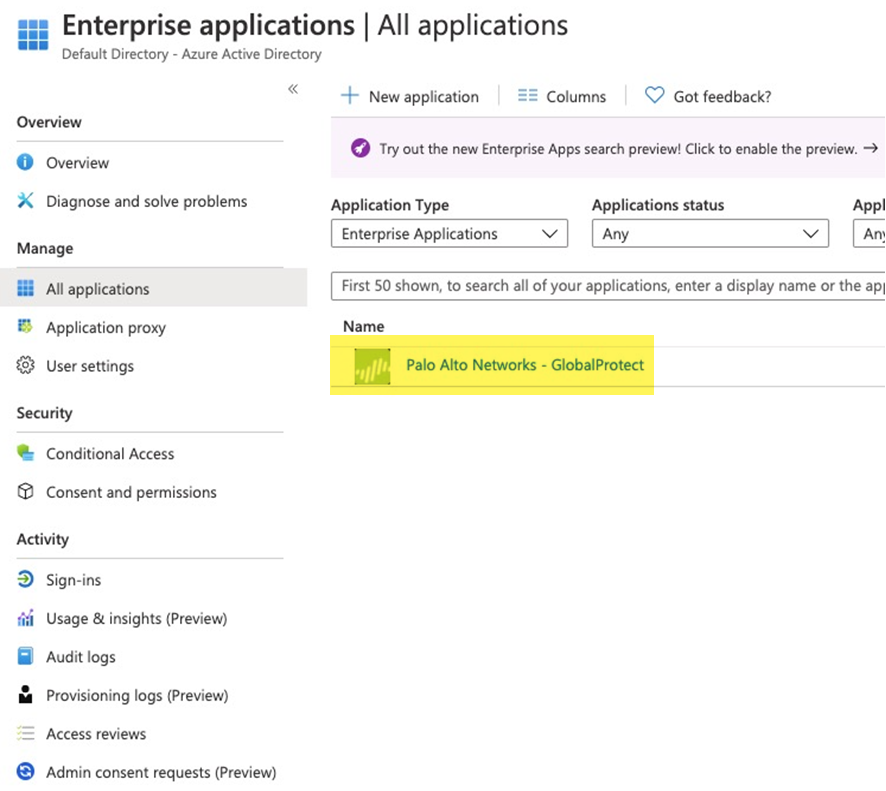
GlobalProtect Deployments—Select ; then, search for Palo Alto Networks - GlobalProtect and select the Palo Alto Networks - GlobalProtect application. Rename the application if required.
![]()
-
Explicit Proxy Deployments—Select and create a New application; then, select Create your own application, give it a Name, select Integrate any other application you don’t find in the gallery, and Create it.
![]() After you create the application, select it.
After you create the application, select it.![]()
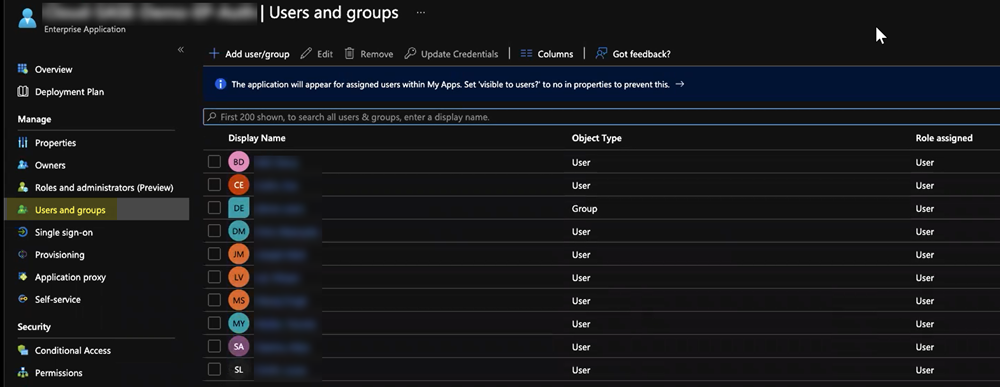
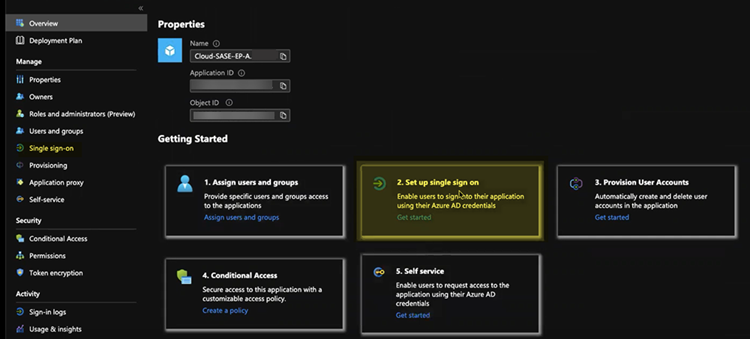
Set up the Microsoft Entra ID application.- Assign Users and groups and Add user/group that require the Microsoft Entra ID authentication.Alternatively, you can select Users and groups from the left navigation pane to Add user/group.
![]() Select Set up single sign on from the button or select Single sign on from the left navigation pane.In the Basic SAML Configuration area, click Edit.
Select Set up single sign on from the button or select Single sign on from the left navigation pane.In the Basic SAML Configuration area, click Edit.![]()
![]() Enter the parameters for your Explicit Proxy or GlobalProtect deployment.
Enter the parameters for your Explicit Proxy or GlobalProtect deployment.- Mobile Users—GlobalProtect Deployments—Enter the following parameters:
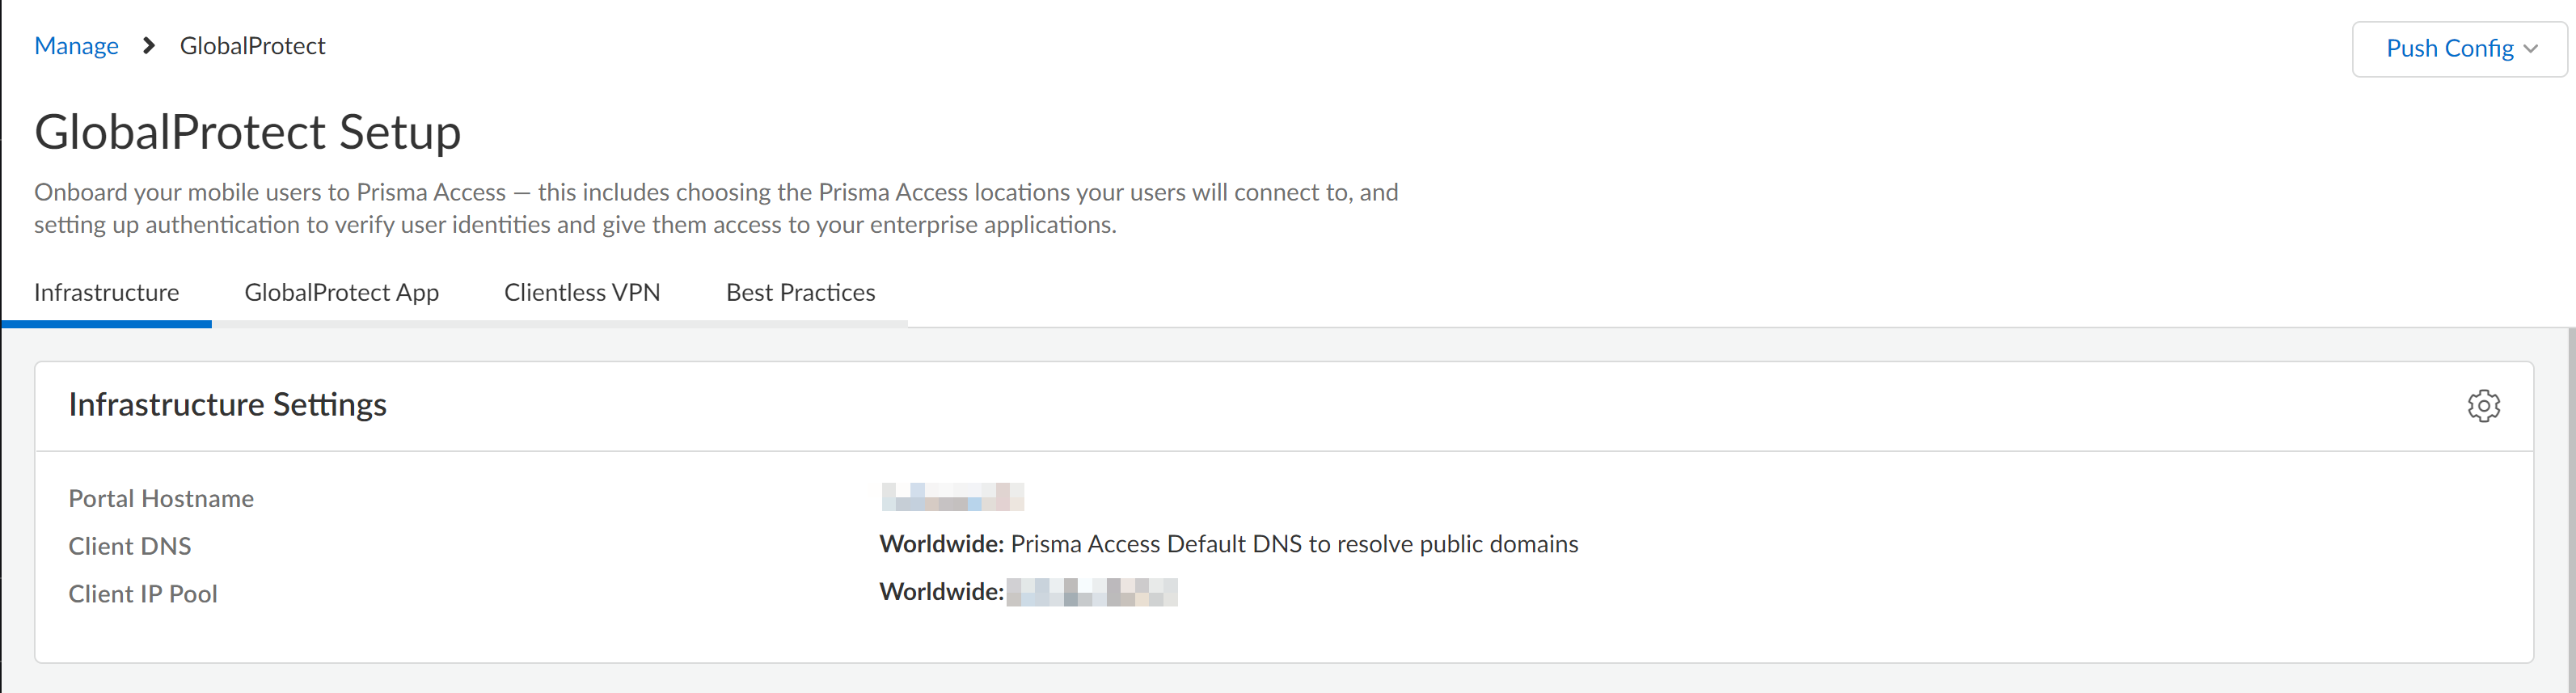
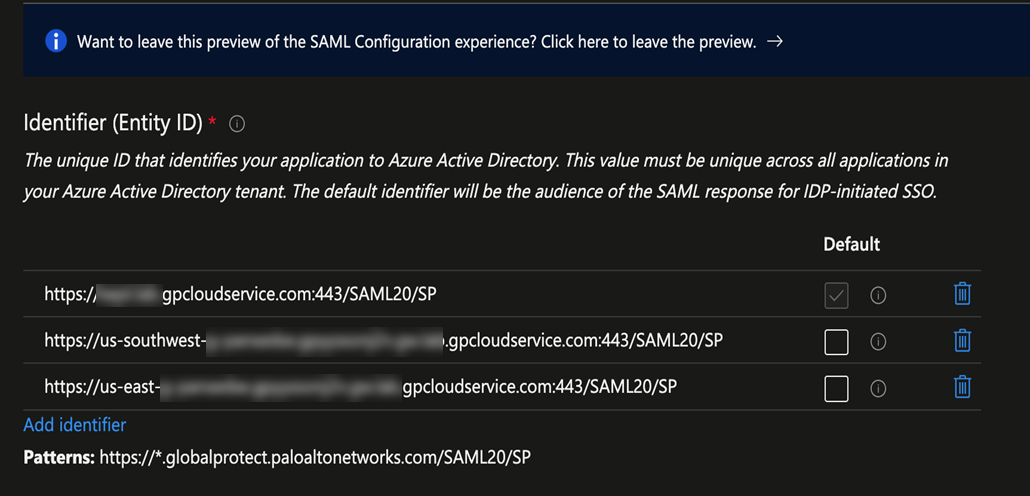
- In the Identifier (Entity ID) area, enter a URL of https://portal-name:443/SAML20/SP, where portal-name is the Mobile Users—GlobalProtect portal name (in Prisma Access select ), and select that as the Default entity ID.
![]() In addition, enter all gateway names in the format of https://gateway-name:443/SAML20/SP.
In addition, enter all gateway names in the format of https://gateway-name:443/SAML20/SP.![]() If you are configuring a standalone GlobalProtect deployment, you can use either the FQDN or IP address of the GlobalProtect portal as the portal-name.
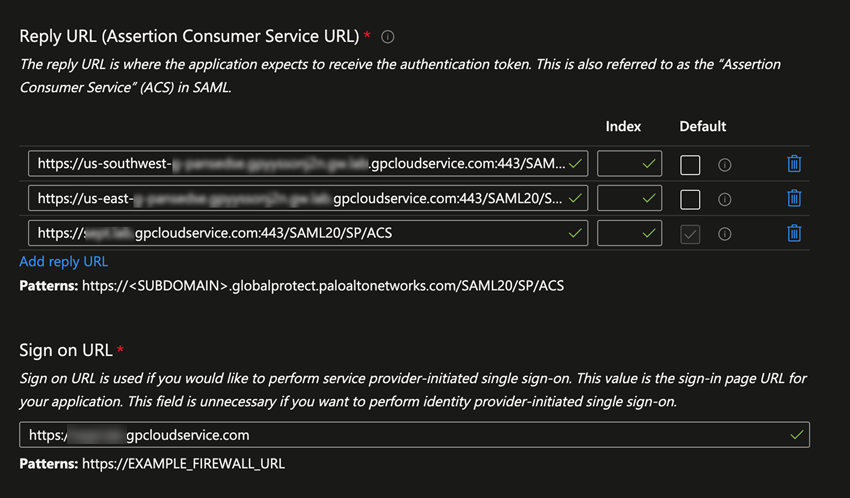
If you are configuring a standalone GlobalProtect deployment, you can use either the FQDN or IP address of the GlobalProtect portal as the portal-name. - In the Reply URL (Assertion Consumer Service URL), re-enter the portal and gateway names, appending ACS to the URL names (https://portal-name:443/SAML20/SP/ACS and https://gateway-name:443/SAML20/SP/ACS, respectively). Specify the portal name as the default.
- Explicit Proxy Deployments—Enter the following parameters:
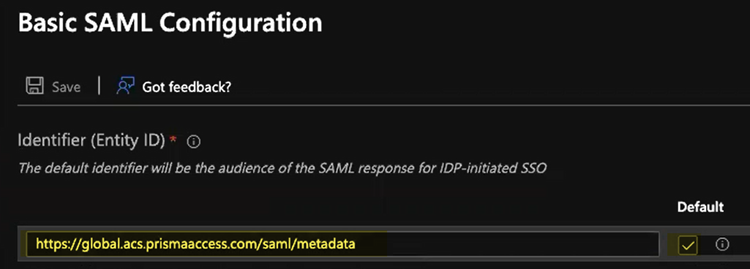
- In the Identifier (Entity ID) area, enter an Entity ID of https://ACS URL/saml/metadata, where the ACS URL is explicit proxy mobile users name (in Prisma Access, select ) and select that as the Default identifier.
![]()
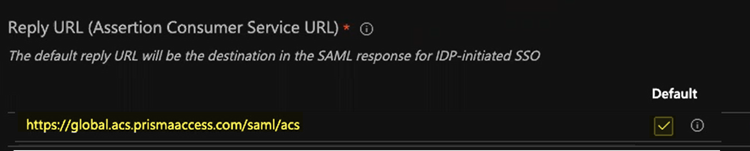
- In the Reply URL (Assertion Consumer Service URL), enter a SAML Assertion Consumer Service URL of https://global.acs.prismaaccess.com/saml/acs and select that as the Default entity ID.
![]()
- Use https://global.acs.prismaaccess.com/saml/acs as the Sign on URL.
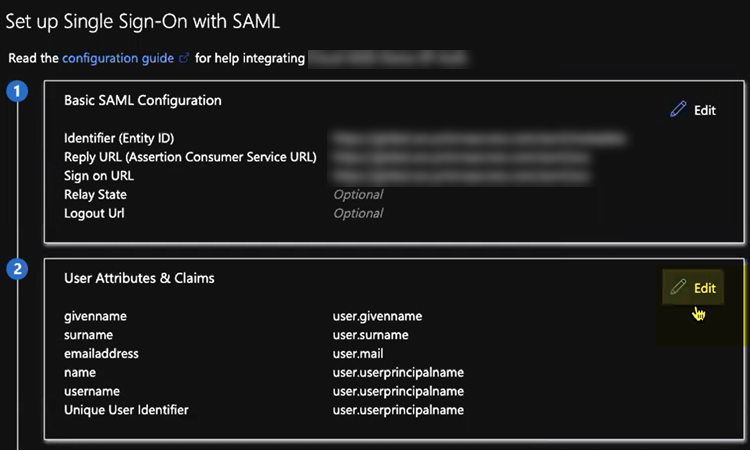
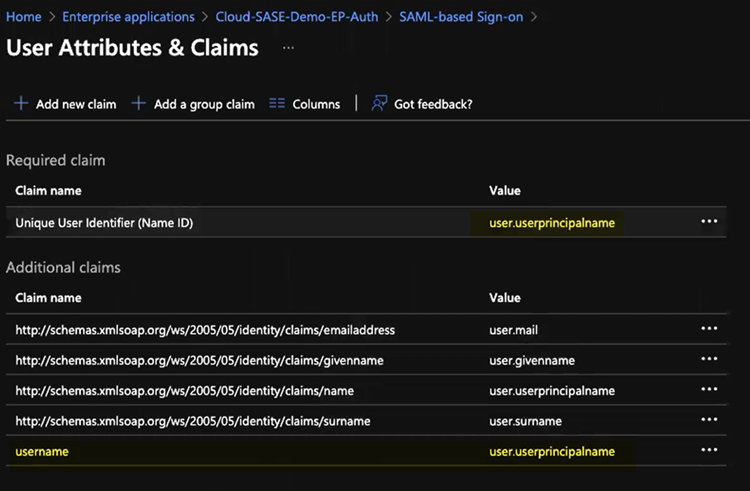
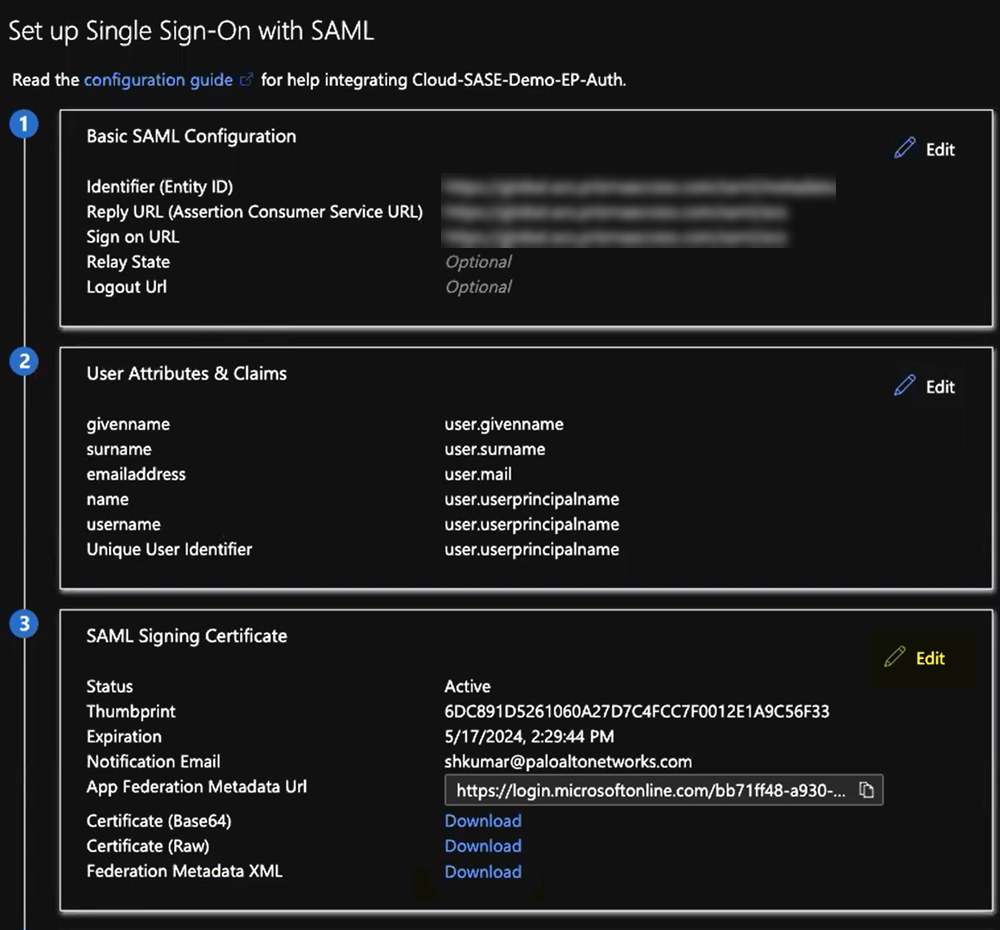
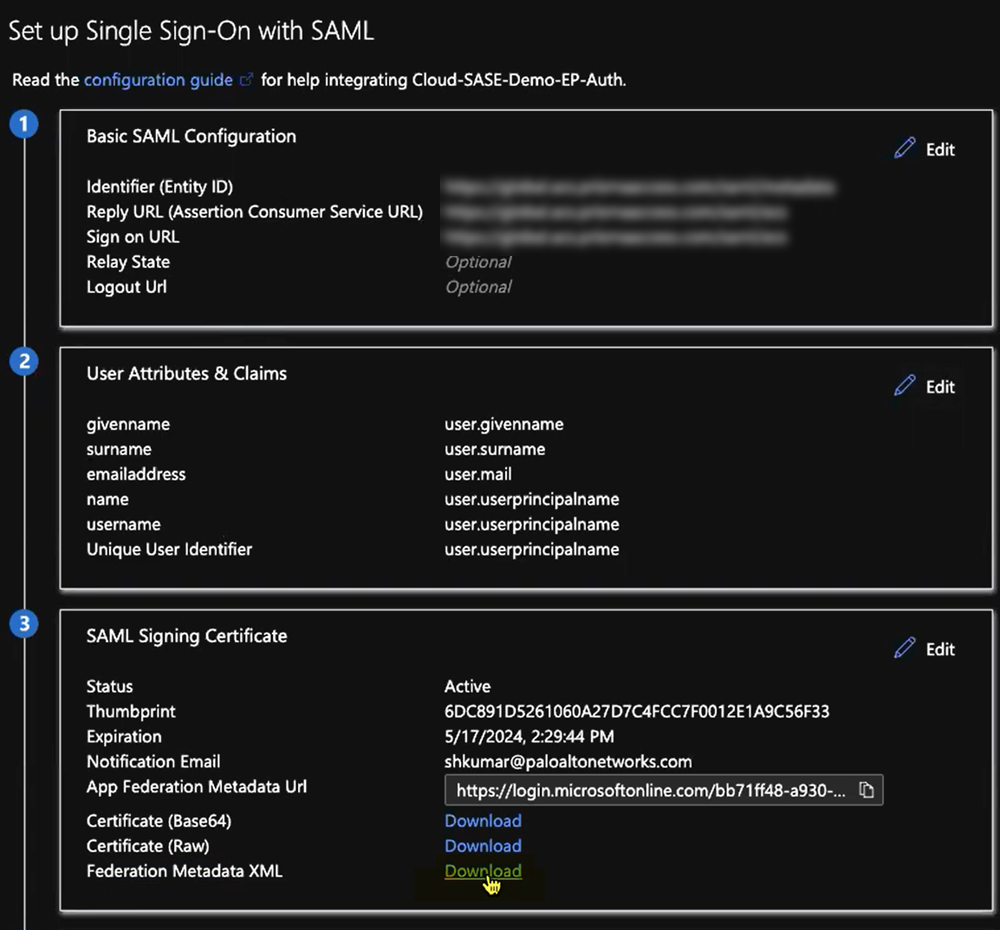
In the Set Up Single Sign-On with SAML pane, select Edit in the User Attributes & Claims area.![]() Enter the following values:
Enter the following values:- Enter user.userprincipalname as the Unique User Identifier (Name ID).
- In the Additional Claims area, add a Claim Name of username and a Value of user.userprincipalname.You must add this claim to ensure correct username-to-IP address mapping for authenticated users.
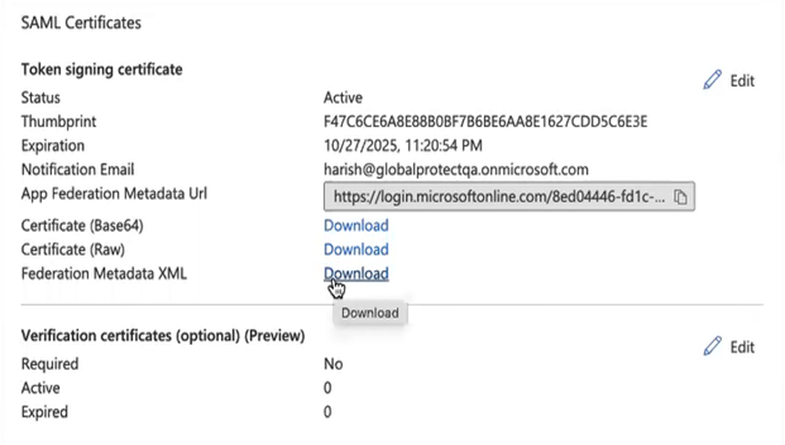
![]() Export the metadata XML file from Microsoft Entra ID and save it to a client system from which you can upload it to Prisma Access by clicking Download in the Federation Metadata XML area.Prisma Access requires this XML file to retrieve the correct SAML attributes from Microsoft Entra ID. You upload the file when you create the SAML IdP profile in Prisma Access.
Export the metadata XML file from Microsoft Entra ID and save it to a client system from which you can upload it to Prisma Access by clicking Download in the Federation Metadata XML area.Prisma Access requires this XML file to retrieve the correct SAML attributes from Microsoft Entra ID. You upload the file when you create the SAML IdP profile in Prisma Access.![]() (For GlobalProtect mobile users only) In Prisma Access, configure an authentication profile for Microsoft Entra ID.The profile defines authentication settings that are common to a set of users.
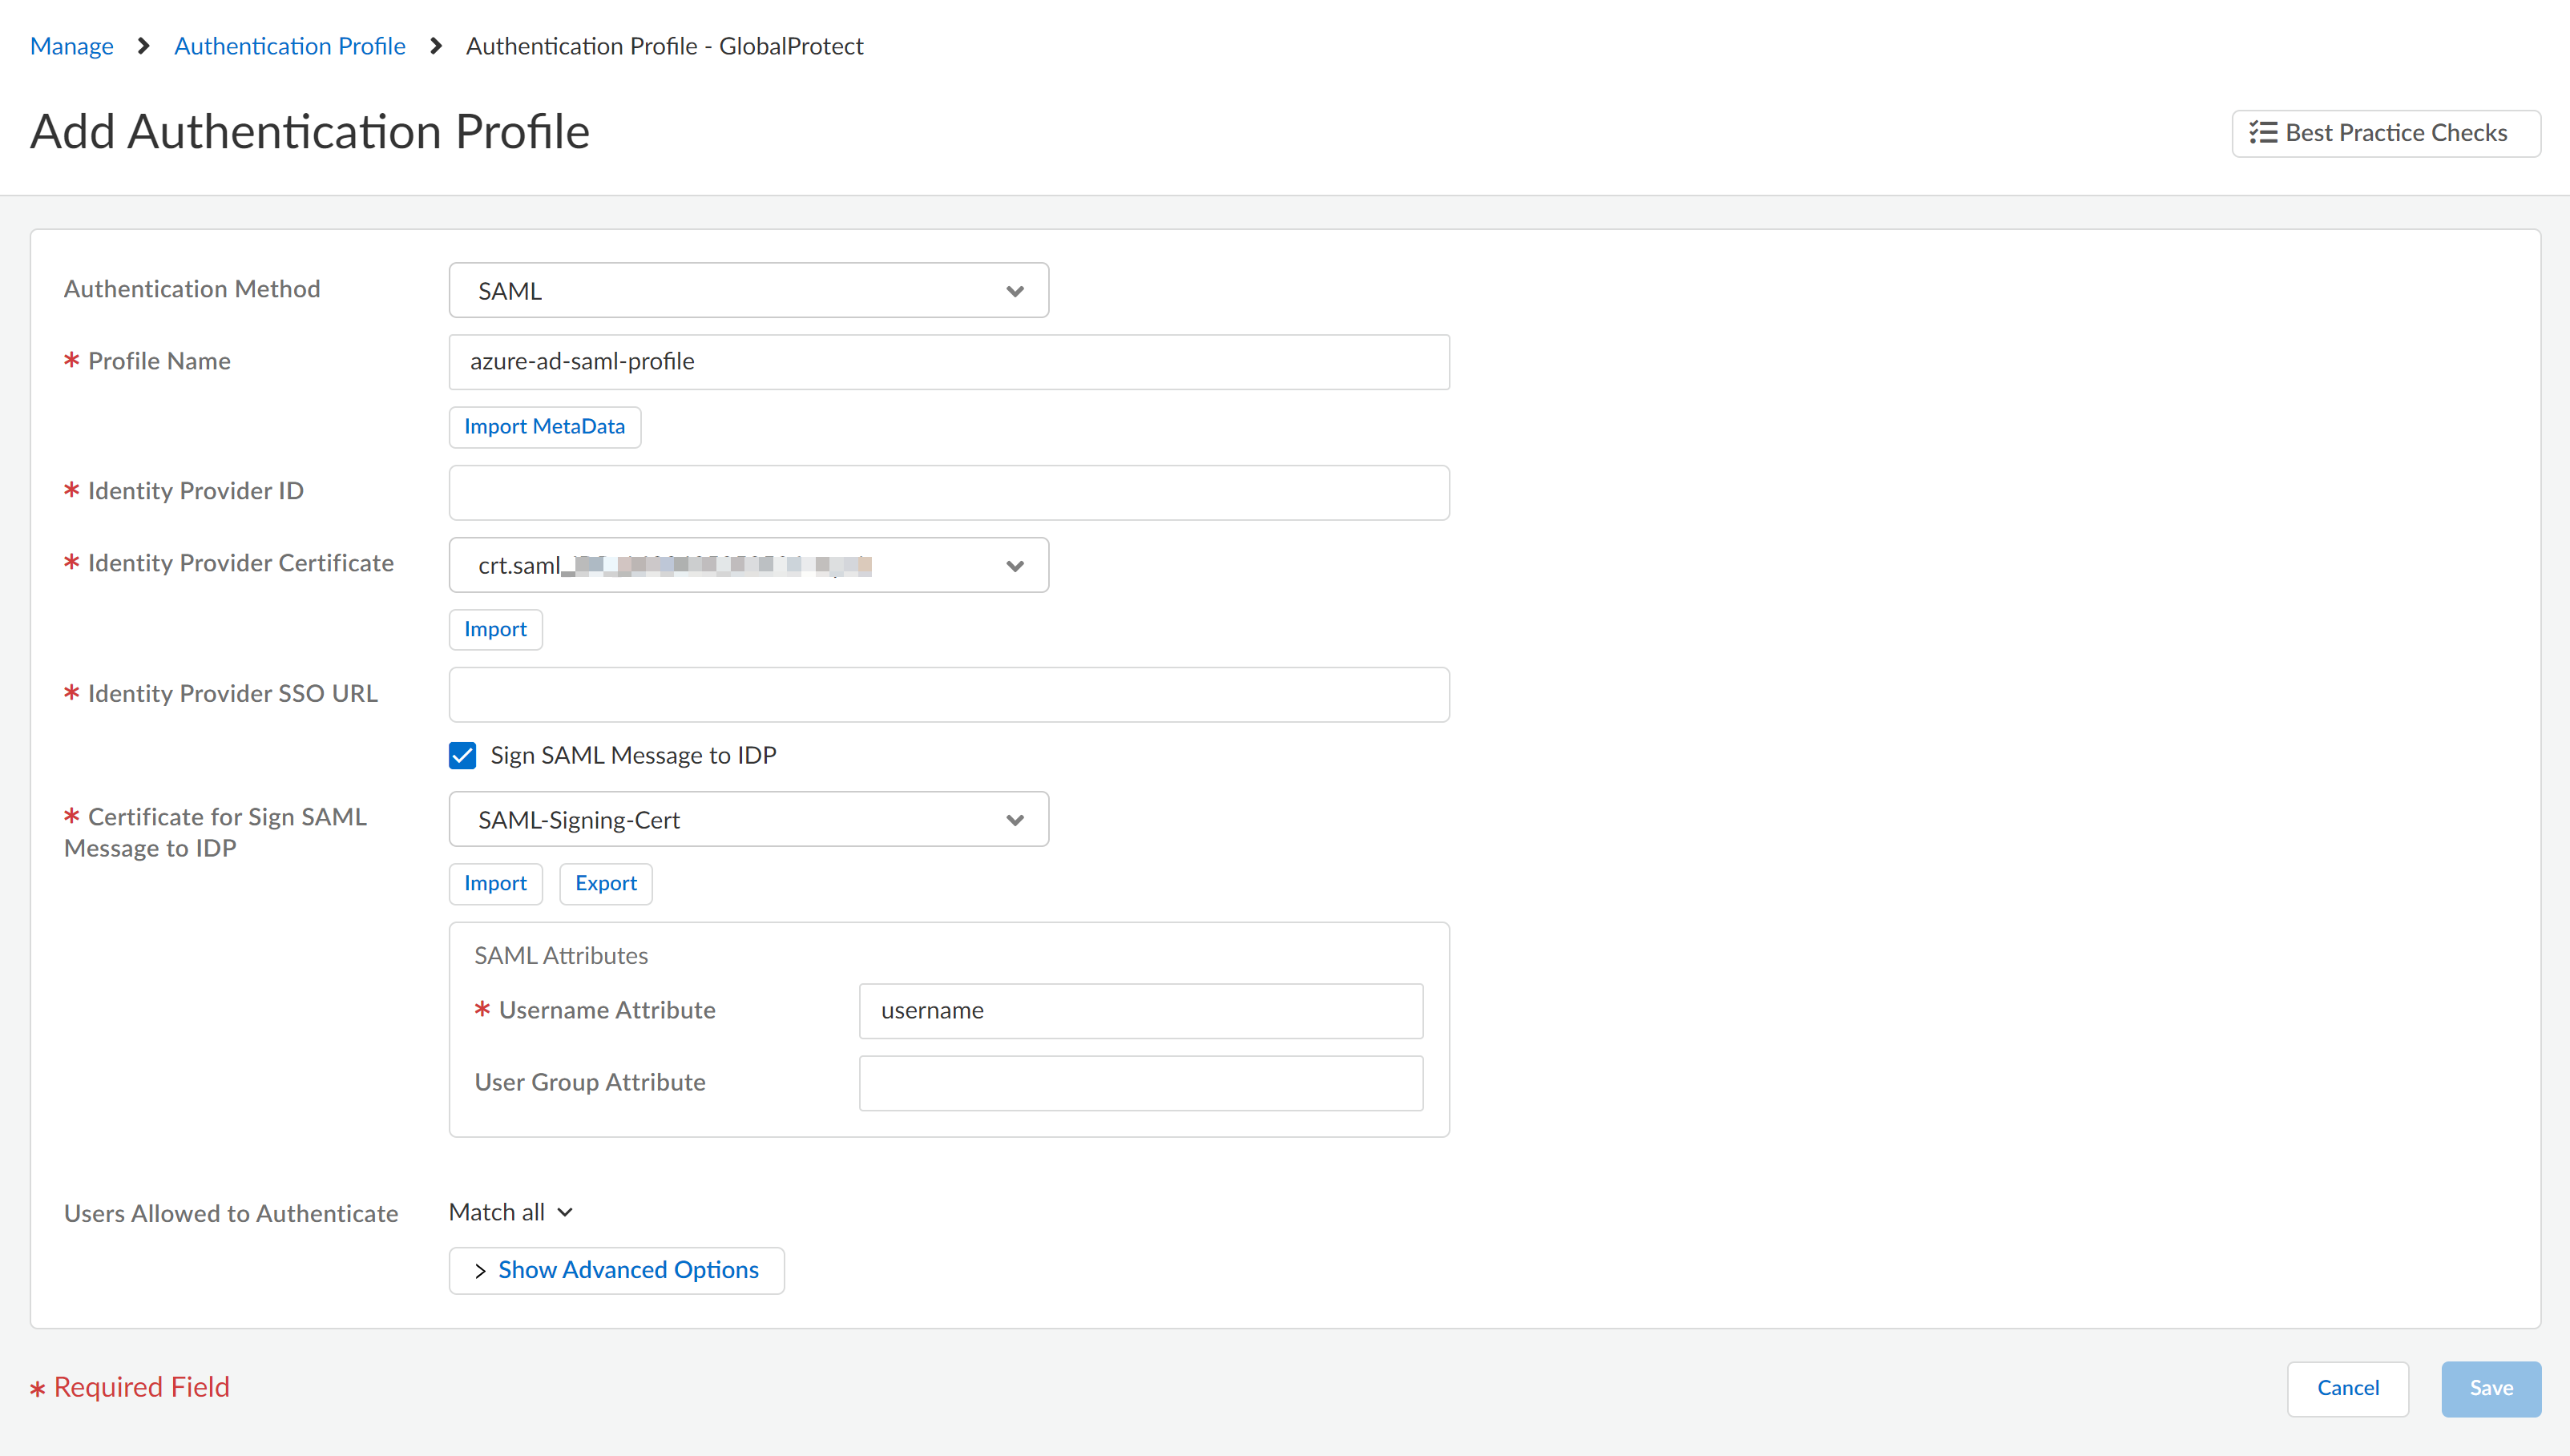
(For GlobalProtect mobile users only) In Prisma Access, configure an authentication profile for Microsoft Entra ID.The profile defines authentication settings that are common to a set of users.- Select .Make sure that you are creating the authentication profile for GlobalProtect or explicit proxy mobile users.Add Profile.Select the SAML authentication method.Enter a profile name and Import MetaData that you downloaded in step 3.When you import the metadata, it fills other fields. Save this authentication profile.
![]() Attach the authentication profile to the mobile users.The profile defines authentication settings that are common to a set of users.
Attach the authentication profile to the mobile users.The profile defines authentication settings that are common to a set of users.-
For GlobalProtect mobile users
- Select and Add Authentication.Enter values.Make sure you select the SAML authentication method and profile you created in step 4.Save the authentication.Move the authentication to the top to prioritize it.
- For explicit proxy mobile users
- Select .Edit the User Authentication settings.Import Metadata.Choose file that you downloaded in step 3.Import.Enter a name and Save.Push your changes.Commit and Push your changes.Verify that SAML authentication is working.
- From a mobile user’s endpoint, authenticate from a supported browser.
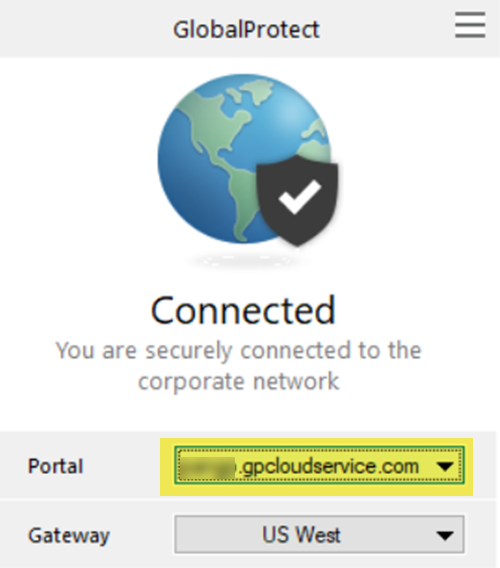
- GlobalProtect Deployments—Open the GlobalProtect app to find the GlobalProtect Portal; then, enter the portal URL in a supported browser.
![]()
- Explicit Proxy Deployments—Navigate from a supported browser to a website that is protected by Explicit Proxy.
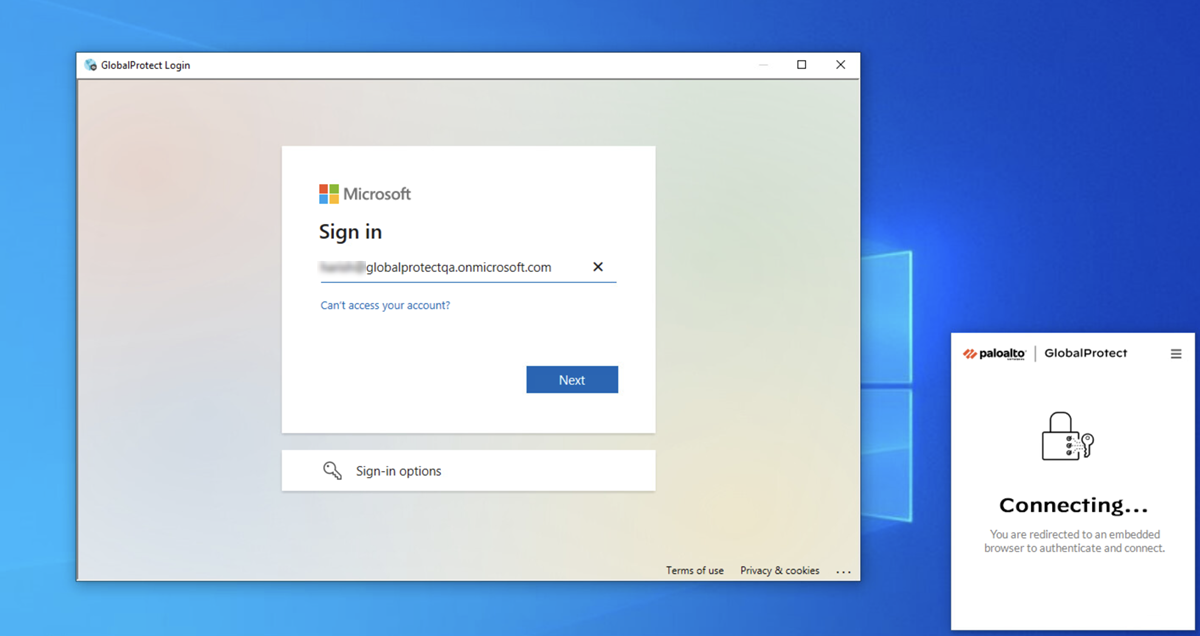
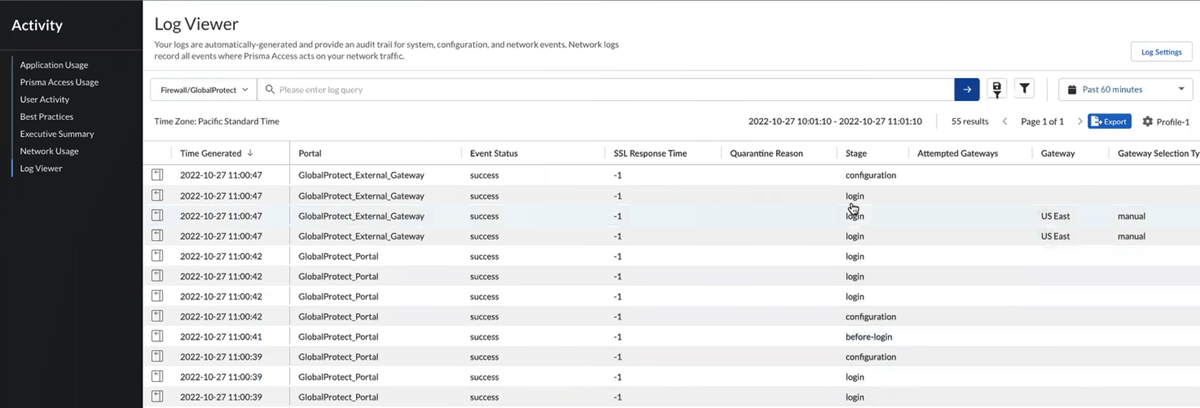
When you are challenged for authentication, verify that you are redirected to Microsoft Entra ID and are presented with a login page.After you successfully authenticate to Microsoft Entra ID, Microsoft Entra ID redirects you to Prisma Access. Prisma Access then validates the SAML responses from Microsoft Entra ID and the mobile user should be allowed to visit the website (for Explicit Proxy deployments) or you can successfully log in to the GlobalProtect portal (for GlobalProtect deployments).![]() View the logs and verify that the mobile user’s username is displayed in the Traffic, URL Filtering, and Authentication logs.
View the logs and verify that the mobile user’s username is displayed in the Traffic, URL Filtering, and Authentication logs.![]()
Configure Mobile Users without Cloud Identity Engine (Panorama)
This procedure assumes that you have a Microsoft Entra ID account, can create and modify enterprise applications, can set up a SAML Service Provider in Microsoft Entra ID, and can download SAML metadata XML files in Azure.- Log in to Microsoft Entra ID and open the enterprise application for either GlobalProtect or Explicit Proxy, depending on the deployment type.GlobalProtect has its own app in Microsoft Entra ID; for Explicit Proxy, Palo Alto Networks does not have an existing enterprise application for Explicit Proxy and you must create one.Palo Alto Networks does not control your Microsoft Entra ID setup and the UI might be different than these examples. For more information, refer to the Microsoft Azure documentation.
-
GlobalProtect Deployments—Select ; then, search for Palo Alto Networks - GlobalProtect and select the Palo Alto Networks - GlobalProtect application.
![]()
-
Explicit Proxy Deployments—Select and create a New application; then, select Create your own application, give it a Name, select Integrate any other application you don’t find in the gallery, and Create it.
![]() After you create the application, select it.
After you create the application, select it.![]()
Set up the Microsoft Entra ID application.- Select Set up single sign on from the button or select Single sign on from the left navigation pane.
![]() In the Basic SAML Configuration area, click Edit.
In the Basic SAML Configuration area, click Edit.![]() Enter the parameters for your Explicit Proxy or GlobalProtect deployment.
Enter the parameters for your Explicit Proxy or GlobalProtect deployment.- Mobile Users—GlobalProtect Deployments—Enter the following parameters:
- In the Identifier (Entity ID) area, enter a URL of https://portal-name:443/SAML20/SP, where portal-name is the Mobile Users—GlobalProtect portal name (), and select that as the Default entity ID. is the Mobile Users—GlobalProtect host name, and select that as the Default identifier.In addition, enter all gateway names () in the format of https://gateway-name:443/SAML20/SP.
![]() If you are configuring a standalone GlobalProtect deployment, you can use either the FQDN or IP address of the GlobalProtect portal as the portal-name. To find the FQDN or IP address, select .
If you are configuring a standalone GlobalProtect deployment, you can use either the FQDN or IP address of the GlobalProtect portal as the portal-name. To find the FQDN or IP address, select . - In the Reply URL (Assertion Consumer Service URL), re-enter the portal and gateway names, appending ACS to the URL names (https://portal-name:443/SAML20/SP/ACS and https://gateway-name:443/SAML20/SP/ACS, respectively). Specify the portal name as the default.
![]()
- Explicit Proxy Deployments—Enter the following parameters:
- In the Identifier (Entity ID) area, enter an Entity ID of https://global.acs.prismaaccess.com/saml/metadata and select that as the Default identifier.
![]()
- In the Reply URL (Assertion Consumer Service URL), enter a SAML Assertion Consumer Service URL of https://global.acs.prismaaccess.com/saml/acs and select that as the Default entity ID.
![]()
In the Set Up Single Sign-On with SAML pane, select Edit in the User Attributes & Claims area.![]() Enter the following values:
Enter the following values:- Enter user.userprincipalname as the Unique User Identifier (Name ID).
- In the Additional Claims area, add a Claim Name of username and a Value of user.userprincipalname.You must add this claim to ensure correct username-to-IP address mapping for authenticated users.
![]() From the left navigation pane, select Users and groups and Add user/group that require the Microsoft Entra ID authentication.
From the left navigation pane, select Users and groups and Add user/group that require the Microsoft Entra ID authentication.![]() (Optional) If you use a certificate authority (CA)-issued certificate or any other certificate that requires that you validate it when you import the SAML IdP profile into Prisma Access, configure your identity provider certificate in Panorama and in Microsoft Entra ID.If your deployment certificates issued by a CA for SAML authentication, or if the SAML certificate is part of your enterprise’s public key infrastructure (PKI), you must upload the certificate to Microsoft Entra ID before you export the metadata XML file from Microsoft Entra ID. If you do not upload the certificate, Panorama can not validate the certificate for use with Prisma Access. For more information about the steps you perform in Microsoft Entra ID, refer to the Microsoft Azure documentation
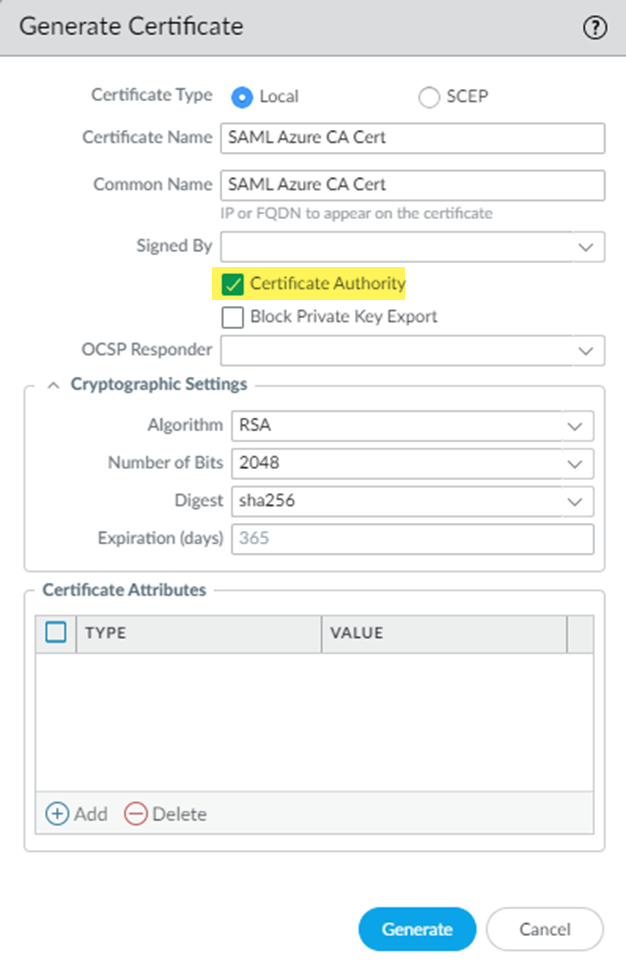
(Optional) If you use a certificate authority (CA)-issued certificate or any other certificate that requires that you validate it when you import the SAML IdP profile into Prisma Access, configure your identity provider certificate in Panorama and in Microsoft Entra ID.If your deployment certificates issued by a CA for SAML authentication, or if the SAML certificate is part of your enterprise’s public key infrastructure (PKI), you must upload the certificate to Microsoft Entra ID before you export the metadata XML file from Microsoft Entra ID. If you do not upload the certificate, Panorama can not validate the certificate for use with Prisma Access. For more information about the steps you perform in Microsoft Entra ID, refer to the Microsoft Azure documentation- From the Panorama that manages Prisma Access, select and create a self-signed root CA certificate (if you have not done so already).Generate a certificate from your enterprise root CA as a subordinate certificate.Be sure to select Certificate Authority so that this certificate can be validated by the authentication profile you create in a later step.
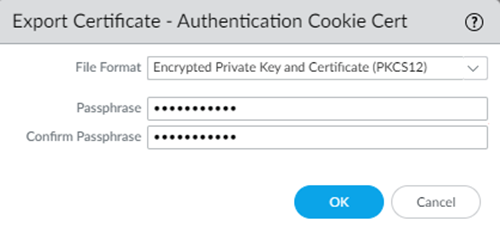
![]() Select the certificate you created and Export Certificate.Because you need both the certificate and a certificate password for enhanced security, select Encrypted Private Key and Certificate (PKC512) and enter a Passphrase.
Select the certificate you created and Export Certificate.Because you need both the certificate and a certificate password for enhanced security, select Encrypted Private Key and Certificate (PKC512) and enter a Passphrase.![]() From Microsoft Entra ID, in the SAML Signing Certificate area, select Edit.
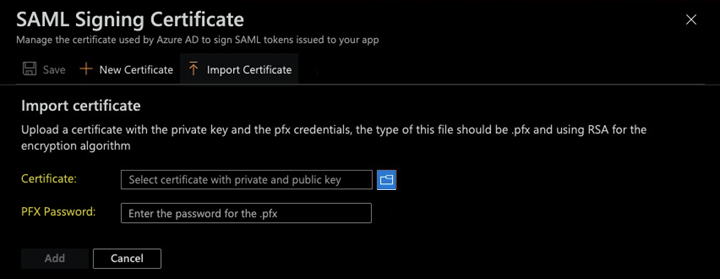
From Microsoft Entra ID, in the SAML Signing Certificate area, select Edit.![]() Import Certificate.Select the Certificate you exported from Panorama and enter the PFX Password, which is the Passphrase (password) you entered for the certificate.
Import Certificate.Select the Certificate you exported from Panorama and enter the PFX Password, which is the Passphrase (password) you entered for the certificate.![]() Select the certificate you uploaded and Make certificate active.(Optional) If you have another certificate uploaded, either deactivate it or delete it.For more information about uploading and activating certificates, refer to the Microsoft Azure documentation.Export the metadata XML file from Microsoft Entra ID and save it to a client system from which you can upload it to Prisma Access by clicking Download in the Federation Metadata XML area.Prisma Access requires this XML file to retrieve the correct SAML attributes from Microsoft Entra ID. You upload the file when you create the SAML IdP profile in Panorama.
Select the certificate you uploaded and Make certificate active.(Optional) If you have another certificate uploaded, either deactivate it or delete it.For more information about uploading and activating certificates, refer to the Microsoft Azure documentation.Export the metadata XML file from Microsoft Entra ID and save it to a client system from which you can upload it to Prisma Access by clicking Download in the Federation Metadata XML area.Prisma Access requires this XML file to retrieve the correct SAML attributes from Microsoft Entra ID. You upload the file when you create the SAML IdP profile in Panorama.![]() Log in to the Panorama that manages Prisma Access, add a SAML IdP server profile, and import the metadata XML file you downloaded to the profile.You import the SAML metadata file from Azure so that Prisma Access can automatically create a server profile and populate the connection, registration, and IdP certificate information.
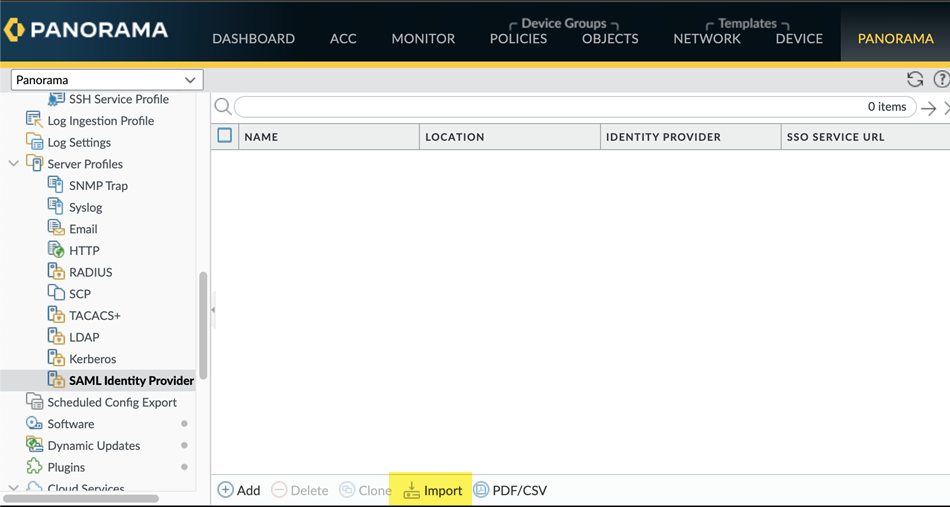
Log in to the Panorama that manages Prisma Access, add a SAML IdP server profile, and import the metadata XML file you downloaded to the profile.You import the SAML metadata file from Azure so that Prisma Access can automatically create a server profile and populate the connection, registration, and IdP certificate information.- From the Panorama that manages Prisma Access, select .Make sure you are in the Explicit_Proxy_Template (for explicit proxy deployments) or Mobile_User_Template (for GlobalProtect deployments).Import the metadata XML file from Azure to the SAML IdP.
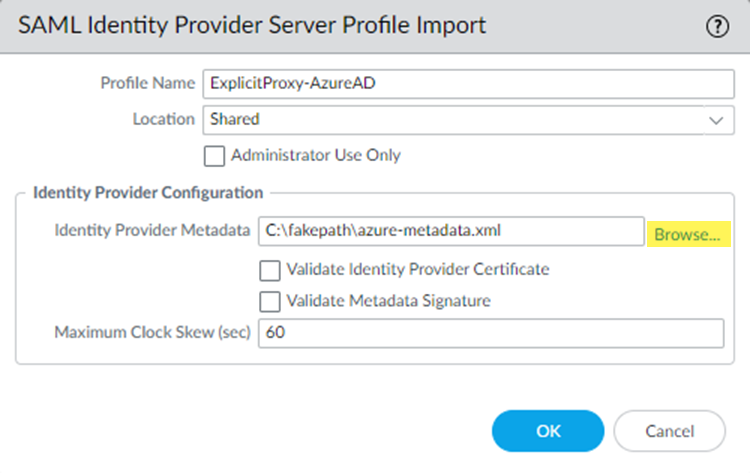
![]() Enter a Profile Name to identify the server profile.Browse to the Identity Provider Metadata file.(Optional) If you are using a CA-issued certificate for SAML authentication, select Validate Identity Provider Certificate; otherwise, leave this choice deselected.Make sure that you have added the SAML certificate to Microsoft Azure.(Optional) Enter the Maximum Clock Skew, which is the allowed difference in seconds between the system times of the IdP and Prisma Access at the moment when Prisma Access validates IdP messages (default is 60; range is 1 to 900). If the difference exceeds this value, authentication fails.
Enter a Profile Name to identify the server profile.Browse to the Identity Provider Metadata file.(Optional) If you are using a CA-issued certificate for SAML authentication, select Validate Identity Provider Certificate; otherwise, leave this choice deselected.Make sure that you have added the SAML certificate to Microsoft Azure.(Optional) Enter the Maximum Clock Skew, which is the allowed difference in seconds between the system times of the IdP and Prisma Access at the moment when Prisma Access validates IdP messages (default is 60; range is 1 to 900). If the difference exceeds this value, authentication fails.![]() Click OK to save the server profile.The metadata file updates the information for the Identity Provider ID, Identity Profile SSO URL, and Identity Provider SLO URL.
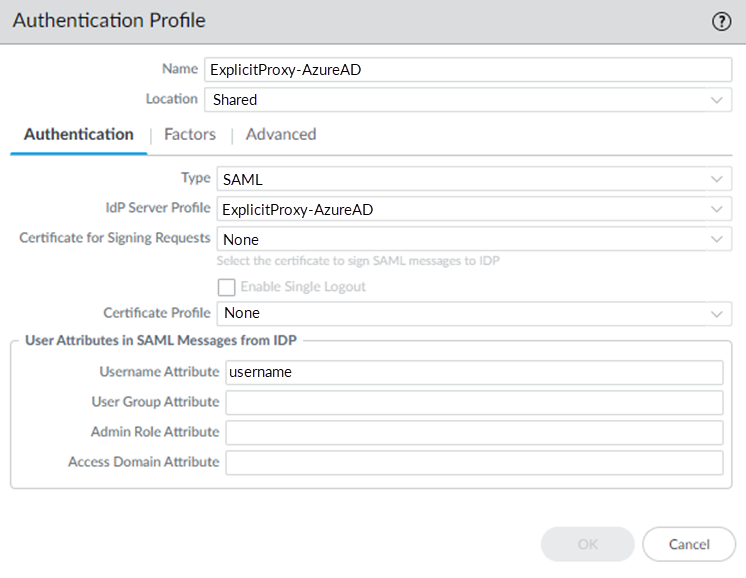
Click OK to save the server profile.The metadata file updates the information for the Identity Provider ID, Identity Profile SSO URL, and Identity Provider SLO URL.![]() Configure an authentication profile for Microsoft Entra ID.The profile defines authentication settings that are common to a set of users.
Configure an authentication profile for Microsoft Entra ID.The profile defines authentication settings that are common to a set of users.- Select and Add a profile.Make sure that you are still in the Explicit_Proxy_Template (for explicit proxy deployments) or Mobile_User_Template (for GlobalProtect deployments).Enter a Name to identify the profile.Set the Type to SAML.Select the IdP Server Profile you created.Enter the Username Attribute that IdP messages use to identify users (default username).
![]() Select Advanced and Add the allow list of user‘s and user groups that can authenticate with this profile.Select All to allow all users to authenticate with this profile.Click OK to save the authentication profile.Commit and Push your changes.Add the authentication profile you created to the Explicit Proxy or GlobalProtect deployment.
Select Advanced and Add the allow list of user‘s and user groups that can authenticate with this profile.Select All to allow all users to authenticate with this profile.Click OK to save the authentication profile.Commit and Push your changes.Add the authentication profile you created to the Explicit Proxy or GlobalProtect deployment.-
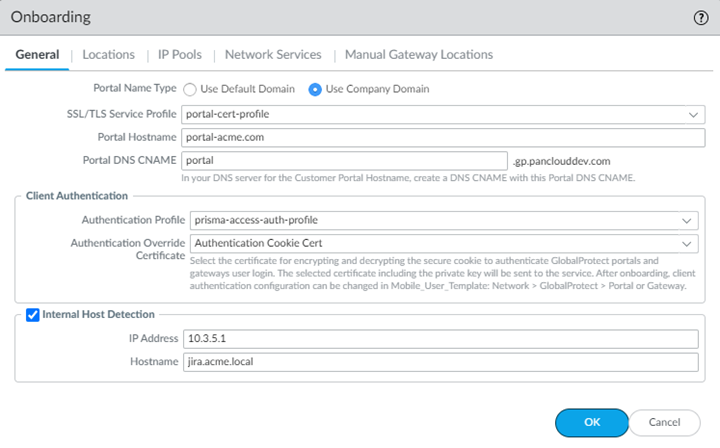
GlobalProtect Deployments—Select , select a Hostname or Configure a new GlobalProtect configuration; then, select the Authentication Profile you created.After you commit and push your changes, you cannot make any changes to the authentication profile and authentication override certificate in this area and the choices become read-only. To make changes after initial onboarding, modify or add one or more GlobalProtect client authentication configurations under the Mobile_User_Template.
![]()
-
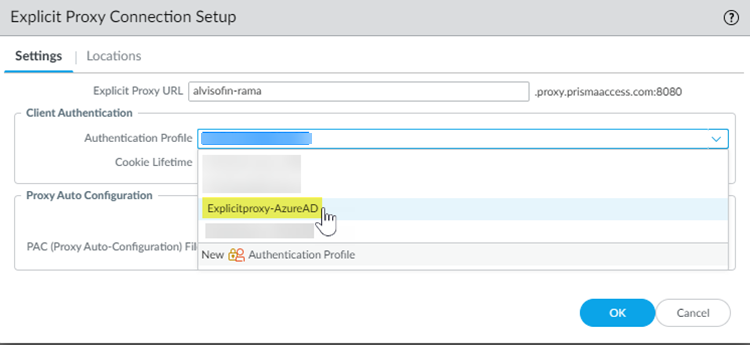
Explicit Proxy Deployments—Select , select a Connection Name or Configure a new Explicit Proxy configuration; then, in the Settings tab, specify the Authentication Profile you created.
![]()
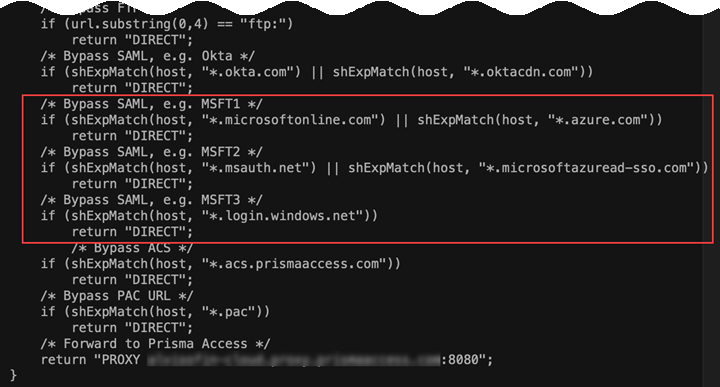
Commit and Push your changes.(Explicit Proxy Deployments Only) Configure the PAC file to bypass the URLs used for authentication with Explicit Proxy.Explicit Proxy provides you with a sample PAC file that you add to your end users’ browsers; you can modify this PAC file or edit an existing one.Palo Alto Networks recommends that you edit the PAC file to add the following Azure-specific URLs by bypass Explicit Proxy:- *.microsoftonline.com
- *.azure.com
- *.msauth.net
- *.microsoftazuread-sso.com
- *.login.windows.net
![]() (Optional) Configure user and group mapping settings by associating the Cloud Identity Engine with Prisma Access.While you cannot authenticate users with Prisma Access using the Cloud Identity Engine, you can use the Cloud Identity Engine to simplify the retrieval of user and group information from Microsoft Entra ID to enforce user- and group-based policy.
(Optional) Configure user and group mapping settings by associating the Cloud Identity Engine with Prisma Access.While you cannot authenticate users with Prisma Access using the Cloud Identity Engine, you can use the Cloud Identity Engine to simplify the retrieval of user and group information from Microsoft Entra ID to enforce user- and group-based policy.- Create a Cloud Identity Engine instance for Prisma Access, and make a note of the instance name.When you activate the Cloud Identity Engine, it creates an instance. You use the instance name when you associate the Cloud Identity Engine with Prisma Access in a later step. Optionally, if you need to create a separate instance for Prisma Access, create it and make a note of the instance name.Configure Microsoft Entra ID (formerly Azure Active Directory (Azure AD)) in the Cloud Identity Engine to allow the Cloud Identity Engine to collect data from your Microsoft Entra ID for policy enforcement and user visibility.See Configure Azure Active Directory in the Cloud Identity Engine Getting Started for details.To configure a Microsoft Entra ID in the Cloud Identity Engine, you must have at least the following role privileges in Microsoft Entra ID: Application Administrator and Cloud Application Administrator. For more information about roles in Microsoft Entra ID, refer to the following link.Associate the Cloud Identity Engine with the Panorama app by logging in to the Palo Alto Networks hub and selecting the Panorama app.
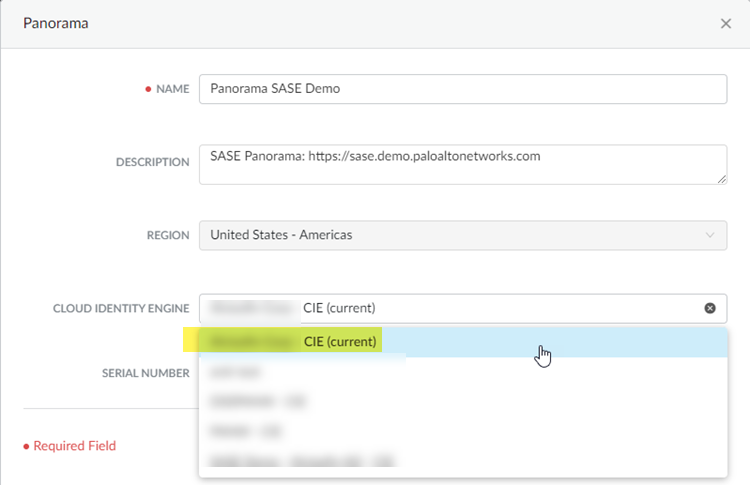
![]() Complete the association by selecting the Cloud Identity Engine instance you want to associate with the app and click OK.
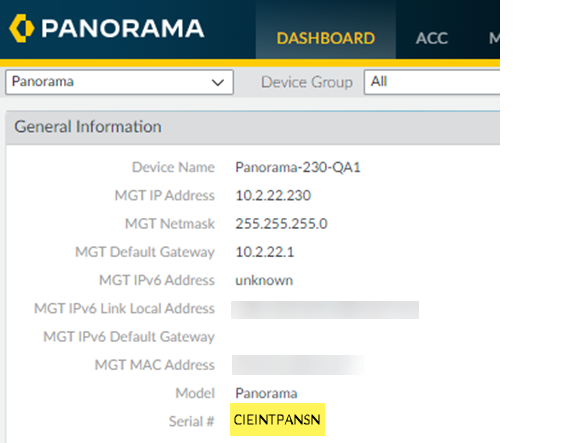
Complete the association by selecting the Cloud Identity Engine instance you want to associate with the app and click OK.![]() From the Panorama that manages Prisma Access, find the serial number of the Panorama Explicit Proxy deployment by selecting the Dashboard and noting the Serial # that displays.
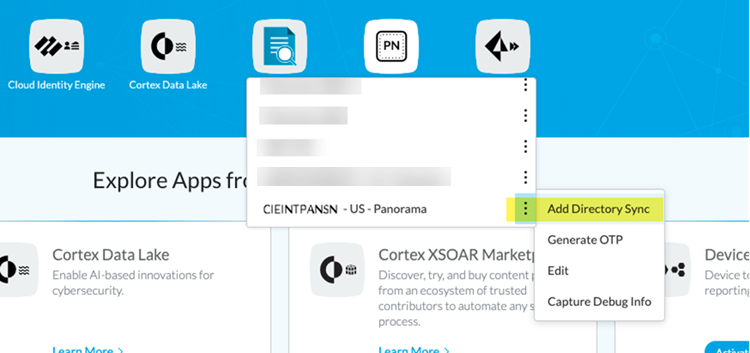
From the Panorama that manages Prisma Access, find the serial number of the Panorama Explicit Proxy deployment by selecting the Dashboard and noting the Serial # that displays.![]() Return to the Palo Alto Networks hub and select Panorama; then, Find the serial number of the Panorama that manages Prisma Access, select it, then select Add Directory Sync.
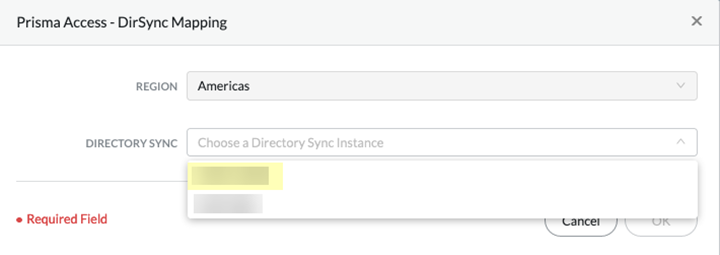
Return to the Palo Alto Networks hub and select Panorama; then, Find the serial number of the Panorama that manages Prisma Access, select it, then select Add Directory Sync.![]() Enter the Directory Sync instance you created and click OK.You do not need to select the Region; the Cloud Identity Engine uses the same region that Prisma Access uses for Strata Logging Service.
Enter the Directory Sync instance you created and click OK.You do not need to select the Region; the Cloud Identity Engine uses the same region that Prisma Access uses for Strata Logging Service.![]() Return to the Panorama that manages Prisma Access, select or (for GlobalProtect deployments) or (for explicit proxy deployments), select the gear icon to edit the Settings, then select Group Mapping Settings.
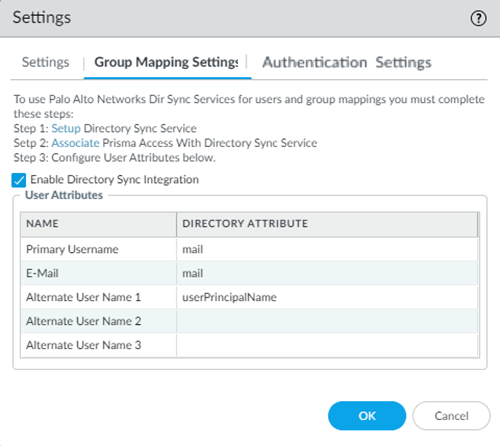
Return to the Panorama that manages Prisma Access, select or (for GlobalProtect deployments) or (for explicit proxy deployments), select the gear icon to edit the Settings, then select Group Mapping Settings.![]() Select Enable Directory Sync Integration to enable Cloud Identity Engine with Prisma Access; then, enter the following information and click OK:
Select Enable Directory Sync Integration to enable Cloud Identity Engine with Prisma Access; then, enter the following information and click OK:- Specify a Primary Username and E-Mail of mail.
- Specify an Alternate User Name 1 of userPrincipalName.
Complete the configuration of Explicit Proxy or GlobalProtect in Panorama, including creating security policy rules to enforce your organization’s security policies and adding the PAC file to the browsers on your end users’ endpoints.See Secure Mobile Users with an Explicit Proxy (for explicit proxy) or Secure Mobile Users With GlobalProtect (for GlobalProtect) in the Prisma Access Administrator’s Guide (Panorama Managed) for details. If you have already configured Explicit Proxy, skip this step.Verify that SAML authentication is working with Explicit Proxy.- Set up a tool to capture authentication-related SAML messages from the mobile user’s endpoint.Most supported browsers have a tool you can use to capture SAML messages, such as a browser extension or plugin.You can perform an internet search for SAML debugging tools to find a SAML tracer extension or plugin for your mobile user’s preferred browser.From a mobile user’s endpoint, authenticate from a supported browser.
- GlobalProtect Deployments—Open the GlobalProtect app to find the GlobalProtect Portal; then, enter the portal URL in a supported browser.
![]()
- Explicit Proxy Deployments—Navigate from a supported browser to a website that is protected by Explicit Proxy.
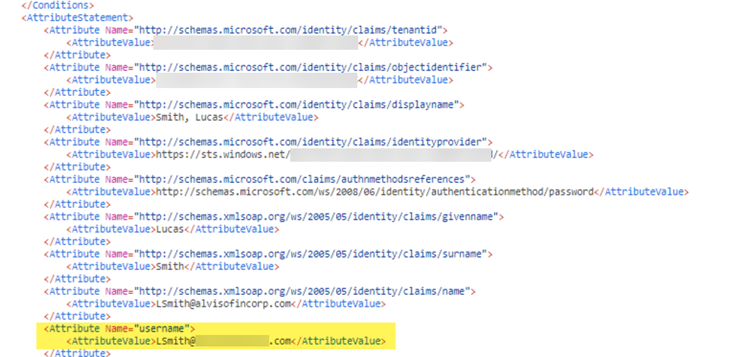
When you are challenged for authentication, verify that you are redirected to Microsoft Entra ID and are presented with a login page.After you successfully authenticate to Microsoft Entra ID, Microsoft Entra ID redirects you to Prisma Access. Prisma Access then validates the SAML responses from Microsoft Entra ID and the mobile user should be allowed to visit the website (for Explicit Proxy deployments) or you can successfully log in to the GlobalProtect portal (for GlobalProtect deployments).From Panorama, select and verify that the mobile user’s username is displayed in the Traffic, URL Filtering, and Authentication logs.(Optional) If the username is not displaying correctly in the logs, open a website that is protected by Explicit Proxy from another browser and capture the SAML response from Microsoft Entra ID from that mobile user's browser using the tool you set up.In the attribute for username, the correct user name should be displayed.![]() (Optional) If you are still not seeing correct user names, revisit the Microsoft Entra ID configuration and make sure that you have set up claims correctly; in particular, make sure that you have set up the correct claim for username, and retry the sign-on operation.
(Optional) If you are still not seeing correct user names, revisit the Microsoft Entra ID configuration and make sure that you have set up claims correctly; in particular, make sure that you have set up the correct claim for username, and retry the sign-on operation.

-
-