SaaS Security
Begin Scanning a Zendesk App
Table of Contents
Begin Scanning a Zendesk App
Authorize Data Security to connect to Zendesk to
scan all content shared within the app.
| Where Can I Use This? | What Do I Need? |
|---|---|
|
Or any of the following licenses that include the Data Security license:
|
You can connect a Zendesk to Data Security to scan for file and attachments on Zendesk Support (aka Zendesk
Suite) to ensure your company’s proprietary information is secure.
To
connect Zendesk to Data Security and begin scanning assets,
you need to:
- Supported Content
- Add Zendesk App
- Customize Zendesk App
- Identify Risks
- Fix Zendesk Onboarding Issues
- FAQs for Zendesk
Support for automated remediation capabilities varies by SaaS application.
Supported Content
|
Support For
|
Details
|
|---|---|
|
Scan Content
| Files, Attachments |
|
Backward Scan
|
No
|
|
Forward Scan
|
Yes
Scans for new assets only—not deleted assets and content
updates on assets.
|
|
Selective Scan
|
N/A
|
|
Rescan
|
No
|
|
Exposure
|
Internal
|
|
Remediation Actions
|
|
|
Post-Remediation Actions (Actions after Admin
Quarantine):
You can delete, restore, or download a quarantined file
after performing a remediation action (for example
quarantine or incident generation).
|
|
|
Notifications
|
|
|
User Activities
|
|
|
Snippet Support
|
Yes
|
|
Known License/Version restrictions
|
Supported Versions
|
|
Caveats/Notes
|
None
|
Add Zendesk App
In order for Data Security to scan assets, you must consent to specific permissions during
adding the Zendesk app.
- Log in to Strata Cloud Manager.Select .
![]() Click Connect to Zendesk Account.Specify your subdomain, then Add to Zendesk.If you receive an error, resolve the issue.Sign in with a Zendesk account that has Administrator privileges for your Zendesk product.Allow Data Security access to scan your organization’s assets.
Click Connect to Zendesk Account.Specify your subdomain, then Add to Zendesk.If you receive an error, resolve the issue.Sign in with a Zendesk account that has Administrator privileges for your Zendesk product.Allow Data Security access to scan your organization’s assets.![]()
Customize Zendesk App
After you add the Zendesk app, customize the app to make use of capabilities that are unique to this app or that differentiate this app instance from others.- (Optional) Give a descriptive name to this app instance.
- Select the Zendesk n link on the Cloud Apps list.Enter a descriptive Name to differentiate this instance of Zendesk from other instances.Click Done to save your changes.Next step: Proceed to Identify Risks.
Identify Risks
When you add a new cloud app, then enable scanning, Data Security automatically scans the cloud app against the default data patterns and displays the match occurrences. You can take action now to improve your scan results and identify risks.- To start scanning the new Zendesk app for risks, select .Monitor the scan results.During the discovery phase, as Data Security scans files and matches them against enabled policy rules:
- Verify that Data Security displays assets.
- Verify that your default policy rules are effective. If the results don’t capture all the risks or you see false positives, proceed to next step to improve your results.
(Optional) Modify match criteria for existing policy rules.(Optional) Add new policy rules.Consider the business use of your cloud app, then identify risks unique to your enterprise. As necessary, add new:(Optional) Configure or edit a data pattern.You can Configure Data Patterns to identify specific strings of text, characters, words, or patterns to make it possible to find all instances of text that match a data pattern you specify.Next step: Proceed to Fix Zendesk Onboarding Issues, if necessary.Fix Zendesk Onboarding Issues
The most common issues related to onboarding a Zendesk app are as follows:SymptomExplanationSolutionA browser error displays after I specify my subdomain and attempt to Add to Zendesk.This occurs when you specify the domain (zendesk.com). The domain is already known, and so you don't need to specify it.Remove the domain. Specify the subdomain only.FAQs for Zendesk
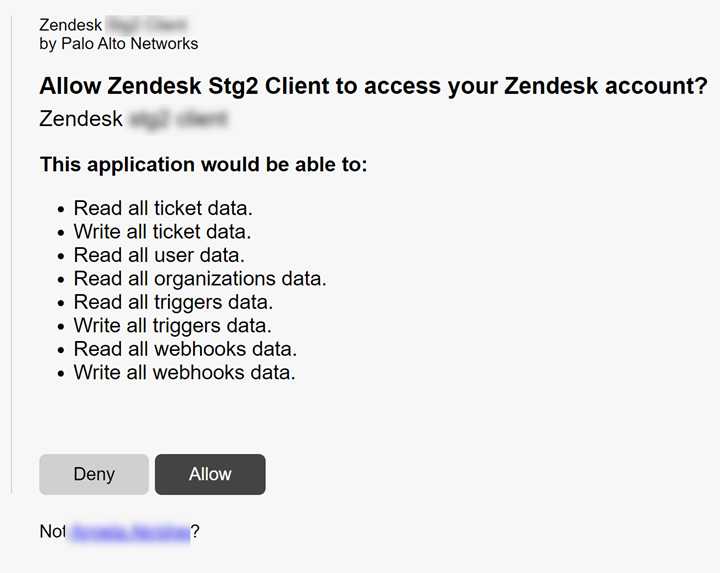
The most common questions related to onboarding a Zendesk app are as follows:QuestionAnswerWhy do I see Data Security triggers and webhooks in my Zendesk Admin Center?![]() Due to Zendesk framework, Data Security uses triggers and webhooks to integrate with Zendesk, and after onboarding, these display in your Admin Center alongside your internal triggers and webhooks. When you offboard the app, Data Security automatically deletes these triggers and webhooks. If you deactivate or delete the Data Security triggers and webhooks prematurely, your Zendesk integration on Data Security won't work as expected.
Due to Zendesk framework, Data Security uses triggers and webhooks to integrate with Zendesk, and after onboarding, these display in your Admin Center alongside your internal triggers and webhooks. When you offboard the app, Data Security automatically deletes these triggers and webhooks. If you deactivate or delete the Data Security triggers and webhooks prematurely, your Zendesk integration on Data Security won't work as expected.