Configure an Aggregate Ethernet Interface and Subinterfaces for SD-WAN
Table of Contents
Configure an Aggregate Ethernet Interface and Subinterfaces for SD-WAN
SD-WAN supports AE interfaces for link redundancy and
tagged Layer 3 subinterfaces for traffic segmentation.
Physical firewalls running PAN-OS 10.1 and
SD-WAN Plugin 2.1.0 support SD-WAN on aggregated Ethernet (AE) interfaces
so that an SD-WAN firewall in a data center, for example, can have
an aggregate interface group (bundle) of physical Ethernet interfaces
that provide link redundancy. SD-WAN supports AE interfaces with
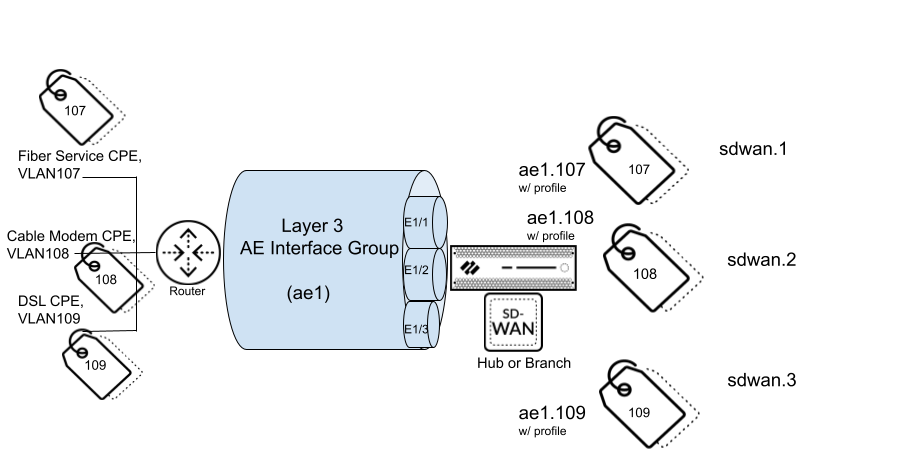
or without subinterfaces. You can create an AE interface with subinterfaces
that you can tag for different ISP services in order to provide
end-to-end traffic segmentation. Thus, your ISP services can reach
multiple labs or buildings without needing a dedicated pair of fibers
for each connection. A Layer 3 AE interface group connects to a
router, as shown in the following figure:
VM-Series
firewalls do not support AE interfaces. An SD-WAN hub or branch
firewall that has an AE interface should not belong to the same
VPN cluster as a VM-Series SD-WAN hub or branch firewall because
AE interfaces are not supported on VM-Series firewalls.
PPPoE
is not supported on subinterfaces.
- Configure an SD-WAN Interface Profile for each ISP connection (subinterface) in the AE interface group to define its link attributes.
- Create an AE interface group.
- Select , select a Panorama Template, and Add Aggregate Group.
- For Interface Name, enter the number to identify the aggregate group; range is 1 to 16.
- For Interface Type, select Layer3.
- Click OK.
- Assign physical interfaces to the aggregate group.
- Select and select the interface you want to assign to the aggregate group.
- Select the Interface Type as Aggregate Ethernet.
- Select the Aggregate Group you created; for example, ae1.
- On the Advanced tab, select the Link Speed, Link Duplex, and Link State.
- Click OK.
- Repeat this step for each interface you want to assign to the aggregate group.
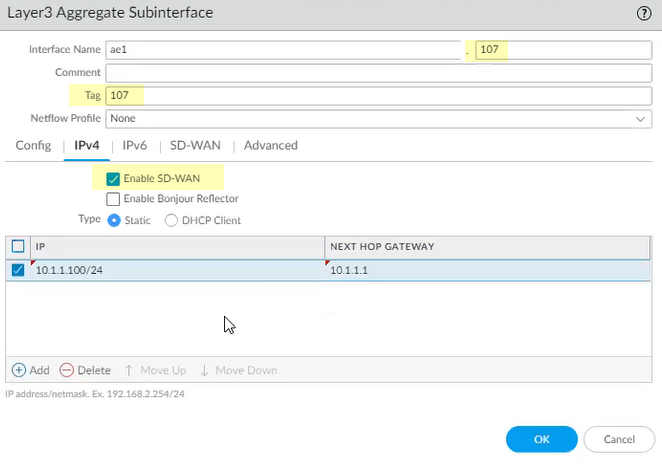
- For the aggregate group, create a subinterface that uses a static IP address.
- Select , highlight the aggregate interface, such as ae1, and click Add Subinterface at the bottom of the screen.
- For Interface Name, enter a number after the period, such as 107.
- Enter the VLAN Tag to differentiate between the subinterfaces. For ease of use, make the tag the same number as the subinterface ID.
- Select the IPv4 tab and Enable SD-WAN.
- Select the Type of address: Static.
- Add the IP address (and subnet mask) of the subinterface.
- Enter the IP address of the Next Hop Gateway.
- Click OK.

- Alternatively, for the aggregate group, create a subinterface that uses DHCP to get its address.
- Select and in the Template field, select a Template Stack.
- Highlight the aggregate interface, such as ae1, and click Add Subinterface at the bottom of the screen.
- Highlight the subinterface and click Override at the bottom of the screen.
- Highlight the subinterface and for Interface Name, enter a number after the period, such as 1.
- Enter the VLAN Tag to differentiate between the subinterfaces. For ease of use, make the tag the same number as the subinterface ID.
- Select the IPv4 tab and Enable SD-WAN.
- Select the Type of address: DHCP Client.
- Select Enable.
- Uncheck (do not select) Automatically create default route pointing to default gateway provided by server.
- Select the Advanced tab and DDNS tab.
- Select Settings and Enable. The Hostname is automatically generated by the Panorama SD-WAN plugin.
- Select the Vendor as Palo Alto Networks DDNS.
- Click OK.
- Apply an SD-WAN Interface Profile to the subinterface.
- Highlight the subinterface you created and select the SD-WAN tab.
- Select the SD-WAN Interface Profile you created for this link or create a new profile.
- Click OK.
- Repeat the prior steps to create additional Layer3 subinterfaces for the aggregate interface group and apply an SD-WAN Interface Profile to each subinterface.
- Commit.