Configure Layer 3 Subinterfaces for SD-WAN
Table of Contents
2.2
Expand all | Collapse all
-
- Create a Link Tag
- Configure an SD-WAN Interface Profile
- Configure a Physical Ethernet Interface for SD-WAN
- Configure an Aggregate Ethernet Interface and Subinterfaces for SD-WAN
- Configure Layer 3 Subinterfaces for SD-WAN
- Configure a Virtual SD-WAN Interface
- Create a Default Route to the SD-WAN Interface
-
- Create a Path Quality Profile
-
- Create a SaaS Quality Profile
- Use Case: Configure SaaS Monitoring for a Branch Firewall
- Use Case: Configure a Hub Firewall Failover for SaaS Monitoring from a Branch Firewall to the Same SaaS Application Destination
- Use Case: Configure a Hub Firewall Failover for SaaS Monitoring from a Branch Firewall to a Different SaaS Application Destination
- SD-WAN Traffic Distribution Profiles
- Create a Traffic Distribution Profile
- Create an Error Correction Profile
- Configure an SD-WAN Policy Rule
- Allow Direct Internet Access Traffic Failover to MPLS Link
- Configure DIA AnyPath
- Distribute Unmatched Sessions
- Configure HA Devices for SD-WAN
- Create a VPN Cluster
- Create a Full Mesh VPN Cluster with DDNS Service
- Create a Static Route for SD-WAN
-
- Use CLI Commands for SD-WAN Tasks
- Replace an SD-WAN Device
- Replace the SD-WAN enabled Panorama HA Peer
- Convert SD-WAN enabled Standalone Panorama to Panorama HA
- Troubleshoot App Performance
- Troubleshoot Link Performance
- Upgrade your SD-WAN Firewalls
- Install the SD-WAN Plugin
- Uninstall the SD-WAN Plugin
Configure Layer 3 Subinterfaces for SD-WAN
Configure Layer 3 subinterfaces for SD-WAN.
Firewalls running PAN-OS 10.1 and SD-WAN Plugin
2.1.0 support SD-WAN on Layer 3 subinterfaces so that the firewall
can segment traffic using VLAN tags. The following task shows how
to create a Layer3 subinterface that uses a static IP address and
how to create one that uses DHCP to get its address. It shows how
to assign a VLAN tag to the subinterface and enable SD-WAN on the
subinterface. Create an SD-WAN interface profile to define each
ISP connection and assign the profile to the corresponding subinterface
(a virtual SD-WAN interface).
If you configure SD-WAN
Layer 3 subinterfaces on VM-Series firewalls, the VMware configuration
must have respective portgroups attached to those interfaces that
allow all VLANs.
PPPoE is not supported on subinterfaces.
- Configure an SD-WAN Interface Profile for each ISP connection (subinterface) to define its link attributes.
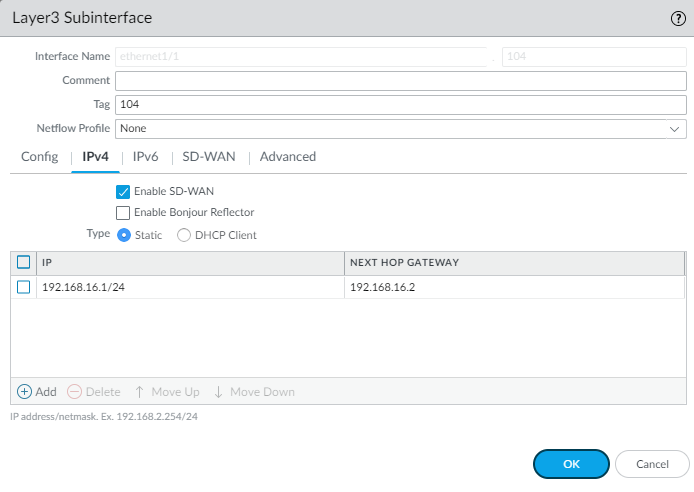
- Create a Layer 3 subinterface that uses a static IP address.
- Select NetworkInterfacesEthernet and in the Template field select a template.
- Select an interface.
- For Interface Type, select Layer3 and click OK.
- Highlight the interface and click Add Subinterface at the bottom of the screen.
- After the Interface Name and period, enter the subinterface number.
- Enter a Tag for the subinterface (range is 1 to 4,094). For ease of use, make the tag the same number as the subinterface ID.
- On the IPv4 tab, Enable SD-WAN.
- Select the Type of address: Static.
- Add the IP address and subnet mask.
- Enter the IP address of the Next Hop Gateway.
- Click OK.

- Alternatively, create a Layer 3 subinterface that uses DHCP to get its address.
- Select NetworkInterfacesEthernet and in the Template field, select a template stack (not a template).
- Select an interface.
- For Interface Type, select Layer3 and click OK.
- Highlight the interface and click Add Subinterfaces at the bottom of the screen.
- Highlight the subinterface and click Override.
- Highlight the subinterface and after the Interface Name and period, enter the subinterface number.
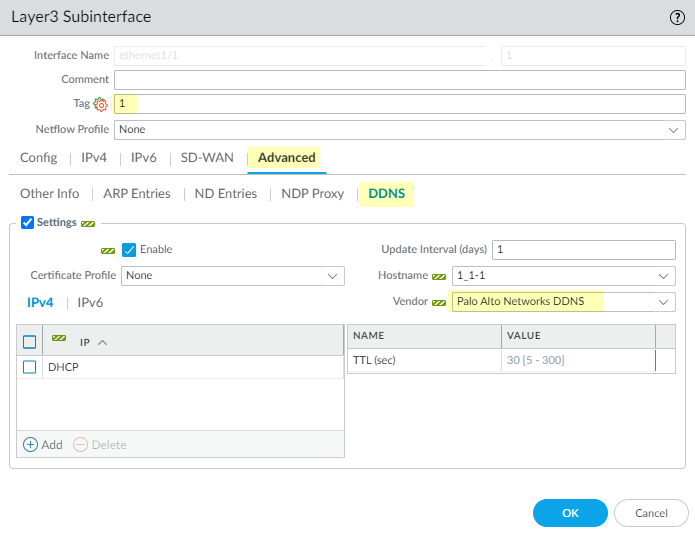
- Enter a Tag for the subinterface (range is 1 to 4,094). For ease of use, make the tag the same number as the subinterface ID.
- On the IPv4 tab, Enable SD-WAN.
- Select Type of address: DHCP Client and Enable.
- Uncheck (do not select) Automatically create default route pointing to default gateway provided by server.
- Select the Advanced tab and then the DDNS tab.
- Select Settings and Enable. The Hostname is automatically generated by the Panorama SD-WAN plugin.
- Select the Vendor as Palo Alto Networks DDNS.
- Click OK.

- Apply an SD-WAN Interface Profile to the subinterface.
- Highlight the subinterface you created and select the SD-WAN tab.
- Select the SD-WAN Interface Profile you created for this link or create a new profile.
- Click OK.
- Repeat the prior steps to add more subinterfaces to the interface.
- Commit.


