Install the Traps Agent for Windows
Table of Contents
Expand all | Collapse all
Install the Traps Agent for Windows
Use the following workflows to install the Traps agent
4.2 on Windows endpoints. This topic provides options to use the
MSI, Msiexec, and how to configure on a non-persistent VDI.
Before installing Traps™ agent 4.2 on a Windows
endpoint, verify that the system meets the requirements described
in Traps Agent for Windows Requirements.
Install
Traps agents using a software distribution tool of your choice or
use one of the following methods:
Traps
agents also support installation on both a persistent and a non-persistent virtual
desktop infrastructure (VDI). You are not required to complete additional actions
when you install a Traps agent on a persistent VDI but you must
perform additional tasks when you Set Up a Non-Persistent VDI.
Install the Traps Agent Using the MSI
Use the following workflow to install the
Traps agent using the MSI file.
- Initiate the Traps software installation. You
can also install Traps using Msiexec (see Install the Traps Agent Using Msiexec).The version(s) of Traps that you install on your endpoints must be the same as or older than the ESM Server and ESM Console version.
- Obtain the software from your Palo Alto Networks Account Manager, reseller, or from Customer Support Portal (https://support.paloaltonetworks.com).
- Unzip the zip file and double click the Traps installation file; choose either the x64 (64-bit) or x86 (32-bit) version depending on your endpoint’s OS.
- Click Next.
- Select I accept the terms in the License Agreement and then click Next.
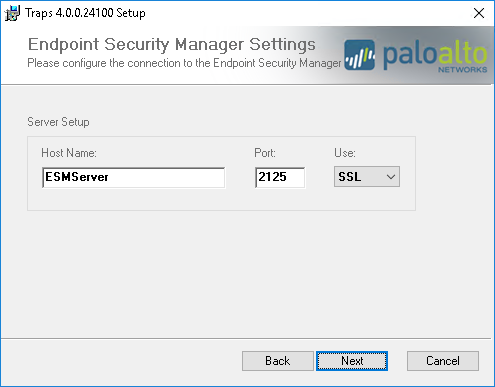
- Configure the Traps agents to connect to the ESM Server.
- Provide the following information for the
ESM Server:
![]()
- Host Name—Enter the FQDN or IP address of the ESM Server.
- Port—Change the port number, if required (default is 2125).
- Select SSL to encrypt communication to the server (default) or No SSL to not encrypt communication (not recommended).
- Click NextInstall.
- Provide the following information for the
ESM Server:
- Click Finish.
- After you complete the installation, restart the endpoint.
- Verify Connectivity from the Endpoint.
Install the Traps Agent Using Msiexec
As an alternative to using the Windows MSI
installer, you can use Windows Msiexec to install the Traps agent
on Windows endpoints. Msiexec provides full control over the installation
process and allows you to install, modify, and perform operations
on a Windows Installer from the command line interface (CLI). You
can also use Msiexec to log any issues encountered during installation.
You
can also use Msiexec in conjunction with a System Center Configuration Manager
(SCCM), Altiris, Group Policy Object (GPO), or other MSI deployment
software to install Traps on multiple endpoints for the first time.
When
you install Traps with Msiexec, you must install Traps per-machine
and not per-user.
After installing Traps on an endpoint
and establishing an initial connection with the ESM Server, you
can upgrade or uninstall Traps from one or more endpoints by creating
an action rule (see the Traps Endpoint Security Manager Administrator Guide).
Use
the following workflow to install the Traps agent 4.2 using Msiexec.
- Use one of the following methods to open a command prompt
as an administrator.
- Select StartAll ProgramsAccessories. Right-click Command prompt and Run as administrator.
- Select Start. In the Start Search box, type cmd. Then, to open the command prompt as an administrator, press CTRL+SHIFT+ENTER.
- Run the msiexec command followed
by one or more of the following options or properties:Although Msiexec supports additional options, Traps installers support only the options listed here. For example, with Msiexec, the option to install the software in a non-standard directory is not supported—you must use the default path.
- Install, display, and logging options:
- /i <installpath>\<installerfilename>.msi—Install a package. For example, msiexec /i c:\install\traps.msi.
- /l*v <logpath>\<logfilename>.txt—Log verbose output to a file. For example, /l*v c:\logs\install.txt.
- /qn—Displays no user interface (quiet installation). At minimum, you must also specify the host server name or IP address using the CYVERA_SERVER property.
For a full list of Msiexec parameters, see https://docs.microsoft.com/en-us/windows/desktop/Msi/command-line-options - Public properties:
- CYVERA_SERVER=<servername>—Primary host server name or IP address (default is ESMserver)
- CYVERA_SERVER_PORT=<serverport>—Primary host server port (default is 2125)
- USE_SSL_PRIMARY=[0|1]—(Quiet installation only) Set encryption preferences on the primary server by specifying 0 to not use SSL (not recommended) or 1 to use SSL (default)
For example, to install Traps without a user interface, specify a server named TrapsServer that does not use SSL encryption on a port other than the default (for example on port 5212, a non-standard port), and create an installation log in C:\temp, enter the following:msiexec /i c:\install\traps.msi /l*v C:\temp\trapsinstall.log /qn CYVERA_SERVER=TrapsServer CYVERA_SERVER_PORT=5212 USE_SSL_PRIMARY=0 - After you complete the installation, restart the endpoint.
- Verify Connectivity from the Endpoint.
Verify Connectivity from the Endpoint
After successfully installing Traps, the Traps
agent should be able to connect to the ESM Server. To verify the
agent can connect:
- Launch the Traps Console using one of the following methods:
- From the notification area (system tray), double-click the Traps icon(or right-click the icon and select Console).
![]()
- Run CyveraConsole.exe from the Traps installation folder.
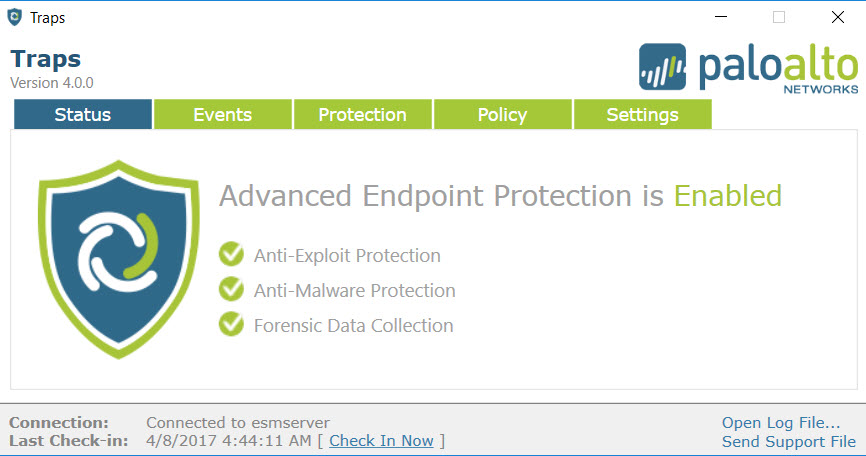
- Verify the status of the server connection. If Traps
is connected to the server, the Connection status
reports that the connection is successful. If the Traps agent is
unable to establish a connection with the primary or secondary server,
the Traps Console reports a disconnected status.
![]()
- If you cannot connect, verify network connectivity on the endpoint and then Check In Now.
- As an additional verification step, you can verify connectivity from the ESM Console. See the Traps Endpoint Security Manager Administrator’s Guide.


