Enterprise DLP
Set Up SFTP Storage to Save Evidence
Table of Contents
Expand All
|
Collapse All
Enterprise DLP Docs
Set Up SFTP Storage to Save Evidence
Connect your SFTP server to store files that match your Enterprise Data Loss Prevention (E-DLP) data
profiles.
On May 7, 2025, Palo Alto Networks is introducing new Evidence Storage and Syslog Forwarding service IP
addresses to improve performance and expand availability for these services
globally.
You must allow these new service IP addresses on your network
to avoid disruptions for these services. Review the Enterprise DLP
Release Notes for more
information.
| Where Can I Use This? | What Do I Need? |
|---|---|
|
Or any of the following licenses that include the Enterprise DLP license
|
To store your files scanned by Enterprise Data Loss Prevention (E-DLP), you must specify the SFTP
server connectivity information to successfully upload and write files to a target
location on the SFTP server. creates a a
reportId folder on first upload to your
SFTP server. Enterprise DLP uploads all subsequent files to
reportId folder within your folder path. Enterprise DLP automatically names files uploaded to your SFTP server using the
SFTP target folder location, default reportId folder,
and filename.
The following special characters in a file name are not supported and prevent Enterprise DLP from saving files to SFTP storage: '/ \ * ?
<>'. If you have a file name that includes one of these special
characters, you must change the special character to an underscore
(_) so Enterprise DLP can save a copy of the
file.
Enterprise DLP automatically sends email alerts to the data security
administrator who originally connected Enterprise DLP to the SFTP storage
bucket and to the data security admin who last modified the storage bucket settings
in case of connection issues. Enterprise DLP sends the email alert every 48
hours until you restore the connection between Enterprise DLP and the storage
bucket.
Files not scanned while Enterprise DLP is disconnected from your storage
bucket can’t be stored and are lost. This means that all impacted files are not
available for download. However, your data security administrator can still view
all snippet data associated with the DLP incident.
Enterprise DLP automatically resumes forwarding files to your storage bucket
after you restore the connection.
This procedure assumes you have already set up an SFTP server to save evidence for
investigative analysis.
- Review the setup prerequisites for Enterprise DLP and enable the required ports, full qualified domain names (FQDN), and IP addresses on your network.
- You must allow all IP addresses for Evidence Storage in the region where you deployed the SFTP server. This gives Enterprise DLP access to your network in order to write to your SFTP server.
- You must allow the IP or FQDN of the SFTP server on your network. The SFTP server must be accessible on your network so Enterprise DLP can successfully write to your SFTP server.
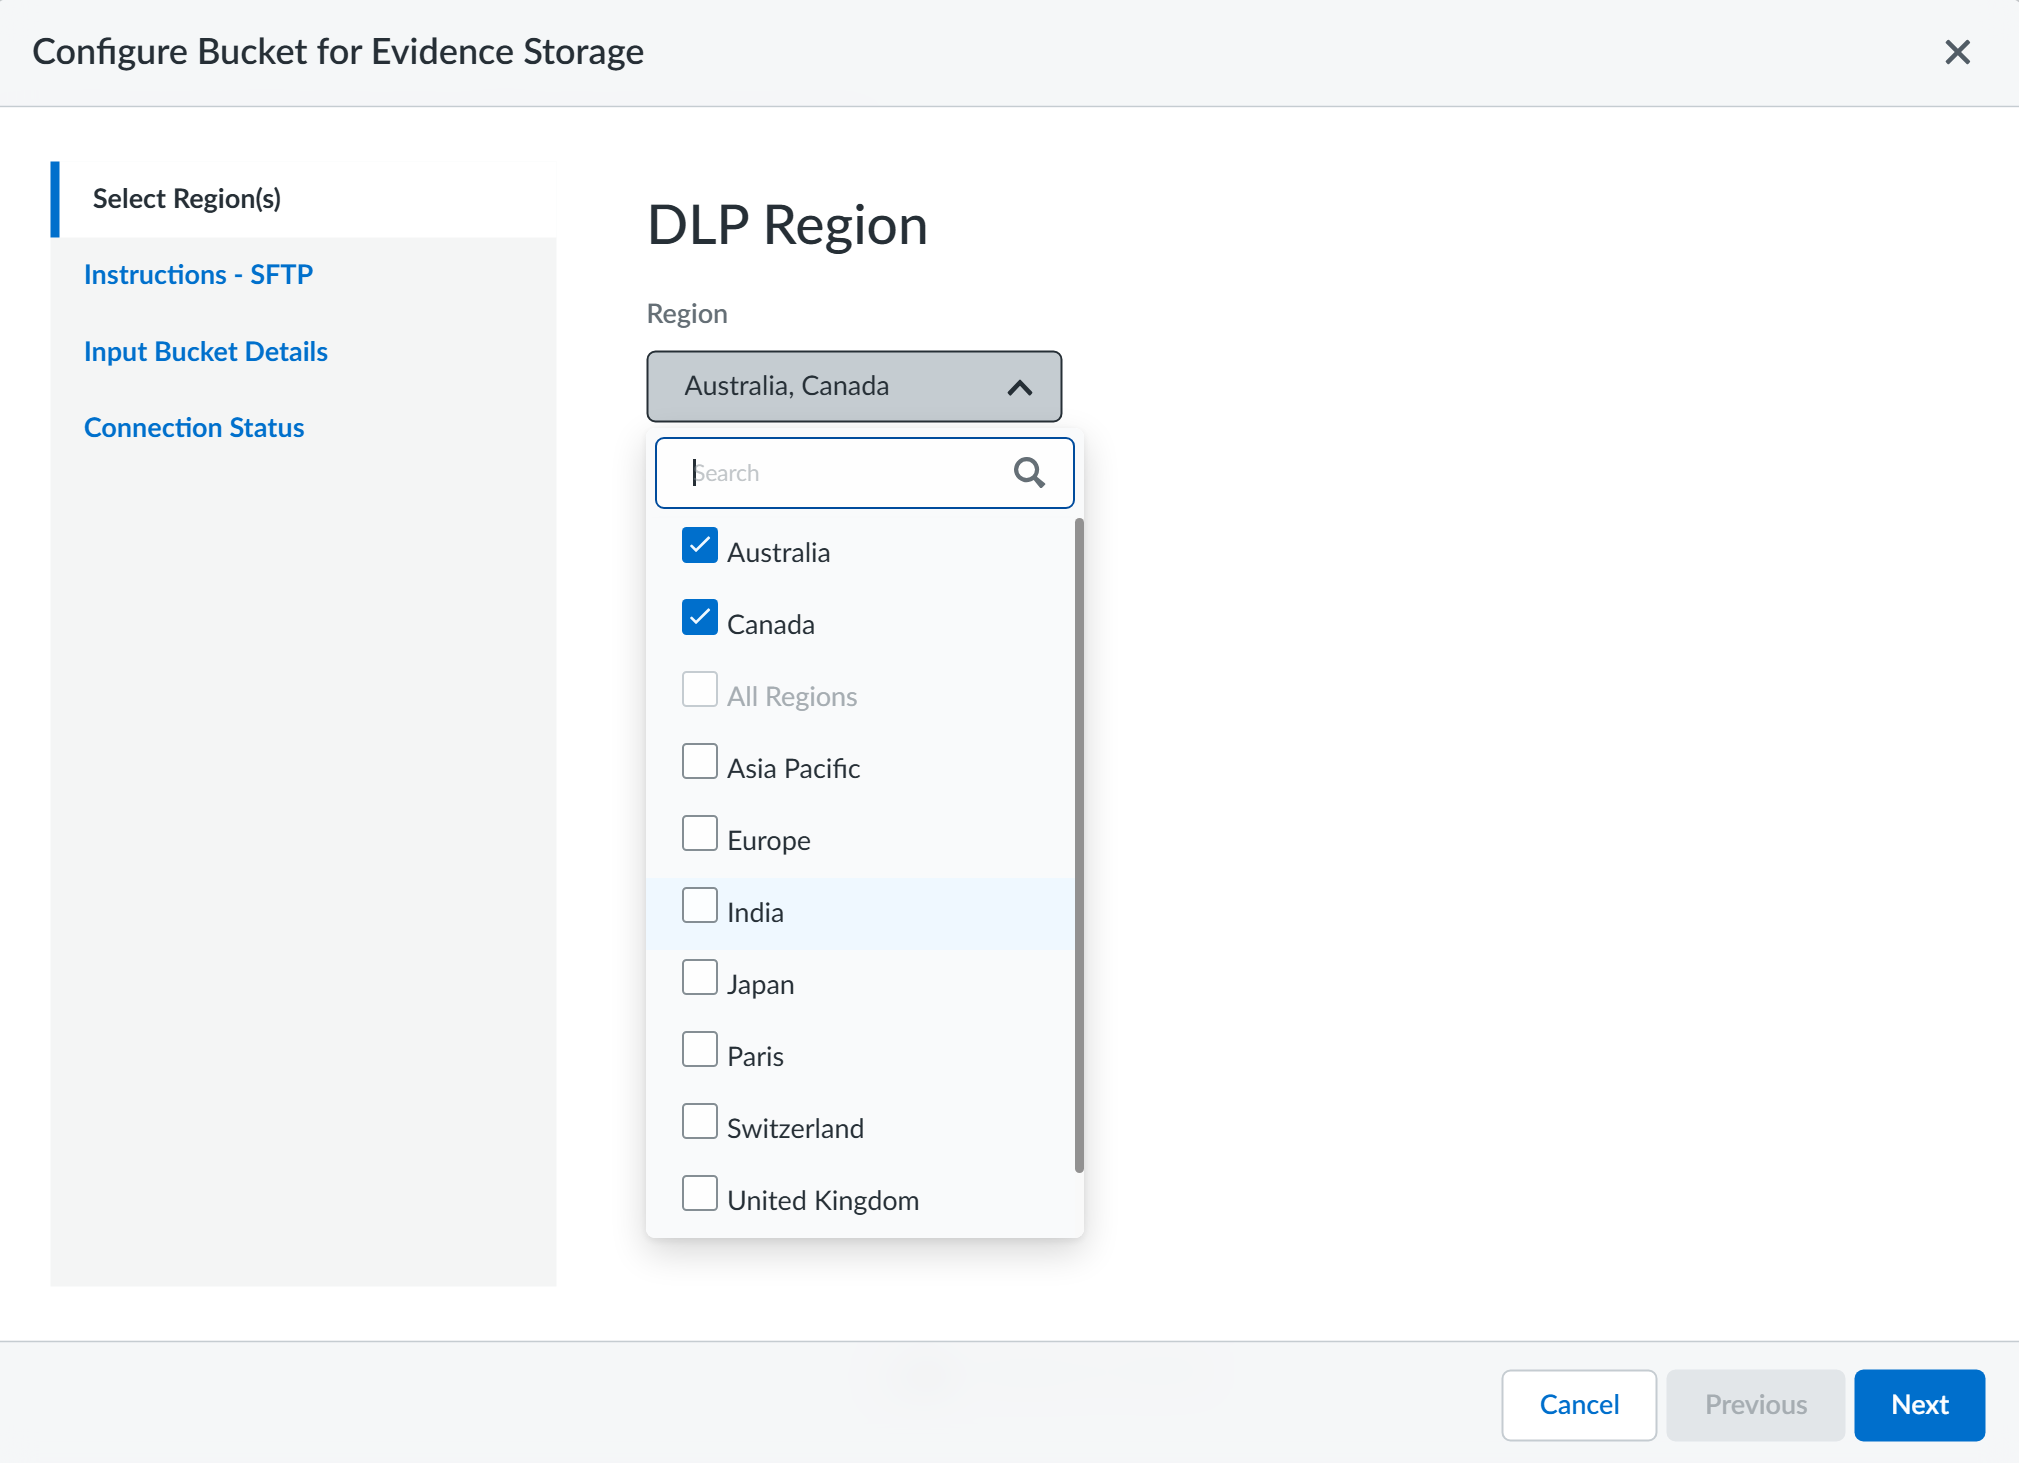
Log in to Strata Cloud Manager.Access to evidence storage settings and files on Strata Cloud Manager is allowed only for an account administrator or app administrator role with Enterprise DLP read and write privileges. This is to ensure that only the appropriate users have access to report data and evidence.(Email DLP only) Select ConfigurationSaaS SecuritySettingsEmail DLP Settings and enable Evidence Storage for Email DLP.You must enable the evidence storage service for Email DLP so Enterprise DLP can forward evidence files to your storage buckets. Enterprise DLP won't forward evidence files for Email DLP traffic matches if you don't enable this setting.Select ConfigurationData Loss PreventionSettingsSensitive Data and select Configure Regional BucketAzure.Select the Region(s) from which you want to forward evidence files to the storage bucket.This setting specifies the regions where DLP incidents are generated. When DLP incidents are generated in the regions you select here, Enterprise DLP forwards the incident evidence to the storage bucket.![]() Review the Instructions - SFTP and click Next.Input Bucket Details to configure the SFTP server connection settings.
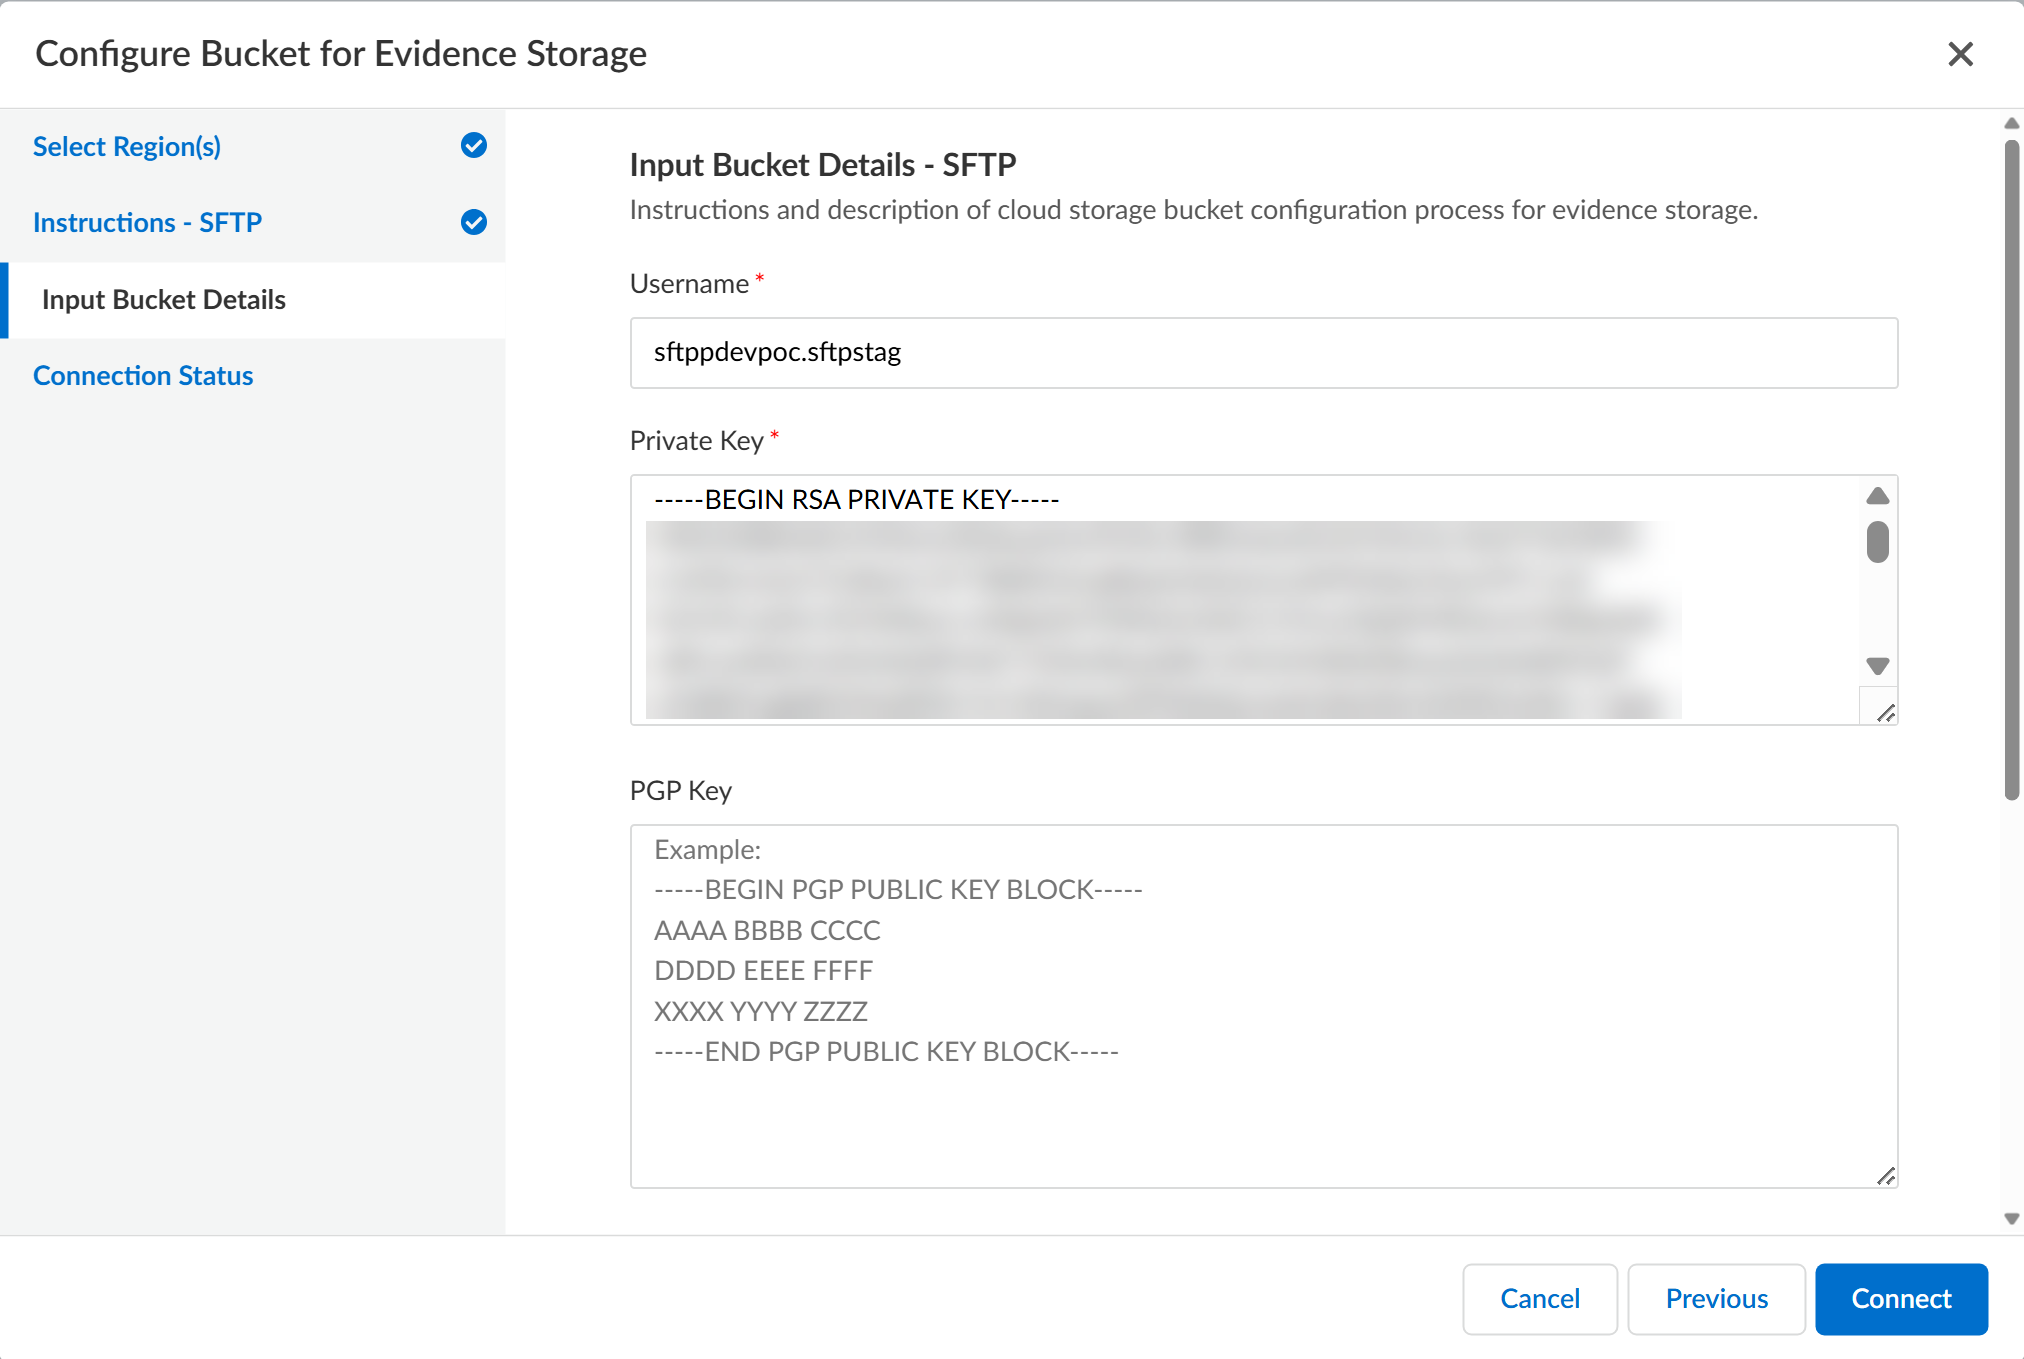
Review the Instructions - SFTP and click Next.Input Bucket Details to configure the SFTP server connection settings.- Enter the Username of the SFTP server user used for secure file uploads.The user is required to have read and write access to the SFTP server.Enter the Private Key for the SFTP server.This is required to authenticate the SSH connection to the SFTP server. The Private Key must include both the BEGIN RSA PRIVATE KEY and END RSA PRIVATE KEY prompts.(Optional) Enter the public PGP Key to sign and encrypt files uploaded to the SFTP server.Pretty Good Privacy (PGP) is an encryption program providing privacy and authentication for data communication, and used for signing, encrypting, and decrypting files. The PGP Key must include both the BEGIN RSA PRIVATE KEY and END RSA PRIVATE KEY prompts.
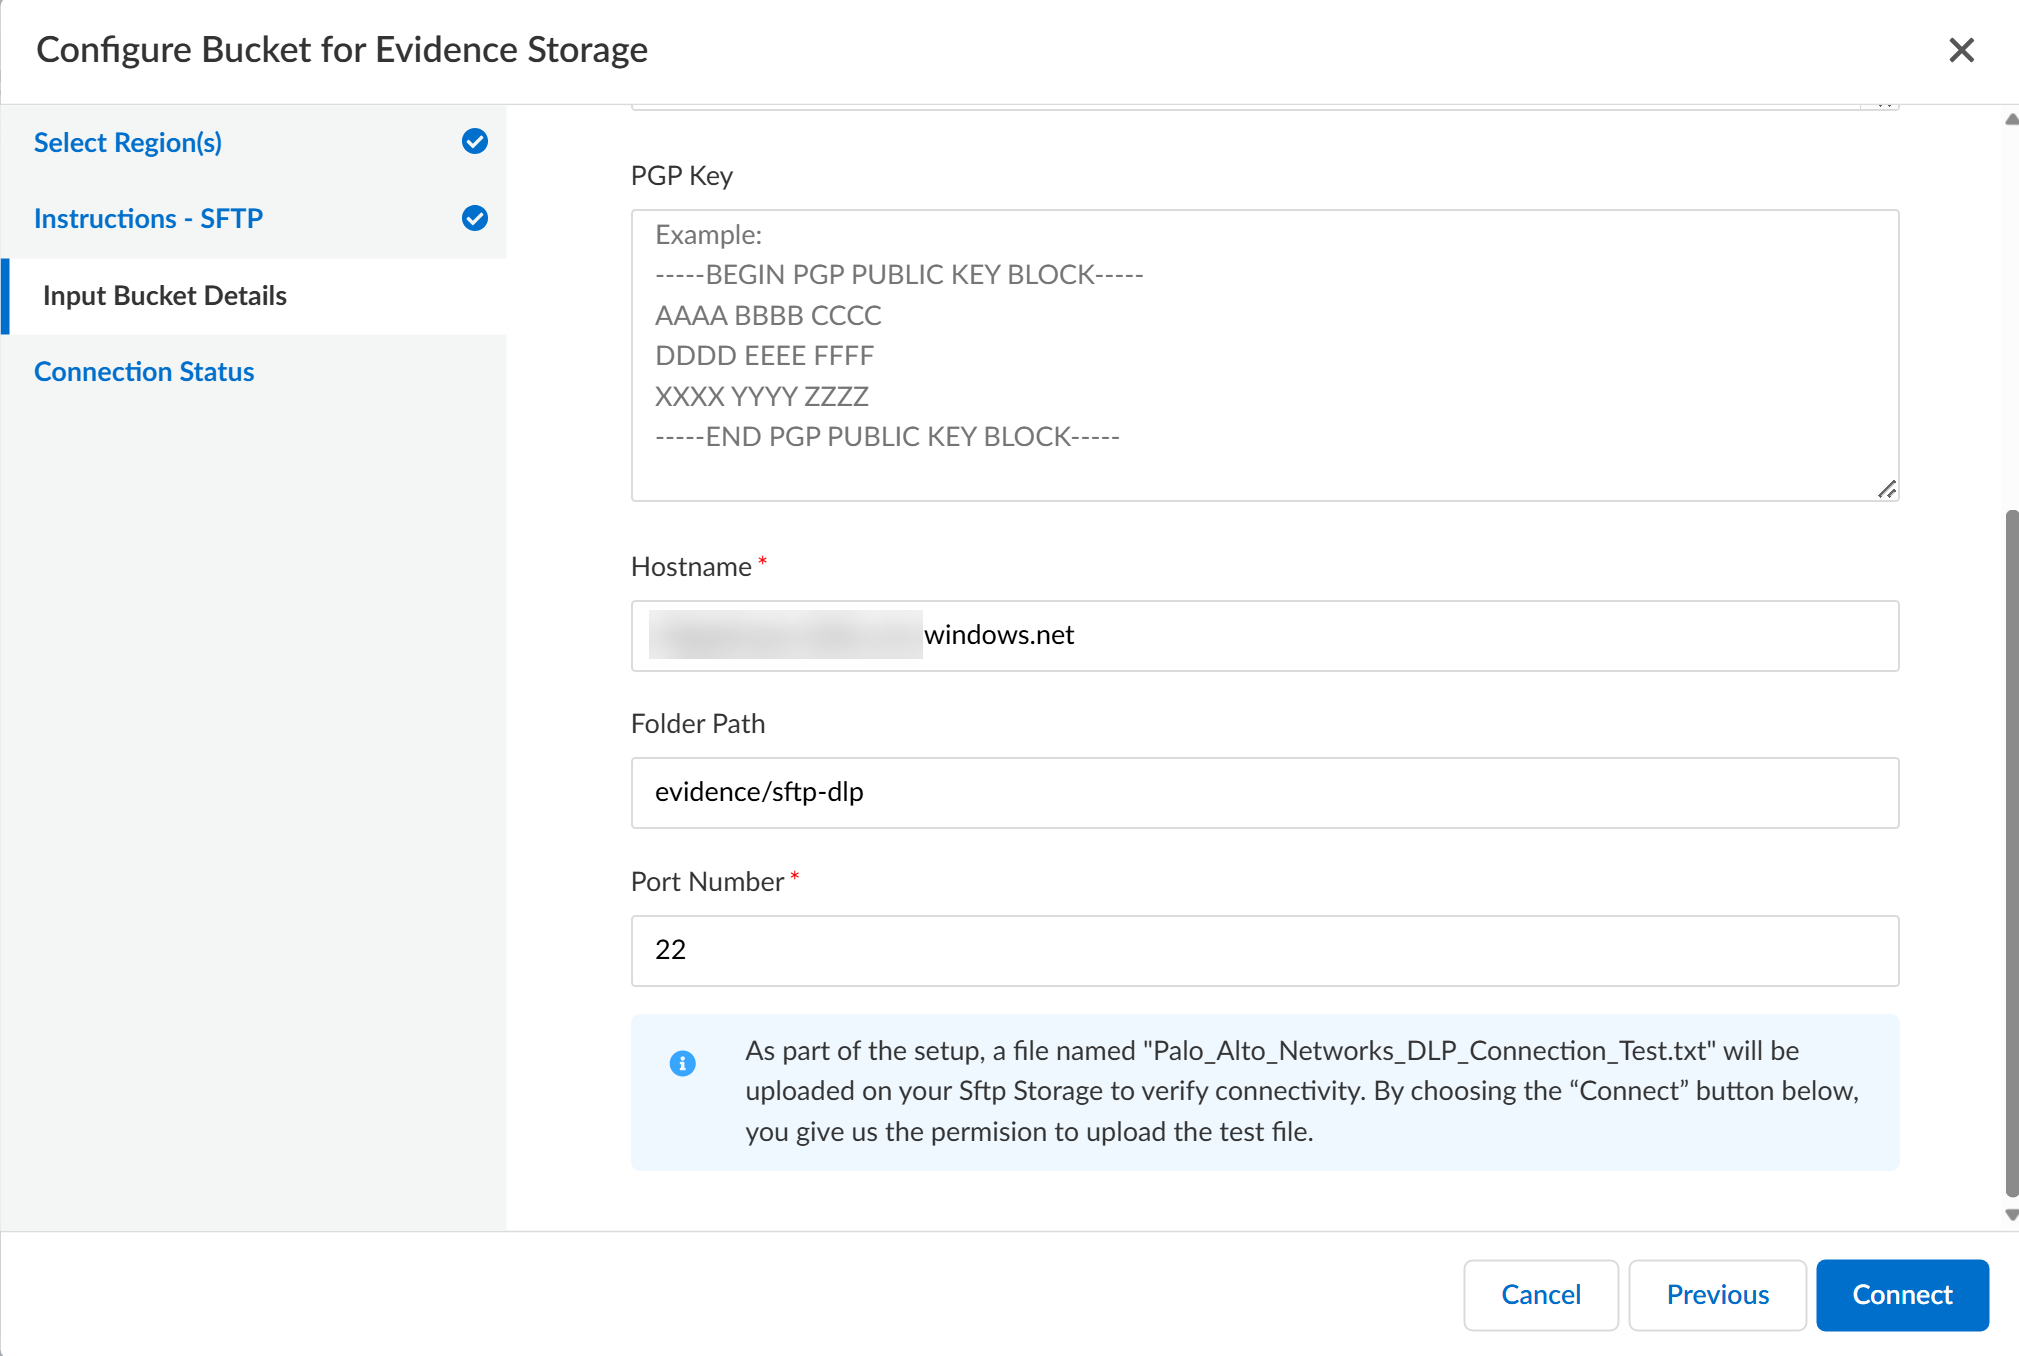
![]() Enter the Hostname of the SFTP server.The Hostname can be a Fully Qualified Domain Name (FQDN) or an IPv4 address.If you enter a FQDN, the FQDN must be publicly resolvable. If you enter an IPv4 address, the IP address must be public. Enterprise DLP cannot connect to a private FQDN or IPv4 address.(Optional) Enter the Folder Path for uploaded files to specify the target location where files are uploaded to on the SFTP server.If no Folder Path is specified, Enterprise DLP creates the default reportId folder at the top-most folder the Username has read and write access to. The folder path for uploaded files depends on whether a Folder Path is specified.
Enter the Hostname of the SFTP server.The Hostname can be a Fully Qualified Domain Name (FQDN) or an IPv4 address.If you enter a FQDN, the FQDN must be publicly resolvable. If you enter an IPv4 address, the IP address must be public. Enterprise DLP cannot connect to a private FQDN or IPv4 address.(Optional) Enter the Folder Path for uploaded files to specify the target location where files are uploaded to on the SFTP server.If no Folder Path is specified, Enterprise DLP creates the default reportId folder at the top-most folder the Username has read and write access to. The folder path for uploaded files depends on whether a Folder Path is specified.- Folder Path Specified—<folder path>/reportId/<file name>
- Folder Path Not Specified—/reportId/<file name>
Enter the Port number through which files are uploaded to the SFTP server.Palo Alto Networks recommends using Port 22 for file uploads to your SFTP server. For uncommon ports, Enterprise DLP needs to open the egress port for connection and upload.Connect Enterprise DLP to your SFTP server![]() Review the Connection Status to verify Enterprise DLP successfully connected to your SFTP server.As part of the setup process, Enterprise DLP uploads a Palo_Alto_Networks_DLP_Connection_Test.txt file the target Folder Path on your SFTP server to test and verify connectivity.Save the SFTP server settings if Enterprise DLP successfully connected.Select Previous and edit the bucket connection settings if Enterprise DLP can’t successfully connect to your SFTP server
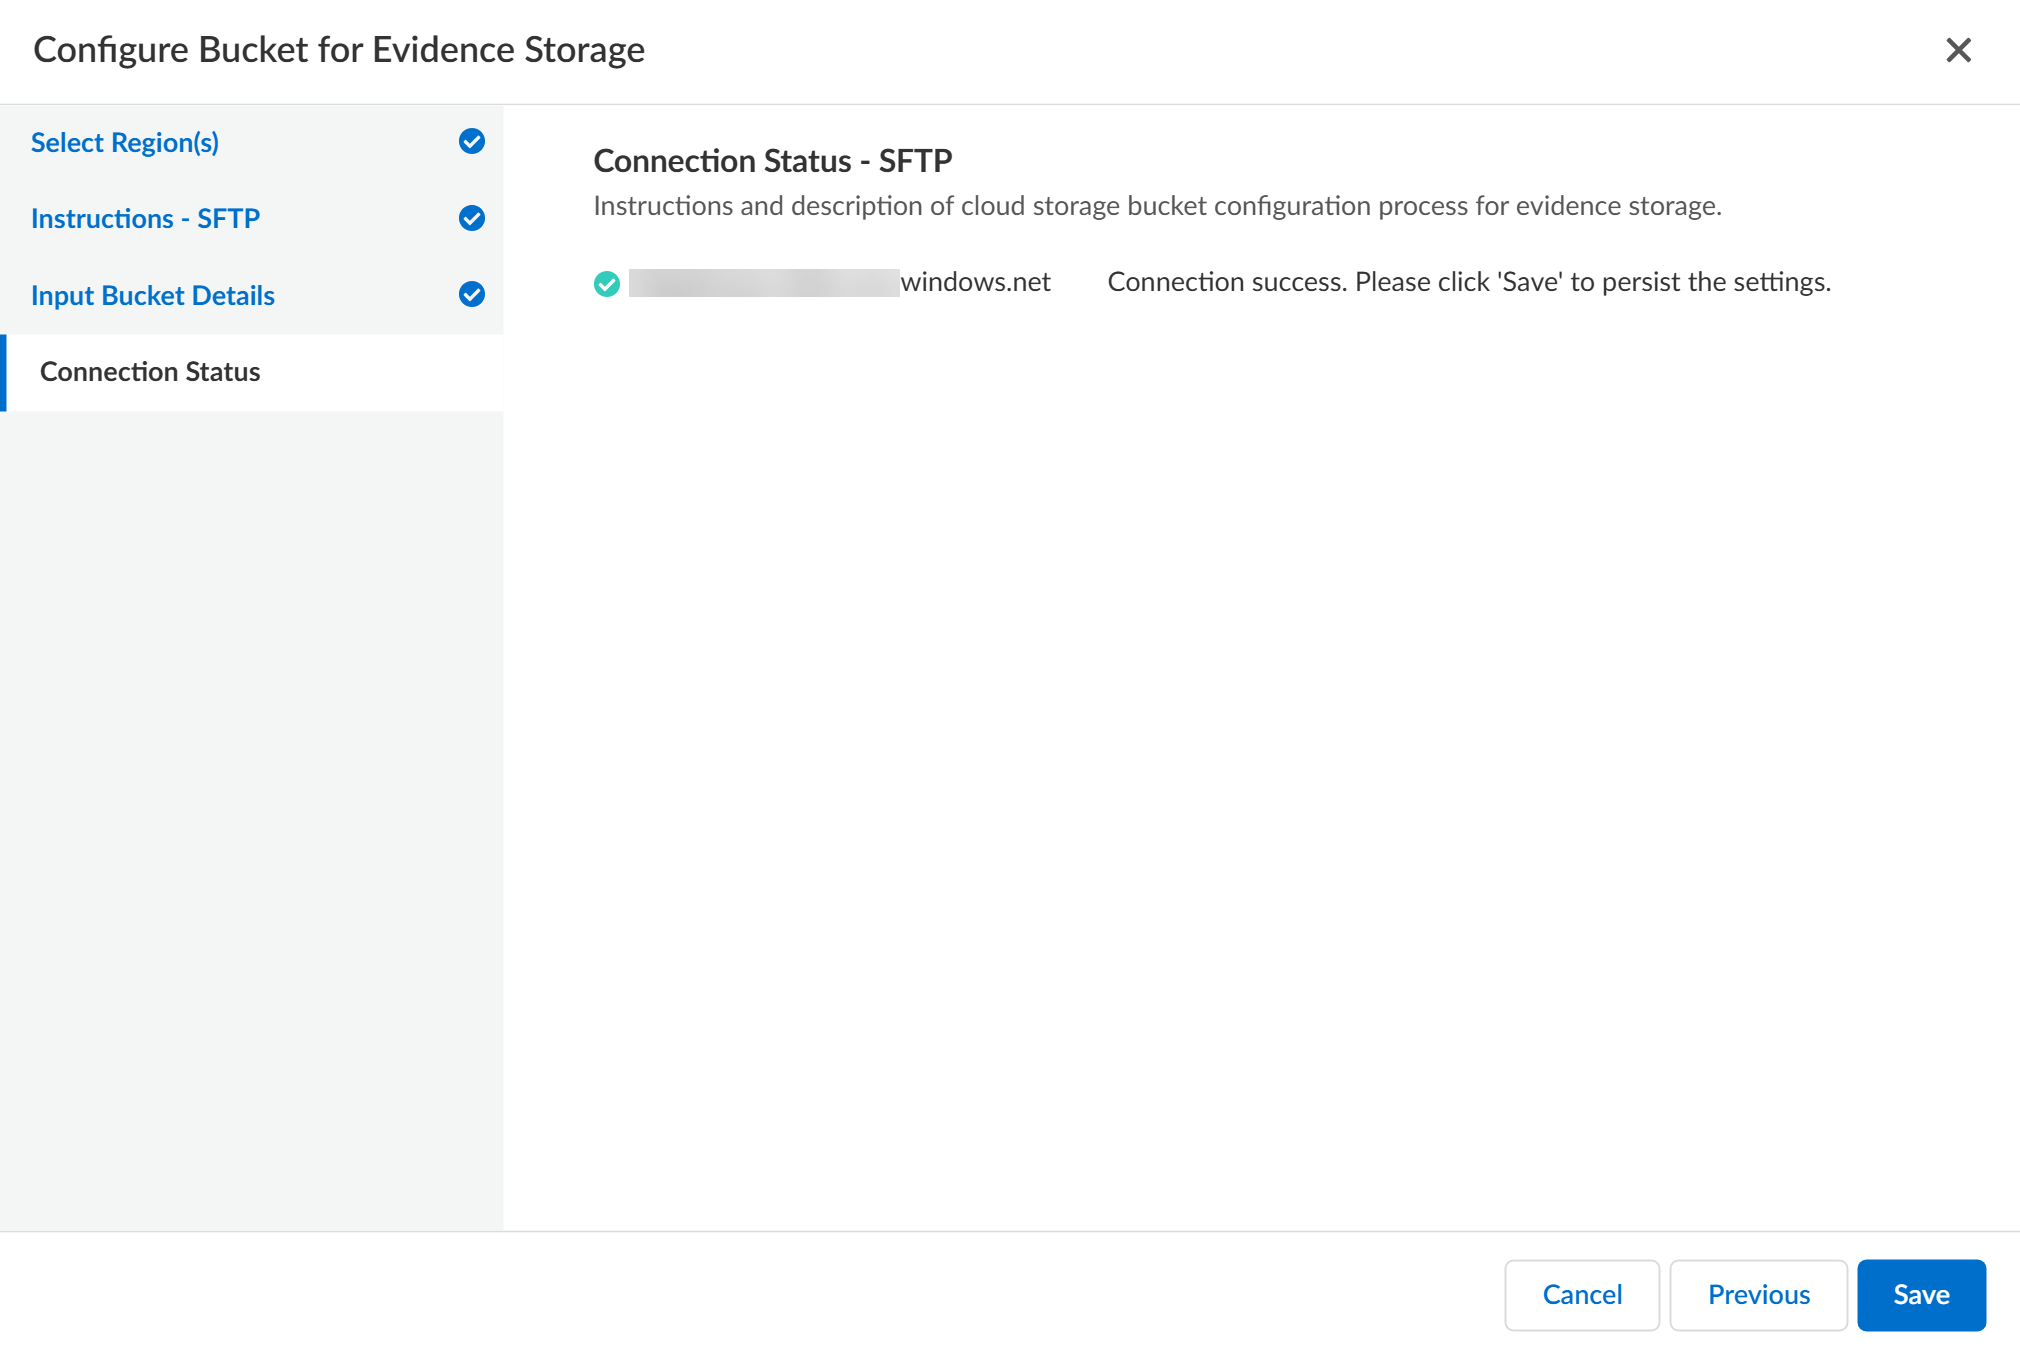
Review the Connection Status to verify Enterprise DLP successfully connected to your SFTP server.As part of the setup process, Enterprise DLP uploads a Palo_Alto_Networks_DLP_Connection_Test.txt file the target Folder Path on your SFTP server to test and verify connectivity.Save the SFTP server settings if Enterprise DLP successfully connected.Select Previous and edit the bucket connection settings if Enterprise DLP can’t successfully connect to your SFTP server![]() Enable Sensitive Files for your enforcement points.You can enable evidence storage of sensitive files for Prisma Access, NGFW, and Endpoint DLP. Enable evidence storage when prompted to confirm.
Enable Sensitive Files for your enforcement points.You can enable evidence storage of sensitive files for Prisma Access, NGFW, and Endpoint DLP. Enable evidence storage when prompted to confirm.


